Bosch SHE3AR56UC Installation Instructions
Bosch SHE3AR56UC Manual
 |
View all Bosch SHE3AR56UC manuals
Add to My Manuals
Save this manual to your list of manuals |
Bosch SHE3AR56UC manual content summary:
- Bosch SHE3AR56UC | Installation Instructions - Page 1
Dishwasher Installation Instructions Instructions d'Installation de Lave-vaisselle Instrucciones de Instalación de Lavavajillas 9000633142 - Bosch SHE3AR56UC | Installation Instructions - Page 2
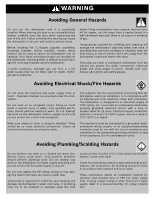
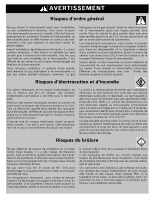
Instructions Save This Information To avoid possible injury or property damage, OBSERVE ALL WARNINGS AND CAUTIONS. These instructions are intended for use by qualified installers only. •In addition to these instructions, the dishwasher shall be installed to meet all electrical and plumbing codes - Bosch SHE3AR56UC | Installation Instructions - Page 3
6 inches (152.4 mm) away from the dishwasher's water inlet valve. Check local plumbing codes for approved plumbing procedures and accessories. All plumbing should be done in accordance with national and local codes. These instructions depict an installation method for stainless steel braided hose or - Bosch SHE3AR56UC | Installation Instructions - Page 4
électriques doivent être composés de fils en cuivre nº14 AWG minimum ayant une résistance thermique minimale de 75 être relier à la terre soit en le connectant au support métallique qui est relié à la terre soit en gionales. Ces instructions sont relatives à une méthode d'installation utilisant des - Bosch SHE3AR56UC | Installation Instructions - Page 5
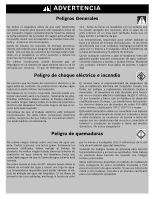
de agua estén en contacto. Se proporcionan canales separados en la parte inferior del lavaplatos. No trabaje en un circuito conectado. Hacerlo puede 15 amps. Los conductores del suministro eléctrico deben ser de alambre de cobre #14 AWG como mínimo, clasificación 75º C (167º F) o mayor. Este - Bosch SHE3AR56UC | Installation Instructions - Page 6
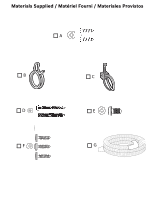
Materials Supplied / Matériel Fourni / Materiales Provistos A B C D E F G - Bosch SHE3AR56UC | Installation Instructions - Page 7
Tools Needed / Outils Nécessaires / Herramientas Necesarias - Bosch SHE3AR56UC | Installation Instructions - Page 8
Needed / Matériel Nécessaires / Materiales Necesarios Electrical Supply Cable - Minimum #14 AWG, 2 conductor, 1 ground, insulated copper conductors rated 75°C (167°F) or higher. Câble d'alimentation électrique - Minimum n° 14 AWG, 2 conducteurs, 1 mise à la terre, conducteur en cuivre isolé cot - Bosch SHE3AR56UC | Installation Instructions - Page 9
you begin, you must read the safety instructions on the reverse of this sheet. PRE-INSTALL CHECKLIST Unpack unit. Retain packing material until successful installation is complete. Remove all packing material from inside the dishwasher. Inspect parts to ensure you have all the necessary materials - Bosch SHE3AR56UC | Installation Instructions - Page 10
Enlever le couvercle de la boîte de jonction et le mettre de côté pour pouvoir le replacer plus tard. Coloque el lavaplatos suavemente sobre la parte trasera. Remueva el panel de la base. Afloje ligeramente los niveladores de la pata (2). Remueva la cubierta de la caja de conexiones y guárdela - Bosch SHE3AR56UC | Installation Instructions - Page 11
3 Attach 90° elbow joint to dishwasher oriented as shown, using thread seal tape when required rese que la manguera no tenga contacto con las partes sueltas debajo de la unidad. 5 30" (77 cm) 21" (54 mm) Turn power off at fuse box. Extend cable approximately 21" (54 cm) from the opening's left - Bosch SHE3AR56UC | Installation Instructions - Page 12
If the dishwasher will be plugged into an electric receptacle, contact customer service to order ceptacle électrique, contacter le service clientèle pour commander un autre kit d'installation qui sera adapté (SKU Más adelante será reinstalada. Dishwasher Electrical Rating Cote électrique du lave - Bosch SHE3AR56UC | Installation Instructions - Page 13
sink. IMPORTANT: Route hose toward sink PRIOR TO connection. Do not turn after attachment. Attach drain hose elbow (Part G) to back of unit using pliers to install the spring clamp (Part B). Orienter le tuyau vers la direction d'évier. IMPORTANT: Le tuyau de route vers l'évier AVANT la connexion. Ne - Bosch SHE3AR56UC | Installation Instructions - Page 14
height, insert leg leveler locking screw (part F) in back foot. Step 18 will complete the leveling process. L'unité 18 completarán el proceso que nivela. IMPORTANT: Do not allow leg levelers to scratch or mark floor. Place hands where pictured to push into place. As you slide the unit in, guide - Bosch SHE3AR56UC | Installation Instructions - Page 15
12 a la placa del sujetacables. Los dos tornillos en la parte trasera del sujetacables se deben colocar según lo demostrado para prevenir sur le schéma. À l'aide d'une pince, plier l'extrémité du câble électrique comme indiqué sur le schéma. Ceci facilitera l'installation de la plaque du réducteur de - Bosch SHE3AR56UC | Installation Instructions - Page 16
14 Do Not Over-tighten or Remove Terminal Screws 15 Do Not tools. Important: Ne pas desserrer ou retirer les vis principales! Cela risque d'engendrer des dégâts matériels. À l'aide d'une pince, tordre les fils électriques afin qu'ils soient bien positionnés. Introduire le fil noir (chaud) dans le - Bosch SHE3AR56UC | Installation Instructions - Page 17
èce E du kit d'installation). Coloque la cubierta de la caja de conexiones. Cerciórese de que la cubierta esté asentada detrás del borde delantero de la placa del sujetacables. Una la cubierta con el tornillo (parte E) del equipo de instalación. 18 F (2) (1) Level the dishwasher horizontally by - Bosch SHE3AR56UC | Installation Instructions - Page 18
position à chaque points sur le côté. Introduire la vis (B) par le biais de pré-supports situés de chaque côté de l'unité et fixez les supports. Si la encimera es de piedra, extraiga los soportes de montaje (A) de la parte superior y la posición de ellos en cualquiera de los puntos en el lateral - Bosch SHE3AR56UC | Installation Instructions - Page 19
. 43" (109 cm) 22 12 Route drain hose to household plumbing. Note: Plumbing installations will vary - refer to local codes. Always include a Loop in the Drain Hose for proper function - Height of loop -[Min. 20"(51cm) - Max. 43"(109cm)] / Length of Drain Hose included on Dishwasher 92" (233 cm - Bosch SHE3AR56UC | Installation Instructions - Page 20
Start washer, listen for water and pump for water distribution. Press Cancel/Reset to drain and check for leaks. Relier le tuyau d'alimentation en eau . Attach the metal toe panel with screws (Part D) so it is flush with the floor. Success! Your installation is now complete. Recouvrer le tout avec le - Bosch SHE3AR56UC | Installation Instructions - Page 21
section of the Use and Care Manual. If you are having a problem with your dishwasher, before calling for service please refer to the Self Help section in the Use and Care Manual. If service is necessary, contact your dealer or installer or an authorized service center. Do not attempt to repair - Bosch SHE3AR56UC | Installation Instructions - Page 22
-
 1
1 -
 2
2 -
 3
3 -
 4
4 -
 5
5 -
 6
6 -
 7
7 -
8
-
9
-
10
-
11
-
12
-
13
-
14
-
15
-
16
-
17
-
18
-
19
-
20
-
21
-
22
 |
 |
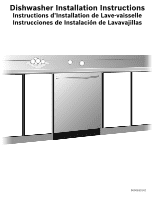
Dishwasher Installation Instructions
Instructions d’Installation de Lave-vaisselle
Instrucciones de Instalación de Lavavajillas
9000633142