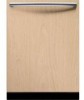
Bosch SHV68E13UC Instructions for Use
Bosch SHV68E13UC - Accepts Custom Panels Integra 800 Manual
 |
UPC - 825225868354
View all Bosch SHV68E13UC manuals
Add to My Manuals
Save this manual to your list of manuals |
Bosch SHV68E13UC manual content summary:
- Bosch SHV68E13UC | Instructions for Use - Page 1
- Bosch SHV68E13UC | Instructions for Use - Page 2
important. We highly recommend that you read this manual before you use your dishwasher for the first time. To learn even more about your dishwasher and available accessories, as well as many other topquality Bosch appliances, visit our website at www.bosch=appliances.com. Please contact us if you - Bosch SHV68E13UC | Instructions for Use - Page 3
must be performed by a qualified service technician using only original equipment factory replacement parts. Electrical shock or fire could result if the electrical supply for the dishwasher covered in this manual is incorrectly installed or if the dishwasher has been improperly grounded. Do not - Bosch SHV68E13UC | Instructions for Use - Page 4
Getting to know your Applia nee Start D ? 1 - On/Off Button 2 - Wash Cycles 3 - Digital Display 4 - Delay Start 5 -Additional cycle options 6 - Start Button - Bosch SHV68E13UC | Instructions for Use - Page 5
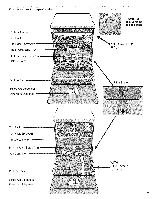
CutleryBasket Top Rack Top RackSprayArm TabletCollectingTray BottomRackSprayArm Salt Container Bottom Rack Rinse Aid Dispenser Detergent Dispenser Top Rack Top Rack Spray Arm Tablet Collecting Tray Bottom Rack Spray Arm Salt Container Bottom Rack Rinse Aid Dispenser Detergent Dispenser Extra Tall - Bosch SHV68E13UC | Instructions for Use - Page 6
system to function dishwasher water softener salt .The amount properly, it will need to use of salt dispensed can be set 0- 110 120- 140 150- 180 from "H:00" to " H:07". Salt is not required at H:00 (this is the default 190 - 210 factory setting). 220 - 290 . Open the door (for hidden controls - Bosch SHV68E13UC | Instructions for Use - Page 7
information about ordering salt please contact Customer Service. Use only detergent specifically designed for dishwashers. For best results, use fresh dishwashing detergent. The dishwasher is also equipped with a tablet collecting tray, designed to fully dissolve detergent tabs. NOTICE To avoid - Bosch SHV68E13UC | Instructions for Use - Page 8
with your thumb. NOTE: The dishwasher indicates low rinse agent either by showing the be set from "r:00" to "r:06". o Open the door (for hidden controls only). o Turn unit on by pressing "r:01" means the Rinse Agent dispenser is at the lowest setting. , "r:02" means the Rinse Agent dispenser is low - Bosch SHV68E13UC | Instructions for Use - Page 9
. over or Non-Stick Coatings: Apply a light coating of vegetable oil to non-stick surfaces after drying. Plastics: Make sure the piece is dishwasher safe. Stainless Steel, Sterling Silver, and Silver Plate: Place these pieces so that they do not contact dissimilar metals. Not Recommended Acrylic - Bosch SHV68E13UC | Instructions for Use - Page 10
. Remove large food particles, bones, seeds, toothpicks, baked-on or starchy soils may require pre-treatment. Load only dishwasher-safe items into the dishwasher. Load dishes in the dishwasher racks so that the insides of bowls, pots, and pans are face downwards. Avoid nesting and contact points - Bosch SHV68E13UC | Instructions for Use - Page 11
UPPER RACK- 10 PLACE SETTING LOWER RACK - 10 PLACE SETTING CUTLERY RACK- 10 PLACE SETTING UPPER RACK - 12 PLACE SETTING UPPER RACK - 12 PLACE SETTING CUTLERY RACK- 12 PLACE SETTING 11 - Bosch SHV68E13UC | Instructions for Use - Page 12
and fold the tines When the top rack is loaded, push it into the dishwasher. Cutlery drawer * Arrange the cutlery in the cutlery rack as illustrated. Separately height on both sides. Otherwise, the appliance door cannot be closed and the upper spray arm will not be connected to the water - Bosch SHV68E13UC | Instructions for Use - Page 13
cycle is appropriate for mixed loads. Delicate Wash For delicate or heirloom dishwasher and silverware or other special items. Always make sure that the items are dishwasher safe. Refer to the Materials section of this manual for further information. Hand washing may be the best treatment of such - Bosch SHV68E13UC | Instructions for Use - Page 14
indicate unit is running. Do not open the dishwasher door until the LED is no longer visible on the floor. If the appliance is installed at eye-level, the LED is not visible ". , Press "A" until the display shows "1:01" , Press "C" to switch between "1:01" and "1:00" and press START to 14 save. - Bosch SHV68E13UC | Instructions for Use - Page 15
(see page 4) to turn intensive drying , Press START button. The set value is saved. ON = d:01 or OFF = d:00 , Close the door (for hidden controls only). Switching on the appliance , For hidden controls, open the door. , Turn unit on by pressing the ON/OFF switch. The display of the last selected - Bosch SHV68E13UC | Instructions for Use - Page 16
indicates "0:01" . Close the door. The program sequence lasts approx. 1 min. . The display will indicate 0:00 . Close the door (for hidden controls only). Child-proof lock * (select models) The Child Safety Lock is designed to prevent children from opening the dishwasher. . To lock the door, push - Bosch SHV68E13UC | Instructions for Use - Page 17
faults. This saves time and prevents problems. Overall condition of the machine Check spray particularly suitable for use with dishwashers. . Regularly clean door seal with a damp cloth. and clean filters under running water. . Re=install filter system in reverse sequence and ensure that the - Bosch SHV68E13UC | Instructions for Use - Page 18
Wastewater pump Largefood remnantsin the rinsingwater not retainedby the filters may block the waste water pump.The rinsingwater does not get pumped out and coversthe filter. In this case: , Disconnecthe appliancefromthe powersupply. , Removethe filters. , Scoopout water,use a spongeif required. , - Bosch SHV68E13UC | Instructions for Use - Page 19
dishwasher itself. The following with a dishwasher problem without involving a repair professional. information may help you Problem Cause Action Dishwasher does not start Dishwasher beeping (end of cycle signal) 2. Door Preparing and Loading" section of this manual. 3. Rinse and Hold setting - Bosch SHV68E13UC | Instructions for Use - Page 20
manual. i. Suds 2. Door seal could be pulled away from track. 3. Condensation vent is blocked. 4. Improper installation. 1. Wrong type of detergent results in suds and leaks. Use only dishwasher ), for all other faults please contact customer service and state the indicated fault E:XX. - Bosch SHV68E13UC | Instructions for Use - Page 21
section of the Use and Care Manual. If you are having a problem with your dishwasher, before calling for service please refer to the Self Help section in the Use and Care Manual. If service is necessary, contact your dealer or installer or an authorized service center. Do not attempt to repair - Bosch SHV68E13UC | Instructions for Use - Page 22
you request, Bosch would still pay for labor and parts and ship the parts to the nearest authorized service provider, but you would still be fully liable and improper or negligent installation, tampering, failure to follow operating instructions, mishandling, unauthorized service (including self- - Bosch SHV68E13UC | Instructions for Use - Page 23
- Bosch SHV68E13UC | Instructions for Use - Page 24
- Bosch SHV68E13UC | Instructions for Use - Page 25
- Bosch SHV68E13UC | Instructions for Use - Page 26
- Bosch SHV68E13UC | Instructions for Use - Page 27
vaisselle. tap set value water hardness at ppm CaCO_/I dishwashe_ use dishwasher salt La quantite de sel requise depend du degre de durete de jusqu'a ce que la reglage desir6e s'affiche. 0- 110 H:O0 non 120- 140 H:01 oui H:02 oui 115900 -- 211800 H:03 oui 220 - 290 H:04 oui 300- - Bosch SHV68E13UC | Instructions for Use - Page 28
Sel Utilisation du sel Toujours remplir de sel immediatement avant de mettre rappareil en circuit. Ceci permet de dissoudre le surplus de solution de sel et de ne pas corroder le reservoir de rin_;age. . Remplir le reservoir avec de reau (seulement requis au moment de la premiere mise en circuit de - Bosch SHV68E13UC | Instructions for Use - Page 29
. La valeur est sauvegardee. , Fermerla porte. Rel&cher les deux touches. Presser + ou - pour choisir le reglage distributeur d'agent de nngage distributeur d'agent de nngage distributeur d'agent de nngage deris6. hors circuit. au plus bas reglage. au reglage bas. - Bosch SHV68E13UC | Instructions for Use - Page 30
MAT R AU× REMARQUE: avant d'utiliser le lave-vaisselle la premiere fois, verifier rinformation ci-dessous. Certains articles ne conviennent pas au lave-vaisselle et devraient etre laves & la main. Communiquer avec le fabricant de rartide en cas d'incertitude quant & savoir si un article va au lave- - Bosch SHV68E13UC | Instructions for Use - Page 31
PANIER SUPERIEUR - COUVERTS PANIER INFE_RIEUR - 12 COUVERTS PANIER A USTENSILES - 12 COUVERTS 8}C}@UUE}E} E} ©C E} C}OC}O OC}© C} C}©8}0 0C}8} C} E)©C)0 0C)C] C] C}OC}O 0C}8} C} @]0@]00_@] E] @]0@000@]@] Oc 0 @@@0000@ @_@@]NN@E_@ Chargement du lave=vaisselle Ne pas prelaver les - Bosch SHV68E13UC | Instructions for Use - Page 32
PANIER SUPE_RIEUR - 10 COUVERTS PANIER INF#RIEUR - 10 COUVERTS PANIER A USTENSILES - 10 COUVERTS PANIER SUP#RIEUR - 12 COUVERTS - 12 COUVERTS PANIER A USTENSILES - 12 COUVERTS 32 - Bosch SHV68E13UC | Instructions for Use - Page 33
the racks easier in some Grasp the tines, release from notch, and fold the tines When the top rack is loaded, push it into the dishwasher. Tiroir _ ustensiles * Placer les ustensiles dans le tiroir, tel qu'il est illustre ; les separer afin qu'ils soient plus faciles & vider. Le tiroir est - Bosch SHV68E13UC | Instructions for Use - Page 34
Cycle de iavage ® Lavage r_curage puissant Nettoie les articles ayant des residus tenaces ou sech6s. Ces articles peuvent necessiter un recurage & la main ou un pretrempage. Lavage auto @ Fini les devinettes ! Les capteurs du lave-vaisselle reglent automatiquement la duree du cycle, les - Bosch SHV68E13UC | Instructions for Use - Page 35
* Selon le modele Demi-charge* _ Si I'on a seulement quelques articles a laver (ex. : verres, tasses, assiettes), regler a demi-charge. Ceci permet une economie d'eau, de temps et d'energie. II est recommande d'utiliser moins de detergent. Extra Wash * Cycle option can be selected to increase wash - Bosch SHV68E13UC | Instructions for Use - Page 36
en marche de 1 h & 24 h. , Ouvrir la pore, mettre I'appareil en circuit. , Presser la touche "A "jusqu'& ce que I'affichage de programmation passe & 01 , Presser la toucheAjusqu'& ce que la duree desir6e s'affiche. , Presser la touche START, la programmation minutee est activee Pour supprimer la - Bosch SHV68E13UC | Instructions for Use - Page 37
-vaisselle jusqu'a ce qu'il s'arrete. Tirer le panier vers le haut et jusqu'a ce que les roulettes se liberent des guides. Mettre le panier de c6te. Pousser les guides au fond du lave-vaisselle. Inserer le gicleur pour grands articles dans la prise du gicleur du panier superieur et le tourner - Bosch SHV68E13UC | Instructions for Use - Page 38
Une verification et un entretien regulier de I'appareil permet d'eviter les problemes et economise du temps et de I'argent. Conditions g_n_rales Verifier s'il y a de la graisse ou des residus sur le bras gicleur. S'il y a des residus : , Ajouter - Bosch SHV68E13UC | Instructions for Use - Page 39
et tirer vers le haut jusqu'a resistance, puis le sortir. , Verifier I'interieur du compartiment et enlever tout objet etranger. , Remettre le couvercle a sa position d'origine. , Installer le filtre. 39 - Bosch SHV68E13UC | Instructions for Use - Page 40
-vaisselle peut parfois presenter des probl&mes non reli_s _ un mauvais fonctionnement r_soudre le probl&me sans avoir _ faire un appel de service. de I'appareil. L'information suivante peut aider Probl_me Cause Action _ prendre Le lave vaisselle ne se met pas en marche Le lavevaisselle fait - Bosch SHV68E13UC | Instructions for Use - Page 41
Problem Le lave-vaisselle ne se remplit pas d'eau Cause 1. Syst&me d' pas obstru_. Voir _ - Bosch SHV68E13UC | Instructions for Use - Page 42
copie de la facture et la conserver dans ce guide. Le consommateur est responsable de la preuve d'achat pour obtenir un service sous garantie. Information du modele " • Num@o de modele • Num@o de s@ie • Date d'achat Date d'installation _,(:::AUTION Le retrait de tout couvercle ou le fair - Bosch SHV68E13UC | Instructions for Use - Page 43
commercial et 3) aux Etats-Unis ou au Canada et qu'il est demeur_ en tout temps . Dur_e de la garantie : Bosch garantit que le produit ne pr_sente installation inadequate ou n_gligente, alteration, manquement d'observer les instructions de fonctionnement, mauvaise manipulation, service - Bosch SHV68E13UC | Instructions for Use - Page 44
iFelicidades y Gracias de parte de Bosch! Gracias por haber escogido una lavadora de platos Bosch. Usted se ha unido a muchos clientes quienes exigen un rendimiento silencioso y excepcional de su lavadora de platos. Este manual ha sido escrito tomando en cuenta su seguddad y comodidad y la - Bosch SHV68E13UC | Instructions for Use - Page 45
. No use la lavadora de platos cubierta por este manual de otra forma o para alg0n otro prop6sito que no que indiquen "a prueba de lavadora de platos" [dishwasher safe]. En cuanto a los productos de pl_stico que platos a menos de que todos los paneles del gabinete est6n instalados correctamente. • No - Bosch SHV68E13UC | Instructions for Use - Page 46
1 - Bot6n On/Off (Prender/Apagar) 2 - Ciclos de lavado 3 - Visualizador digital 4 - Retardar la puesta en marcha 5 - Opciones de ciclos adicionales 6- Bot6n de arranque 46 - Bosch SHV68E13UC | Instructions for Use - Page 47
COMPONIENTES DE LA LAVADORA DIE PLATOS Canasta para cubiertos Rejilla superior Brazo rociador de la rejilla superior Bandeja para tablillas Brazo rociador de la rejilla inferior Surtidor de sal Rejilla inferior Surtidor del agente enjuague Surtidor de detergente Rejilla superior Brazo rociador de - Bosch SHV68E13UC | Instructions for Use - Page 48
hasta que el visualizador indique "H:00". . Suelte ambos botones. tap set value water hardness at ppm CaCO3/I dishwasher 0-110 120-140 150-180 190-210 220-290 300-370 380-540 550-890 H:00 H:01 H:02 H:03 H:04 H:05 H:06 H:07 use regeneratior salt no si si si si si si si - Bosch SHV68E13UC | Instructions for Use - Page 49
Usar sal Siempre vuelva a Ilenar el tanque de sal inmediatamente antes de prender el aparato para asegurar que se lave cualquier exceso de sal. Esto evita la corrosi6n. . Llene eltanque con agua (se requiere solamente cuando se prende el aparato por primera vez). . A5ada sal (sal de regeneraci6n) - Bosch SHV68E13UC | Instructions for Use - Page 50
indique "r:00". , Suelte ambos botones. , Pulse + o - para seleccionar el ajuste deseado. "r:00" significa que el surtidor del agente de enjuague esta apagado. "r:01" significa que el surtidor del agente de enjuague esta en la posici6n mas baja. "r:02" significa que el surtidor del agente de - Bosch SHV68E13UC | Instructions for Use - Page 51
Materiales devajillas NOTA: Antes de usar su lavavajillas por primera vez, revise la informaci6n en esta secci6n. Algunos articulos que usted desea limpiar no estan a prueba de lavavajillas y deben ser lavados a mano; otros requieren de un acomodo especial. P6ngase en contacto con el fabdcante del - Bosch SHV68E13UC | Instructions for Use - Page 52
y la grasa excesiva. Tal vez es necesario las piezas con suciedades pegadas, quemadas o endurecidas.. Cargue Qnicamente arficulos a prueba del lavavajillas [dishwasher-safe] en su lavavajillas. Cargue su vajilla en las rejillas del lavavajillas de tal forma que los interiores de platos, ollas - Bosch SHV68E13UC | Instructions for Use - Page 53
Rejilla superior - 10 Juego de vajilla Reilla inferior 10 Jue( ilia Rejilla para cuchi!los - 10 Juego de vaji!la Rejilla superior - 12 Juego de vajilla Re ilia inferior- 12 Juec Rejilla para cuchillos - 12 Juego de vajilla 53 - Bosch SHV68E13UC | Instructions for Use - Page 54
easier in some instances. Grasp the tines, release from notch, and fold the tines downward. When the top rack is loaded, push it into the dishwasher. Caj6n para cubiertos* Acomode los cubiertos en el caj6n como se muestra. separados son mas faciles de quitar despues del lavado. quitar el caj6n - Bosch SHV68E13UC | Instructions for Use - Page 55
u otros articulos especiales. AsegQrese siempre que los articulos esten a prueba de lavadora de platos. Consulte la secci6n de Materiales en este manual para mas informaci6n. Puede que el mejor tratamiento sea lavar estos articulos a mano. Regular El ciclo regular limpia a fondo cargas ligeramente - Bosch SHV68E13UC | Instructions for Use - Page 56
Opciones adicionales * dependiendo del modelo Media carga* [1/__ Si usted cuenta solamente con algunas piezas a lavar (p.ej. vasos, tazas, platos), puede cambiar al modo "half load" (media carga). Con esto ahorrara agua, energia y tiempo. Se recomienda usar un poco menos detergente en el surtidor - Bosch SHV68E13UC | Instructions for Use - Page 57
por 24 horas. , Abra la puerta. Prenda el aparato. , Opdma el bot6n "eco"hasta que el visualizador de programaci6n del tempod- zador salte a 01 . , Opdma el bot6n + o- hasta que el tiempo indicado coincida con sus requedmientos. , Opdma el bot6n START, la programaci6n del tempodzador esta activada - Bosch SHV68E13UC | Instructions for Use - Page 58
Secado intensivo El enjuague final emplea una temperatura mas alta para mejorar el resultado del secado. El tiempo de funcionamiento puede incrementarse ligeramente. (iCuidado si se trata de utensilios delicados!) , Abra la puerta. , Pulse el bot6n ON/OFF (Prender/Apagar). , Mantenga oprimido el - Bosch SHV68E13UC | Instructions for Use - Page 59
que se detenga y luego j_lela hacia adelante. • Revise el compartimiento interior y quite todos los objetos ajenos. • Coloque la cubierta en su posici6n original, empOjela y ci6rrela. • Instale los filtros. 59 - Bosch SHV68E13UC | Instructions for Use - Page 60
la lavadora an- 2. Consulte "Limpiar el Empaque y Sello de la Puerta" en la secci6n de Cui- tes de iniciar un ciclo. dado y Mantenimiento de este manual. 4. Hay agua residual en el piso de la lavadora de platos. 3. Inicie un ciclo de Enjuagar/Retener si usted no piensa lavar los trastes 5. La - Bosch SHV68E13UC | Instructions for Use - Page 61
rayas en los art_culos de cristal o residuos en los trastes El panel del tablero est_ decolorado o marcado Ruido durante el ciclo de lavado Causa o tapada. 2. Consulte la secci6n "Cancelar o cambiar el ciclo" de este manual. 3. Cancele el retardo de la puesta en marcha o espere hasta que ter- - Bosch SHV68E13UC | Instructions for Use - Page 62
la garantia. Si usted tiene algQn problema con su lavadora de platos Bosch y no esta contento con el servicio que ha recibido, tome los siguientes . Por favor saque una copia de su factura y guardela junto con este manual. El cliente debe mostrar un comprobante de compra para obtener el servicio de - Bosch SHV68E13UC | Instructions for Use - Page 63
no para la reventa o uso comercial; y (3) en los Estados Unidos o Canada y que siempre ha permanecido en el pals de la compra original. Las garantfas caso, si usted Io solicita, Bosch a0n asf pagarfa la mano de obra y las partes y enviarfa las partes al proveedor de servicio autorizado m_s - Bosch SHV68E13UC | Instructions for Use - Page 64
BSH reserves the right to change specifications or design without notice. Some models are certified for use in Canada. BSH is not responsible for products which are transported from the United States for use in Canada. Check with your local Canadian distributor or dealer. BSH se reserve le droit de
-
 1
1 -
 2
2 -
 3
3 -
 4
4 -
 5
5 -
 6
6 -
 7
7 -
8
-
9
-
10
-
11
-
12
-
13
-
14
-
15
-
16
-
17
-
18
-
19
-
20
-
21
-
22
-
23
-
24
-
25
-
26
-
27
-
28
-
29
-
30
-
31
-
32
-
33
-
34
-
35
-
36
-
37
-
38
-
39
-
40
-
41
-
42
-
43
-
44
-
45
-
46
-
47
-
48
-
49
-
50
-
51
-
52
-
53
-
54
-
55
-
56
-
57
-
58
-
59
-
60
-
61
-
62
-
63
-
64
 |
 |
