Bose Lifestyle 18 Installation guide
Bose Lifestyle 18 Manual
 |
View all Bose Lifestyle 18 manuals
Add to My Manuals
Save this manual to your list of manuals |
Bose Lifestyle 18 manual content summary:
- Bose Lifestyle 18 | Installation guide - Page 1
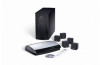
LIFESTYLE® 18 DVD Home Entertainment System Installation Guide - Bose Lifestyle 18 | Installation guide - Page 2
the system, is intended to alert the user to the presence of important operating and maintenance instructions in this owner's guide. CAUTION: To prevent electric shock, match wide blade of plug to wide slot, insert fully. Class 1 laser product The DVD player contained within the media center is - Bose Lifestyle 18 | Installation guide - Page 3
in this guide 4 System Installation 5 Getting started 5 Cables and accessories 6 Placing your speakers 7 Left and right front speaker placement 7 Center speaker placement 8 Surround speaker placement 8 Acoustimass® module placement 9 Placing your media center 10 Connecting the speakers to - Bose Lifestyle 18 | Installation guide - Page 4
English Introduction Welcome Thank you for purchasing a LIFESTYLE® home entertainment system. If you have successfully installed your new LIFESTYLE® system using the Quick Set Up Guide, congratulations! You can now skip to "Finishing the installation" on page 19. If not, the information provided - Bose Lifestyle 18 | Installation guide - Page 5
"Using alternate system connections" on page 21. Left front speaker Center front speaker Right front speaker Front speaker outputs Rear speaker outputs Speaker zone 1 output Media center Left surround Right surround speaker speaker Cable TV or satellite input AUX left & right audio (if - Bose Lifestyle 18 | Installation guide - Page 6
input cable Component video adapter Mounting strip TV on/off detector FM antenna AM loop antenna Optional IR emitter cable ADAPTiQ™ audio calibration system* Media center power supply Batteries Rubber feet for Acoustimass® module Rubber feet for cube speakers Setup disc 2 Remote control - Bose Lifestyle 18 | Installation guide - Page 7
English System Installation Placing your speakers When you place your speakers according to the guidelines below, they provide the audio atmosphere of a home theater. You may experiment with the placement and orientation of the speakers to produce the sound most pleasing to you. CAUTION: Choose a - Bose Lifestyle 18 | Installation guide - Page 8
and reflection rays Left front Center Right front Acoustimass® module English Left surround Right surround Center speaker placement The sound from the center speaker should appear to come directly from the center of the picture. The center speaker cable allows up to 20 feet (6.1 m) distance - Bose Lifestyle 18 | Installation guide - Page 9
, DO NOT allow furniture or drapes to block the ventilation openings of the module. • Place the Acoustimass module within reach of the audio input cable, speaker cables, and an AC power (mains) outlet. • Place the Acoustimass module on the floor on its long edge or lay it down on its largest side. DO - Bose Lifestyle 18 | Installation guide - Page 10
additional audio and/or video cables to connect all of your components, see your dealer or call Bose® customer service. Refer to the Bose address list included with your system. • Place the media center within 30 feet (9.1 m) of the Acoustimass® module (the length of the audio input cable). Note - Bose Lifestyle 18 | Installation guide - Page 11
the orange connectors into the matching left surround and right surround jacks. Front speakers Left Center Right Surround speakers Left Right FRONT L FRONT C FRONT R SURROUND L SURROUND R AUDIO INPUT OUTPUTS TO CUBE SPEAKERS FRONT SURROUND L C L R R POWER 100-120/200-240V AC - Bose Lifestyle 18 | Installation guide - Page 12
English System Installation Connecting the Acoustimass® module to the media center Connect the Acoustimass module to the media center with the audio input cable (Figure 9). Note: Be sure that each connector is fully inserted into each jack. 1. Plug the small black multi-pin connector (flat side - Bose Lifestyle 18 | Installation guide - Page 13
the media center, and at least 2 feet (60 cm) from the Acoustimass® module. Experiment with the orientation of the loop for optimum AM reception. Connecting to a cable radio provider Some cable TV providers make FM radio signals available through the cable service to your home. This connection is - Bose Lifestyle 18 | Installation guide - Page 14
your TV to the system The media center provides audio and video connections for your TV. See Figure 11. Making audio connections Using the supplied stereo audio cable, connect the left (L) and right (R) audio outputs on the rear panel of your TV to the L and R TV audio inputs on the rear panel - Bose Lifestyle 18 | Installation guide - Page 15
setting to YPbPr. See your LIFESTYLE® 18 system operating guide for instructions on how to change system settings. Note: Component video jacks are often color-coded and it is essential that you match the color-coded connections with the cables. Media Center S-VIDEO OUTPUT COMPOSITE VIDEO OUTPUT - Bose Lifestyle 18 | Installation guide - Page 16
the S-VIDEO INPUT. Note: If your cable/satellite box did not come with the stereo audio and video cables required to connect it to your LIFESTYLE® system, contact your local electronics store or authorized Bose dealer. The rear panel of the media center provides audio and video connections for your - Bose Lifestyle 18 | Installation guide - Page 17
Media center rear panel TV SENSOR IR EMITTER SERIAL DATA 33V DC POWER 1.1A RECORD TAPE AUX VCR TV AM L L L L L FM 75 ANTENNA 1 OPTICAL OPTICAL R R R R R VIDEO INPUTS COMPOSITE S-VIDEO 2 SPEAKER ZONES INPUT OUTPUT DIGITAL AUDIO OUTPUTS DIGITAL DIGITAL DIGITAL AUDIO INPUTS - Bose Lifestyle 18 | Installation guide - Page 18
the Acoustimass module Connector panel AUDIO INPUT L C R FRONT Power switch OUTPUTS TO CUBE SPEAKERS SURROUND L R POWER 100-120/200-240V AC 50/60 Hz 350W MAX. Figure 17 Power connection of the media center Power supply DC power jack Rear panel CAUTION: For dual voltage units, make - Bose Lifestyle 18 | Installation guide - Page 19
your Operating Guide for information on how to prevent conflicts with other LIFESTYLE® music systems. Figure 18 Remote control battery installation Four (4) AAA (IEC-LR3) batteries + Battery ++ compartment + cover Finishing the installation • Setup Disc 1 verifies that your system's speakers - Bose Lifestyle 18 | Installation guide - Page 20
DIGITAL DIGITAL AUDIO INPUTS DIGITAL COMPOSITE S-VIDEO VIDEO OUTPUTS Temporarily remove the cable/satellite box cable if it is connected Save the headset for possible future use When you have played both discs and followed their instructions, the installation of your LIFESTYLE® DVD system is - Bose Lifestyle 18 | Installation guide - Page 21
Reference Using alternate system connections The following describes alternate ways to connect your VCR and TV to your LIFESTYLE® home entertainment system. To play VCR audio (not TV audio) through your system Connect the VCR audio outputs to the TV or VCR inputs of the media center as in Figure - Bose Lifestyle 18 | Installation guide - Page 22
the LIFESTYLE® system TV source must always be selected. Left front speaker Center front Right front speaker speaker Front speaker outputs Rear speaker outputs Speaker zone 1 output Media center Left surround Right surround speaker speaker Input from cable provider AUX left & right audio - Bose Lifestyle 18 | Installation guide - Page 23
audio input cable from the zone 2 system to the SPEAKER ZONES 2 output on the rear panel of the media center. 3. When power is connected and you are ready to set up your second remote control, see "Setting up a second listening zone" in your LIFESTYLE® system operating guide. Figure 21 Media center - Bose Lifestyle 18 | Installation guide - Page 24
/playback connections Media center connector panel TV SENSOR IR EMITTER SERIAL DATA 33V DC POWER 1.1A RECORD TAPE AUX VCR TV AM L L L L L FM 75 ANTENNA 1 OPTICAL OPTICAL R R R R R VIDEO INPUTS COMPOSITE S-VIDEO 2 SPEAKER ZONES INPUT OUTPUT DIGITAL AUDIO OUTPUTS DIGITAL - Bose Lifestyle 18 | Installation guide - Page 25
the media center using the OPTICAL INPUT/OUTPUT connectors. You will need an optical digital cable to make this connection. Note: Before you can listen to a source through the OPTICAL input, you need to assign the OPTICAL connection to TV, VCR, TAPE or AUX. See your operating guide for instructions - Bose Lifestyle 18 | Installation guide - Page 26
IR emitter cable The IR (infrared) emitter cable is designed for optional use with system components that are connected to the media center, but placed where they cannot receive IR signals from it. This can resolve the problem when a particular component does not respond to LIFESTYLE® remote control - Bose Lifestyle 18 | Installation guide - Page 27
: NTSC or PAL 1Vp-p with sync on Y Remote control range 65 ft (20 m) Dimensions/Weights Media Center: 15.8" W x 11.0" D x 3.5" H (40.1 cm x 27.9 cm x 8.9 cm) Cube speakers: 3.1" W x 4.0" D x 3.1" H (7.9 cm x 10.2 cm x 7.9 cm) Acoustimass® module: 8.0" W x 24.5" D x 16.0" H (20.3 cm x 62.2 cm - Bose Lifestyle 18 | Installation guide - Page 28
©2003 Bose Corporation, The Mountain, Framingham, MA 01701-9168 USA 269712 AM Rev.00 JN31014
-
 1
1 -
 2
2 -
 3
3 -
 4
4 -
 5
5 -
 6
6 -
 7
7 -
8
-
9
-
10
-
11
-
12
-
13
-
14
-
15
-
16
-
17
-
18
-
19
-
20
-
21
-
22
-
23
-
24
-
25
-
26
-
27
-
28
 |
 |

LIFESTYLE
®
18 DVD Home Entertainment System
Installation Guide