Brother International BE-1201B-AC Cap to Tubular - English
Brother International BE-1201B-AC Manual
 |
View all Brother International BE-1201B-AC manuals
Add to My Manuals
Save this manual to your list of manuals |
Brother International BE-1201B-AC manual content summary:
- Brother International BE-1201B-AC | Cap to Tubular - English - Page 1
(D) and remove the metal bar with the "L" stamped into the top left corner of the plate from guide pins (C). 5) Remove the cap needle plate (A-2) and replace with the flat needle plate (A-1). 6) Turn machine off and move the switch (L) to "FLAT" mode and turn the power back on. 7) Move the needle
-
 1
1
 |
 |

B
B
E
E
S
S
-
-
9
9
1
1
6
6
,
,
9
9
0
0
1
1
,
,
1
1
2
2
1
1
6
6
,
,
1
1
2
2
0
0
1
1
A
A
C
C
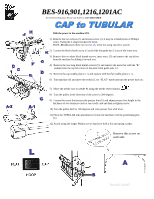
With the power to the machine ON
.
1)
Remove the two screws (
K
) and loosen screw (
J
), it may be a thumbscrew or Phillips
screw. Swing the L shape bracket (
H
) down.
NOTE:
Do not
attach these two screws
(K)
when not using cap drive system
2)
Loosen the black thumb screw (
G
) and slide the guide bar (
F
) out of the lower arm.
3)
Remove the two short black thumb screws, inner ones, (
E
) and remove the cap driver
from the machine by sliding it toward you.
4)
Remove the two long black thumb screws (
D
) and remove the metal bar with the “
L
”
stamped into the top left corner of the plate from guide pins
(C).
5)
Remove the cap needle plate (
A-2
) and replace with the flat needle plate (
A-1
).
6)
Turn machine off and move the switch (
L
) to “FLAT” mode and turn the power back on.
7)
Move the needle case to needle #1 using the needle select buttons
.
8)
Turn the pulley in the direction of the arrow to 200 degrees.
9)
Loosen the screw that secures the presser foot (
B
) and adjust presser foot height to the
thickness of two business cards or one credit card and then re-tighten screw.
10) Turn the pulley
back
to 100 degrees and raise presser foot with lever.
11) Place the TUBULAR arm attachment (
A
) onto the machine over the positioning pins
(
C
).
12) Attach using the longer Philips screws that have both a flat and spring washer.
For Technical Assistance Please Call Toll Free
1-877-4BROTHER
Remove this screw on
each side
Revised 1/10/05