Brother International DCP-8025D Users Manual - English
Brother International DCP-8025D Manual
 |
View all Brother International DCP-8025D manuals
Add to My Manuals
Save this manual to your list of manuals |
Brother International DCP-8025D manual content summary:
- Brother International DCP-8025D | Users Manual - English - Page 1
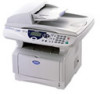
USER'S GUIDE DCP-8020 DCP-8025D ¨ - Brother International DCP-8025D | Users Manual - English - Page 2
to call Customer Service Please complete the following information for future reference: Model Number: DCP-8020, DCP-8025D (Circle your model number) Serial Number:* Date of Purchase: Place of Purchase: * The serial number is on the back of the unit. Retain this User's Guide with your sales receipt - Brother International DCP-8025D | Users Manual - English - Page 3
Copier/Printer needs. You can download the latest software and utilities, read FAQs and troubleshooting tips, and go to the "Solutions" section to learn how to get the most from your Brother product. http://solutions.brother.com You can check here for Brother driver updates. For Customer Service - Brother International DCP-8025D | Users Manual - English - Page 4
877-BROTHER (voice) Description Item Toner Cartridge TN-530 (Standard, Prints up to 3,300 pages) TN-560 (High yield, Prints up to 6,500 pages) Drum Unit Brother Print Server (10/100 Base-TX Ethernet Network) NC-9100h User's Guide LE8867001 LF2044001 (French For Canada) Quick Setup Guide - Brother International DCP-8025D | Users Manual - English - Page 5
THE LIKE) ARISING OUT OF THE USE OR INABILITY TO USE THE SOFTWARE EVEN IF BROTHER'S LICENSOR HAS BEEN ADVISED OF THE POSSIBILITY OF SUCH DAMAGES. BECAUSE SOME Compilation and Publication Notice Under the supervision of Brother Industries Ltd., this manual has been compiled and published, covering the - Brother International DCP-8025D | Users Manual - English - Page 6
Brother® Three-Year Limited Warranty and Exchange Service For DCP-8020 and DCP-8025D (USA only) Who is covered: • This limited include but are not limited to toner, drums, print heads and ink cartridges. • Except as otherwise provided herein, Brother warrants that the Machine and the accompanying - Brother International DCP-8025D | Users Manual - English - Page 7
first reported the problem after 2 years, but before 3 years from the original purchase date, Brother or its Authorized Service Center will repair the Machine at no charge to you for parts or labor. Brother reserves the right to use refurbished parts provided such refurbished parts conform to the - Brother International DCP-8025D | Users Manual - English - Page 8
to Brother within five (5) business days; (ii) the problems of your original Product are not covered by the warranty; (iii) the proper packaging instructions are the use of this Product. Except for that repair or replacement as described above, Brother shall not be liable for any direct, indirect, - Brother International DCP-8025D | Users Manual - English - Page 9
) Ltd. ("Brother"), or its Authorized Service Centers, will repair this DCP/Facsimile machine free of charge if defective in material or workmanship. This Limited Warranty does not include cleaning, consumables (including, without limitation, print cartridges, print head, toner and drum) or damage - Brother International DCP-8025D | Users Manual - English - Page 10
the DCP safely Save these instructions for later reference. WARNING There are high voltage electrodes inside the DCP. Before you clean the DCP or Doing this might cause an electrical shock. After you use the DCP, some internal parts are extremely HOT! To prevent injuries, be careful not to put - Brother International DCP-8025D | Users Manual - English - Page 11
be careful not to put your fingers in the area shown in the illustration. WARNING ■ When you move the DCP, grasp the side handholds that are under the scanner. Do NOT carry the DCP by holding it at the bottom. ■ Install equipment with a power cord near a socket/outlet that is easily accessible. ■ Do - Brother International DCP-8025D | Users Manual - English - Page 12
electrical outlets controlled by wall switches or automatic timers. ■ Disruption of power can wipe out information in the DCP's memory. ■ Do not connect your DCP to electrical outlets on the same circuit as large appliances or other Equipment that might disrupt the power supply. ■ Avoid interference - Brother International DCP-8025D | Users Manual - English - Page 13
Symbols used in this Guide 1-1 On-line Registration (USA and Canada 1-2 DCP part names and operations 1-3 Control panel overview 1-6 Status LED indications 1-8 Inserting originals for copying (and scanning 1-10 Using the ADF (automatic document feeder 1-10 Using the scanner glass 1-12 - Brother International DCP-8025D | Users Manual - English - Page 14
17 Using the DCP as a printer 6-1 Using the Brother DCP-8020, DCP-8025D printer driver ..... 6-1 How to print your document 6-2 Simultaneous printing and scanning 6-3 Two-sided printing (Duplex Printing 6-3 Automatic Duplex Printing (For DCP-8025D) ......... 6-3 Manual Duplex Printing 6-4 Face - Brother International DCP-8025D | Users Manual - English - Page 15
Printer driver settings 7-1 Printer driver settings 7-1 How to access the printer driver settings 7-1 Features in the Brother Native Driver 11 Secure Print 7-11 Accessories tab 7-14 Support tab 7-16 Features in the PS printer driver (For Windows 7-17 Ports tab 7-18 Device Settings - Brother International DCP-8025D | Users Manual - English - Page 16
(For Windows® XP only 8-10 WIA compliant 8-10 How to access the scanner 8-10 Scanning a document into the PC 8-11 Scanning a document using the ADF 8-11 Pre-Scanning to crop a portion you want to scan using the scanner glass 8-13 Brother Scanner Utility 8-15 Using the scan key (For USB or - Brother International DCP-8025D | Users Manual - English - Page 17
9-14 Copy 9-15 To access the Copy Configurations screen 9-15 Scanner settings 9-15 Number of copies 9-15 10 Using the Windows®-Based Brother SmartUI Control Center (For Windows® XP 10-1 Brother SmartUI Control Center 10-1 AutoLoad the Brother Control Center 10-2 How to turn off Auto Load 10 - Brother International DCP-8025D | Users Manual - English - Page 18
Scan Settings 10-32 Using your DCP with a Macintosh 11-1 Setting up your USB-equipped Apple® Macintosh 11-1 Using the Brother printer driver with your Apple® Macintosh® (OS 8.6 - 9.2 11-2 Using the Brother Printer Driver with Your Apple® Macintosh® (Mac OS X 11-4 Choosing page setup options - Brother International DCP-8025D | Users Manual - English - Page 19
14-14 Packing and shipping the DCP 14-18 Routine maintenance 14-21 Cleaning the scanner 14-21 Cleaning the printer 14-22 Cleaning the drum unit 14-23 Replacing the toner cartridge 14-24 How to replace the toner cartridge 14-25 Replacing the drum unit 14-30 Checking the drum life 14-34 Page - Brother International DCP-8025D | Users Manual - English - Page 20
#2 15-11 G Glossary G-1 S Specifications S-1 Product description S-1 General S-1 Print media S-2 General (continued S-2 Copy S-3 Scanner S-3 Printer S-4 Interfaces S-4 Computer requirements S-5 Consumable items S-6 Network (LAN) board (NC-9100h S-7 16 Index I-1 xviii - Brother International DCP-8025D | Users Manual - English - Page 21
Using this Guide Thank you for buying a Brother Digital Copier Printer (DCP). Your DCP-8020 or DCP-8025D is simple to use, with LCD screen instructions to guide you through programming it. You can make the most of your DCP by taking a few minutes to read this Guide. Finding information - Brother International DCP-8025D | Users Manual - English - Page 22
On-line Registration (USA and Canada) 1 Insert the MFL-Pro Suite CD-ROM into your CD-ROM drive. 2 Click Online Registration to register your product. 1 - 2 INTRODUCTION - Brother International DCP-8025D | Users Manual - English - Page 23
DCP part names and operations ■ Front view 5 Automatic Document Feeder (ADF) 4 Control Panel 3 Face-down Output Tray Support Flap with Extension 6 ADF Document Support Extension 7 ADF Document Output Support Flap 8 Document Cover 2 Front Cover Release Button 1 (DCP-8020) Manual Feed Tray (DCP- - Brother International DCP-8025D | Users Manual - English - Page 24
printing. Slide out to remove paper jammed inside the DCP. Connect the AC Power Connector here. Open it when thicker paper is placed in the MP tray or Manual feed tray. Open to remove paper jammed inside the ADF unit. Connect the USB Cable here. Connect the Parallel Cable here. 1 - 4 INTRODUCTION - Brother International DCP-8025D | Users Manual - English - Page 25
Glass Description Use to center the original on the scanner glass. This is used to scan the original when using the ADF. Use to lock/unlock the scanner when relocating the DCP. Open to place the original on the scanner glass. Clean it for good quality copying and scanning. Place the original - Brother International DCP-8025D | Users Manual - English - Page 26
Control panel overview DCP-8020 and DCP-8025D have similar control panel keys. 12 3 1 Print keys: Secure Lets you print out data saved in memory by entering your four-digit password. Job Cancel Clears data from the printer memory. 2 Status LED (Light-Emitting Diode) The LED will flash and change - Brother International DCP-8025D | Users Manual - English - Page 27
would like to use for the next copy. Sort Lets you sort multiple copies using the ADF. N in 1 (For DCP-8020) N in 1 lets you copy 2 or 4 pages onto one page. 8 Duplex/N in 1 (For DCP-8025D) You can choose Duplex to copy on both sides of the paper or N in 1 to copy 2 or 4 pages - Brother International DCP-8025D | Users Manual - English - Page 28
Emitting Diode) will flash and change color depending on the DCP status. The LED indications shown in the table below are used Green Yellow Red LED DCP status Sleep Mode Warming Up Description The power switch is off or the DCP is in Sleep mode or Power save mode. The DCP is warming up for - Brother International DCP-8025D | Users Manual - English - Page 29
call indication after turning the DCP back on, please call Brother Customer Service at: 1-800-284-4329 (in USA), 1-877-BROTHER (in Canada) or (514)685-6464 (in Montreal). The cover is open. Close the cover. (See Error messages on page 14-1.) Replace the toner cartridge with a new one. (See Replacing - Brother International DCP-8025D | Users Manual - English - Page 30
, newspaper, or fabric. (To copy or scan this kind of document, see Using the scanner glass on page 1-12.) Make sure originals written with ink are completely dry. 1 Pull out the ADF document support ADF Document Support Extension extension. 2 Unfold the ADF ADF Document Output document output - Brother International DCP-8025D | Users Manual - English - Page 31
4 Adjust the paper guides to fit the width of your originals. The documents are Face Up in the ADF ADF Document Output Support Flap 5 Press Start. The DCP starts scanning the first page. INTRODUCTION 1 - 11 - Brother International DCP-8025D | Users Manual - English - Page 32
2 Using the document guidelines on the left, center the orignal face down on the scanner glass and close the document cover. 3 Using the numeric keys, enter the number of copies you want (up to 99). 4 Press Start. The DCP will start scanning the original. If the original is a book or is thick - Brother International DCP-8025D | Users Manual - English - Page 33
or optional lower tray. Tray Type Paper tray (Tray #1) Manual feed tray Multi-purpose tray (MP tray) Optional lower tray (Tray #2) Recommended paper Model name DCP-8020, DCP-8025D DCP-8020 DCP-8025D Option for DCP-8020, DCP-8025D Plain Paper: Transparency: Labels: Xerox 4200DP 20 lb Hammermill - Brother International DCP-8025D | Users Manual - English - Page 34
Caution Do not use ink jet paper. It may cause a paper jam and damage your DCP. The output quality depends on the paper type and paper brand. Visit us at http://solutions.brother.com and check the latest recommendations for paper that can be used with the DCP-8020 and DCP-8025D. Choosing acceptable - Brother International DCP-8025D | Users Manual - English - Page 35
Paper capacity of the paper trays Multi-purpose tray (MP tray) (DCP-8025D) Manual feed tray (DCP-8020) Paper tray (Tray #1) Optional lower tray (Tray #2) Duplex printing Paper size Number of sheets Width: 2.75 to 8.66 in. (69.8 to 220 mm) Height: 4.57 - Brother International DCP-8025D | Users Manual - English - Page 36
specifications for each paper tray Model Paper types Paper weights Paper sizes DCP-8020 DCP-8025D Multi- N/A purpose tray Plain paper, Bond paper, Recycled paper, Envelope*1, Labels*2, and Transparency*2 Manual feed tray Paper tray Optional Lower tray Plain paper, Bond paper, N/A Recycled - Brother International DCP-8025D | Users Manual - English - Page 37
paper tray 1 Pull the paper tray completely out of the DCP. 2 While pressing the paper guide release lever, slide the adjusters to fit the paper size. Check that the guides are firmly in the slots. For Legal size paper, press the universal guide release button and pull out the back of the paper tray - Brother International DCP-8025D | Users Manual - English - Page 38
in the tray, below the maximum paper mark, and that the paper guide is flush against the paper stack. Up to here. 5 Put the paper tray firmly back in the DCP and unfold the support flap before you use the DCP. Support Flap with Extension When you put paper in the paper tray, please remember - Brother International DCP-8025D | Users Manual - English - Page 39
To load paper or other media in the manual feed tray (For DCP-8020) When printing envelopes and labels you should only use the manual feed tray. 1 Open the manual feed tray. Slide the paper guides to fit the paper size. 2 Using both hands put paper in the manual feed tray until the front edge of the - Brother International DCP-8025D | Users Manual - English - Page 40
When you put paper in the manual feed tray, please remember the following ■ The side to be printed on it gently into the tray. ■ Make sure that the paper is straight and in the proper position on the manual feed tray. If it is not, the paper may not be fed properly, resulting in a skewed printout or - Brother International DCP-8025D | Users Manual - English - Page 41
media in the multi-purpose tray (MP tray) (For DCP-8025D) When printing envelopes and labels you should only use the multi-purpose tray. 1 Open the MP tray and lower it gently. 2 Pull out and unfold the MP tray support flap. MP tray support flap 3 When loading paper in the MP tray, make - Brother International DCP-8025D | Users Manual - English - Page 42
lever, slide the paper guide to fit the paper size. When you put paper in the MP tray, please remember the following: ■ The side to be printed on must be face up. ■ During printing, the inside tray rises to feed paper into the DCP. ■ Put the leading edge (top of the paper - Brother International DCP-8025D | Users Manual - English - Page 43
To use Automatic Duplexing for copy and print operations (For DCP-8025D) If you want to print on both sides of the Tray. 2 Set the Paper Adjustment Lever for Duplex Printing, in the back of the DCP, to match your paper size. LTR/LGL A4 3 Your DCP is now ready to print two-sided pages. PAPER 2 - 11 - Brother International DCP-8025D | Users Manual - English - Page 44
has to offer. Since your programming is done on the LCD, we have created step-by-step on-screen instructions to help you program your DCP. All you need to do is follow the instructions as they guide you through the menu selections and programming options. Menu table You can probably program your - Brother International DCP-8025D | Users Manual - English - Page 45
you enter the menu, the LCD scrolls. Press 1 for General Setup menu -OR- Press 2 for Copy menu -OR- 1.General Setup 2.Copy 3.Printer 4.LAN Select ▲▼ & Set Press 3 for Printer menu -OR- Press 4 for LAN menu (Only for the optional LAN board (NC-9100h) is installed.) -OR- You can scroll more - Brother International DCP-8025D | Users Manual - English - Page 46
The LCD will then show the next menu level. Press or Press Set. to scroll to your next menu selection. When you finish setting an option, the LCD shows Accepted. Use to scroll backward if you passed your choices or want to save keystrokes. The current setting is always the option with " ". 3 - Brother International DCP-8025D | Users Manual - English - Page 47
Submenu Menu Selections Options Descriptions Page 1.Paper Type 1.MP Tray (DCP-8025D) Thin Plain Thick Sets the type of 4-1 paper in the Thin Sets the type of paper 4-1 (For Plain in paper tray #1. DCP-8020, this Thick menu does not Thicker appear.) Transparency 3.Tray #2 (option - Brother International DCP-8025D | Users Manual - English - Page 48
3-9.) 5.LCD Contrast (For DCP-8020) 6.LCD Contrast (For DCP-8025D) (If you have the optional tray#2, see page 3-9.) 6.Drum Life (For DCP-8020) 7.Drum Life (For DCP-8025D) (If you have the optional tray#2, see page 3-9.) Menu Selections Options - High Med Low Off 1.Toner Save On Off 2.Sleep - Brother International DCP-8025D | Users Manual - English - Page 49
DCP-8020) 8.Page Counter (For DCP-8025D) (If you have the optional tray#2, see page 3-9.) 8.User Settings (For DCP-8020) 9.User Settings (For DCP-8025D) (If you have the optional tray#2, see page 3-9.) 0.Local Language (Canada Only) 1.Quality 2.Contrast 1.Emulation 2.Print Options 3.Reset Printer - Brother International DCP-8025D | Users Manual - English - Page 50
to select to to accept exit If you installed optional LAN board (NC-9100h), the LCD shows the following LAN menu. (See the Network User's Guide on the CD-ROM.) Main Menu 4.LAN (option) Submenu 1.Setup TCP/IP Menu Selections Options 1.BOOT Method Auto Static RARP BOOTP DHCP 2.IP Address - Brother International DCP-8025D | Users Manual - English - Page 51
to select to to accept exit (See the Network User's Guide on the CD-ROM.) Main Menu 4.LAN (option) (Continued DCP on a Macintosh network. Select On to use the DCP on a DLC/LLC network. Select On to use the DCP on a Net BIOS/IP network. Selects Ethernet link mode. See Network User's Guide - Brother International DCP-8025D | Users Manual - English - Page 52
the optional paper tray, the LCD displays these menu options. (For DCP-8020 with the optional paper tray #2) Main Menu 1.General Setup Submenu 5.Tray Use: Copy Menu Selections - 6.LCD - Contrast 7.Drum Life - 8.Page - Counter 9.User - Settings Options Descriptions Page Tray #1 Only - Brother International DCP-8025D | Users Manual - English - Page 53
16 entering your four-digit password. Job Cancel - Clear data from the printer memory. 6-16 Scan Scan to E-mail Scan a black & white . Tray Select #1 (XXX*), #2 (XXX*), Auto (For DCP-8020) Change the tray use only for the 5-10 next copy. (For DCP-8025D) #1 (XXX*), #2 (XXX*), MP Tray, Auto - Brother International DCP-8025D | Users Manual - English - Page 54
4s Getting started General Setup Setting the Paper Type To get the best print quality, set the DCP for the type of paper you are using. For DCP-8020 1 Press Menu, 1, 1. -OR- If you have the optional paper tray, press Menu, 1, 1, 1 to set the paper type for Tray #1 or Menu, 1, 1, 2 to set the - Brother International DCP-8025D | Users Manual - English - Page 55
For DCP-8025D 1 Press Menu, 1, 1, 1 to set the paper type for MP Tray. -OR- Press Menu, 1, 1, 2 to set the paper type for Tray #1. 11.Paper Type 1.MP - Brother International DCP-8025D | Users Manual - English - Page 56
, letter, legal, executive, A5, A6, B5 and B6. When you change the size of paper in the DCP, you will need to change the setting for Paper Size at the same time so your DCP can fit reduced copy on the page. 1 Press Menu, 1, 2. 2 Press or to select A4, Letter, Legal, Executive - Brother International DCP-8025D | Users Manual - English - Page 57
volume. The default setting is Med. When the beeper is on, the DCP beeps every time you press a key or make a mistake. 1 Press & Set Press Set. 3 Press Stop/Exit. Toner Save You can conserve toner using this feature. When you set Toner Save to On, print appears somewhat lighter. The default - Brother International DCP-8025D | Users Manual - English - Page 58
The timer is automatically reset when the DCP receives PC data, or makes a copy. The factory setting is 05 minutes. While the DCP is in sleep mode, lamp. You can turn off the scanner lamp manually if you wish by pressing the and keys simultaneously. The scanner lamp will remain turned off until the - Brother International DCP-8025D | Users Manual - English - Page 59
Setting the Tray Use for Copy mode If your DCP is a DCP-8020 without the optional tray #2, you can skip this setting. DCP-8020 The default setting of Auto allows your DCP to choose the optional Tray #2 when paper is out in Tray #1 and when the size of the original will fit best on the paper in - Brother International DCP-8025D | Users Manual - English - Page 60
Setting the LCD Contrast You can change the contrast to help the LCD look lighter or darker. 1 (DCP-8020) Press Menu, 1, 5. 16.LCD Contrast (DCP-8025D) - + Press Menu, 1, 6. Select & Set -OR- If you have the optional Tray #2, press Menu, 1, 6. 2 Press to increase the contrast. -OR- - Brother International DCP-8025D | Users Manual - English - Page 61
5 Making copies Using the DCP as a copier Your DCP can make up to 99 copies at a time. Printable area The printable area of your DCP begins at approximately 0.14 in. (3.64 mm) on both sides and 0.12 in. (3 mm) on the top and bottom of the paper. Ex: Letter (Original) - Brother International DCP-8025D | Users Manual - English - Page 62
and N in 1 (For DCP-8020) or Duplex/N in 1 (For DCP-8025D). These settings are temporary, and the DCP returns to its default settings 1 minute after it finishes copying. If you want to use these temporary settings again, place the next original in the ADF or on the scanner glass within that time - Brother International DCP-8025D | Users Manual - English - Page 63
Making a single copy from the ADF 1 Place the original face up in the ADF. 2 Press Start. Do NOT pull on the original while copying is in progress. To stop copying and eject the original, press Stop/Exit. Making multiple copies from the ADF 1 Insert the original face up in the ADF. 2 Use the Numeric - Brother International DCP-8025D | Users Manual - English - Page 64
guidelines on the left, center the original face down on the scanner glass and close the document cover. 3 Using the numeric keys, enter the number of copies you want (up to 99). For example, press 3 8 for 38 copies. 4 Press Start. The DCP will start scanning the original. If you want to sort - Brother International DCP-8025D | Users Manual - English - Page 65
Using the copy keys (temporary settings) When you want to change the settings only for the next copy, use the temporary copy keys. Temporary Copy Keys You can use different combinations. The large LCD shows your current copy mode settings. Enlg/Red:100% Quality :Auto Contrast:- + 01 Tray :#1( - Brother International DCP-8025D | Users Manual - English - Page 66
the following enlargement or reduction ratios. Auto sets the DCP to calculate the ratio that fits the size of LTR) 97% (LTR → A4) 1 Place the original face up in the ADF, or face down on the scanner glass. 2 Use the numeric keys to enter the number of copies you want (up to 99). 3 Press Enlarge - Brother International DCP-8025D | Users Manual - English - Page 67
temporary copy keys for more settings. ■ Special Copy Options (2in1, 4in1 or Poster) are not available with Enlarge/Reduce. ■ Auto is not available with the scanner glass. MAKING COPIES 5 - 7 - Brother International DCP-8025D | Users Manual - English - Page 68
used for originals containing only text. Photo is used for copying photographs. 1 Place the original face up in the ADF, or face down on the scanner glass. 2 Use the numeric keys to enter the number of copies you want (up to 99). 3 Press Quality. 4 Press or to choose the type of - Brother International DCP-8025D | Users Manual - English - Page 69
You can adjust the copy contrast to make copies darker or lighter. 1 Place the original face up in the ADF, or face down on the scanner glass. 2 Use the numeric keys to enter the number of copies you want (up to 99). 3 Press Contrast. 4 Press to make a copy lighter -OR- Press - Brother International DCP-8025D | Users Manual - English - Page 70
, or face down on the scanner glass. 2 Use the numeric keys to enter the number of copies you want (up to 99). 3 Press Tray Select. 4 Press or to select the tray usage. Press Set. 5 Press Start. -OR- Press other Temporary Copy keys for more settings. (For DCP-8020 with the optional paper tray - Brother International DCP-8025D | Users Manual - English - Page 71
on both sides of the paper. Temporary Key Press Duplex/N in 1 (DCP-8025D) N in 1 (DCP-8020) Level 1 N in 1 Level 2 - Option 2 in 1 (P) 2 in 1 (L) 4 in 1 (P) 4 in 1 (L) Duplex(1 in 1) (DCP-8025D) Portrait1 Portrait2 Landscape1 Landscape2 - Single Sided Double Sided Single Sided Double - Brother International DCP-8025D | Users Manual - English - Page 72
a new setting. Press Set. 7 Press Start. If you are using the ADF, the DCP scans the originals and prints the copies. -OR- If you are using the scanner glass, the DCP scans the page. Place the next original on the scanner glass. 8 Select 1 and press Set, or press 1, Flatbed Copy: to copy next - Brother International DCP-8025D | Users Manual - English - Page 73
You can make a poster size copy of a photograph. You must use the scanner glass. 1 Place the original face down on the scanner glass. 2 Press Duplex/N in 1 and or to select Poster. Press Set. 3 Press Start. The DCP starts scanning the original and prints the pages for the poster. For poster - Brother International DCP-8025D | Users Manual - English - Page 74
option will not appear.) Press Set. 6 Press Start. The DCP starts scanning. If you are using the ADF, the DCP starts printing the copy. -OR- If you placed the original on the scanner glass, go to Step 7. 7 Place the next original on the scanner glass. Select 1 and press Set or press 1. Flatbed - Brother International DCP-8025D | Users Manual - English - Page 75
Making a double-sided copy from a double-sided original (Not available for multiple copies) 1 1 2 2 1 Place the original face up in the ADF. 2 Press Duplex/N in 1 and or to select Duplex(1 in 1). Press Set. 3 Press or to select Portrait2 or Landscape1. Press Set. 4 Press or 5 Press - Brother International DCP-8025D | Users Manual - English - Page 76
Landscape1 or Landscape2. Press Set. 5 Press Start. The DCP starts scanning. If you are using the ADF, the DCP starts printing the copy. -OR- If you placed the original on the scanner glass, go to Step 6. 6 Place the next original on the scanner glass. Select 1 and press Set, or press 1. Repeat - Brother International DCP-8025D | Users Manual - English - Page 77
Changing the default copy settings You can adjust the copy settings that are shown in the chart. These settings will stay until you change them again. Submenu 1.Quality 2.Contrast Menu Selections - - Options Text Photo Auto - + - + - + - + - + Factory Settings Auto - + Quality - Brother International DCP-8025D | Users Manual - English - Page 78
Quick Setup Guide. Also, the latest printer driver can be downloaded from the Brother Solutions Center at: http://solutions.brother.com Windows® Printing The dedicated printer driver and TrueType™ compatible fonts for Microsoft® Windows® 95/98/98SE/Me/2000 Professional/XP and Windows NT® workstation - Brother International DCP-8025D | Users Manual - English - Page 79
select the Print command. If your computer is also connected to any other printers, select Brother DCP-8020 or DCP-8025D (USB) Printer as your printer driver from the Print or Print Settings menu in your software application, and then click on OK to begin printing. 2 Your computer sends a print - Brother International DCP-8025D | Users Manual - English - Page 80
an original into the computer. Two-sided printing (Duplex Printing) The supplied printer driver supports duplex printing. (For more information, see Duplex Printing on page 7-7.) Automatic Duplex Printing (For DCP-8025D) In this mode, the DCP prints on both sides of the A4, Letter or Legal paper - Brother International DCP-8025D | Users Manual - English - Page 81
Manual Duplex Printing The DCP prints all the even-numbered pages on one side of the paper first. Then, the Windows® driver instructs you (with a pop-up message) to reinsert the paper. Before reinserting the paper, straighten it well, or you may get a paper jam. Very thin or - Brother International DCP-8025D | Users Manual - English - Page 82
plain paper The manual feed tray (For DCP-8020) The DCP automatically turns on the Manual Feed mode when you put paper in the manual feed tray. 1 Select the Paper Size, Media Type, Paper Source, and other settings in the printer driver. Media Type: Plain Paper Paper Source: Manual 2 Send the print - Brother International DCP-8025D | Users Manual - English - Page 83
, and other settings in the printer driver. Media Type: Plain Paper Paper Source: MP Tray 2 Open the MP tray and lower it gently. 3 Pull out the MP tray support flap. 4 When loading paper in the MP tray, make sure it touches the back of the tray. Paper-Guide Release Lever Make sure that the - Brother International DCP-8025D | Users Manual - English - Page 84
card stock. The manual feed tray (For DCP-8020) 1 Select the Paper Size, Media Type, Paper Source, and other settings in the printer driver. Media Type: Thick paper or Thicker paper Paper Source: Manual 2 Open the back output tray. 3 Open the manual feed tray. Slide the paper guides to fit the paper - Brother International DCP-8025D | Users Manual - English - Page 85
5 Send the print data to the DCP. 6 After the printed page comes out of the DCP, put in the next sheet of paper as in Step 4 above. Repeat for each page that you want to sheet immediately after printing. Stacking the sheets may cause a paper jam or the paper to curl. USING THE DCP AS A PRINTER 6 - 8 - Brother International DCP-8025D | Users Manual - English - Page 86
DCP-8025D) 1 Select the Paper Size, Media Type, Paper Source, and other settings in the printer driver. Media Type: Thick paper or Thicker paper Paper Source: MP Tray 2 Open the back output tray, and then pull out the face-up output tray support paper-guide release lever, slide the paper guide to - Brother International DCP-8025D | Users Manual - English - Page 87
7 Send the print data to the DCP. 8 When you have finished the print job, close the back output tray. Caution Remove each sheet immediately after printing. Stacking the sheets may cause a paper jam or the paper to curl. USING THE DCP AS A PRINTER 6 - 10 - Brother International DCP-8025D | Users Manual - English - Page 88
mode when you put paper in the manual feed tray. ■ All sides should be properly folded without any wrinkles or creases. 1 Select the Paper Size, Media Type, Paper Source, and other settings in the printer driver. Media Type: Envelope, Env.thin or Env.thick For DCP-8020: 2 Open the back output tray - Brother International DCP-8025D | Users Manual - English - Page 89
the manual feed tray. Slide the paper guides to fit the envelope size. If envelopes are creased after they have been printed: At the back of the DCP, open back output tray to reset the two blue tabs back to their original position. 4 Using both hands put the envelope in the manual feed tray until the - Brother International DCP-8025D | Users Manual - English - Page 90
than one envelope in the manual feed tray at any one time, or it may cause a jam. ■ Put the envelope in the manual feed tray, making sure DCP. 7 After you finish the print job, close the back output tray. For DCP-8025D: 2 Open the back output tray, and then pull out the face-up output tray support - Brother International DCP-8025D | Users Manual - English - Page 91
support flap. If envelopes are creased after they have been printed: At the back of the DCP, open the back output tray and push down the blue tabs at the left and right hand sides (as shown in the figure below). When you have finished printing your envelopes, close the back output tray to reset - Brother International DCP-8025D | Users Manual - English - Page 92
6 Press and slide the paper-width guide to fit the envelope size. When you put envelopes in the MP tray, please remember the following; ■ During printing, the inside tray rises to feed envelopes into the DCP. ■ The side to be printed on must be face up. ■ Put the leading edge (top of the - Brother International DCP-8025D | Users Manual - English - Page 93
from the memory. To use this function, you need to set your password in the printer driver dialog box. (See Device Options on page 7-11.) The Secure Key function is not available when using the Brother BR-Script driver. 1 Press Secure. -OR- The LCD displays No Data ! if there is no secured data - Brother International DCP-8025D | Users Manual - English - Page 94
network server. If the function does not work properly, either select the required emulation mode manually using the DCP panel buttons or use the emulation selection commands in your software. ■ After you print the secured data it will be cleared from the memory. 6 - 17 USING THE DCP AS A PRINTER - Brother International DCP-8025D | Users Manual - English - Page 95
Press Start Restoring default settings You can return the DCP to the default settings. Fonts and macros in the temporary settings are cleared. 1 Press Menu, 3, 3. 2 Press 1 to restore the factory settings 33.Reset Printer ▲ 1.Reset ▼ 2.Exit -OR- Select ▲▼ & Set Press 2 to exit without making - Brother International DCP-8025D | Users Manual - English - Page 96
available with the Universal printer driver. How to access the printer driver settings 1 Select Print from the File menu in your application software. 2 Select Brother DCP-8020 or DCP-8025D (USB) Printer as your printer and click Preferences for Windows® 2000/XP (Properties for Windows® 95/98/98SE - Brother International DCP-8025D | Users Manual - English - Page 97
Features in the Brother Native Driver The Brother Native driver is a printer driver developed exclusively by Brother. This driver includes more features than the Microsoft® Windows® Universal printer driver. Basic tab 1 2 3 4 1 Select the Paper Size, Multiple Page, Border Line (if any) and - Brother International DCP-8025D | Users Manual - English - Page 98
no border around each page on the sheet. Orientation Orientation selects the position of how your document will be printed (Portrait or Landscape). Portrait Landscape 7 - 3 PRINTER DRIVER SETTINGS - Brother International DCP-8025D | Users Manual - English - Page 99
Collate box checked Collate box not checked Media Type You can use the following types of media in your DCP. For the best print quality, select the type of media that you wish to use. Plain Paper heavier weight paper or rough paper select Env. Thick or Env. Thin. PRINTER DRIVER SETTINGS 7 - 4 - Brother International DCP-8025D | Users Manual - English - Page 100
Quality Resolution You can change the resolution as follows: ■ HQ 1200 ■ 600 dpi ■ 300 dpi When you select Use Duplex Unit, HQ1200 is not available. 7 - 5 PRINTER DRIVER SETTINGS - Brother International DCP-8025D | Users Manual - English - Page 101
options manually. For Windows® 2000/XP/NT® WS 4.0 ■ Check Use Printer Halftone to print using Halftone. ■ Check Use System Halftone to print using Halftone of the system. To change the setting, press Setting. ■ If the halftone cannot be printed correctly, check Improve gray printing. PRINTER DRIVER - Brother International DCP-8025D | Users Manual - English - Page 102
Unit. In this mode the DCP prints on both sides of the paper automatically. Manual Duplex Check the Duplex box and then select Manual Duplex. In this mode, the DCP prints all the even numbered pages first. Then the printer driver stops and shows the instructions required to re-install the paper - Brother International DCP-8025D | Users Manual - English - Page 103
the background of your document. If this feature is not checked then the Watermark will be printed on top of your document. In Outline Text (Window® 2000 Professional/XP/NT® WS 4.0 Only) Check In Outline Text if you only want to print an outline of the watermark - Brother International DCP-8025D | Users Manual - English - Page 104
set the scaling size of the image. ■ Position This setting offers you the control for where the Watermark is to be positioned on the page. 7 - 9 PRINTER DRIVER SETTINGS - Brother International DCP-8025D | Users Manual - English - Page 105
Size, if your document has an unusual size, or if you have only the standard size paper. ■ Check the Free box if you want to manually reduce or enlarge the output. ■ You can also use the Mirror Print or Reverse Print feature for your page setting - Brother International DCP-8025D | Users Manual - English - Page 106
from the control panel of the DCP. (See Secure key on page 6-16.) To delete a secured document: You need to use the control panel of the DCP to delete a secured document. (See Secure key on page 6-16.) You can store up to 8 MB of secured data in the DCP's memory. 7 - 11 PRINTER DRIVER SETTINGS - Brother International DCP-8025D | Users Manual - English - Page 107
Windows® 95/98/98SE/Me Users Only) The administrator selection permits the Copy, Scaling and Watermark features to be locked and password protected. Record your password and keep it in a safe place for future reference. If you forget your password these settings can not be accessed. PRINTER DRIVER - Brother International DCP-8025D | Users Manual - English - Page 108
the format that will be printed. The actual Date and Time printed on your document is automatically retrieved from the settings of your computer. 7 - 13 PRINTER DRIVER SETTINGS - Brother International DCP-8025D | Users Manual - English - Page 109
Accessories tab The Accessories Tab includes the settings for configuring the printer driver for the size of paper loaded in each paper source. This tab also installs any additional options into the driver settings. Paper Source Setting To configure the paper size for each paper source, highlight - Brother International DCP-8025D | Users Manual - English - Page 110
Available Options In order to access the optional 2nd paper tray the option must be installed in the driver. Highlight the model number from the Available Options list and click Add. The optional tray will then be listed in the Installed box, Paper Source - Brother International DCP-8025D | Users Manual - English - Page 111
product including FAQs (Frequently Asked Questions), User Guides, Driver Updates and Tips for using your DCP. Web Update Web Update checks the Brother web site for updated drivers, and automatically downloads and updates the printer driver on your computer. Check Setting The Check Setting selection - Brother International DCP-8025D | Users Manual - English - Page 112
appears, select Custom and check the PS Printer Driver. Then continue following on-screen instructions. You can download the latest driver by accessing the Brother Solutions Center at http://solutions.brother.com The screens in this section are from Windows® XP. The screens on your PC will vary - Brother International DCP-8025D | Users Manual - English - Page 113
Ports tab Select the port where your printer is connected or the path to the network printer you are using. PRINTER DRIVER SETTINGS 7 - 18 - Brother International DCP-8025D | Users Manual - English - Page 114
Device Settings tab Select the options you installed. 7 - 19 PRINTER DRIVER SETTINGS - Brother International DCP-8025D | Users Manual - English - Page 115
4.0, Windows® 2000 or XP, you can access the Layout tab by clicking Printing Preferences... in the General tab of the Brother DCP-8025D BR-Script3 Properties screen. You can change the Layout setting by selecting the setting in the Orientation, Page Order and Page Per Sheet. PRINTER DRIVER SETTINGS - Brother International DCP-8025D | Users Manual - English - Page 116
Paper/Quality tab Select the Paper Source. 7 - 21 PRINTER DRIVER SETTINGS - Brother International DCP-8025D | Users Manual - English - Page 117
Advanced Options If you are using Windows NT® 4.0, Windows® 2000 or XP, you can access the Advanced Options tab by clicking Advanced... button in 3 You can change settings by selecting the setting in the Printer Features list: ■ Media Type ■ Toner Save ■ BR-Script Level PRINTER DRIVER SETTINGS 7 - 22 - Brother International DCP-8025D | Users Manual - English - Page 118
a document (For Windows® XP only) on page 8-10.) ■ For ScanSoft®, PaperPort® and TextBridge® OCR Go to Using ScanSoft® PaperPort® and TextBridge® OCR on page 8-19. Scanning a document TWAIN compliant The Brother MFL-Pro Suite software includes a TWAIN compliant scanner driver. TWAIN drivers meet the - Brother International DCP-8025D | Users Manual - English - Page 119
How to access the Scanner The instructions for scanning in this Guide are for when you use ScanSoft® PaperPort® 8.0SE. 1 Open the software application (ScanSoft® PaperPort®) to scan a document. 2 Select Scan from the File drop-down menu or select the Scan button. 3 Select Brother DCP-8025D (if using - Brother International DCP-8025D | Users Manual - English - Page 120
page 1 Place the original face up in the ADF (automatic document feeder), or face down on the scanner glass. 2 Adjust the following settings, if required, in the Scanner window: ■ Image Type ■ Resolution ■ Scan Type ■ Brightness ■ Contrast ■ Document Size After you select a document size, you can - Brother International DCP-8025D | Users Manual - English - Page 121
in the scanner window to scan the image. 1 Place the original face up in the ADF, or face down on the scanner glass. Scanning area 2 Select the settings for Image Type, Resolution, Scan Type, Brightness and Contrast, as needed. 3 In the Brother DCP-8025D, Brother DCP-8025D USB or Brother DCP-8025D - Brother International DCP-8025D | Users Manual - English - Page 122
1, please the original face up in the ADF again. 6 Click Start. This time only the selected area of the original will appear in the PaperPort® window (or your software application window). 7 In the PaperPort® window, use the options available to refine the image. 8 - 5 HOW TO SCAN USING - Brother International DCP-8025D | Users Manual - English - Page 123
Settings in the Scanner window Image Type Select the image type of output from Photo, Web or Text. Resolution and Scan Type will be altered for each default setting. The Yes Yes No No No No True Gray / 24 bit color Yes Yes Yes Yes Yes Yes Yes Yes Yes Yes HOW TO SCAN USING WINDOWS® 8 - 6 - Brother International DCP-8025D | Users Manual - English - Page 124
the Image, while a decrease reveals more detail in gray areas. You can also type a value in the box for the setting. 8 - 7 HOW TO SCAN USING WINDOWS® - Brother International DCP-8025D | Users Manual - English - Page 125
or business cards, select the document size, and then place the document face down at the center of scanner glass. When scanning photographs or other images for use in a word processor or other graphics application. You " or "inch" as the unit for Width and Height. HOW TO SCAN USING WINDOWS® 8 - 8 - Brother International DCP-8025D | Users Manual - English - Page 126
: shows the approximate data size calculated in a Bitmap format. The size will be different for other file formats such as JPEG. 8 - 9 HOW TO SCAN USING WINDOWS® - Brother International DCP-8025D | Users Manual - English - Page 127
scan images directly into the PaperPort® viewer that Brother included with your DCP or you can scan images directly into any other software application that supports WIA or TWAIN scanning. How to access the scanner The instructions for scanning in this Guide are for when you use ScanSoft® PaperPort - Brother International DCP-8025D | Users Manual - English - Page 128
to scan and then crop a portion of the page after pre-scanning the document you will need to use the scanner glass (Flatbed). Scanning a document using the ADF 1 Place the original face up in the ADF (automatic document feeder size from the drop-down list box (D). 8 - 11 HOW TO SCAN USING WINDOWS® - Brother International DCP-8025D | Users Manual - English - Page 129
Advanced Properties. Click the OK button after you choose your settings. ■ The scanner resolution you can select is up to 1200 × 1200 dpi. ■ For resolutions greater than 1200dpi, use the Brother Scanner Utility. (See Brother Scanner Utility on page 8-15.) 6 To start scanning your document, click the - Brother International DCP-8025D | Users Manual - English - Page 130
any unwanted portions from the image. When you are satisfied with the preview, click the Scan button from the scanner window to scan the image. 1 Place the original face down on the scanner glass. 2 Make sure you selected Flatbed in the Paper source pull-down box (A). A Scanning area B 3 Select the - Brother International DCP-8025D | Users Manual - English - Page 131
your document, click the Scan button in the Scan dialog box. This time only the selected area of the original will appear in the PaperPort® window (or your software application window). HOW TO SCAN USING - Brother International DCP-8025D | Users Manual - English - Page 132
Brother Scanner Utility The Brother Scanner Utility is used for configuring the scanner driver for resolutions greater than 1200dpi and for changing the paper size. If you want to set Legal not sufficient then your computer may freeze and you could lose your file. 8 - 15 HOW TO SCAN USING WINDOWS® - Brother International DCP-8025D | Users Manual - English - Page 133
/98/98SE/Me/2000 Professional and Windows NT® WS 4.0) on page 9-1. ■ For Windows® XP, see Using the Windows®-Based Brother SmartUI Control Center (For Windows® XP) on page 10-1. ■ If your DCP is connected with both a USB and a Parallel cable, you need to select USB or Parallel as the destination in - Brother International DCP-8025D | Users Manual - English - Page 134
face up in the ADF, or face down on the scanner glass. 2 Press Scan. 3 Press or to E-mail to OCR ▼Scan to File Select ▲▼ & Set The DCP will scan the original, create a file attachment, and launch See Scan to Image on page 9-14.) (For Windows® XP: See Hardware Section: Changing the Scan to button - Brother International DCP-8025D | Users Manual - English - Page 135
and specific folder are based on the settings you have chosen in the Scan to File screen of the Brother MFL-Pro Control Center. (See Scan to File on page 9-8 to 9-9.) (For Windows® XP: See Hardware Section: Changing the Scan to button configuration on page 10-5 to 10-11.) 1 Place the original face - Brother International DCP-8025D | Users Manual - English - Page 136
PaperPort® on the CD-ROM. The complete ScanSoft® PaperPort® Users Guide, including ScanSoft® TextBridge® OCR, is in the documentation on the ® PaperPort® for Brother and ScanSoft® TextBridge® OCR are installed with it automatically. If you are using Windows® XP or Windows® 2000 Professional, we - Brother International DCP-8025D | Users Manual - English - Page 137
display it, you can also double-click a non-PaperPort® item to open it. Page View displays each item as a full page HOW TO SCAN USING WINDOWS® 8 - 20 - Brother International DCP-8025D | Users Manual - English - Page 138
non paperport® files) appear on the Desktop. ■ You can also use Windows® Explorer to manage the folders and items shown in Desktop View. Quick links does not automatically recognize one of the applications on your computer, you can manually create a link using the Add to Send To Bar... command. (See - Brother International DCP-8025D | Users Manual - English - Page 139
TextBridge® OCR lets you convert image text into text you can edit Software by: ScanSoft® TextBridge® OCR is installed automatically with PaperPort® when you ® Excel. ■ Import files saved in other file formats, such as Windows® Bitmap (BMP) or Tag Image File Format (TIFF). HOW TO SCAN USING - Brother International DCP-8025D | Users Manual - English - Page 140
: Select Start, Settings, Control Panel and Add/Remove Programs. Select Brother Extensions for Paperport and click the Change/Remove button. Select PaperPort® 8.0 SE from the list and click the Change button. For Windows® XP: Select Start, Control Panel, Add or Remove Programs and the Change - Brother International DCP-8025D | Users Manual - English - Page 141
® WS 4.0) If you are using Windows® 2000 Professional, we recommend that you are logged on with administrator rights. Brother MFL-Pro Control Center The Brother Control Center is a software utility that pops up on the PC screen whenever paper is put in the ADF of the DCP. This allows you to quickly - Brother International DCP-8025D | Users Manual - English - Page 142
the software. Double-click the Control Center icon on the desktop or from the Start menu, select Programs, ScanSoft PaperPort 8.0, and then click Brother SmartUI POPUP. How to turn off AutoLoad 1 Left-click the Control Center icon and click Show. 2 When the Control Center window - Brother International DCP-8025D | Users Manual - English - Page 143
Brother Control Center features Auto Configuration During installation the Control Center will check your system to set up Word Pad to MS Word by changing the application that is listed for the Word Processor. USING THE BROTHER CONTROL CENTER (FOR WINDOWS® 95/98/98SE/ME/2000 PROFESSIONAL AND - Brother International DCP-8025D | Users Manual - English - Page 144
-Lets you use the PC and any Windows® printer driver for enhanced copy operations. You can scan the page on the Brother DCP and print the copies using any of the features of the Brother DCP printer driver. -OR- You can send the copy output to any standard Windows® printer driver that is on your PC - Brother International DCP-8025D | Users Manual - English - Page 145
settings for Scan and Copy buttons When the Pop-Up screen appears, you can access the Scanner Settings window. Click the Smart Click icon at the top right of the Brother Control Center screen -OR- Click the Modify Settings button on any of the Configuration screens. Global settings AutoLoad - Brother International DCP-8025D | Users Manual - English - Page 146
Setting up the scanner configurations The Pop-Up application stores eight different scanning modes. Each time you scan an original . Faxing is only possible if you have a fax modem attached to your computer. 9 - 6 USING THE BROTHER CONTROL CENTER (FOR WINDOWS® 95/98/98SE/ME/2000 PROFESSIONAL AND - Brother International DCP-8025D | Users Manual - English - Page 147
the ADF. Place the original in the DCP's ADF, and then click OK to go to the Control Center screen. If you want to scan the original from the scanner glass, please use Scan on the control panel of the DCP. USING THE BROTHER CONTROL CENTER (FOR WINDOWS® 95/98/98SE/ME/2000 PROFESSIONAL AND - Brother International DCP-8025D | Users Manual - English - Page 148
click OK. -OR- To go back to the default settings, click the Restore Defaults button. Scanner settings From the pull-down list, select the scanning mode that is appropriate for the type of to your computer. 9 - 8 USING THE BROTHER CONTROL CENTER (FOR WINDOWS® 95/98/98SE/ME/2000 PROFESSIONAL AND - Brother International DCP-8025D | Users Manual - English - Page 149
Image Item (*.max) PaperPort 4.0 Image Item (*.max) PaperPort 3.0 Image Item (*.max) Windows Bitmap (*bmp) PC Paintbrush (*.pcx) PCX Multi-page (*.dcx) JPEG (*.jpg) TIFF-Uncompressed Click OK to save your settings. USING THE BROTHER CONTROL CENTER (FOR WINDOWS® 95/98/98SE/ME/2000 PROFESSIONAL AND - Brother International DCP-8025D | Users Manual - English - Page 150
click OK. -OR- To go back to the default settings, click the Restore Defaults button. Scanner settings From the pull-down list, select the scanning mode that is appropriate for the type of to your computer. 9 - 10 USING THE BROTHER CONTROL CENTER (FOR WINDOWS® 95/98/98SE/ME/2000 PROFESSIONAL AND - Brother International DCP-8025D | Users Manual - English - Page 151
Click the E-Mail Settings button to set up links. The Send To Options window will appear: Send to Options Convert attachments to specified file type-Converts items to when the file type supports multiple pages, such as multi-page TIFF. USING THE BROTHER CONTROL CENTER (FOR WINDOWS® 95/98/98SE/ME/2000 - Brother International DCP-8025D | Users Manual - English - Page 152
click OK. -OR- To go back to the default settings, click the Restore Defaults button. Scanner settings From the pull-down list, select the scanning mode that is appropriate for the type of to your computer. 9 - 12 USING THE BROTHER CONTROL CENTER (FOR WINDOWS® 95/98/98SE/ME/2000 PROFESSIONAL AND - Brother International DCP-8025D | Users Manual - English - Page 153
application will read the pages that you scan into your word processor application. The OCR Settings window will appear: Select your setting and click OK. ■ Auto orient page-Click this checkbox in a one-column format. USING THE BROTHER CONTROL CENTER (FOR WINDOWS® 95/98/98SE/ME/2000 PROFESSIONAL AND - Brother International DCP-8025D | Users Manual - English - Page 154
click OK. -OR- To go back to the default settings, click the Restore Defaults button. Scanner Settings From the pull-down list, select the scanning mode that is appropriate for the type of defined application. 9 - 14 USING THE BROTHER CONTROL CENTER (FOR WINDOWS® 95/98/98SE/ME/2000 PROFESSIONAL AND - Brother International DCP-8025D | Users Manual - English - Page 155
click OK. -OR- To go back to the default settings, click the Restore Defaults button. Scanner settings From the pull-down list, select the scanning mode that is appropriate for the type of to save your Copy settings. USING THE BROTHER CONTROL CENTER (FOR WINDOWS® 95/98/98SE/ME/2000 PROFESSIONAL AND - Brother International DCP-8025D | Users Manual - English - Page 156
Center (For Windows® XP) Brother SmartUI Control Center The Brother Control Center is a software utility that allows you to quite easily, with very few mouse clicks, access the most frequently used scanning applications. Using the Control Center eliminates the need to manually launch the specific - Brother International DCP-8025D | Users Manual - English - Page 157
AutoLoad the Brother Control Center The Control Center is initially configured to automatically load each time Windows® is started. Tray and select Show. 2 The main SmartUI Control Center window appears. Please look at the bottom of the window for a check box labeled "AutoLoad Pop-up". 3 Uncheck - Brother International DCP-8025D | Users Manual - English - Page 158
format and destination folder without having to run any other applications. Select which section you want by clicking on the appropriate tab. 10 - 3 USING THE WINDOWS®-BASED BROTHER SMARTUI CONTROL CENTER (FOR WINDOWS® XP) - Brother International DCP-8025D | Users Manual - English - Page 159
a different application. For example, you can change the E-mail scan button from Outlook Express to Outlook by changing the application that is listed. USING THE WINDOWS®-BASED BROTHER SMARTUI CONTROL CENTER (FOR WINDOWS® XP) 10 - 4 - Brother International DCP-8025D | Users Manual - English - Page 160
window to reconfigure the Scan button on your DCP. Click the Hardware Section tab at the top left of the SmartUI Control Center screen. (See Using the scan key (For USB or Parallel interface cable users) on page 8-16.) 10 - 5 USING THE WINDOWS®-BASED BROTHER SMARTUI CONTROL CENTER (FOR WINDOWS® XP - Brother International DCP-8025D | Users Manual - English - Page 161
the configuration that includes the destination E-mail application, attachment file and the scanner settings. To change the destination E-mail application you use the Application pull down display a list of file types. USING THE WINDOWS®-BASED BROTHER SMARTUI CONTROL CENTER (FOR WINDOWS® XP) 10 - 6 - Brother International DCP-8025D | Users Manual - English - Page 162
the default PaperPort folder so the file appears in PaperPort or you can select another folder/directory by clicking the Browse button. 10 - 7 USING THE WINDOWS®-BASED BROTHER SMARTUI CONTROL CENTER (FOR WINDOWS® XP) - Brother International DCP-8025D | Users Manual - English - Page 163
to Image button and the following screen will appear. You can change the configuration, which includes the destination image format or document application. USING THE WINDOWS®-BASED BROTHER SMARTUI CONTROL CENTER (FOR WINDOWS® XP) 10 - 8 - Brother International DCP-8025D | Users Manual - English - Page 164
define the size of the paper you're using, and you can adjust the brightness and contrast of the image before scanning. 10 - 9 USING THE WINDOWS®-BASED BROTHER SMARTUI CONTROL CENTER (FOR WINDOWS® XP) - Brother International DCP-8025D | Users Manual - English - Page 165
Scan to OCR To configure the Scan to OCR feature left-click on the Scan to OCR button and the following screen will appear. You can change the configuration, which includes the destination applications. USING THE WINDOWS®-BASED BROTHER SMARTUI CONTROL CENTER (FOR WINDOWS® XP) 10 - 10 - Brother International DCP-8025D | Users Manual - English - Page 166
send your scan as a different file type. You can select the application from the File Type window according to your needs. You have the option to choose your OCR setting from Single column output to Auto orient page. 10 - 11 USING THE WINDOWS®-BASED BROTHER SMARTUI CONTROL CENTER (FOR WINDOWS® XP) - Brother International DCP-8025D | Users Manual - English - Page 167
Section The Software Section contains three groups of scan to buttons. Each section has a number of different and Scan to Image applications. The Copy section contains three buttons for N to 1 copying. *1 *2 *3 *4 USING THE WINDOWS®-BASED BROTHER SMARTUI CONTROL CENTER (FOR WINDOWS® XP) 10 - 12 - Brother International DCP-8025D | Users Manual - English - Page 168
any of the features of the DCP printer driver-OR-you can direct the copy output to any standard Windows® printer driver installed on the PC including network printers. Four/Two to One Copy-enables you to use the Four/Two on One-page features of the Brother printer driver to copy four/two original - Brother International DCP-8025D | Users Manual - English - Page 169
change the configuration of each of these buttons to meet your specific requirements by right-clicking on a button and following the configuration menus. USING THE WINDOWS®-BASED BROTHER SMARTUI CONTROL CENTER (FOR WINDOWS® XP) 10 - 14 - Brother International DCP-8025D | Users Manual - English - Page 170
the Scan to File button and click Configuration. The Scan Action tab is set to File and should not be changed. 10 - 15 USING THE WINDOWS®-BASED BROTHER SMARTUI CONTROL CENTER (FOR WINDOWS® XP) - Brother International DCP-8025D | Users Manual - English - Page 171
setting by selecting the Other Folder button and then clicking Browse and selecting the folder in which you wish to save your files. USING THE WINDOWS®-BASED BROTHER SMARTUI CONTROL CENTER (FOR WINDOWS® XP) 10 - 16 - Brother International DCP-8025D | Users Manual - English - Page 172
. To change the E-mail application click on the Configuration tab. From the Application pull down list, select your preferred E-mail application. 10 - 17 USING THE WINDOWS®-BASED BROTHER SMARTUI CONTROL CENTER (FOR WINDOWS® XP) - Brother International DCP-8025D | Users Manual - English - Page 173
To change the file type of the attachment click the Link Preferences button to set up links. Check the Convert attachment to specified file type box and then select the appropriate file type from the pull down list. USING THE WINDOWS®-BASED BROTHER SMARTUI CONTROL CENTER (FOR WINDOWS® XP) 10 - 18 - Brother International DCP-8025D | Users Manual - English - Page 174
Browser-Viewable (*.htm) PaperPort Self Viewing (*.exe) PaperPort 5.0 Image Item (*.max) PaperPort 4.0 Image Item (*.max) PaperPort 3.0 Image Item (*.max) Windows Bitmap (*.bmp) PC Paintbrush (*.pcx) PCX Multi-page (*.dcx) JPEG (*.jpg) TIFF-Uncompressed (*.tif) TIFF Group 4 (*.tif) Multi-Page - Brother International DCP-8025D | Users Manual - English - Page 175
Scanner settings You have the ability to change the scanner settings used to create the file attachments. Click on the Scan Settings tab and select the appropriate settings. USING THE WINDOWS®-BASED BROTHER SMARTUI CONTROL CENTER (FOR WINDOWS® XP) 10 - 20 - Brother International DCP-8025D | Users Manual - English - Page 176
example: Word Pad instead of Word) and file type. You can also choose another OCR software package besides the TextBridge OCR which is built into PaperPort. To configure Scan to OCR right- Application pull down list. 10 - 21 USING THE WINDOWS®-BASED BROTHER SMARTUI CONTROL CENTER (FOR WINDOWS® XP) - Brother International DCP-8025D | Users Manual - English - Page 177
-down list, select the file format you want to use for documents. OCR-Select the OCR application from the OCR pull down list. USING THE WINDOWS®-BASED BROTHER SMARTUI CONTROL CENTER (FOR WINDOWS® XP) 10 - 22 - Brother International DCP-8025D | Users Manual - English - Page 178
set to Application and should not be changed. To change the configuration of the destination application click on the Configuration Tab. 10 - 23 USING THE WINDOWS®-BASED BROTHER SMARTUI CONTROL CENTER (FOR WINDOWS® XP) - Brother International DCP-8025D | Users Manual - English - Page 179
a screen resolution of (96dpi), show a warning if the item has any annotations and update the original item if the sent item is modified. USING THE WINDOWS®-BASED BROTHER SMARTUI CONTROL CENTER (FOR WINDOWS® XP) 10 - 24 - Brother International DCP-8025D | Users Manual - English - Page 180
the Copy button configuration you must set the printer driver. Click the Copy options button to display the printer driver settings. The copy options screen will vary depending upon which Brother model you purchased. 10 - 25 USING THE WINDOWS®-BASED BROTHER SMARTUI CONTROL CENTER (FOR WINDOWS® XP) - Brother International DCP-8025D | Users Manual - English - Page 181
to copy two pages to one you must select 2 in 1. You must configure each of the copy buttons before they can be used. USING THE WINDOWS®-BASED BROTHER SMARTUI CONTROL CENTER (FOR WINDOWS® XP) 10 - 26 - Brother International DCP-8025D | Users Manual - English - Page 182
OCR software package installed on your PC you can select it. The default OCR software is guide lines for Custom Button configuration. 1. Select the Scan Action Select the type of scan by clicking the appropriate button. 10 - 27 USING THE WINDOWS®-BASED BROTHER SMARTUI CONTROL CENTER (FOR WINDOWS® XP - Brother International DCP-8025D | Users Manual - English - Page 183
list. Click on Link Preferences to set the Send to options. You can select the application from the scroll menu on the left. USING THE WINDOWS®-BASED BROTHER SMARTUI CONTROL CENTER (FOR WINDOWS® XP) 10 - 28 - Brother International DCP-8025D | Users Manual - English - Page 184
PaperPort directory or select your own destination directory by selecting Other Folder. Use the Browse button to select the destination directory. 10 - 29 USING THE WINDOWS®-BASED BROTHER SMARTUI CONTROL CENTER (FOR WINDOWS® XP) - Brother International DCP-8025D | Users Manual - English - Page 185
. You can also choose another OCR application from the OCR pull down list if another is installed on you system. ScanSoft® TextBridge® is installed as part of the PaperPort 8.0 application. USING THE WINDOWS®-BASED BROTHER SMARTUI CONTROL CENTER (FOR WINDOWS® XP) 10 - 30 - Brother International DCP-8025D | Users Manual - English - Page 186
Preferences button to configure the Send To E-mail options. You can select the File type and Quick Send E-mail address list. 10 - 31 USING THE WINDOWS®-BASED BROTHER SMARTUI CONTROL CENTER (FOR WINDOWS® XP) - Brother International DCP-8025D | Users Manual - English - Page 187
Scan Settings. You can select the scanner settings from each of the Scan Type options for the Custom buttons. You have the option to select Color Mode, Resolution, Paper Size and Brightness and Contrast settings. USING THE WINDOWS®-BASED BROTHER SMARTUI CONTROL CENTER (FOR WINDOWS® XP) 10 - 32 - Brother International DCP-8025D | Users Manual - English - Page 188
1.8 metres. Do not connect the DCP to a USB port on a key board or a non-powered USB hub. The features supported by the DCP will depend on the operating system you are using. The chart below shows which features are supported. Feature Printing Scanning (TWAIN) Mac OS 8.6 9.X Yes Yes Yes Yes - Brother International DCP-8025D | Users Manual - English - Page 189
driver with your Apple® Macintosh® (OS 8.6 - 9.2) To select a Printer: 1 Open the Chooser from the Apple menu. 2 Click the Brother Laser icon. On the right side of the Chooser window, click the printer you want to print to. Close the Chooser. To print a document: 1 From the application software - Brother International DCP-8025D | Users Manual - English - Page 190
2 From application software such as Presto! PageManager®, click File menu and select Print. Click Print to start printing. If you want to change your settings before clicking Print. Device Options allows you to select Duplex. Automatic Duplex is only available with the DCP-8025D. 11 - 3 USING YOUR - Brother International DCP-8025D | Users Manual - English - Page 191
Using the Brother Printer Driver with Your Apple® Macintosh® (Mac OS X) Choosing page setup options 1 From application software such as Presto! PageManager®, click the File menu and select Page Setup. Make sure DCP-8020 or DCP-8025D is selected in the Format for pop-up menu. You can change the - Brother International DCP-8025D | Users Manual - English - Page 192
Specific settings Set the Media Type, Resolution, Toner Save, and other settings. Press Copies & Pages to select settings you want to change. Duplex Automatic Duplex is only available with the DCP-8025D. 11 - 5 USING YOUR DCP WITH A MACINTOSH® - Brother International DCP-8025D | Users Manual - English - Page 193
Printer settings USING YOUR DCP WITH A MACINTOSH® 11 - 6 - Brother International DCP-8025D | Users Manual - English - Page 194
the USB cable. (See Setting the Emulation Selection on page 6-17.) The PS driver does not support the following functions: ■ HQ 1200 ■ Secure Print For Mac OS 8.6 to 9.2 users 1 For Mac® OS 8.6 to 9.04 Users: Open the Apple Extras folder. Open the Apple LaserWriter Software folder. For Mac® OS - Brother International DCP-8025D | Users Manual - English - Page 195
2 Open the Desktop Printer Utility icon. 3 Select Printer (USB), and then click OK. USING YOUR DCP WITH A MACINTOSH® 11 - 8 - Brother International DCP-8025D | Users Manual - English - Page 196
4 Click Change... in the PostScript® Printer Description (PPD) file. Select Brother DCP-8025D, and then click Select. 5 Click Change... in the USB Printer Selection. Select Brother DCP-8025D, and then click OK. 11 - 9 USING YOUR DCP WITH A MACINTOSH® - Brother International DCP-8025D | Users Manual - English - Page 197
6 Click Create.... 7 Enter your DCP name (DCP-8025D), and then click Save. 8 Select Quit from the File menu. USING YOUR DCP WITH A MACINTOSH® 11 - 10 - Brother International DCP-8025D | Users Manual - English - Page 198
users You need to install the PS driver using the following instructions. ■ If you use a USB cable and your Macintosh is "Mac OS X", only one printer driver for a DCP can be registered in Print Center. ■ If a Brother Native Driver (DCP-XXX) is already listed in Printer list, you will need to delete - Brother International DCP-8025D | Users Manual - English - Page 199
2 Open the Utilities folder. 3 Open the Print Center icon. 4 Click Add Printer... . USING YOUR DCP WITH A MACINTOSH® 11 - 12 - Brother International DCP-8025D | Users Manual - English - Page 200
5 Select USB. 6 Select DCP-8025D, and then click Add. 7 Select Quit Printer Center from the Print Center menu. 11 - 13 USING YOUR DCP WITH A MACINTOSH® - Brother International DCP-8025D | Users Manual - English - Page 201
Using the Brother TWAIN scanner driver with your Macintosh® The Brother DCP software includes a TWAIN Scanner driver for Macintosh®. You can use this Macintosh® TWAIN Scanner driver with any applications that support the TWAIN specifications. Mac OS X Scanning is supported in Mac OS X 10.2.1 or - Brother International DCP-8025D | Users Manual - English - Page 202
the document. Scanning a whole page 1 Place the original face up in the ADF, or face down on the scanner glass. 2 Adjust the following settings, if needed, in the Scanner Setup dialog box: Resolution Color Type Scanning Area Brightness Contrast 3 Click Start. When scanning has finished, the image - Brother International DCP-8025D | Users Manual - English - Page 203
ADF, or face down on the scanner glass. 2 Click PreScan. The whole image will be scanned ® and will appear in the Scanning Area of the Scanner dialog box: 3 To scan a portion of the Type (Gray Scale), Brightness, Contrast, and Size in the Scanner Setup dialog box. 6 Click Start. This time only the - Brother International DCP-8025D | Users Manual - English - Page 204
Settings in the Scanner window Image Resolution From the Resolution pop-up menu choose the scanning resolution. Higher resolutions use more memory and transfer time, but produce a finer scanned image. 11 - 17 USING YOUR DCP WITH A MACINTOSH® - Brother International DCP-8025D | Users Manual - English - Page 205
creates an image with the most accurate colors, the image file will be about three times larger than a file created with 8-bit Color. USING YOUR DCP WITH A MACINTOSH® 11 - 18 - Brother International DCP-8025D | Users Manual - English - Page 206
size. Business Card Size To scan business cards, select the Business Card size (90 × 60 mm) and place the business card at the center of scanner glass. When you are scanning photographs or other images to use in a word processor or other graphics application, it is a good idea to try different - Brother International DCP-8025D | Users Manual - English - Page 207
Adjusting the Image Brightness Adjust the Brightness setting to get the best image. The Brother TWAIN Scanner driver offers 100 Brightness levels (-50 to 50). The default value is 0, representing an ' type a value in the box to set the Contrast. Click OK. USING YOUR DCP WITH A MACINTOSH® 11 - 20 - Brother International DCP-8025D | Users Manual - English - Page 208
software built into Presto! PageManager®. If you use the DCP as a scanner, we recommend that you install Presto! PageManager. To install Presto! PageManager®, see the Quick Setup Guide images. ■ Treeview Window: View and arrange your folder hierarchy for easy access. ■ Thumbnail Window: View files as - Brother International DCP-8025D | Users Manual - English - Page 209
of free disk space Recommended: ■ 8-bit Color or higher video adapter. ■ Eudora Mail, or Outlook Express electronic mail software Technical Support For USA Newsoft America Inc. Postal Address: 4113 Clipper Court Fremont, CA 94538, USA Telephone: 510-4458600 FAX: 510-4458601 E-mail Address - Brother International DCP-8025D | Users Manual - English - Page 210
your PC with the DCP If you need to change the DCP that was registered to your PC during the installation of Brother MFL-Pro Suite (see Quick Setup Guide on page 34), follow the steps below. 1 For Windows® 98/Me/2000 From the Start menu, select Control Panel, Scanners and Cameras, and then - Brother International DCP-8025D | Users Manual - English - Page 211
Right-click Scanner Device icon and select properties to view the Network Scanner Properties dialog box. 2 Click the Network Setting tab in the dialog box and select a method to specify the DCP as a Network scanner for your PC. < NETWORK SCANNING (WINDOWS® 98/98SE/ME/2000 PROFESSIONAL AND XP ONLY) - Brother International DCP-8025D | Users Manual - English - Page 212
your DCP by Name Enter the DCP Node name in the Node Name field. Click Apply and then OK. Search from a list of available device Click Browse and select the appropriate device you want to use. Click OK. Click Apply and then OK. 12 - 3 NETWORK SCANNING (WINDOWS® 98/98SE/ME/2000 PROFESSIONAL AND XP - Brother International DCP-8025D | Users Manual - English - Page 213
in the dialog box and enter your PC Name in the Display Name field. The DCP's LCD displays the Name you enter. Default setting is your PC Name. You can can be scanned and sent to the DCP. (See Using the Scan key on page 12-5 to 12-8.) NETWORK SCANNING (WINDOWS® 98/98SE/ME/2000 PROFESSIONAL AND - Brother International DCP-8025D | Users Manual - English - Page 214
button. You will not be able to initiate a Network scan from the Brother Control Center (SmartUI). You can change the Scan configuration. For Windows® 98/Me/2000: (See Scan to E-mail on page 9-10 to 9-11.) (For Windows® XP: See Hardware Section: Changing the Scan to button configuration on page 10 - Brother International DCP-8025D | Users Manual - English - Page 215
(For Windows® XP: See Hardware Section: Changing the Scan to button configuration on page 10-5 to 10-10.) For Network Scanning the Brother Control a Network scan from the Brother Control Center (SmartUI). 1 Place the original face up in the ADF, or face down on the scanner glass. 2 Press Scan. - Brother International DCP-8025D | Users Manual - English - Page 216
(For Windows® XP: See Hardware Section: Changing the Scan to button configuration on page 10-5 to 10-11.) For Network Scanning the Brother Control a Network scan from the Brother Control Center (SmartUI). 1 Place the original face up in the ADF, or face down on the scanner glass. 2 Press Scan. - Brother International DCP-8025D | Users Manual - English - Page 217
Brother SmartUI on the designated PC. You can change the Scan configuration. (For Windows® 98/Me/2000: See Scan to File on page 9-8 to 9-9.) (For Windows® XP Network scan from the Brother Control Center (SmartUI). 1 Place the original face up in the ADF, or face down on the scanner glass. 2 Press - Brother International DCP-8025D | Users Manual - English - Page 218
Brother International Corporation 100 Somerset Corporate Boulevard Bridgewater, NJ 08807-0911 USA TEL: (908) 704-1700 declares, that the products Product Name: DCP-8020, DCP-8025D comply with Part installed and used in accordance with the instructions, may cause harmful interference to radio - Brother International DCP-8025D | Users Manual - English - Page 219
AC outlet after checking the rating of the local power supply for the DCP to operate properly and safely. ■ For protection against the risk of electrical outlet before servicing, modifying or installing the equipment. Important Changes or modifications not expressly approved by Brother Industries, Ltd - Brother International DCP-8025D | Users Manual - English - Page 220
. The Scanner Unit should not be opened under any circumstances. International ENERGY STAR® Compliance Statement The purpose of the International ENERGY STAR® Program is to promote the development and popularization of energy-efficient office equipment. As an ENERGY STAR® Partner, Brother Industries - Brother International DCP-8025D | Users Manual - English - Page 221
product under the U.S. Department of Health and Human Services (DHHS) Radiation Performance Standard according to the Radiation DCP indicates compliance with the FDA regulations and must be attached to laser products marketed in the United States. Manufactured: BROTHER CORP. (ASIA) LTD. BROTHER - Brother International DCP-8025D | Users Manual - English - Page 222
Changes or modifications not expressly approved by Brother Industries, Ltd. may void the user's authority to operate the equipment. Internal laser radiation Max. Radiation Power Wave Length Laser Class 5 mW 760 - 810 nm Class IIIb (Accordance with 21 CFR Part 1040.10) 13 - 5 IMPORTANT INFORMATION - Brother International DCP-8025D | Users Manual - English - Page 223
reference. 3 Follow all warnings and instructions marked on the product. 4 Before cleaning, turn off the DCP's power switch and unplug the power your dealer or local power company. Use only the power cord supplied with this DCP. 9 This product is equipped with a 3-wire grounded plug, a plug having a - Brother International DCP-8025D | Users Manual - English - Page 224
servicing to a Brother Authorized Service Center under the following conditions: ■ When the power cord is damaged or frayed. ■ If liquid has been spilled into the product. ■ If the product has been exposed to rain or water. ■ If the product does not operate normally when the operating instructions - Brother International DCP-8025D | Users Manual - English - Page 225
of NewSoft Technology Corporation. Each company whose software title is mentioned in this manual has a Software License Agreement specific to its proprietary programs. All other brand and product names mentioned in this User's Guide are registered trademarks of their respective companies. IMPORTANT - Brother International DCP-8025D | Users Manual - English - Page 226
. You can correct most problems by yourself. If you need additional help, call the Brother fax back system (USA only). In USA only: 1-800-521-2846 ERROR MESSAGES ERROR MESSAGE CAUSE Change Drum Soon The drum unit is near the end of its life. The drum counter was not reset. Check Original The - Brother International DCP-8025D | Users Manual - English - Page 227
close the jam clear cover. (See Paper jams on page 14-5.) Machine Error DCP has a mechanical problem. XX Call Brother Customer Service and tell them the Machine Error number. In USA: 1-800-284-4329 In Canada: 1-877-BROTHER In Montreal: (514) 685-6464 No DX Tray You tried to make duplex printing - Brother International DCP-8025D | Users Manual - English - Page 228
cover. If the error message remains, open and close the front cover again. If the DCP cannot reset itself and return to the copy setting prompt, it will display Machine Error XX. Please call Brother Customer Service and tell them the Machine Error number: In USA: 1-800-284-4329 In Canada: 1-877 - Brother International DCP-8025D | Users Manual - English - Page 229
where the original is jammed, follow the appropriate set of instructions to remove it. Original is jammed in the top of . 5 Press Stop/Exit. -OR- 1 Take the ADF support out of the ADF unit. 2 Pull the jammed original out to the right. 3 Press Stop/Exit. TROUBLESHOOTING AND ROUTINE MAINTENANCE 14 - 4 - Brother International DCP-8025D | Users Manual - English - Page 230
have just used the DCP, some parts inside the DCP are extremely hot. When you open the front cover or back output tray of the DCP, never touch the shaded parts shown in the following from feeding through the DCP at one time and reduces paper jams. 14 - 5 TROUBLESHOOTING AND ROUTINE MAINTENANCE - Brother International DCP-8025D | Users Manual - English - Page 231
the front cover. 4 Pull out the drum unit assembly. Pull the jammed paper up and out of the DCP. If you cannot remove the drum unit assembly easily at this time, do not use extra force. Instead, pull the edge of the jammed paper from the paper tray. TROUBLESHOOTING AND ROUTINE MAINTENANCE 14 - 6 - Brother International DCP-8025D | Users Manual - English - Page 232
WARNING To prevent damage to the DCP caused by static electricity, do not touch the of the DCP, the fuser may get dirty with toner powder and it may scatter on the next printouts. Print a few copies of the test page until the scattering of toner stops. 14 - 7 TROUBLESHOOTING AND ROUTINE MAINTENANCE - Brother International DCP-8025D | Users Manual - English - Page 233
some internal parts of the DCP are extremely HOT! Wait for the DCP to cool down before you touch the internal parts of the DCP. HOT! Back view 6 Open the jam clear cover. Pull the jammed paper out of the fuser unit. 7 Close the jam clear cover. Close the back output tray. TROUBLESHOOTING AND ROUTINE - Brother International DCP-8025D | Users Manual - English - Page 234
in the drum unit. 9 Put the drum unit assembly back in the DCP. 10 Put the paper tray in the DCP. 11 Close the front cover. Paper is jammed in the duplex tray (For DCP-8025D) 1 Pull the duplex tray and paper tray out of the DCP. 2 Pull the jammed paper out of the DCP. 14 - 9 TROUBLESHOOTING AND - Brother International DCP-8025D | Users Manual - English - Page 235
3 Put the duplex tray and paper tray back into the DCP. ■ The Jam Duplex message appears if you remove a sheet of paper from the Face Down Output on the page. (See To use Automatic Duplexing for copy and print operations (For DCP-8025D) on page 2-11.) TROUBLESHOOTING AND ROUTINE MAINTENANCE 14 - 10 - Brother International DCP-8025D | Users Manual - English - Page 236
corona wire (see Cleaning the drum unit on page 14-23). If the problem continues, call Brother Customer Service at 1-800-284-4329 (In USA), 1-877-BROTHER (In Canada) or (514) 685-6464 (In Montreal). Sometimes you may see vertical streaks on your copies. Either the scanner or the primary corona wire - Brother International DCP-8025D | Users Manual - English - Page 237
in the application and in the printer driver are the same. Try to reduce the print resolution. If you are using Windows® 95/98/98SE/Me, select 'Printer Settings' from the 'Start' menu. Select the properties of the 'Brother DCP-8020 or DCP-8025D (USB) Printer'. Click 'Spool Setting' on the 'Details - Brother International DCP-8025D | Users Manual - English - Page 238
on page 4-1 and Media Type on page 7-4.) Printouts are too light. Set Toner Save mode to off in the Advance tab in the printer driver. (See Toner Save Mode on page 7-6.) Network Difficulties I cannot print over the Network Make sure that your DCP is powered on and is On Line and in Ready mode - Brother International DCP-8025D | Users Manual - English - Page 239
Toner Save mode in the printer Properties tab of the driver. -OR- If your DCP is not connected to a computer, turn off Toner Save mode in the DCP itself. (See Toner Save on page 4-4.) Try installing a new toner cartridge. (See Replacing the toner cartridge on page 14-24.) Try installing a new drum - Brother International DCP-8025D | Users Manual - English - Page 240
on the surface comes off. Caution Do not try to clean the surface of the photosensitive drum with a sharp object, such as a ball-point pen, and so on. The drum unit may be damaged. Put in a new drum unit. (See Replacing the drum unit on page 14-30.) 14 - 15 TROUBLESHOOTING AND ROUTINE MAINTENANCE - Brother International DCP-8025D | Users Manual - English - Page 241
a torn piece of paper is not inside the printer covering the scanner window. The fixing unit may be smudged. Call Customer Service. You may clear the problem by wiping the scanner window with a soft cloth. (See Cleaning the printer on page 14-22.) The toner cartridge may be damaged. Put in a new - Brother International DCP-8025D | Users Manual - English - Page 242
temperatures and high humidity will cause paper to curl. If you don't use the printer very often, the paper may have been in the paper tray too long. Turn input tray. The drum unit is a consumable item and it is necessary to replace it periodically. 14 - 17 TROUBLESHOOTING AND ROUTINE MAINTENANCE - Brother International DCP-8025D | Users Manual - English - Page 243
Lock Lever up to lock the scanner. This lever is located on the left of the scanner glass. Scanner Lock Lever Caution Damage caused to your DCP by failure to lock the scanner before moving and shipping may void your warranty. 4 Open the front cover. TROUBLESHOOTING AND ROUTINE MAINTENANCE 14 - 18 - Brother International DCP-8025D | Users Manual - English - Page 244
drum unit. 6 Place the drum unit and toner cartridge assembly into the plastic bag and seal the bag. 7 Close the front cover. Fold down the face-down output tray flap. 8 Wrap the DCP in the plastic bag and place it in the original carton with the original packing material. 14 - 19 TROUBLESHOOTING - Brother International DCP-8025D | Users Manual - English - Page 245
9 Pack the drum unit and toner cartridge assembly, AC cord and printed materials in the original carton as shown below: If you are returning the DCP to Brother as part of the Exchange Service, pack only the DCP. Keep all separate parts to use with your 'Exchange' machine. 10 Close the carton and - Brother International DCP-8025D | Users Manual - English - Page 246
a lint free cloth. White Film Glass strip Document Cover White film If the screen still displays a scanner error, call Brother Customer Service for assistance at 1-800-284-4329 (in USA), 1-877-BROTHER (in Canada), or (514) 685-6464 (in Montreal). 14 - 21 TROUBLESHOOTING AND ROUTINE MAINTENANCE - Brother International DCP-8025D | Users Manual - English - Page 247
the drum unit and toner cartridge assembly. WARNING Just after you have used the DCP, some internal parts of the machine are extremely HOT! When you open the front cover of the DCP, never touch the shaded parts shown in the diagram below. HOT! Front view 3 Gently clean the scanner window by wiping - Brother International DCP-8025D | Users Manual - English - Page 248
If the blue tab is not at Home position (▼), printed pages may have vertical stripes. 3 Reinstall the drum unit and toner cartridge assembly into the DCP. (See Replacing the drum unit on page 14-30.) 4 Close the front cover. 5 Plug in the power cord. 14 - 23 TROUBLESHOOTING AND ROUTINE MAINTENANCE - Brother International DCP-8025D | Users Manual - English - Page 249
domestic waste. Be sure to seal the toner cartridge tightly so toner powder does not spill out of the cartridge. If you have questions, call your local waste disposal office. We recommend that you clean the DCP when you replace the toner cartridge. TROUBLESHOOTING AND ROUTINE MAINTENANCE 14 - 24 - Brother International DCP-8025D | Users Manual - English - Page 250
How to replace the toner cartridge WARNING Just after you use the DCP, some internal parts of the machine will be extremely HOT! So, never touch the shaded parts shown in the illustration. HOT! 1 Open the front cover and pull out the drum unit. 14 - 25 TROUBLESHOOTING AND ROUTINE MAINTENANCE - Brother International DCP-8025D | Users Manual - English - Page 251
below. 2 Hold down the lock lever on the right and pull the toner cartridge out of the drum unit. Lock Lever Caution Handle the toner cartridge carefully. If toner scatters on your hands or clothes, immediately wipe it off or wash it with cold water. TROUBLESHOOTING AND ROUTINE MAINTENANCE 14 - 26 - Brother International DCP-8025D | Users Manual - English - Page 252
not apply to any problem that was caused by the use of unauthorized third party toner and toner cartridges. To protect your investment and guarantee your print quality please continue to replace consumed toner cartridges with only Genuine Brother Branded Supplies. 14 - 27 TROUBLESHOOTING AND ROUTINE - Brother International DCP-8025D | Users Manual - English - Page 253
times to distribute the toner evenly inside the cartridge. 5 Remove the protective cover. 6 Insert the new toner cartridge in the drum unit until it clicks into place. If you put it in properly, the lock lever will lift automatically. Drum Unit Toner Cartridge TROUBLESHOOTING AND ROUTINE MAINTENANCE - Brother International DCP-8025D | Users Manual - English - Page 254
to left several times. Return the blue tab to the Home position (▼) before reinstalling the drum unit and toner cartridge assembly. Home Position(▼) Tab Corona Wire 8 Reinstall the drum unit and toner cartridge assembly and close the front cover. 14 - 29 TROUBLESHOOTING AND ROUTINE MAINTENANCE - Brother International DCP-8025D | Users Manual - English - Page 255
unit should be replaced. You should clean the DCP when you replace the drum unit. (See Cleaning the drum unit on page 14-23.) Caution When removing the drum unit, handle it carefully because it contains toner. If toner scatters and your hands or clothes get dirty, immediately wipe or wash with cold - Brother International DCP-8025D | Users Manual - English - Page 256
Just after you have used the DCP, some internal parts of the DCP are extremely HOT! So please be careful. HOT! Follow these steps to replace the drum unit: 1 Press the cover release button and then open the front cover. 2 Remove the old drum unit and toner cartridge assembly. Place it on a drop - Brother International DCP-8025D | Users Manual - English - Page 257
Lever Discard the used drum unit according to local regulations, keeping it separate from domestic waste. Be sure to seal the drum unit tightly so toner powder does not spill out of the unit. If you have questions, call your local waste disposal office. TROUBLESHOOTING AND ROUTINE MAINTENANCE 14 - Brother International DCP-8025D | Users Manual - English - Page 258
. 7 Press Clear/Back. 8 Press 1 and when the LCD shows Accepted, and close the front cover. Replace Drum ▲ 1.Yes ▼ 2.No Caution Select ▲▼ & Set If toner scatters and your hands or clothes get dirty, immediately wipe off or wash with cold water. 14 - 33 TROUBLESHOOTING AND ROUTINE MAINTENANCE - Brother International DCP-8025D | Users Manual - English - Page 259
is 0%, you may continue to use the drum unit until you have a print quality problem. Page Counter You can see number of total pages, copy pages, print pages and List (total list print) pages that your DCP has printed. 1 (DCP-8020) Press Menu, 1, 7. (DCP-8025D) Press Menu, 1, 8. 18.Page Counter - Brother International DCP-8025D | Users Manual - English - Page 260
DCP. When you add the optional memory board, it increases the performance for printer operations. Model Name DCP-8020 (32 MB Standard Memory) DCP-8025D Some DIMMs might not work with this DCP. For the latest information from Brother visit: http://solutions.brother.com 15 - 1 OPTIONAL ACCESSORIES - Brother International DCP-8025D | Users Manual - English - Page 261
of the main board within 15 minutes after turning off the power. 1 Turn the DCP power switch off, unplug the DCP power cord from the AC outlet, and then disconnect the interface cable. WARNING Turn the DCP power switch off, before installing (or removing) the memory board. 2 Remove the side cover - Brother International DCP-8025D | Users Manual - English - Page 262
wrist strap when you install or remove the board. If you do not have an antistatic wrist strap, frequently touch the bare metal on the printer. 4 Hold the DIMM with your fingers on the side edges and your thumb on the back edge. Line up the notches on the DIMM with - Brother International DCP-8025D | Users Manual - English - Page 263
in the driver and check the printout to make sure it shows the additional memory. ■ You can check the current memory size in the user settings list. (See the NC-9100h Network User's Guide on the CD-ROM.) WARNING If the Status LED turns Red for a Service Error, please coll Brother Custome Service at - Brother International DCP-8025D | Users Manual - English - Page 264
Scanner, Network Printer and Network Management operations. WARNING DO NOT touch the surface of the main board within 15 minutes after turning off the power. For more details about how to configure the Network board, please see the NC-9100h Network User's Guide on the CD-ROM supplied with the DCP - Brother International DCP-8025D | Users Manual - English - Page 265
: Phillips Screwdriver Step 1: Hardware installation WARNING DO NOT touch the surface of the main boards within 15 minutes after turning off the power. 1 Turn the DCP power switch off, unplug the DCP power cord from the AC outlet, and then disconnect the interface cable. OPTIONAL ACCESSORIES 15 - 6 - Brother International DCP-8025D | Users Manual - English - Page 266
WARNING Turn the DCP power switch off, before installing (or removing) the NC-9100h board. 2 Remove the side cover. Loosen the two screws, and then remove the metal shield plate. 3 Loosen the two screws, and then remove the metal cover plate. Cover Plate 15 - 7 OPTIONAL ACCESSORIES - Brother International DCP-8025D | Users Manual - English - Page 267
two screws. 6 Put the side cover back on. 7 Reconnect any additional interface cables that you removed. 8 Reconnect the power cable and then turn on the DCP power switch. 9 Press the Test switch and print a network configuration page. (See TEST SWITCH on page 15-10.) OPTIONAL ACCESSORIES 15 - 8 - Brother International DCP-8025D | Users Manual - English - Page 268
) of the NC-9100h. Verifying successful hardware Installation: Plug in the AC power cord. After initialization and warm-up (this may take several seconds), the DCP will come to a Ready state. LED No light: If both of the two LEDs are off, then the print server is not connected to the - Brother International DCP-8025D | Users Manual - English - Page 269
Short push: Prints the network configuration page. Long push (more than 5 seconds): Reset the network configuration back to the default settings. Test Switch LED Ethernet RJ-45 LED To set up the DCP on the Network, see the NC-9100h Network User's Guide on the CD-ROM. OPTIONAL ACCESSORIES 15 - 10 - Brother International DCP-8025D | Users Manual - English - Page 270
Paper Tray #2 You can purchase the Paper Tray #2 accessory (LT-5000) to use as a third paper source. Tray #2 holds up to 250 sheets of 20 lb (80 g/m2) paper. Paper Tray #2: Basis Weight: Moisture Content: We Recommend: Cut sheet: Holds approx. 250 sheets of 20 lb (80 g/m2) Letter/A4 paper 16 to 28 - Brother International DCP-8025D | Users Manual - English - Page 271
On-Screen Programming. Menu mode Programming mode for changing your DCP's settings. MFL-Pro Suite Turns your DCP into a printer and a scanner using the DCP. OCR (optical character recognition) The bundled ScanSoft® TextBridge® software application converts an image of text to text you can edit - Brother International DCP-8025D | Users Manual - English - Page 272
Product description The DCP-8020, DCP-8025D are 3 in 1 Multi-Function Centers: Printer, Copier and Color Scanner. The DCP-8025D includes Duplex Printing. General Memory Capacity Optional Memory Automatic Document Feeder (ADF) Paper Tray Manual Feed Tray Multi-Purpose Tray Printer Type Print Method - Brother International DCP-8025D | Users Manual - English - Page 273
Without Drum/Toner Unit: DCP-8020: 36.6 lb/16.6 kg DCP-8025D: Plain paper, recycled paper and transparencies, envelopes (Manual Feed/Multi-purpose Tray) ■ Paper size: Approx. 50 sheets of 20 lb (80 g/m2) plain paper (DCP-8025D only) Manual Feed Tray/Multi-Purpose Tray ■ Paper size: Width: 2.75 - - Brother International DCP-8025D | Users Manual - English - Page 274
Windows NT® Workstation Version 4.0) Mac OS 8.6-9.2/OS X 10.2.1 or greater Yes (Windows® XP) Up to 9,600 × 9,600 dpi (interpolated)* Up to 600 × 2,400 dpi (optical) * Maximum 1200 x 1200 dpi scanning with Windows® XP (resolution up to 9600 x 9600 dpi can be selected by using the Brother scanner - Brother International DCP-8025D | Users Manual - English - Page 275
Printer Driver Resolution Print Quality Print Speed Duplex Printing First Print PCL6 (Brother Printing System for Windows® emulation mode of HP LaserJet) and BR-Script (PostScript®) Level 3 Windows® 95/98/98SE/Me/2000 Professional/XP and Windows NT® Workstation Version 4.0 driver supporting Brother - Brother International DCP-8025D | Users Manual - English - Page 276
MB NOTE: USB is not supported under Windows® 95 or Windows NT® WS 4.0. All registered trademarks referenced herein are the property of their respective companies. For the latest drivers, access the Brother Solutions Center at http://solutions.brother.com/ *1 Application Software is different for - Brother International DCP-8025D | Users Manual - English - Page 277
will vary depending upon the type of average print job. Drum Unit Life Expectancy DR-500: Up to 20,000 pages/drum unit There are many factors that determine the actual drum life, such as temperature, humidity, type of paper, toner you use and number of pages per print job. SPECIFICATIONS - Brother International DCP-8025D | Users Manual - English - Page 278
) DCP-8020 (Option) DCP-8025D (Option) When you add the optional Network (LAN) Board (NC-9100h), you can connect your DCP into the network to use the Network Scanner, Network Printer and Network Management software operations for small workgroups. Support for: Windows® 95/98/Me/NT® 4.0/2000/XP - Brother International DCP-8025D | Users Manual - English - Page 279
and supplies ......ii Brother numbers i Customer Service i fax back system ii frequently asked questions (FAQs i product support i warranties iii, iv, vii Brother Control Center using and configuring ....... 9-1 C cleaning (routine maintenance) drum unit 14-23 printer 14-22 scanner 14-21 - Brother International DCP-8025D | Users Manual - English - Page 280
print area 5-1 canceling jobs 6-16 difficulties 14-11 drivers 7-1, 7-17 Duplex (two-sided 6-3 emulation Windows 6-1, 7-17 Emulation Selection ....... 6-17 envelopes 6-11 improving the print quality 14-14 jams 14-5 jobs 6-16 manual feed tray 6-5 media 2-1, S-2 multi-purpose tray 6-6 on - Brother International DCP-8025D | Users Manual - English - Page 281
shipping the DCP 14-18 Sleep Time 4-5 software Brother Control Center ....... 9-1 ScanSoft® Paper Port® .... 8-19 specifications, general ........S-1 T temporary copy settings ......5-5 toner cartridge replacing 14-24, 14-25 save toner 4-4 Tray Use, setting copy 4-6 troubleshooting 14-1 error - Brother International DCP-8025D | Users Manual - English - Page 282
, CANADA H9B 3H6 Visit us on the World Wide Web http://www.brother.com These machines are made for use in the USA and Canada only. We cannot recommend using them overseas because the power requirements of your Digital Copier/Printer may not be compatible with the power available in foreign countries
-
 1
1 -
 2
2 -
 3
3 -
 4
4 -
 5
5 -
 6
6 -
 7
7 -
8
-
9
-
10
-
11
-
12
-
13
-
14
-
15
-
16
-
17
-
18
-
19
-
20
-
21
-
22
-
23
-
24
-
25
-
26
-
27
-
28
-
29
-
30
-
31
-
32
-
33
-
34
-
35
-
36
-
37
-
38
-
39
-
40
-
41
-
42
-
43
-
44
-
45
-
46
-
47
-
48
-
49
-
50
-
51
-
52
-
53
-
54
-
55
-
56
-
57
-
58
-
59
-
60
-
61
-
62
-
63
-
64
-
65
-
66
-
67
-
68
-
69
-
70
-
71
-
72
-
73
-
74
-
75
-
76
-
77
-
78
-
79
-
80
-
81
-
82
-
83
-
84
-
85
-
86
-
87
-
88
-
89
-
90
-
91
-
92
-
93
-
94
-
95
-
96
-
97
-
98
-
99
-
100
-
101
-
102
-
103
-
104
-
105
-
106
-
107
-
108
-
109
-
110
-
111
-
112
-
113
-
114
-
115
-
116
-
117
-
118
-
119
-
120
-
121
-
122
-
123
-
124
-
125
-
126
-
127
-
128
-
129
-
130
-
131
-
132
-
133
-
134
-
135
-
136
-
137
-
138
-
139
-
140
-
141
-
142
-
143
-
144
-
145
-
146
-
147
-
148
-
149
-
150
-
151
-
152
-
153
-
154
-
155
-
156
-
157
-
158
-
159
-
160
-
161
-
162
-
163
-
164
-
165
-
166
-
167
-
168
-
169
-
170
-
171
-
172
-
173
-
174
-
175
-
176
-
177
-
178
-
179
-
180
-
181
-
182
-
183
-
184
-
185
-
186
-
187
-
188
-
189
-
190
-
191
-
192
-
193
-
194
-
195
-
196
-
197
-
198
-
199
-
200
-
201
-
202
-
203
-
204
-
205
-
206
-
207
-
208
-
209
-
210
-
211
-
212
-
213
-
214
-
215
-
216
-
217
-
218
-
219
-
220
-
221
-
222
-
223
-
224
-
225
-
226
-
227
-
228
-
229
-
230
-
231
-
232
-
233
-
234
-
235
-
236
-
237
-
238
-
239
-
240
-
241
-
242
-
243
-
244
-
245
-
246
-
247
-
248
-
249
-
250
-
251
-
252
-
253
-
254
-
255
-
256
-
257
-
258
-
259
-
260
-
261
-
262
-
263
-
264
-
265
-
266
-
267
-
268
-
269
-
270
-
271
-
272
-
273
-
274
-
275
-
276
-
277
-
278
-
279
-
280
-
281
-
282
 |
 |

USER’S GUIDE
¨
DCP-
8025
D
DCP-
8020