Brother International Entrepreneur PR650e Users Manual - English
Brother International Entrepreneur PR650e Manual
 |
View all Brother International Entrepreneur PR650e manuals
Add to My Manuals
Save this manual to your list of manuals |
Brother International Entrepreneur PR650e manual content summary:
- Brother International Entrepreneur PR650e | Users Manual - English - Page 1
Embroidery Machine Operation Manual Product Code: 884-T07 - Brother International Entrepreneur PR650e | Users Manual - English - Page 2
1998-2007 Datalight, Inc. U.S.Patent Office 5,860,082/6,260,156 FlashFX® Pro™ is a trademark of Datalight, Inc. Datalight® is a registered trademark of including, but not limited to, procurement of substitute goods or services; loss of use, data, or profits; or business interruption) however caused - Brother International Entrepreneur PR650e | Users Manual - English - Page 3
Introduction Thank you for purchasing this embroidery machine. Before using this machine, carefully read the "IMPORTANT SAFETY INSTRUCTIONS", and then study this manual for the correct operation of the various functions. In addition, after you have finished reading this manual, store it where it can - Brother International Entrepreneur PR650e | Users Manual - English - Page 4
being sewn may ignite, resulting in fire or an electric shock. • Do not use this machine near an open flame; the movement of the embroidery frame could cause the garment being sewn to catch fire. • Do not place this machine on an unstable surface, such as an unsteady or slanted table, otherwise the - Brother International Entrepreneur PR650e | Users Manual - English - Page 5
, first follow the troubleshooting table in the back of the operation manual to inspect and adjust the machine yourself. If the problem persists, please consult your local authorized Brother dealer. Use this machine only for its intended use as described in the manual. Use accessories recommended by - Brother International Entrepreneur PR650e | Users Manual - English - Page 6
a fuse approved by ASTA to BS 1362, i.e. carrying the mark, rating as marked on plug. • Always replace the fuse cover. Never use plugs with the fuse cover omitted. • If the available electrical outlet is not suitable for the plug supplied with this equipment, you should contact your - Brother International Entrepreneur PR650e | Users Manual - English - Page 7
: (908) 704-1700 declares that the product Product Name: Brother Embroidery Machine Model Number: PR650e complies with Part 15 of the FCC Rules. Operation is subject generates, uses, and can radiate radio frequency energy and, if not installed and used in accordance with the instructions, may cause - Brother International Entrepreneur PR650e | Users Manual - English - Page 8
BROTHER retains ownership of all rights to CONTENT and to the copies of the CONTENT included in this package. The CONTENT are licensed (not sold) to you ("CUSTOMER") under the terms and conditions of this Agreement. CUSTOMER is licensed to: • Use the CONTENT in combination with an embroidery machine - Brother International Entrepreneur PR650e | Users Manual - English - Page 9
Warning Labels The following warning labels are on the machine. Be sure to observe the precautions described in the labels. 1 2 Label locations Please put a drop of oil onto the hook once a day before use. Warning Labels 7 - Brother International Entrepreneur PR650e | Users Manual - English - Page 10
are listed on the screen. Thread the needle bars as indicated. 1 1 Needle bar 1 2 Needle 1 3 Needle bar case The machine automatically assigns a thread color to each needle. If a needle is already threaded by a color that will be used on the next pattern the machine will assign the color to that - Brother International Entrepreneur PR650e | Users Manual - English - Page 11
instructions appear on the LCD. Differences with single-needle machines ■ Can sew embroidery patterns using six or less colors without the need to replace the thread spools With single-needle machines is hooped and the embroidery frame is attached to the machine, regardless of how the fabric is positioned - Brother International Entrepreneur PR650e | Users Manual - English - Page 12
you have. In addition, the embroidery pattern can be displayed as it would appear after it is embroidered. ■ Automatic needle-threading mechanism Using the automatic needle-threading mechanism, the needle can easily be threaded. The machine is locked. The machine can be started. ■ Wide selection - Brother International Entrepreneur PR650e | Users Manual - English - Page 13
on caps. ■ Various built-in patterns In addition to the many built-in character patterns, embroidery patterns and frame patterns, using optional embroidery cards greatly expands this machine's pattern library. If the machine is positioned at a distance that the USB cable does not reach the computer - Brother International Entrepreneur PR650e | Users Manual - English - Page 14
Manual Structure This manual is constructed as described below. Read before use Chapter 1: Getting Ready The setup of the embroidery machine and the various preparations required before starting to sew are described in this chapter. Chapter 2: Embroidering Tutorial This chapter describes the - Brother International Entrepreneur PR650e | Users Manual - English - Page 15
...1 IMPORTANT SAFETY INSTRUCTIONS 1 License Agreement ...6 Warning Labels...7 Machine Structure and Features 8 Six-needle machine embroidering ...8 Differences with single-needle machines ...9 Other features ...10 Available features ...11 Manual Structure...12 Read before use ...12 Read when - Brother International Entrepreneur PR650e | Users Manual - English - Page 16
...80 OTHER BASIC PROCEDURES 85 Changing the Needle ...86 Replacing the needle...86 Correctly Using the Embroidery Frames 88 Embroidery frame types and applications ...88 Attaching Iron-On Stabilizer (Backing) to Fabric 90 Hooping the Fabric...91 Hooping the fabric in the extra-large and large - Brother International Entrepreneur PR650e | Users Manual - English - Page 17
the machine at the next color change 128 Specifying pause locations before embroidering 128 Temporary Needle Bar Setting 130 Uninterrupted embroidering (using a single color 131 Reserved Needle Bar Settings 132 SELECTING/EDITING/SAVING PATTERNS 135 Precautions...136 Concerning embroidery - Brother International Entrepreneur PR650e | Users Manual - English - Page 18
data ...220 Creating Beautiful Embroidery 221 Threads ...221 Stabilizers (backing) ...221 Hooping techniques...222 Fabric/stabilizer compatibility chart ...223 OPTIONAL ACCESSORIES 224 Attaching an optional embroidery frame for industrial embroidery machines 224 Using the Optional Cap Frame - Brother International Entrepreneur PR650e | Users Manual - English - Page 19
...251 Troubleshooting ...252 On-screen troubleshooting ...252 Troubleshooting...253 Error messages ...261 If the machine does not respond when a key is pressed 269 Specifications ...270 Embroidery machine specifications...270 Upgrading Your Machine's Software 271 Upgrade procedure using USB - Brother International Entrepreneur PR650e | Users Manual - English - Page 20
18 - Brother International Entrepreneur PR650e | Users Manual - English - Page 21
22 Optional accessories 23 Setting Up the Machine 24 Setup and transporting precautions 24 Setup location...25 Setting up the machine 26 Adjusting the operation panel position 27 Preparing the thread guide assembly 28 Positioning the spool stand 29 Attaching the embroidery frame holder 29 - Brother International Entrepreneur PR650e | Users Manual - English - Page 22
bar case Moves to the left and right to move the needle to the embroidering position. 3 Lower thread guide 4 Carriage Attach the embroidery frame to the carriage. When the machine is turned on or when the machine is embroidering, the carriage moves forward, backward, left and right. 5 Hook cover - Brother International Entrepreneur PR650e | Users Manual - English - Page 23
In order to import/export patterns between a computer and the machine, plug the USB cable into the USB port. 4 Touch pen holder Use the touch pen holder to hold the touch pen when not in use. 5 Handwheel Rotate the handwheel to move the needle up and down. Be sure to rotate the handwheel toward - Brother International Entrepreneur PR650e | Users Manual - English - Page 24
included with this machine. Make sure to use the accessories designed for this machine. Included accessories After XC5759-051 Embroidery sheet (small) 40 mm 28 (H) × 60 mm (W) (1-1/2 inches (H) × 2-3/8 inches (W)) XC5761-051 29 Operation manual This manual 30 Quick reference guide XE9983-001 - Brother International Entrepreneur PR650e | Users Manual - English - Page 25
are not compatible with this embroidery machine. ● Visit your nearest authorized dealer for a complete listing of optional accessories and embroidery cards available for your machine. 9. 10. 11. 12. Memo ● Always use accessories recommended for this machine. ● All specifications are correct at - Brother International Entrepreneur PR650e | Users Manual - English - Page 26
use the machine in a location where it will be exposed to direct sunlight, otherwise the machine may malfunction. ● Set up the machine with it's four adjustable feet completely in contact with the desk or table, so that the machine is level. ● Do not put anything under the embroidery machine that - Brother International Entrepreneur PR650e | Users Manual - English - Page 27
• Place no objects within the moving range of the embroidery frame 1 • Set-up machine near an electrical outlet • Use a level and stable surface, such as a desk • Use a surface that can support the weight of the machine (about 37 kg (81 lb)) • Allow open space around the ventilation slots - Brother International Entrepreneur PR650e | Users Manual - English - Page 28
so that they securely contact the desk or table. After adjusting the legs to the desired length, 5 use the included wrench to tighten the nuts. 1 Lock nut Press down on each corner of the 6 embroidery machine to check that it is stable. If it is still unstable, perform steps 3 through 5 again to - Brother International Entrepreneur PR650e | Users Manual - English - Page 29
operation panel, adjust the operation panel to an easy-to-view angle, and then tighten the thumb screws. (Side view) 1 Thumb screws (Top view) Note ● Using the disc-shaped screwdriver included, loosen and firmly tighten the five thumb screws. Setting Up the - Brother International Entrepreneur PR650e | Users Manual - English - Page 30
screws on the left and right sides of the thread guide assembly and lift up the thread guide so that it is level. Using the Phillips screwdriver, loosen the 1 screws on the left side of the thread guide assembly support so that the thread guide assembly can be raised. Remove screw 1, and then turn - Brother International Entrepreneur PR650e | Users Manual - English - Page 31
Attaching the embroidery frame holder Attach the embroidery frame holder to the carriage. 1 Remove the two thumb screws of the 1 embroidery frame holder. 2 tighten the thumb screw. 1 Thumb screws Align the holes in the embroidery frame 2 holder with the pins on the frame-mounting plate of the - Brother International Entrepreneur PR650e | Users Manual - English - Page 32
GETTING READY Secure the embroidery frame holder with 3 the two thumb screws removed in step 1. 1 Thumb screws Note ● Using the disc-shaped screwdriver included, firmly tighten the thumb screws. This completes the preparation of the machine. 30 - Brother International Entrepreneur PR650e | Users Manual - English - Page 33
...35 Screen Quick Reference Guide 70 When You Have a Question, This May Help You 79 Installing the Bobbin 1 Turning ON the Machine 2 Selecting an Embroidery Pattern 3 Editing the Embroidery Pattern 4 Specifying Embroidering Setting 5 Previewing the Image 6 Hooping the Fabric in the - Brother International Entrepreneur PR650e | Users Manual - English - Page 34
embroidery machine and unplug the power supply cord, otherwise a fire, an electric shock or damage to the machine may result. • When you are away from the machine. • After using the machine. • If a power outage occurs while the machine servicing the machine or when removing covers, the machine must - Brother International Entrepreneur PR650e | Users Manual - English - Page 35
the correct choice of needle for your machine. CAUTION ● Your machine is designed to use household embroidery needles. The factory recommended needle is "HAX 130 EBBR" (Organ). Schmetz needles 130/705 H-E may be used as a substitute. Use of any other needles may break the needle or thread or - Brother International Entrepreneur PR650e | Users Manual - English - Page 36
touch pen. Do not use a mechanical pencil, screwdriver or any other hard or sharp object. In addition, do not apply extreme pressure to the display screen, otherwise damage to the display screen may result. • The display may be dark immediately after the embroidery machine is turned on. This - Brother International Entrepreneur PR650e | Users Manual - English - Page 37
Hoop the fabric in the embroidery frame. p. 47 p. 34 8 Attach the embroidery frame to the machine. p. 49 9 Check the embroidery area. p. 51 10 Thread the upper threads. p. 53 p.34 Unlock the machine in the tables on pages 70 to 78. Use these tables for quick reference. The various - Brother International Entrepreneur PR650e | Users Manual - English - Page 38
picker can only be moved within a certain range. Do not pull it with extreme force. 36 Installing the bobbin Memo ● This embroidery machine is not equipped with a bobbin-winder. Use pre-wound (L type) bobbins. ● The optional bobbin winder (stand-alone type) and optional metal bobbins can also be - Brother International Entrepreneur PR650e | Users Manual - English - Page 39
off the bobbin clockwise as shown in the illustration. If the bobbin is installed with the thread winding off in the opposite direction, the embroidery will not be sewn correctly. Pass the thread through the thread slit and 2 under the tension-adjusting spring. 1 Tab 2 Notch Fully insert the bobbin - Brother International Entrepreneur PR650e | Users Manual - English - Page 40
on the embroidery machine. For precautions concerning the power supply, refer to page 32. Plug the power supply cord into the 1 machine. Touch . • If the number 1 needle bar is not already at the embroidering position, the needle bar case moves and the number 1 needle bar moves to the embroidering - Brother International Entrepreneur PR650e | Users Manual - English - Page 41
to move or thread a selected needle bar. key This key is available in any screen. p. 61 6 Settings key Touch this key to change the embroidery machine settings. p. 194 * The keys in the table above appear and can be used in most of the screens described later in this manual. Turning ON the - Brother International Entrepreneur PR650e | Users Manual - English - Page 42
settings screen. In the embroidering settings screen, if it is a combined pattern, edit the entire pattern, specify the embroidering settings and check the embroidery area. (Refer to page 45, 75.) 1 2 1 Touch this key to return to the pattern type selection screen. 2 Touch this key to continue - Brother International Entrepreneur PR650e | Users Manual - English - Page 43
, check the thread colors assigned to the needle bars, and then install the upper threads. Touch to unlock the machine so that the start/stop button starts flashing in green. The embroidery machine is now ready to begin sewing. After the embroidery is sewn, the embroidering settings screen - Brother International Entrepreneur PR650e | Users Manual - English - Page 44
Pattern As an example, we will select the pattern shown at the right, on the last page of the embroidery patterns. In the pattern type selection screen, select a pattern category (type). Pattern type selection screen (For details on the keys and other information on the - Brother International Entrepreneur PR650e | Users Manual - English - Page 45
. 1 2 3 1 • To select a pattern group other than the embroidery patterns, touch 1 Return key The pattern type selection screen appears. 2 Current 4, which can be used to change the pattern size or change the text arrangement of a character. The functions that can be used differ depending on the - Brother International Entrepreneur PR650e | Users Manual - English - Page 46
entire pattern, including all patterns, is shown. 2 Highlights the sizes of embroidery frames that can be used to sew the currently selected embroidery pattern. Memo ● If the embroidery frame holder is not attached to the machine, the embroidering area will not display the correct frame size. (Refer - Brother International Entrepreneur PR650e | Users Manual - English - Page 47
use. Embroidering settings screen (For details on the keys and other information on the screen, refer to page 75.) Memo 1 ● If the embroidery embroidering settings screen, the embroidery frame guide in the pattern display area indicates the size of the installed embroidery frame. 5 Touch these - Brother International Entrepreneur PR650e | Users Manual - English - Page 48
Memo ● A preview image in a landscape orientation cannot be rotated to a portrait orientation, even if there is space at the top and bottom. Memo ● The embroidery can be sewn while the preview image is displayed in the embroidering screen. If the preview image is displayed in any screen other than - Brother International Entrepreneur PR650e | Users Manual - English - Page 49
frames included with this machine. For details on the uses for each frame, refer to "Correctly Using the Embroidery Frames" on page 88. Note ● The embroidery frame indicators show all embroidery frame sizes in which the embroidery pattern can be sewn. Be sure to use an embroidery frame of the most - Brother International Entrepreneur PR650e | Users Manual - English - Page 50
depending on the type of fabric being embroidered. Try various methods to achieve the best embroidering results. (Refer to "Hooping techniques" on page 222.) Memo ● This embroidery machine can also be used with the optional cap frames. (Refer to "Using the Optional Cap Frame" on page 225.) 48 - Brother International Entrepreneur PR650e | Users Manual - English - Page 51
8. Attaching the Embroidery Frame to the Machine After hooping the fabric in the embroidery frame, attach the frame to the embroidery machine. CAUTION ● If the embroidery frame is not correctly attached it may hit the presser foot and damage the machine, or cause injury to the user. ● When - Brother International Entrepreneur PR650e | Users Manual - English - Page 52
frame 4 Mark for embroidery frame for industrial embroidery machines* 5 Mark for small embroidery frame 6 Align the screw with the mark. * When using embroidery frames for industrial embroidery machines, the machine does not recognize the embroidery area of the frame. Be sure to use the trial sewing - Brother International Entrepreneur PR650e | Users Manual - English - Page 53
positioned, it moves to the correct position, and then the embroidering position is indicated. Touch . 1 Temporarily stopping to check the area 2 The embroidery frame can be temporarily stopped at a desired position or the checking of the embroidering area can be stopped. When the - Brother International Entrepreneur PR650e | Users Manual - English - Page 54
EMBROIDERING TUTORIAL Continuing to the embroidering screen After finishing the necessary operations in the embroidering settings screen, continue to the embroidering screen. Touch . 1 X The embroidering screen appears. 52 - Brother International Entrepreneur PR650e | Users Manual - English - Page 55
screen and the message instructing that the needle bars be threaded (that needle bar 4 Thread information for the fourth needle bar 5 Thread information for the fifth needle bar 6 Thread information for the sixth needle bar 7 If no thread color name is displayed, that needle bar has not been used - Brother International Entrepreneur PR650e | Users Manual - English - Page 56
bar to the sewing position. Use when threading the 6 needle with the automatic needle-threading mechanism. 3 4 2 5 CAUTION ● When (unlock key) in the embroidering screen is touched, the start/stop button begins flashing in green and the embroidery machine can start sewing. If the upper - Brother International Entrepreneur PR650e | Users Manual - English - Page 57
break or become tangled, causing the needle to bend or break. 2 Note ● It is recommended that rayon or polyester embroidery thread be used (120 den/2, 135 dtex/2, 40 weight (in Americas and Europe), #50 (in Japan)). Memo ● The path that the embroidery machine should be threaded is indicated by - Brother International Entrepreneur PR650e | Users Manual - English - Page 58
above the spool, and then pass the thread through the number 1 hole in the thread guide toward the front of the machine. • Make sure that the spool stand is opened in the shape of a V. • When using small spools of thread, be sure to place the included spool mat on the spool pin before - Brother International Entrepreneur PR650e | Users Manual - English - Page 59
thread clockwise once around the 5 number 1 thread tension disc. 1 Hole in upper thread guide Pass the thread through the number 1 upper 4 thread guide. Hold the thread with both hands, and then pass it under the guide from the right. 1 Thread tension disc • Make sure that the thread is securely - Brother International Entrepreneur PR650e | Users Manual - English - Page 60
the number 1 slot to 7 pass it through the number 1 take-up lever hole from right to left. 1 Hole in lower thread guide Use the included threader to pass the thread 9 into the number 1 needle bar thread guide. 1 Thread take-up lever 58 1 Needle bar thread guide 2 Needle changing tool (Threader) - Brother International Entrepreneur PR650e | Users Manual - English - Page 61
bar that you want to thread is positioned as the sewing position, otherwise the automatic needle- 2 threading mechanism cannot be used at the particular needle. If the needle bar is not at the sewing position, move it there. (Refer to page 61.) Pull out about 150 mm (6 inches) of thread - Brother International Entrepreneur PR650e | Users Manual - English - Page 62
• The wiper comes out and catches the thread between the needle and the threader. • The threader goes back to the original home position. This completes the upper threading for needle bar 1. Thread the remaining needle bars in the same way. Note : If the needle bar to be threaded is not moved to the - Brother International Entrepreneur PR650e | Users Manual - English - Page 63
to the embroidering position at any time. Press the automatic needle-threading button 3 while the needle bar move screen appears. Touch . 1 2 X The needle bar move screen appears. Touch the key for the needle bar that you 2 wish to move or thread. Touch 4 screen. to return to the previous - Brother International Entrepreneur PR650e | Users Manual - English - Page 64
spool. It may be necessary to adjust thread tension when using the spool net. X The selected needle bar moves to the embroidering position. Note ● If the easy to re-thread by cutting the thread currently being used between the spool and the thread guide above the spool. Place the new spool on the - Brother International Entrepreneur PR650e | Users Manual - English - Page 65
as the needle, needle bar case, thread take-up lever and carriage, otherwise injuries may result. ■ Locking mechanism For safety reasons, this embroidery machine is equipped with a locking function. Normally, the embroidery machine is locked (it cannot start sewing). Unless the machine is unlocked - Brother International Entrepreneur PR650e | Users Manual - English - Page 66
soon be used for sewing appears at the top of the thread color sequence display. The remaining thread colors are listed in the sewing order, starting from the top. 2 A blue frame appears around the thread information box of the needle bar currently being selected. • While the embroidery machine is - Brother International Entrepreneur PR650e | Users Manual - English - Page 67
is not trimmed. • To continue sewing, after checking that the upper thread is taut, touch the unlock key, and then press the start/stop button. Memo ● If the Reserve Stop key is touched while embroidery is being sewn, the machine stops before sewing for the next color begins. (Refer to "Stopping the - Brother International Entrepreneur PR650e | Users Manual - English - Page 68
embroidery machine stops and the start/stop button lights up in red. • The thread is not trimmed. Touch 2 machine. to unlock the embroidery Press the thread trimming button. 3 X The embroidery machine If a problem occurs while sewing, such as if the thread breaks, the machine stops automatically - Brother International Entrepreneur PR650e | Users Manual - English - Page 69
the first 100 stitches of each color sewn with each needle bar. ● The resulting embroidery may not appear as expected, due to the type or the fabric being sewn or to the type of stabilizer material used. Be sure to sew a trial embroidery before sewing on your project. Loosen the tension dial by - Brother International Entrepreneur PR650e | Users Manual - English - Page 70
machine may start sewing. If the machine accidentally starts operating, injuries may result. ● When removing the embroidery frame, be careful that the embroidery embroidery frame. Removing the fabric Loosen the outer frame screw. 1 X If the screw was tightened using a discshaped screwdriver, use - Brother International Entrepreneur PR650e | Users Manual - English - Page 71
a power outage occurs while the embroidery machine is being operated, turn off the embroidery machine and unplug the power supply cord. When restarting the embroidery machine, follow the necessary procedure to correctly operate the machine. (Refer to "Turning ON the Machine" on page 38.) Ð Turning - Brother International Entrepreneur PR650e | Users Manual - English - Page 72
. guide key p.206 Touch this key to 4 change the embroidery machine Settings key settings. p.194 Touch this key to cancel all operations 5 previously performed and return to the Home key initial pattern group selection screen. Touch this key to move or thread a 6 selected needle bar - Brother International Entrepreneur PR650e | Users Manual - English - Page 73
small, medium and large sizes. p. 150 8 Greek alphabet key Greek uppercase letters. p. 151 By using the included USB cable to connect a 9 Computer (USB) key computer to the embroidery machine, patterns can be recalled from the computer. p. 156 0 Recall patterns from USB media. USB media - Brother International Entrepreneur PR650e | Users Manual - English - Page 74
be Preview key embroidered so be previewed. it can p.46 Shows the number of 6 thread color for the Number of currently selected thread color embroidery pattern. Touch this key to 8 display the previous Previous page. page key p. 140 9 Touch this key to Next page display the next page - Brother International Entrepreneur PR650e | Users Manual - English - Page 75
including all patterns, is shown. Shows the sizes of embroidery frames that 2 Embroidery frame indicators can be used to sew the embroidery pattern currently displayed in the pattern display area. p. 47 (horizontal) width of the pattern that is being edited. Screen Quick Reference Guide 73 - Brother International Entrepreneur PR650e | Users Manual - English - Page 76
being p.164 Size key edited. Enables the thread color of each character 3 in an alphabet pattern Multi Color key to be changed; can only be used when an alphabet is selected. p.170 Changes the orientation of the 4 characters in the p.167 Array key alphabet pattern that is being edited - Brother International Entrepreneur PR650e | Users Manual - English - Page 77
can be saved for later use. Display 1 No. Function Page Shows the size of the embroidery pattern currently displayed in the pattern . If the Pattern size embroidery pattern consists of multiple patterns embroidery frames that 3 Embroidery frame indicators can be used to sew the embroidery - Brother International Entrepreneur PR650e | Users Manual - English - Page 78
Specifies the needle 9 position at the Starting/ beginning of sewing ending and at the end. position key p.123 Moves the embroidery 0 frame so that the Trial sewing embroidering position p.51 key can be checked. Save a pattern in the A machine's memory, - Brother International Entrepreneur PR650e | Users Manual - English - Page 79
color of the thread currently being sewn appears at the top. Indicates the needle 6 bar number where the thread color at Needle bar the left is assigned. number The bottom value shows the total number of value shows how much time has already passed sewing. Screen Quick Reference Guide 77 - Brother International Entrepreneur PR650e | Users Manual - English - Page 80
3 4 8 5 Display No. Key Name Function While sewing embroidery, touch 1 this key for the Reserve Stop machine to stop key prior to the next color beginning. Page p. 128 Enables the needle 2 bar settings to Temporary manually be p. 130 needle bar specified. settings key Change the - Brother International Entrepreneur PR650e | Users Manual - English - Page 81
format. information, therefore the embroidery machine automatically assigns colors when a Tajima Use USB media to transfer the data to the machine. 2 (.dst) file is loaded. (Refer to page 220.) Using the USB cable, the data can be transferred ■ Needle number The needles are numbered from right - Brother International Entrepreneur PR650e | Users Manual - English - Page 82
(Refer to page 49.) To insure proper registration of pattern for embroidery, turning off the machine and turning it back on will allow the embroidery arm to reset it's registration points. ■ Cancel the current design and start again Select the "Home" key on the upper right of the screen. The pattern - Brother International Entrepreneur PR650e | Users Manual - English - Page 83
USB media inserted first is detected. ● Use only an embroidery card reader designed for this machine. Using an unauthorized embroidery card reader may cause your machine to operate incorrectly. ● Embroidery patterns cannot be saved from the machine to an embroidery card inserted into a connected USB - Brother International Entrepreneur PR650e | Users Manual - English - Page 84
USB mouse The USB mouse, connected to the sewing machine, can be used to perform a variety of operations in the screens. Connect the left mouse button and its wheel can be used to perform operations. No other buttons can be used. ● The mouse pointer does not appear in the screen saver. 1 Pointer - Brother International Entrepreneur PR650e | Users Manual - English - Page 85
■ Changing pages Rotate the mouse wheel to switch through the tabs of the pattern selection screens. Memo ● If page numbers and a vertical scroll bar for additional pages are displayed, rotate the mouse wheel or click the left mouse button with the pointer on / to display the previous or next - Brother International Entrepreneur PR650e | Users Manual - English - Page 86
EMBROIDERING TUTORIAL ■ Changing the size Refer to "Changing the size of a pattern" on page 164. Touch . 1 ■ Rotating the pattern Refer to "Adjusting the angle" on page 97 and "Rotating a pattern" on page 166. Touch . 1 Change the size of the pattern. 2 • Rotate the mouse wheel away from you to - Brother International Entrepreneur PR650e | Users Manual - English - Page 87
Needle 86 Replacing the needle 86 Correctly Using the Embroidery Frames 88 Embroidery frame types and applications 88 Attaching Iron-On Stabilizer (Backing) to Fabric 90 Hooping the Fabric 91 Hooping the fabric in the extra-large and large embroidery frames 91 Using the embroidery Machine 110 - Brother International Entrepreneur PR650e | Users Manual - English - Page 88
is broken, replace the needle with a new one. Use the included Allen screw driver to replace the needle with one that is designed specifically for this machine and that passes the test described in "Checking the needle" on page 33. Replacing the needle Turn off the embroidery machine. 1 • Do not - Brother International Entrepreneur PR650e | Users Manual - English - Page 89
screw. Use the Allen screw driver to turn the needle set screw clockwise. 3 CAUTION ● Be sure to insert the needle all the way up until it touches the needle bar stopper and securely tighten the needle set screw with the Allen screw driver, otherwise the needle may break or the machine may be - Brother International Entrepreneur PR650e | Users Manual - English - Page 90
OTHER BASIC PROCEDURES Correctly Using the Embroidery Frames The various types of embroidery frames and their uses are described below. In addition to the included embroidery frames, the optional cap frame can be used with this embroidery machine. CAUTION ● Only use embroidery frames of the sizes - Brother International Entrepreneur PR650e | Users Manual - English - Page 91
authorized dealer. inches (W)) Note ● The embroidery frame indicators show all embroidery frame sizes in which the embroidery pattern 3 can be sewn. Be sure to use an embroidery frame of the most suitable size. If the embroidery frame that is too large is used, the pattern may be misaligned or - Brother International Entrepreneur PR650e | Users Manual - English - Page 92
) is not used while embroidering, the needle may bend or break or the pattern may become misaligned. Using a steam iron, affix the iron-on 1 stabilizer (backing) to the back of the fabric. Note ● Use a piece of iron-on stabilizer (backing) that is larger than the embroidery frame. When framing - Brother International Entrepreneur PR650e | Users Manual - English - Page 93
way, lightly pull the fabric in the direction indicated by arrow C and insert corner C, 1 Disc-shaped screwdriver Memo ● To correctly frame the fabric in the embroidery frame, we recommend using a flat surface. Hooping the Fabric 91 - Brother International Entrepreneur PR650e | Users Manual - English - Page 94
BASIC PROCEDURES Using the embroidery sheet In order to hoop the fabric so that the pattern will be sewn in the correct position, use the guidelines on the embroidery sheet to accurately stretch the fabric in the frame. Press the inner frame into the outer frame. 4 Remove the embroidery sheet - Brother International Entrepreneur PR650e | Users Manual - English - Page 95
When embroidering pieces of fabric that are smaller than the embroidery frame, use spray fabric adhesive to attach the fabric to stabilizer (backing) hooped in the embroidery frame. With fabrics where you do not wish to use spray adhesive, baste the fabric to the stabilizer (backing). 1 Fabric - Brother International Entrepreneur PR650e | Users Manual - English - Page 96
provides information concerning the embroidery frame when operating the embroidery machine. ■ Embroidery frames that cannot be used for embroidering As explained on page 47, the embroidery frame indicators at the top of the screen show the embroidery frames that can be used to sew the currently - Brother International Entrepreneur PR650e | Users Manual - English - Page 97
frame at the correct position 2 Needle position when the embroidery frame is replaced In order to correct the misalignment of this embroidery frame, the embroidery frame automatically moves to the correct position when any of the following are performed. • The embroidery machine is turned on. The - Brother International Entrepreneur PR650e | Users Manual - English - Page 98
the Embroidering Position When the embroidery machine is purchased, it was adjusted so that the beginning of the stitching was from the center of the pattern. Therefore, move the frame and adjust the embroidering position so that the center of the pattern aligns with the needle drop point at the - Brother International Entrepreneur PR650e | Users Manual - English - Page 99
lowered beyond the positioning click into the fabric. X The needle bar is unlocked. 3 X The needle and presser foot are locked in the down position. Touch the arrow keys in the embroidery 2 settings screen to move the embroidery frame so that the needle drop point is at the center of the area where - Brother International Entrepreneur PR650e | Users Manual - English - Page 100
OTHER BASIC PROCEDURES 1 2 3 4 5 6 7 Example: Original angle Touch the keys to adjust the pattern to the 2 desired angle. Each touch of a key rotates the pattern. 8 9 1 1 Rotates 1 degree to the right 2 Rotates 10 degrees to the right 3 Rotates 90 degrees to the right 4 Rotates 90 degrees to - Brother International Entrepreneur PR650e | Users Manual - English - Page 101
is particularly useful when embroidering items, such as bags and tubular items, that have limitations to being hooped in the embroidery frame. Example degrees. Pass the machine bed through from the waist of the T-shirt, not from the neck, and attach the embroidery frame to the machine. This will - Brother International Entrepreneur PR650e | Users Manual - English - Page 102
OTHER BASIC PROCEDURES Switching the Thread Colors on the Screen If a thread color on the spool stand is different than the needle position thread color on the screen, the thread colors on the screen can be switched to match the spool stand thread color position. Touch . 1 • To - Brother International Entrepreneur PR650e | Users Manual - English - Page 103
embroidering a pattern that uses seven or more thread colors, it is necessary to change the thread spools. When changing the thread spools, instruction to change the thread spools will appear with the machine automatically stopping. ■ Assignment of thread colors to needle bars Thread colors are - Brother International Entrepreneur PR650e | Users Manual - English - Page 104
OTHER BASIC PROCEDURES ■ Spool change indicator ( ) The spool change indicator in the stitch Check the position of 3 . navigating screen indicates the number of times that the thread spools will need to be changed and the amount of time between changes. Touch 1 in the embroidering screen - Brother International Entrepreneur PR650e | Users Manual - English - Page 105
embroidering a pattern that contains seven or more colors, the machine automatically stops sewing and the message shown below appears. This message stored. If the same thread color is used the next time that the thread spools must be changed, the needle bar will be assigned the same thread color - Brother International Entrepreneur PR650e | Users Manual - English - Page 106
changed when replacing a thread spool whose thread is correctly threaded through the machine. Pull out the old thread just after the needle 4 bar thread guide. Cut the thread between the thread spool and 1 the thread guide. Change the thread spool. 2 Continue pulling the thread until the knot is - Brother International Entrepreneur PR650e | Users Manual - English - Page 107
thread runs out while embroidering, the machine will automatically stop. Since some stitches ten stitches back through the stitching. The embroidery frame moves. Go back to the point where point where stitches have already been sewn. If the needle bar is moved back too far through the stitching - Brother International Entrepreneur PR650e | Users Manual - English - Page 108
OTHER BASIC PROCEDURES Touch . 4 If the bobbin thread breaks or runs out Touch , and then press the thread 1 trimming button. X The embroidering screen appears again. Touch 5 , and then press the start/ stop button to continue embroidering. X The upper thread is trimmed. • If the - Brother International Entrepreneur PR650e | Users Manual - English - Page 109
3 with bobbin thread. (Refer to page 36.) • If the hook cover can be opened, replace the bobbin without removing the 3 embroidery frame from the machine. • If the machine bed is hidden, for example, with a bag-shaped piece of fabric, or if the hook cover cannot be opened, temporarily remove - Brother International Entrepreneur PR650e | Users Manual - English - Page 110
trial embroidery was sewn and an incorrect thread tension was used or if the wrong thread color was used, restart the embroidering using the through the stitching since the embroidery frame moves at the same time. Press the start/stop button to stop the 1 machine. X The stitch navigating screen - Brother International Entrepreneur PR650e | Users Manual - English - Page 111
of this key moves one hundred stitches forward through the stitching. X The needle bar case moves and the current needle bar moves to the sewing position, and then the embroidery frame moves and current needle position is indicated. Embroidering From the Beginning or Middle of the Pattern 109 - Brother International Entrepreneur PR650e | Users Manual - English - Page 112
was accidentally turned off, for example, due to a power outage, while it was embroidering. The remainder of the embroidery can be sewn when the machine is turned on again; however, some of the stitches that were already sewn may be sewn again. Note Touch . 4 ● Be careful when going back - Brother International Entrepreneur PR650e | Users Manual - English - Page 113
when the thread color is changed. (For details, refer to "Setting the Machine to Stop at Color Changes" on page 128.) 1 Each touch of this key moves one stitch back through the stitching. • Check that the needle drop point is positioned where stitches have already been sewn. Resume Embroidering - Brother International Entrepreneur PR650e | Users Manual - English - Page 114
to adjust the thread tension if the correct thread tension as described on page 67 was not used. After adjusting the tension of the bobbin thread, adjust the tension of the upper thread for each needle bar. Note ● Be sure to check the tension of the bobbin thread each time that the - Brother International Entrepreneur PR650e | Users Manual - English - Page 115
try 4 embroidering with all needle bars to check the thread tension. Memo ● In the built-in embroidery patterns, one pattern is used for checking the thread tension. If the thread tension setting is made 3 extremely weak, the machine may stop during sewing. This is not the sign of a malfunction - Brother International Entrepreneur PR650e | Users Manual - English - Page 116
OTHER BASIC PROCEDURES ■ Upper thread is too tight The tension of the upper thread is too tight, resulting in the bobbin thread being visible from the right side of the fabric. ■ Upper thread is too loose The tension of the upper thread is too loose, resulting in a loose upper thread, loose - Brother International Entrepreneur PR650e | Users Manual - English - Page 117
Sewing Speed Setting 127 Setting the Machine to Stop at Color Changes 128 Stopping the machine at the next color change 128 Specifying pause locations before embroidering 128 Temporary Needle Bar Setting 130 Uninterrupted embroidering (using a single color 131 Reserved Needle Bar Settings 132 - Brother International Entrepreneur PR650e | Users Manual - English - Page 118
SETTINGS Basting Embroidery Before embroidering, basting stitches can be sewn along the outline of the pattern. This is useful for farther the basting is from the pattern. ● The setting remains selected even if the machine is turned off. Note ● When is pressed, the pattern is moved to the - Brother International Entrepreneur PR650e | Users Manual - English - Page 119
from the built-in patterns and patterns on embroidery cards. This is convenient for fabrics that cannot use stabilizer material for embroidering. ● Select a frame that matches the pattern size. Frame options are displayed on the LCD screen. Memo ● The setting remains selected even if the machine - Brother International Entrepreneur PR650e | Users Manual - English - Page 120
stick a piece of stabilizer to the back 6 of the felt or denim fabric to be used as the appliqué piece. Hoop the appliqué fabric in the embroidery 7 frame, attach the embroidery frame to the machine, and then start embroidering. After the cutting line "APPLIQUE 8 MATERIAL" is embroidered, stop the - Brother International Entrepreneur PR650e | Users Manual - English - Page 121
cutting line, otherwise the appliqué fabric will not be caught by the appliqué stitch. Use two layers of adhesive water-soluble 0 stabilizer material with their sticky sides together, and then hoop them in the embroidery frame. Lightly apply glue or spray adhesive, and b paste the appliqué piece so - Brother International Entrepreneur PR650e | Users Manual - English - Page 122
to the appliqué pattern. Dry the appliqué piece, and then iron it if g necessary. Memo ● The outline is sewn using satin stitching. ● Some glue may get onto the presser foot, needle, and needle plate at this time. Finish embroidering the appliqué pattern, and then clean off the glue. Note ● Do not - Brother International Entrepreneur PR650e | Users Manual - English - Page 123
Use to select the frame pattern, 7 and then touch and . X The frame pattern is deleted. Touch to continue to the 8 embroidering settings screen. Touch to continue - Brother International Entrepreneur PR650e | Users Manual - English - Page 124
sew lock stitches, for example at the beginning of the pattern, before sewing each thread color change, and before trimming the thread. When the embroidery machine is purchased, this function is set ON. ■ Specifying that lock stitches be sewn at the beginning of the pattern, at the beginning of - Brother International Entrepreneur PR650e | Users Manual - English - Page 125
, lower-center and lower-right corner. These settings can be used to repeatedly sew a pattern along a diagonal. The starting/ending position settings are specified from the embroidering settings screen. When the embroidery machine is purchased, both the starting position and the ending positions - Brother International Entrepreneur PR650e | Users Manual - English - Page 126
/ending position settings screen. 1 Starting position 2 Ending position After embroidering is finished, the machine 3 stops at the lower-left corner of the pattern. Touch and repeat steps 2 and 3 4 three times. Note ● If the next embroidery pattern of the series will be stitched outside the - Brother International Entrepreneur PR650e | Users Manual - English - Page 127
the starting point to the center of the pattern, touch . ● Use to select a different starting point for embroidering. Select the character patterns 3 X The needle bar is positioned in the lowerleft corner of the pattern. The embroidery frame moves so that the needle is positioned correctly - Brother International Entrepreneur PR650e | Users Manual - English - Page 128
Use a to align the needle with the end of embroidering for the previous pattern. Touch . 9 Note ● For better visibility in placing the needle . b X The needle bar is positioned in the lowerleft corner of the pattern. The embroidery frame moves so that the needle is positioned correctly. - Brother International Entrepreneur PR650e | Users Manual - English - Page 129
maximum sewing speed setting is specified from the embroidering screen. When the embroidery machine is purchased, the maximum sewing speed is set to 1000 spm (Cap machine is turned off remains selected the next time that the machine is turned on. ● Decrease the sewing speed to 400 spm, when using - Brother International Entrepreneur PR650e | Users Manual - English - Page 130
the pattern editing screen. After finishing sewing the area for the 2 current color, the next needle bar moves into position and the machine stops before sewing the next color. X changes back to . • If the machine is temporarily turned off, you will be asked if you wish to continue sewing or - Brother International Entrepreneur PR650e | Users Manual - English - Page 131
cancelled. However, the settings are cancelled if a new pattern is selected. ● If a pattern with the settings to stop the machine at color changes is saved, the settings to stop the machine at color changes are also saved. 4 1 mark Repeat steps 2 and 3 for each pause that 4 you wish to specify - Brother International Entrepreneur PR650e | Users Manual - English - Page 132
a different needle bar, the time for sewing can be saved. For example, similar color thread can be substituted for temporary use. While needle bar threaded 3 with the thread that you wish to embroider with. X After the color currently being sewn is finished, the threads are trimmed and the machine - Brother International Entrepreneur PR650e | Users Manual - English - Page 133
color (needle bar) can be changed with this procedure even when the machine has been used (refer to page 199). ● You can select the needle bar on the embroidering screen, even after touching in step 4. ● After finishing the embroidery, uninterrupted embroidery will be canceled. Temporary Needle - Brother International Entrepreneur PR650e | Users Manual - English - Page 134
color can be manually assigned to a certain needle bar. If a needle bar is specified, that needle bar is removed from the machine's automatic assignments and the specified color remains assigned to it. By specifically assigning often used thread colors to certain needle bars, the trouble of changing - Brother International Entrepreneur PR650e | Users Manual - English - Page 135
To change the setting, first cancel it, and then select the new setting. Touch , , , , or for the 1 number of the needle bar whose setting you wish to cancel. 1 1 The anchor disappears from the thread spool. X This cancels the manual needle bar setting. 4 1 Indicates the number of the selected - Brother International Entrepreneur PR650e | Users Manual - English - Page 136
EMBROIDERING SETTINGS 134 - Brother International Entrepreneur PR650e | Users Manual - English - Page 137
alphabet patterns ...... 149 Appliqué alphabet 150 Greek alphabet patterns 151 Embroidery patterns stored in the machine memory 151 Embroidery cards (optional 152 Computer (USB 156 USB media 160 Editing the Embroidery Pattern (Pattern Editing Screen 162 Combining patterns 162 Selecting the - Brother International Entrepreneur PR650e | Users Manual - English - Page 138
/EDITING/SAVING PATTERNS Precautions Concerning embroidery data Observe the following precautions when using embroidery data other than that created and saved in this machine. CAUTION ● While using embroidery data other than our original patterns, the thread or needle may break when sewing with - Brother International Entrepreneur PR650e | Users Manual - English - Page 139
name. ■ Computers and Operating Systems with the Following Specifications can be Used • Compatible models: IBM PC with a USB port as standard . If embroidery data is stored in a folder in "Removable disk," that embroidery data cannot be retrieved by the machine. ■ Tajima (.dst) embroidery data • - Brother International Entrepreneur PR650e | Users Manual - English - Page 140
manual embroidery cards are used, the embroidery machine may not operate correctly. Be sure to use only recommended embroidery cards. • Some licensed or copyright embroidery cards cannot be used with this embroidery machine. • Embroidery cards sold overseas cannot be used with this embroidery machine - Brother International Entrepreneur PR650e | Users Manual - English - Page 141
USB media is not flashing (refer to page 160). • For additional information, refer to the instruction manual included with the USB media that you have purchased. • Do not unplug a USB device/media from this machine immediately after it has been plugged in. Be sure to wait at least 5 seconds before - Brother International Entrepreneur PR650e | Users Manual - English - Page 142
4 Renaissance alphabet patterns 5 Monogram and frame pattern 6 Alphabet patterns 7 Appliqué alphabet patterns 8 Greek alphabet patterns 9 Embroidery patterns stored in the machine's memory 0 USB media A Computer (USB) 140 2 3 4 5 1 6 7 8 1 Pattern keys • Touch a pattern to display the following - Brother International Entrepreneur PR650e | Users Manual - English - Page 143
. 1 Touch . 3 This confirms the pattern selection. X The pattern editing screen appears. Frame patterns Touch . 1 X The list of embroidery patterns appears. Select an embroidery pattern. 2 Touch the desired pattern. X The list of frame patterns appears. From the upper tabs of the screen - Brother International Entrepreneur PR650e | Users Manual - English - Page 144
SELECTING/EDITING/SAVING PATTERNS Select a frame pattern. 3 Touch the desired pattern. Monogram and frame designs Monogram designs can be created by combining two or three letters. Frame patterns are also available for these types of designs. Touch . 1 X The selected pattern appears in the - Brother International Entrepreneur PR650e | Users Manual - English - Page 145
letters are selected, touch to delete the letters. ● If desired, multiple letters can be selected to use these characters in the same way as 2 any other alphabet pattern without 5 creating a monogram. * of the character. 1 1 Touch to change the size. Selecting an Embroidery Pattern 143 - Brother International Entrepreneur PR650e | Users Manual - English - Page 146
SELECTING/EDITING/SAVING PATTERNS ■ Changing the size After selecting the first character, touch until the character is the desired size. Touch . 8 • The next character that is selected will have the new character size. • The character size of all entered characters cannot be changed after - Brother International Entrepreneur PR650e | Users Manual - English - Page 147
cannot be used with the design. ● The frame patterns are just some of the patterns that can be used. Character patterns other than the 3-letter monogram patterns can be used in the combination. • Touch or selections. for additional X The text input screen appears. Selecting an Embroidery Pattern - Brother International Entrepreneur PR650e | Users Manual - English - Page 148
SELECTING/EDITING/SAVING PATTERNS If the key for the character that you wish to 3 select is not displayed, touch the tab for the desired set of characters. 1 2 With the first character entered, touch 5 to change the size of the character. 3 4 5 1 Uppercase letters 2 Lowercase letters 3 - Brother International Entrepreneur PR650e | Users Manual - English - Page 149
enter a space. Touch 9 and enter "olor". 5 If the text is small and difficult to read on the 0 screen, touch to check the text. Selecting an Embroidery Pattern 147 - Brother International Entrepreneur PR650e | Users Manual - English - Page 150
bend of the curve (makes it flatter). • If the text is arranged using one of the text arrangements on this screen, even more characters can be entered. X The list of floral alphabet patterns appears. Select an embroidery pattern. 2 Touch the desired pattern. X The selected pattern appears in the - Brother International Entrepreneur PR650e | Users Manual - English - Page 151
selection. X The pattern editing screen appears. Renaissance alphabet patterns Touch . 1 X The list of Renaissance alphabet patterns appears. Select an embroidery pattern. 2 Touch the desired pattern. • If the wrong pattern was selected or you wish to select a different pattern, touch the - Brother International Entrepreneur PR650e | Users Manual - English - Page 152
SELECTING/EDITING/SAVING PATTERNS Appliqué alphabet Select an embroidery pattern. 3 Touch the desired pattern. Touch . 1 X The size selection screen appears. Select the text size. 2 Touch the key for the desired text size. 1 2 3 1 1 Touch this - Brother International Entrepreneur PR650e | Users Manual - English - Page 153
Greek alphabet patterns Touch . 1 Touch . 3 This confirms the pattern selection. X The pattern editing screen appears. Embroidery patterns stored in the machine memory Embroidery patterns stored in the machine memory can be recalled. For details on storing a pattern, refer to "Saving - Brother International Entrepreneur PR650e | Users Manual - English - Page 154
card reader and card reader holder to the machine Using the included card reader holder, the embroidery card reader can be attached to the embroidery machine. This is useful if the embroidery card reader is to be used with this machine for a long period of time. 2 1 1 Permanently deletes the - Brother International Entrepreneur PR650e | Users Manual - English - Page 155
holder. 1 Touch pen With the indicator side facing up, place the 2 embroidery card reader in the card reader holder. Be sure to feed the card reader card reader holder, as shown below. 1 Arm 1 Card reader holder 2 Embroidery card reader 3 Indicator 4 Card reader cable 5 1 Handle on card reader - Brother International Entrepreneur PR650e | Users Manual - English - Page 156
from the machine Remove the card reader cable from the 1 hooks on the operation panel. 1 Touch pen 2 Touch pen holder 3 USB port 4 Hooks Memo ● For details on recalling an embroidery pattern from an embroidery card, refer to "About embroidery cards (optional)" on page 152 and "Using embroidery card - Brother International Entrepreneur PR650e | Users Manual - English - Page 157
the USB card reader/writer original embroidery cards are used, the embroidery machine may not operate correctly. Be sure to use only recommended embroidery cards. ● Some licensed or copyright cards may not be compatible with this embroidery machine. 5 to the machine's USB port, be sure to secure - Brother International Entrepreneur PR650e | Users Manual - English - Page 158
selected, the following message appears. Computer (USB) Using the included USB cable, the embroidery machine can be connected to your computer, and the embroidery patterns saved on the computer can be temporarily recalled and used from the machine. Touch to rotate the pattern 90 degrees before - Brother International Entrepreneur PR650e | Users Manual - English - Page 159
position of the USB port on the computer, refer to the instruction manual for the corresponding equipment. After the "Removable Disk" folder appears machine is sewing, do not write data to or delete data from "Removable Disk". Touch . 2 X The list of patterns is displayed. Select an embroidery - Brother International Entrepreneur PR650e | Users Manual - English - Page 160
Patterns" on page 214. • To add a pattern from the computer, repeat step 1. X The following screen appears while data is written to the embroidery machine, and the key for that pattern appears when writing is finished. Note ● The pattern recalled from the computer is only temporarily written to the - Brother International Entrepreneur PR650e | Users Manual - English - Page 161
, 3 repeat steps 1 and 2. Windows Vista Note ● Be sure to perform the operation described above before disconnecting the USB cable from the computer and embroidery machine, otherwise the computer may malfunction, the data may not be written correctly, or the data or data writing area on the - Brother International Entrepreneur PR650e | Users Manual - English - Page 162
USB media or a folder in the USB media. If the embroidery pattern is under the folder, move down layers of folders following primary (top) 1 USB port on the machine. Depending on the type of USB media being used, either directly plug the USB device into the machine's USB port on the right side of - Brother International Entrepreneur PR650e | Users Manual - English - Page 163
screen. to return to the original ■ Deleting embroidery data From this screen, the embroidery data stored on the USB media can be data, delete it from the machine. This will delete design data completely. 1 3 2 Touch . 5 5 1 Shows the amount of memory used by selected pattern. 2 Shows - Brother International Entrepreneur PR650e | Users Manual - English - Page 164
can be seen in the pattern display area. Combining patterns Various patterns, such as embroidery patterns, frame patterns, built-in alphabet patterns and patterns on embroidery cards, can easily be combined. Select an embroidery pattern. 2 Select the pattern to be added as described on page 140 to - Brother International Entrepreneur PR650e | Users Manual - English - Page 165
red frame. Continue touching and until the red frame is around the pattern that you wish to edit. Moving a pattern Determine where in the embroidery frame the pattern will be embroidered. If multiple patterns are combined, move each pattern to lay out the design. Touch the key for the direction - Brother International Entrepreneur PR650e | Users Manual - English - Page 166
the pattern to its position before it was moved (center of the embroidery frame), touch . Flipping a pattern horizontally Touch 1 so that it are touched. ● The arrow keys in the embroidering settings screen are used to move the frame to select the embroidering position. Horizontal flip turned - Brother International Entrepreneur PR650e | Users Manual - English - Page 167
the size of the pattern, check the icons for the embroidery frames that can be used and use only the indicated frames. If a frame other than those indicated are used, the presser foot may hit the embroidery frame and cause injuries. Editing the Embroidery Pattern (Pattern Editing Screen) 165 - Brother International Entrepreneur PR650e | Users Manual - English - Page 168
● After changing the angle of the pattern, check the icons for the embroidery frames that can be used and use only the indicated frames. If a frame other than those indicated are used, the presser foot may hit the embroidery frame and cause injuries. Memo ● If in the embroidering settings screen - Brother International Entrepreneur PR650e | Users Manual - English - Page 169
(makes it flatter). 0 Touch this key to close this screen. Touch the key of the desired text 2 arrangement. X The screen shown below appears. Editing the Embroidery Pattern (Pattern Editing Screen) 167 - Brother International Entrepreneur PR650e | Users Manual - English - Page 170
SELECTING/EDITING/SAVING PATTERNS 1 6 2 3 4 5 7 1 Specifies that all of the characters in a word selected will be spaced equally. 2 Separates characters to be spaced and positioned individually. 3 Increases the space between characters equally. 4 Decreases the space between characters - Brother International Entrepreneur PR650e | Users Manual - English - Page 171
cannot be combined again. Use and 4 then use to select a pattern, and to adjust the character spacing. Trimming the threads between characters If the machine is set to trim the on or off. Threads are not trimmed. Threads are trimmed. Editing the Embroidery Pattern (Pattern Editing Screen) 169 - Brother International Entrepreneur PR650e | Users Manual - English - Page 172
appears. Specifying multi-color text The alphabet pattern characters selected on page 145 are set to black. The color of the characters can be changed using the change thread color key; however, to change the color of individual characters, touch the Multi Color key to turn it on, and then specify - Brother International Entrepreneur PR650e | Users Manual - English - Page 173
your thread colors are registered in a color thread table and if you used the table for changing color, the thread spools can be assigned with Touch , , and to select the 3 new color from the color palette. 2 X The 64 embroidery threads table screen appears. 5 1 1 6 2 7 3 4 5 8 9 1 The part - Brother International Entrepreneur PR650e | Users Manual - English - Page 174
SELECTING/EDITING/SAVING PATTERNS Touch . 4 Designing repeated patterns ■ Sewing repeated patterns Using the border function, you can create stitches using repeated patterns. You can also adjust the spacing of the patterns within a repeated pattern stitch. Touch . 1 X The color change is - Brother International Entrepreneur PR650e | Users Manual - English - Page 175
Select the direction in which the pattern will 2 be repeated. Use 3 to repeat the pattern on top and to repeat the pattern at the bottom. • To delete the Memo ● You can only adjust the spacing of patterns included in the red frame. Editing the Embroidery Pattern (Pattern Editing Screen) 173 - Brother International Entrepreneur PR650e | Users Manual - English - Page 176
are two or more patterns, all patterns will be grouped together as one pattern in the red frame. ■ Repeating one element of a repeated pattern By using the Cut function, you can select one element of a repeated pattern and repeat only that single element. This function allows you to design complex - Brother International Entrepreneur PR650e | Users Manual - English - Page 177
patterns, use the point of this arrow for positioning the following designs to be sewn. Memo ● When repeatedly sewing individual patterns, thread marks can be sewn around the perimeter of the pattern only. Touch . 5 1 Touch . 2 Repeat the selected element. 6 Editing the Embroidery Pattern - Brother International Entrepreneur PR650e | Users Manual - English - Page 178
a custom thread table containing the thread colors that you most often use. You can select thread colors from the machine's extensive list of thread colors from nine different thread brands. You Thread Table Clear/ Restore Program and instructions. Touch and then touch . 1 Touch . 4 176 - Brother International Entrepreneur PR650e | Users Manual - English - Page 179
• You can scroll through 100 colors at a time using and on the custom thread table. Use 4 to enter a color's 4-digit number. • If clear and restore programs from the website 1 5 Use to select one of the thread 3 brands in the machine. 1 Selected thread color X The selected thread - Brother International Entrepreneur PR650e | Users Manual - English - Page 180
5 thread colors are specified. • To delete a specified color from the palette, touch . Touch 6 screen. to return to the original Touch 2 to display the thread list. Use 3 to select a thread color. 1 2 1 Thread list 2 Thread brand 178 - Brother International Entrepreneur PR650e | Users Manual - English - Page 181
threads table screen displays. Touch . 2 1 1 Custom thread change key X The custom thread (300 embroidery threads) table screen will appear. Touch 3 to choose a new color from the custom thread table. • Use and to scroll through the custom thread table. • Touch to return to the original - Brother International Entrepreneur PR650e | Users Manual - English - Page 182
X The screen shown below appears. Touch . 2 1 1 Duplicated pattern Note ● If multiple patterns are displayed in the screen, only the pattern selected using and is duplicated. ● Move and edit each duplicated pattern individually. X The pattern is deleted. • To quit deleting the pattern, touch - Brother International Entrepreneur PR650e | Users Manual - English - Page 183
be edited as a single pattern. In addition, the arrow keys can be used to move the pattern in the pattern editing screen or move the embroidery frame in the embroidering settings screen. Touching these keys moves the embroidery frame. Rotating the entire pattern The entire pattern can be rotated - Brother International Entrepreneur PR650e | Users Manual - English - Page 184
then edit. Touch . 1 To select the pattern, touch . 3 Select . 2 X The pattern editing screen appears. Touch . 4 X This pattern will be positioned at the center of the embroidery area. X The pattern type selection screen appears again. 182 - Brother International Entrepreneur PR650e | Users Manual - English - Page 185
"d". • With a USB mouse, your finger or the touch pen, drag the characters to move them. Touch . 0 X The selected letters appear at the center of the embroidery area. X The pattern type selection screen appears again. Editing a Combined Pattern 183 - Brother International Entrepreneur PR650e | Users Manual - English - Page 186
screen appears. Touch / / and adjust the d position of the letters so that they are well balanced. X The selected letters appear at the center of the embroidery area. 184 - Brother International Entrepreneur PR650e | Users Manual - English - Page 187
Check the balance of the entire pattern, and, e if you wish to edit the pattern, touch Touch . g and to select the pattern to be edited. If a USB mouse is connected, the pattern can be selected by clicking it. Move the mouse to position the pointer over the desired pattern, and then click - Brother International Entrepreneur PR650e | Users Manual - English - Page 188
SELECTING/EDITING/SAVING PATTERNS • If it is difficult to view the text and the pattern, touch , and then touch to preview it. Touch to return to the previous screen. After finishing all editing, touch and j then . X The embroidering settings screen appears. • To return to the pattern - Brother International Entrepreneur PR650e | Users Manual - English - Page 189
Saving Embroidery Patterns Machine's memory You can save embroidery patterns that you have customized and will use often, for example, your name or other pattern combinations, patterns that have been rotated or resized, or patterns that have had their embroidering position changed. A - Brother International Entrepreneur PR650e | Users Manual - English - Page 190
pattern data being saved may be lost. ■ Recalling stored patterns Refer to the appropriate page of "Selecting an Embroidery Pattern" according to the media being used. For patterns saved on the machine, refer to page 151. For patterns saved on USB media, refer to page 160. X The screen shown below - Brother International Entrepreneur PR650e | Users Manual - English - Page 191
USB media When sending embroidery patterns from the machine to USB media, plug the USB media into the machine's USB port. Memo ● Some USB media may not be usable with this machine. Please visit our web site for more details. ● Depending on the type of USB media being used, either directly plug the - Brother International Entrepreneur PR650e | Users Manual - English - Page 192
/SAVING PATTERNS Touch . 3 • Touch to return to the original screen without saving. Computer (USB) Using the included USB cable, the embroidery machine can be connected to your computer, and the embroidery patterns can be saved in the "Removable Disk" folder in your computer. A total of - Brother International Entrepreneur PR650e | Users Manual - English - Page 193
. ● For details on the position of the USB port on the computer, refer to the instruction manual for the corresponding equipment. Move/copy the pattern data in "Removable 5 Disk" that you want be temporarily saved to "Removable Disk" under "Computer (My computer)". Saving Embroidery Patterns 191 - Brother International Entrepreneur PR650e | Users Manual - English - Page 194
SELECTING/EDITING/SAVING PATTERNS 192 - Brother International Entrepreneur PR650e | Users Manual - English - Page 195
This chapter contains descriptions on the use of the settings key, the machine operations guide key and the help key, introduced on page 39. Details on changing the basic embroidery machine settings and viewing operations on the LCD will be provided. Using the Settings Key 194 Understanding the - Brother International Entrepreneur PR650e | Users Manual - English - Page 196
Using the Settings Key Touch (settings key) to change many of the basic embroidery machine settings key was touched appears again. 2 The guides (embroidery frame size, centerpoint marker, grid and cursor the needle after the thread is trimmed (length of thread passed through the eye of the needle). - Brother International Entrepreneur PR650e | Users Manual - English - Page 197
to "Reserved Needle Bar Settings" on when a USB mouse is used. (Refer to page 205 embroidery machine. N Version Shows the version of the software installed on this embroidery machine. (Refer to page 271.) 6 Note ● Check with your local authorized Brother dealer or at "http://solutions.brother - Brother International Entrepreneur PR650e | Users Manual - English - Page 198
frame displayed as a guide. The guides that appears does not indicates the size of the embroidery frame that is actually installed. 3 CENTERPOINT Display (ON) or hides (OFF) the centerpoint marker of the design. ■ Size of the embroidery frame When the embroidery machine is purchased, the extra - Brother International Entrepreneur PR650e | Users Manual - English - Page 199
is displayed as specified. Changing the thread color information You can display the name of the thread colors, embroidery thread number or the embroidery time. When the embroidery machine is purchased, the thread color number (#123) is selected. The thread color display setting can be specified - Brother International Entrepreneur PR650e | Users Manual - English - Page 200
original thread color (i.e. the thread colors that have been built-in the machine). The thread color numbers are displayed with the number (or the nearest size. Large size is 1.5 times the normal size. When the embroidery machine is purchased, normal size is selected. The thumbnail size setting can - Brother International Entrepreneur PR650e | Users Manual - English - Page 201
cuts the upper and bobbin background color. Select the background color from the 66 thread before the jumpstitch. When Tajima embroidery data (.dst) is used, the machine 6 settings available. converts the "jump" code to a trim code, based on the number specified on the next line. OFF: The - Brother International Entrepreneur PR650e | Users Manual - English - Page 202
Touch or 1 setting. The key appears as to select the desired when "ON" is selected, and it appears as when "OFF" is selected. ■ When using Tajima embroidery data (.dst) If "ON" is selected, touch and to 2 select the number of feed codes. The desired setting is displayed. • Each touch of the - Brother International Entrepreneur PR650e | Users Manual - English - Page 203
patterns is used, the pitch may be too small, which may result in the thread or the needle breaking. In order to prevent this, the machine can be set to delete stitches with a fine pitch. Stitches with a pitch less than that specified here can be deleted. When the embroidery machine is purchased - Brother International Entrepreneur PR650e | Users Manual - English - Page 204
the image on your computer or USB media. When the embroidery machine is purchased, the default setting is selected. The screen Connect the USB media or the computer 3 (using a USB cable) that contains your personal image to the USB port of the machine. • Refer to page 80 about USB connectivity. - Brother International Entrepreneur PR650e | Users Manual - English - Page 205
Touch when connecting USB media to the center USB port. X The selected image is stored on your machine. • Touch screen. to return to the previous • Touch when connecting a computer using a USB cable, and then According to the procedure from step 4, 7 select the remaining images. copy your - Brother International Entrepreneur PR650e | Users Manual - English - Page 206
is produced from the speaker. When the embroidery machine is purchased, "5" is selected. The is set to "OFF", the machine does not stop until embroidering is to set it to "OFF". When the machine is purchased, "ON" is selected. The machine will not be able to detect if the upper thread - Brother International Entrepreneur PR650e | Users Manual - English - Page 207
the pointer shape when a USB mouse is used The shape can be selected for the pointer that appears when a USB mouse is connected. Depending upon the background color, select the desired shape from the three that are available. When the embroidery machine is purchased, is selected. The mouse pointer - Brother International Entrepreneur PR650e | Users Manual - English - Page 208
information. ■ Contents of Categories Principal Parts Displays and explains principal parts of the machine and their functions. Troubleshooting Basic guide for problems solving. Basic Operation Illustrates basic threading and hooping instruction. Maintenance Instruction for maintaining your - Brother International Entrepreneur PR650e | Users Manual - English - Page 209
pages 5 Movie key Appears only if the procedure for • Upper threading • Threading the needle • Preparing the cap frame • Installing the cap frame driver A movie showing the procedure can be viewed. 6 X The procedure for threading the upper thread appears. Using the Machine Operations Guide Key 207 - Brother International Entrepreneur PR650e | Users Manual - English - Page 210
BASIC SETTINGS AND HELP FEATURE When appears, touch the key. While a After checking the procedure, touch . movie is being shown, the key changes to 5 . 2 3 1 4 5 6 1 Touch this key to return to the illustration. 2 Touch this key to continue showing the movie. Touch 6 . 3 Touch this - Brother International Entrepreneur PR650e | Users Manual - English - Page 211
252 On-screen troubleshooting ...........252 Troubleshooting 253 Error messages 261 If the machine does not respond when a key is pressed 269 Specifications 270 Embroidery machine specifications ......270 Upgrading Your Machine's Software.......271 Upgrade procedure using USB media.......271 - Brother International Entrepreneur PR650e | Users Manual - English - Page 212
the built-in embroidery patterns can be used for sewing appliqués. Follow the procedures described below to sew appliqués using the patterns or garment in the 4 embroidery frame, and then sew an "APPLIQUE POSITION" pattern. The appliqué position is sewn, and then the machine stops. ■ Procedure for - Brother International Entrepreneur PR650e | Users Manual - English - Page 213
• Depending on the pattern, an "APPLIQUE" pattern may not be available. In this case, sew the appliqué using thread in the color of a part of the embroidery. Finish sewing the embroidery. 7 Select a frame pattern sewn with straight 1 stitches to embroider onto the fabric for the appliqué. Carefully - Brother International Entrepreneur PR650e | Users Manual - English - Page 214
out in step 1, and then attach the appliqué piece to the base fabric. Using a frame pattern to create appliqués (2) There is another way of sewing appliqués. With this method, there is no need to change the fabric in the embroidery frame. The appliqué can be created by sewing two frame patterns of - Brother International Entrepreneur PR650e | Users Manual - English - Page 215
change the size or sewing position of the satin-stitched frame pattern in the same way. • Be sure to stop the machine before the cross at the center is sewn. Remove the embroidery frame from the 4 machine, and then cut off the excess appliqué fabric along the outside of the stitching. Attach the - Brother International Entrepreneur PR650e | Users Manual - English - Page 216
designs larger than the embroidery hoop are divided into multiple sections, which combine to create a single pattern after each section is sewn. For details on creating large-size embroidery patterns and for more detailed sewing instructions, refer to the operation manual included with PE-DESIGN - Brother International Entrepreneur PR650e | Users Manual - English - Page 217
fabric and the embroidery frame. • Be sure to select fabric of the size of combined pattern. Hoop the appropriate part of the fabric. In 5 this case, hoop upper-left alignment stitching. Use this stitching for placement of adjacent pattern section. Sewing Large-size (Split) Embroidery Patterns 215 - Brother International Entrepreneur PR650e | Users Manual - English - Page 218
a aligning on the alignment stitching. In this case, align the left side of the hoop on the right side of the design section embroidered in step 6. X A screen appears so that a section of the large-size embroidery pattern can be selected. Touch to select the next section of the 9 pattern, and - Brother International Entrepreneur PR650e | Users Manual - English - Page 219
Helpful Tips for the Operation of the Machine This section provides descriptions to operations useful in the operation of this machine. Checking the thread tension of built-in patterns Touch . 3 One pattern on the last page of the embroidery patterns can be used to check the thread tension. We - Brother International Entrepreneur PR650e | Users Manual - English - Page 220
APPENDIX Touch (unlock key), and then press 6 the start/stop button to begin embroidering. be adjusted. Touch 1 screen. in the embroidering settings Note ● If adjustment is necessary, refer to instructions on page 67 or 112/113. Set the beginning of stitching in the lower2 left corner. X - Brother International Entrepreneur PR650e | Users Manual - English - Page 221
mark this point on the 3 fabric. Remove the embroidery frame from the 6 machine, and then connect these two points to check the line, reframe the fabric in the embroidery frame or adjust the position of the pattern. X The frame moves so that the needle drop point aligns with the beginning of - Brother International Entrepreneur PR650e | Users Manual - English - Page 222
is created by combining only shapes. For example, the following embroidery data appears as shown below in the Tajima format (.dst) In order for the parts of the pattern to be differentiated when Tajima data is used with this machine, the pattern is displayed with colors automatically applied in the - Brother International Entrepreneur PR650e | Users Manual - English - Page 223
embroidery are described below. Threads Embroidery thread can be costly used on the embroidery machine. It is important that embroidery needle. For every reduction of 14 thread breaks per a day, output can be improved by more than 1.0 %. Stabilizers (backing) Embroidery support "spot problems" where - Brother International Entrepreneur PR650e | Users Manual - English - Page 224
of it. Cap frames: These are specialized embroidery frames (hoops) designed to hold caps for embroidering. They are available in a variety of styles for various machines, with two basic styles: one that allows sewing a flattened cap (for use on a flat machine) or one that allows sewing the cap in - Brother International Entrepreneur PR650e | Users Manual - English - Page 225
alignment problems, use two pieces of lightweight backing instead of one piece of heavy backing. Denim 1 tear-away None Reduce speed if needle use two pieces of lightweight backing instead of one piece of heavy backing. Golf shirt 1 cut-away Optional Use Optional Use a Use Optional Use a used - Brother International Entrepreneur PR650e | Users Manual - English - Page 226
to be attached. Attach the embroidery frame for industrial embroidery machines in the same way that included embroidery frames are attached. (Refer to page 49.) Note ● When using embroidery frames for industrial embroidery machines, the machine does not recognize the embroidery area of the frame. Be - Brother International Entrepreneur PR650e | Users Manual - English - Page 227
again if a different machine is being used. The height may differ depending on the machine that is used. For details, contact your authorized dealer. Note ● If the cap embroidery frame is attached, the embroidery frame indicators, showing which embroidery frames can be used, 7 appear as shown - Brother International Entrepreneur PR650e | Users Manual - English - Page 228
caps With the machine, we recommend that the following types of caps be embroidered. ■ Standard (Pro Style) ■ Golf Style 1 Face: Pro style 2 6 sections Otto International, Inc. cap model number (Example) Mesh backing on the back of front panels (soft or hard) Ease of framing (hooping) OTTO27-007 - Brother International Entrepreneur PR650e | Users Manual - English - Page 229
two lower thumb screws (4 turns). Preparing to use the cap frame ■ Installing the cap frame embroidery frame holder from the carriage on the machine, and then install the cap frame driver. Before removing the embroidery frame holder, remove the embroidery frame. (Refer to "Removing the embroidery - Brother International Entrepreneur PR650e | Users Manual - English - Page 230
frame driver. ■ Adjusting the cap frame driver 1 L-shaped bracket 2 Ring Memo ● If the same machine is being used, the adjustment to the cap frame driver is only required the first time that the machine is used. 1 Pins on the frame-mounting plate of the carriage 2 Holes in the mounting plate of - Brother International Entrepreneur PR650e | Users Manual - English - Page 231
Allen screwdriver (medium) Note ● Do not loosen them too far. Lower the L-shaped bracket to make it touch 3 the machine bed and then tighten the two hexagonal screws using the Allen screwdriver (medium). Firmly tighten the screws. 1 Hexagonal screws 2 Allen screwdriver (large) X When the screws are - Brother International Entrepreneur PR650e | Users Manual - English - Page 232
then attach the mounting jig to a stable surface, such as a desk. Use a Phillips screwdriver to loosen the two 1 screws, and then lower the is firmly secured. ■ Installing the needle plate spacer Attach the needle plate spacer to the needle plate. 1 Needle plate spacer Attach the mounting jig - Brother International Entrepreneur PR650e | Users Manual - English - Page 233
pad of the thumb screw and the mounting surface, insert the included pad as shown below. 1 Low Profile (Low fitting) 2 Standard type (Pro style) ■ For the standard type Using a Phillips screwdriver, turn the four screws (two on the left and two on the right) at the inside of the mounting jig one - Brother International Entrepreneur PR650e | Users Manual - English - Page 234
Pull the mounting jig toward you, and then use the Phillips screwdriver to tighten the four screws ( clamped. Next, attach the cap frame to the cap frame driver on the machine. 1 Side of mounting jig 2 Brace on cap frame 3 Guiding Plate on mounting jig 4 Notch on cap frame 5 Sweat guard holder 6 - Brother International Entrepreneur PR650e | Users Manual - English - Page 235
the sweat guard on the inside of 4 the cap, and then place the cap in the cap frame. Using both hands, hold both sides of the cap, and then align the edge of the lower frame with the Centerline of cap 1 Brim of the cap 2 Inside clamping frame 3 Outside clamping frame Using the Optional Cap Frame 233 - Brother International Entrepreneur PR650e | Users Manual - English - Page 236
APPENDIX Neatly align the teeth of the clamping frame 8 with the base of the brim. Adjust the other side in the same way. 9 1 Teeth of outside clamping frame 2 Base of brim Note ● Loosen the two screws for the outside clamping frame, and then adjust the position of the outside clamping frame so - Brother International Entrepreneur PR650e | Users Manual - English - Page 237
any slack. Adjust the brim so that it maintains a d rounded shape. Use the clips to secure the cap. b X This completes the positioning of the left holders on the mounting jig with both thumbs, and then pull off the embroidery frame, as shown in the illustration. 1 Clips • Repeat steps a and - Brother International Entrepreneur PR650e | Users Manual - English - Page 238
in the illustration, turn the embroidering position to the side when removing the cap frame so the brim of the cap does not hit the embroidery machine. 1 Guiding Plate on cap frame driver 2 Notch on cap frame 3 Holder 236 • Be careful that the cap frame does not hit any nearby parts, such as - Brother International Entrepreneur PR650e | Users Manual - English - Page 239
brim holder, unlock the 2 snap lock of the clamping frame, remove the clips, and then remove the cap. Remove the two upper thumb screws 3 1 Brim holder 2 Snap lock 3 Clips Installing the embroidery frame holder After embroidering using the cap embroidery frame is finished, remove the needle plate - Brother International Entrepreneur PR650e | Users Manual - English - Page 240
stitches. 1 1 Pins in the frame-mounting plate 2 Holes on the embroidery frame holder Secure the embroidery frame holder with the 7 two thumb screws. Start the embroidery pattern from the 2 center, and sew toward the ends. With the machine, the order in which patterns are selected when they are - Brother International Entrepreneur PR650e | Users Manual - English - Page 241
each region or letter. 1 At least 1 mm 2 At least 2 mm CAUTION ● Don't sew more than four overlapping layers. 1 Specify that overlapping areas not be sewn. 7 Using the Optional Cap Frame 239 - Brother International Entrepreneur PR650e | Users Manual - English - Page 242
use the optional bobbin winder. The procedures for using , stable surface. ● Only use the bobbins supplied with this 2 Bobbin winder shaft 3 Hole for thread guide 4 Hole for spool pin 5 DC input connector dealer. 100376-053 130012-054 4 Thread guide 5 AC adapter XC6644-151 Visit your nearest - Brother International Entrepreneur PR650e | Users Manual - English - Page 243
the AC adapter, be sure that the unit is not operating. ● After using the bobbin winder, disconnect it from the electrical outlet. 7 1 Pins on thread guide 2 Notches on hole for thread guide 3 Hole for thread guide • Firmly insert the thread guide as far as possible and make sure that it is secure - Brother International Entrepreneur PR650e | Users Manual - English - Page 244
Also use the included spool cap to keep the small spool stable. Pass the thread through the hole in the left of 3 the thread guide toward the shaft Set the thread spool on the spool pin. 2 1 Hole in the thread guide Pass the thread around the tension disc as 4 shown in the illustration. Make sure - Brother International Entrepreneur PR650e | Users Manual - English - Page 245
5 of the thread guide toward the back of the machine. Note ● Be sure cause the needle to break. Slide the bobbin holder, until it clicks into 8 place. 1 Hole in the thread guide Wind the thread end of the thread through the guide 7 slit in the bobbin winder seat, and pull the thread. The - Brother International Entrepreneur PR650e | Users Manual - English - Page 246
● Check that the bobbin thread has been wound correctly, otherwise the needle may break or the thread tension will be incorrect. ● Be sure use both weights, large (L) and small (S). For detailed instructions on how to adjust the bobbin tension, refer to page 112. Pull the thread through the guide - Brother International Entrepreneur PR650e | Users Manual - English - Page 247
the hook Periodically remove lint and dust for better performance from Hook race area. Use the included cleaning brush. Turn off the embroidery machine. 1 CAUTION ● Unplug the power supply cord before cleaning the machine, otherwise injuries or an electric shock may occur. Open the hook cover, and - Brother International Entrepreneur PR650e | Users Manual - English - Page 248
and the error message may appear, or various parts of the machine may be damaged. Make sure to clean around the needle plate once a month. Use on offset screwdriver and the included cleaning brush. Turn off the embroidery machine. 1 After cleaning is finished, insert the bobbin 4 case into the hook - Brother International Entrepreneur PR650e | Users Manual - English - Page 249
. Therefore, it should be cleaned each time when the bobbin is changed. Use a piece of paper with the thickness of a business card. Open the hook 1 Remove all lint in this area After cleaning is finished, attach the needle 4 plate in the opposite way that it was removed in step 2. Slide the paper - Brother International Entrepreneur PR650e | Users Manual - English - Page 250
upper threads If dust or lint has accumulated in the thread guides or tension unit in the paths of the upper threads, the thread may break while embroidery is being sewn. Periodically clean the thread paths. ■ Cleaning the thread guides Use the included cleaning brush to remove 1 any lint and dust - Brother International Entrepreneur PR650e | Users Manual - English - Page 251
remove tension dial, turn dial 1 counterclockwise as shown on illustration. 1 Tension dial Using the included cleaning brush, remove 2 any lint and dust from the two pieces in an incorrect order. The machine may not operate correctly if the tension units are incorrectly reassembled. Maintenance 249 - Brother International Entrepreneur PR650e | Users Manual - English - Page 252
may appear. Afterward, put a drop of oil onto the hook once a day before use, and put a drop of oil to the lower needle bar felt washer every 40 to 50 hours of machine use. ■ Oiling the race Turn off the embroidery machine. 1 Rotate the handwheel (about 50 degrees) to 3 move the race of the hook - Brother International Entrepreneur PR650e | Users Manual - English - Page 253
oil onto the hook once a day before use. ● Apply one drop of oil on the lower needle bar above the felt washer every 40 - 50 hours of sewing time. ● Apply only sewing machine oil. Use of any other type of oil may result in damage to the embroidery machine. ● Do not apply too much oil. Fabric - Brother International Entrepreneur PR650e | Users Manual - English - Page 254
APPENDIX Troubleshooting On-screen troubleshooting This embroidery machine is equipped with an easy-to-use troubleshooting feature for problems during sewing. Touch the key that shows the problem, and then check for the causes that are displayed. Touch . 1 Check the items that are displayed. - Brother International Entrepreneur PR650e | Users Manual - English - Page 255
before requesting service. If the suggested remedy does not correct the problem, contact your authorized dealer. Symptom The embroidery machine does not operate. Probable Cause The machine is not turned on. The machine has not been unlocked. The start/stop button was not pressed. The needle is not - Brother International Entrepreneur PR650e | Users Manual - English - Page 256
It does not run. A bobbin designed specifically for this machine is not used. The needle and the hook are not correctly passing each other. There is backlash play (forward/ backward) in the needle bar case. The thread density of the embroidery data is too fine. Three or more overlapping stitches are - Brother International Entrepreneur PR650e | Users Manual - English - Page 257
foot. The area around the embroidery foot hole is damaged. Consult your nearest authorized dealer. Replace the presser foot. Consult your nearest authorized dealer. 1 Scratches/Burrs Using a weak thread like a metallic thread. Slow down the machine sewing speed. 7 p.127 Troubleshooting 255 - Brother International Entrepreneur PR650e | Users Manual - English - Page 258
threaded. Un-thread the machine and re-thread the machine. Make sure the thread is correctly positioned in the needle bar thread guide. p.245 p.245, 250 designed specifically for this machine is not used. Make sure thread passes completely under upper and middle thread guide. Remove any knots or - Brother International Entrepreneur PR650e | Users Manual - English - Page 259
may become misaligned or the stitching may shrink. Be sure to correctly frame the fabric in the p.47, 91 7 embroidery frame. The embroidery frame is too Use an embroidery frame that large for the size of the is close to the size of the p.88 embroidery. embroidery. Troubleshooting 257 - Brother International Entrepreneur PR650e | Users Manual - English - Page 260
while replacing bobbin thread, changing needle, or working near embroidery frame. If the carriage is moved, turn the machine off, then on again. The correct frame position at the time that the machine was stopped is stored in the machine's memory, and the embroidery frame is returned to the correct - Brother International Entrepreneur PR650e | Users Manual - English - Page 261
. If the problem no longer occurs after the thread is changed, the thread quality is the problem. Replace the needle threader cannot be used. Recommended needles are not used on this machine. The needle is not installed correctly. Replace and use recommended needle. Correctly install the needle - Brother International Entrepreneur PR650e | Users Manual - English - Page 262
machine detects that the thread is not being fed and stops. The needle knits using a machine will not operate correctly, even if the start/ stop button is pressed after unlocking the machine. ● If the machine suddenly stops: - Turn off the machine, and unplug the power cord. - Restart the machine - Brother International Entrepreneur PR650e | Users Manual - English - Page 263
is not correctly set up or if an incorrect operation is performed, the machine stops and informs you of the error with a buzzer and an error message. If an error message appears, correct the problem according to the instructions in the message. To close the message, touch or perform the correct - Brother International Entrepreneur PR650e | Users Manual - English - Page 264
begin from the specified starting position. Change the starting position or rehoop the fabric and change the embroidering position. (Refer to page 123, 124.) The needle has stopped at an incorrect position. Turn the handwheel so that the mark on the handwheel is at the top. The - Brother International Entrepreneur PR650e | Users Manual - English - Page 265
screen. machine or the USB media. Touch to return to the embroidering settings screen. The previous embroidery in in "Resume Embroidering After Turning Off the Machine" on page 110 to align the needle position and sew the remainder of the using the thread trimming function. Troubleshooting 263 - Brother International Entrepreneur PR650e | Users Manual - English - Page 266
machine was unlocked. Touch to use the thread trimming function. The machine needs maintenance. (Refer to page 251.) The machine is retrieving a previously saved pattern. The machine was stopped while the needle reasons Cancel the write protection. embroidery frame. related to thread delivery - Brother International Entrepreneur PR650e | Users Manual - English - Page 267
the pattern in the machine's memory. You tried to use an editing An unusable embroidery card is function embroidery pattern. specifications (500,000 stitches) This pattern can not be combined. cannot be displayed. Use data 7 design software to reduce the number of stitches. Troubleshooting - Brother International Entrepreneur PR650e | Users Manual - English - Page 268
APPENDIX You tried to retrieve a pattern that You tried to use incompatible was downloaded for a different media. machine. The USB media is transmitting. Dust may have accumulated An error has occurred with the within the moving cutter. USB media. Clean the moving cutter. ( - Brother International Entrepreneur PR650e | Users Manual - English - Page 269
If any of the following messages appear, consult your nearest authorized dealer. 7 Troubleshooting 267 - Brother International Entrepreneur PR650e | Users Manual - English - Page 270
APPENDIX 268 - Brother International Entrepreneur PR650e | Users Manual - English - Page 271
until the screen shown below appears. • The start/stop button is red. X The adjustments screen appears. Use the included touch pen to touch the 2 center of the numbered crosses on the screen, from 1 to your nearest authorized dealer. 7 Turn the machine off, and on again. 4 Troubleshooting 269 - Brother International Entrepreneur PR650e | Users Manual - English - Page 272
Embroidery machine specifications Item Weight Machine size Sewing speed Hook Type Hook size Needle Number of needle Thread tension Cap sewing Tubular sewing Thread trimming Thread breakage sensor Automatic needle Normal size (Type L) HA130EBBR / #11 6 needles Manual (Option) 60 mm (H) × 130 mm (W) - Brother International Entrepreneur PR650e | Users Manual - English - Page 273
or a computer to download software upgrades for your embroidering machine. When an upgrade program is available on "http://solutions.brother.com", please download the files following the instructions on the website and steps below. Note ● When using USB media to upgrade the software, check that no - Brother International Entrepreneur PR650e | Users Manual - English - Page 274
, following message will appear. Copy the upgrade file to "Removable Disk". 4 Remove the USB media, and turn the 5 machine off and on again. Upgrade procedure using computer While pressing the automatic threading 1 button, turn the main power to on. X The following screen will appear on the - Brother International Entrepreneur PR650e | Users Manual - English - Page 275
needle plate 246 bobbin case 247 hook 245 LCD 245 machine surface 245 maintenance message 251 oiling machine Deleting attaching 232 preparing to use 227 removing 236 pattern 180 70 Caps Display guides 196 golf style 226 vertical 73, 75 standard (pro style 226 Dress shirt (woven - Brother International Entrepreneur PR650e | Users Manual - English - Page 276
245 Hook cover/Hook 20 Hooping 47, 91, 222 Horizontal mirror image key 164 I Industrial embroidery frame 224 J Jump code needle bar 97 Low Profile (Low fitting 226 Lower thread guide 20 M Machine operations guide key 206 Main power switch 21, 38, 69 Maintenance 206, 245 Manual needle - Brother International Entrepreneur PR650e | Users Manual - English - Page 277
76 Troubleshooting 206, 252 T-shirt 223 Sewing speed 127 Sewing the embroidery 63 U Sewing time 77 Uninterrupted embroidering (one color 131 Short stitch delete 194, 201 Units of measurements 195, 205 Silk 223 Unlock key 63, 78 Six-needle machine 8 Upgrading machine's software - Brother International Entrepreneur PR650e | Users Manual - English - Page 278
- Brother International Entrepreneur PR650e | Users Manual - English - Page 279
- Brother International Entrepreneur PR650e | Users Manual - English - Page 280
Please visit us at http://solutions.brother.com where you can get product support and answers to frequently asked questions (FAQs). English 884-T07 XE9981-001 Printed in Taiwan
-
 1
1 -
 2
2 -
 3
3 -
 4
4 -
 5
5 -
 6
6 -
 7
7 -
8
-
9
-
10
-
11
-
12
-
13
-
14
-
15
-
16
-
17
-
18
-
19
-
20
-
21
-
22
-
23
-
24
-
25
-
26
-
27
-
28
-
29
-
30
-
31
-
32
-
33
-
34
-
35
-
36
-
37
-
38
-
39
-
40
-
41
-
42
-
43
-
44
-
45
-
46
-
47
-
48
-
49
-
50
-
51
-
52
-
53
-
54
-
55
-
56
-
57
-
58
-
59
-
60
-
61
-
62
-
63
-
64
-
65
-
66
-
67
-
68
-
69
-
70
-
71
-
72
-
73
-
74
-
75
-
76
-
77
-
78
-
79
-
80
-
81
-
82
-
83
-
84
-
85
-
86
-
87
-
88
-
89
-
90
-
91
-
92
-
93
-
94
-
95
-
96
-
97
-
98
-
99
-
100
-
101
-
102
-
103
-
104
-
105
-
106
-
107
-
108
-
109
-
110
-
111
-
112
-
113
-
114
-
115
-
116
-
117
-
118
-
119
-
120
-
121
-
122
-
123
-
124
-
125
-
126
-
127
-
128
-
129
-
130
-
131
-
132
-
133
-
134
-
135
-
136
-
137
-
138
-
139
-
140
-
141
-
142
-
143
-
144
-
145
-
146
-
147
-
148
-
149
-
150
-
151
-
152
-
153
-
154
-
155
-
156
-
157
-
158
-
159
-
160
-
161
-
162
-
163
-
164
-
165
-
166
-
167
-
168
-
169
-
170
-
171
-
172
-
173
-
174
-
175
-
176
-
177
-
178
-
179
-
180
-
181
-
182
-
183
-
184
-
185
-
186
-
187
-
188
-
189
-
190
-
191
-
192
-
193
-
194
-
195
-
196
-
197
-
198
-
199
-
200
-
201
-
202
-
203
-
204
-
205
-
206
-
207
-
208
-
209
-
210
-
211
-
212
-
213
-
214
-
215
-
216
-
217
-
218
-
219
-
220
-
221
-
222
-
223
-
224
-
225
-
226
-
227
-
228
-
229
-
230
-
231
-
232
-
233
-
234
-
235
-
236
-
237
-
238
-
239
-
240
-
241
-
242
-
243
-
244
-
245
-
246
-
247
-
248
-
249
-
250
-
251
-
252
-
253
-
254
-
255
-
256
-
257
-
258
-
259
-
260
-
261
-
262
-
263
-
264
-
265
-
266
-
267
-
268
-
269
-
270
-
271
-
272
-
273
-
274
-
275
-
276
-
277
-
278
-
279
-
280
 |
 |
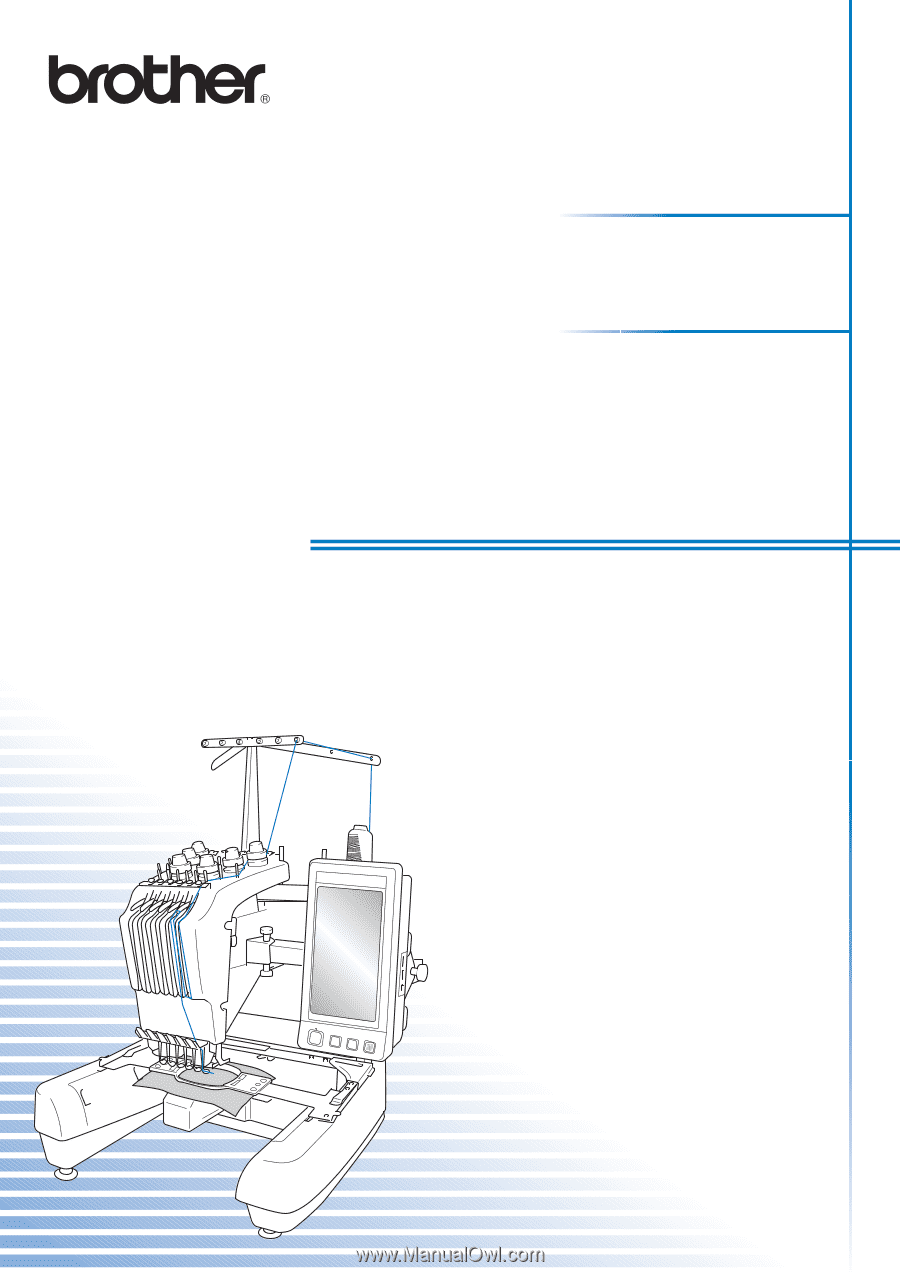
Operation Manual
Embroidery Machine
Product Code: 884-T07