Brother International HL 1850 Driver Setup Guide for Mac - English
Brother International HL 1850 - B/W Laser Printer Manual
 |
UPC - 012502603900
View all Brother International HL 1850 manuals
Add to My Manuals
Save this manual to your list of manuals |
Brother International HL 1850 manual content summary:
- Brother International HL 1850 | Driver Setup Guide for Mac - English - Page 1
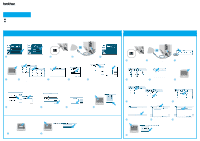
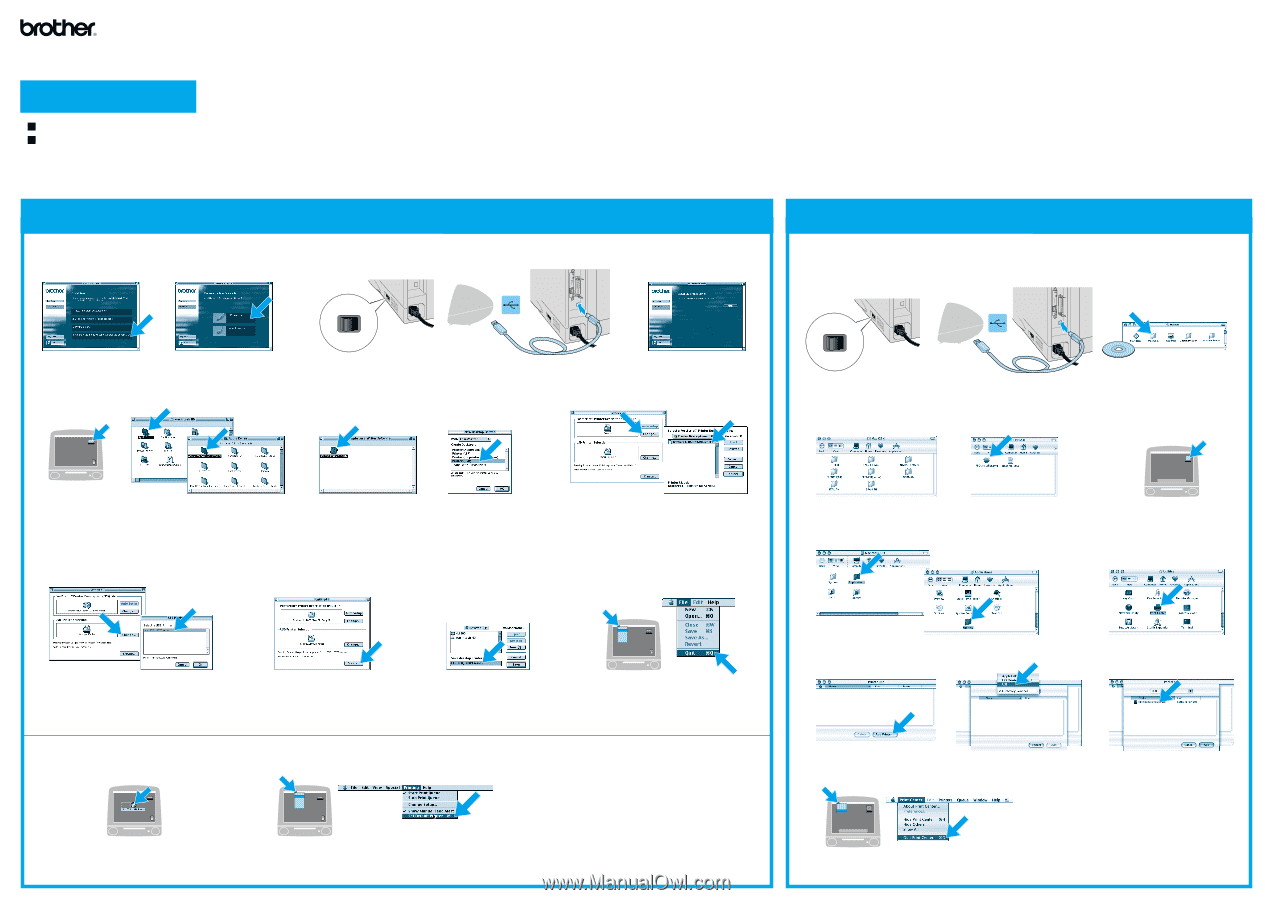
Laser Printer HL-1850 and HL-1870N Driver Installation Guide Macintosh® For USB Users Follow the instructions in this guide for your operating system. Some illustrations are based on the HL-1870N. Steps 1 to 4 Follow these steps in the Quick Setup Guide first. LJ5998001 Printed in China For Mac® OS - Brother International HL 1850 | Driver Setup Guide for Mac - English - Page 2
to the Network Quick Setup Guide. Follow the instructions in this guide for your operating system. Some illustrations are based on the HL-1870N. Steps 1 to 4 Follow these steps in the Quick Setup Guide first. For Mac® OS 8.6 to 9.2 Users Only Step 5 Connect the Printer to Your Macintosh® & Install
-
 1
1 -
 2
2
 |
 |
OFF
ON
O
I
OFF
ON
O
I
Open the
Macintosh HD
icon.
Click "Connect the interface
cable & Install the driver/utility."
Note:
If this screen appears,
select the USB
interface
cable.
Click the
HL-1850_1870N series
icon on the
Desktop.
The setup is now complete.
Select
Set Default Printer
from the Printing menu.
Step 5
Connect the Printer to Your Macintosh
®
& Install the BR-Script PPD File
Step 6
Setting Your Printer as the Default Printer
For Mac
®
OS 8.6 to 9.04 Users:
Open the Apple Extras folder.
Open the Apple LaserWriter Software folder.
For Mac
®
OS 9.1 to 9.2 Users:
Open the Applications (Mac
®
OS 9) folder.
Open the Utilities folder.
The illustrations are based
on Mac
®
OS 9.04.
For
Mac
®
OS 8.6 to 9.2
Users Only
Step 5
Connect the Printer to Your Macintosh
®
&
Install the BR-Script PPD File
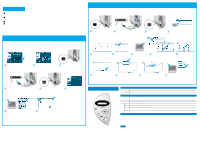
For
Mac
®
OS X 10.1
Users Only
Open the Desktop Printer
Utility icon.
Select Printer (USB), and
then click the OK button.
Click the Create... button.
Click the Change... button in USB Printer
Selection.
Select HL-1850_1870N series, and then click
the OK button.
Click the Change... button in PostScript
TM
Printer
Description (PPD) file.
Select Brother HL-1850_1870N series, and then
click the Select button.
Enter your printer name
(
HL-1850_1870N series
), and
then click the Save button.
Select
Quit
from the File menu.
Follow the instructions on
the screen.
Connect the USB interface cable to
your Macintosh
®
, and then connect it
to the printer.
Insert the CD-ROM into your
CD-ROM drive.
Open the Mac OS X folder.
Double-click the PPD Installer icon.
Follow the instructions on the screen.
Open your language folder.
Make sure the printer power
switch is on.
Make sure the printer power
switch is on.
Connect the USB interface cable to your
Macintosh
®
, and then connect it to the
printer.
Open the Macintosh HD icon.
Open the Applications folder.
Open the Utilities folder.
Open the Print Center icon.
Click the Add Printer...
button.
Select USB.
Select HL-1850_1870N series, and
then click the Add button.
Select
Quit Print Center
from the Print Center menu.
Steps 1 to 4
Follow these steps in the
Quick Setup Guide
first.
The setup is now complete.
Follow the instructions in this guide for your operating system.
Some illustrations are based on the HL-1870N.
Driver Installation Guide
Macintosh
®
For USB Users
Laser Printer HL-1850 and HL-1870N
LJ5998001 Printed in China
1
5
0
1
2
A
B
C
6
7
8
9
2
3
4
1
4
7
9
B
0
A
8
5
6
2
3