Brother International LS30 Users Manual - English
Brother International LS30 Manual
 |
View all Brother International LS30 manuals
Add to My Manuals
Save this manual to your list of manuals |
Brother International LS30 manual content summary:
- Brother International LS30 | Users Manual - English - Page 1
- Brother International LS30 | Users Manual - English - Page 2
changing the needle, threading the bobbin, or changing the presser foot. 15. Always unplug the sewing machine from the electrical outlet when removing covers, lubricating, or when making any other user service adjustments mentioned in this instruction manual. 16. This sewing machine is not intended - Brother International LS30 | Users Manual - English - Page 3
instructions avant d'utiliser la machine." DANGER - Pour réduire le risque de décharge électrique: 1. Ne jamais laisser la machine sans surveillance lorsqu'elle est branchée. Toujours débrancher la machine . Retourner la machine à coudre auprès du revendeur autorisé ou du service technique le plus - Brother International LS30 | Users Manual - English - Page 4
la clavija, no del cable. 10. Mantener los dedos alejados de todas las partes movibles de la máquina. Tener un cuidado especial con la aguja. 11. o cuando se realice algún otro tipo de ajuste mecánico mencionado en el manual de instrucciones. 16. Esta máquina de coser no ha sido pensada para que - Brother International LS30 | Users Manual - English - Page 5
tomada elétrica o plugue de força desta máquina quando for remover tampas, lubrificar ou efetuar qualquer outro ajuste de manutenção mencionado neste manual. 16. Esta máquina de costura não é destinada para ser usada por crianças pequenas ou pessoas deficientes sem supervisão. 17. Crianças pequenas - Brother International LS30 | Users Manual - English - Page 6
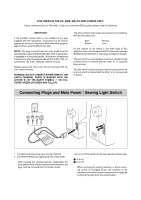
be removed from the socket outlet. Turn on or off the switch for the main power and sew-light. 1 Turn on 2 Turn off - When servicing the sewing machine, or when removing covers or changing lamps, the machine or the electrical set must be disconnected from the supply by removing the plug from the - Brother International LS30 | Users Manual - English - Page 7
THREADING THE MACHINE 14 Winding the Bobbin 14 Lower (bobbin) Threading 15 Upper (Needle) Threading 16 Drawing Up The Bobbin Thread 18 Twin-Needle Sewing (Option 19 Thread Tension 21 CHART OF SEWING FABRICS, NEEDLES AND THREAD COMBINATIONS 23 STRAIGHT AND ZIGZAG STITCHING Straight Stitching - Brother International LS30 | Users Manual - English - Page 8
ÍNDICE DEL CONTENIDO CONOZCA SU MÁQUINA DE COSER ELEMENTOS PRINCIPALES DE LA MÁQUINA ......... 1 ELEMENTOS PRINCIPALES 2 ACCESORIOS 3 FUNCIONAMIENTO DE LA MÁQUINA DE COSER .... 4 Conexión de los enchufes 4 Interruptor principal y de luz 5 Pedal 5 Inserción de la aguja 6 Comprobación de la - Brother International LS30 | Users Manual - English - Page 9
6 Changement de pied-de-biche 7 Couture bras libre 8 Stabiliser la machine 8 DIVERSES COMMANDES 9 Sélecteur de longueur de point 9 Levier de couture de point 11 Sélecteur de position de l'aiguille 12 ENFILAGE DE LA MACHINE 14 Remplissage de la canette 14 Mise en place du fil inférieur - Brother International LS30 | Users Manual - English - Page 10
ÍNDICE CONHEÇA SUA MÁQUINA DE COSTURA PRINCIPAIS PARTES DA SUA MÁQUINA 1 PARTES PRINCIPAIS 2 ACESSÓRIOS 3 OPERANDO A SUA MÁQUINA DE COSTURA 4 Conexão dos plugues 4 Interruptor de Força Principal e da Luz de Costura ..... 5 Reostato 5 Inserção da Agulha 6 Verificação da - Brother International LS30 | Users Manual - English - Page 11
KNOWING YOUR SEWING MACHINE CONNAÎTRE SA MACHINE À COUDRE CONOZCA SU MÁQUINA DE COSER CONHEÇA SUA MÁQUINA DE COSTURA PRINCIPAL PARTS OF YOUR PIECES PRINCIPALES DE LA MACHINE MACHINE ELEMENTOS PRINCIPALES DE LA MÁQUINA PRINCIPAIS PARTES DA SUA MÁQUINA 3 12 6 5 7 4 8 9 0 D A F E C B - Brother International LS30 | Users Manual - English - Page 12
Storage 5 Upper Tension Control Dial 6 Stitch Length Knob 7 Reverse Sewing Lever 8 Thread Cutter 9 Presser Foot Screw 0 Presser Foot (Zigzag) A Needle Plate (Zigzag) B Shuttle Hook C Bobbin Case D Feed Dogs E Needle F Needle Clamp Screw G Thread Guide/Bobbin Winding Tension Disc H Spool Pin - Brother International LS30 | Users Manual - English - Page 13
KNOWING YOUR SEWING MACHINE CONNAÎTRE SA MACHINE À COUDRE CONOZCA SU MÁQUINA DE COSER CONHEÇA SUA MÁQUINA DE COSTURA ACCESSORIES 1 Zipper Foot (1 pc.) (See note.) 2 Bobbins (2 pcs.) 3 Needle Set (Regular #14) (3 pcs.) 4 Extra Spool Pin (1 pc.) (See note.) 5 Darning Plate (1 pc.) Parts Code for - Brother International LS30 | Users Manual - English - Page 14
the foot controller and the power supply plug on the cord, into the jack on the machine. 2. Insert the power supply plug into an electrical outlet. CAUTION: 1. When changing the light bulb or when the sewing machine is not in use, the power supply plug must be disconnected from the wall socket to - Brother International LS30 | Users Manual - English - Page 15
longue période de temps selon les instructions page 54. Après l'avoir huilée, essuyer tout excédent d'huile. Note (For U.S.A. only): G Foot Controller: Model KD-1902 REMARQUE (Uniquement pour les Etats-Unis) : This foot controller can be used for sewing machine model LS-1717/ G Pèdale: modèle - Brother International LS30 | Users Manual - English - Page 16
KNOWING YOUR SEWING MACHINE CONNAÎTRE SA MACHINE À COUDRE CONOZCA SU MÁQUINA DE COSER CONHEÇA SUA recta y afilada para un perfecto cosido. 2. Para comprobar que la aguja no está doblada, coloque la parte plana de la aguja hacia abajo como se muestra en el dibujo. (Ver fig. B.) 3. Cambie la aguja - Brother International LS30 | Users Manual - English - Page 17
SEWING MACHINE CONNAÎTRE SA MACHINE À COUDRE CONOZCA SU MÁQUINA DE COSER CONHEÇA SUA MÁQUINA DE COSTURA Changing the Presser Foot It may be necessary to change the presser foot according to your sewing situé à l'arrière du support. 3. Placer un pied différent que hay en la parte trasera del soporte. - Brother International LS30 | Users Manual - English - Page 18
pour la retirer. 1 Table d'extension Steadying the Machine Stabiliser la machine When the sewing machine is placed on an uneven surface, turn the rubber ajustar su altura girando el cojinete de goma que se encuentra en la parte anterior derecha de la placa de base hasta que la máquina quede - Brother International LS30 | Users Manual - English - Page 19
YOUR SEWING MACHINE CONNAÎTRE SA MACHINE À COUDRE CONOZCA SU MÁQUINA DE COSER CONHEÇA SUA MÁQUINA DE COSTURA VARIOUS CONTROLS DIVERSES COMMANDES Stitch Length Knob Sélecteur de longueur de point The stitch length is regulated by turning this knob. The numbers above the knob represent the stitch - Brother International LS30 | Users Manual - English - Page 20
YOUR SEWING MACHINE CONNAÎTRE SA MACHINE À COUDRE CONOZCA SU MÁQUINA DE COSER CONHEÇA SUA MÁQUINA DE COSTURA Reverse Sewing Lever Levier de couture en marche arrière Reverse sewing is generally used for locking and reinforcing seams. To sew in reverse, hold down the reverse sewing lever - Brother International LS30 | Users Manual - English - Page 21
YOUR SEWING MACHINE CONNAÎTRE SA MACHINE À COUDRE CONOZCA SU MÁQUINA DE COSER CONHEÇA SUA MÁQUINA DE COSTURA Stitch Width Knob Sélecteur de largeur de point The width of the zigzag stitch is regulated by operating the stitch width knob. The numbers above the knob represent the stitch width - Brother International LS30 | Users Manual - English - Page 22
KNOWING YOUR SEWING MACHINE CONNAÎTRE SA MACHINE À COUDRE CONOZCA SU MÁQUINA DE COSER CONHEÇA SUA MÁQUINA DE COSTURA Needle Position Selector By shifting this lever to L (left), M (middle) or R (right), you can sew straight and zigzag stitches on the baseline. When you sew close to the edge of - Brother International LS30 | Users Manual - English - Page 23
1 2 3 4 13 KNOWING YOUR SEWING MACHINE CONNAÎTRE SA MACHINE À COUDRE CONOZCA SU MÁQUINA DE COSER CONHEÇA SUA MÁQUINA DE COSTURA - Brother International LS30 | Users Manual - English - Page 24
YOUR SEWING MACHINE CONNAÎTRE SA MACHINE À COUDRE CONOZCA SU MÁQUINA DE COSER CONHEÇA SUA MÁQUINA DE COSTURA THREADING THE MACHINE Winding the Bobbin ENFILAGE DE LA MACHINE Remplissage de la canette 1. Place the spool of thread on the spool pin and pass the thread around the bobbin winding - Brother International LS30 | Users Manual - English - Page 25
the bobbin case is not properly placed back into the machine, it will fall out from the shuttle immediately after starting to sew. 1 Bobbin case latch 2 Bobbin case finger 3 Tension spring 4 Notch "CAUTION" - "MOVING PARTS-TO REDUCE THE RISK OF INJURY, DISCONNECT FROM SUPPLY CIRCUIT BEFORE SERVICING - Brother International LS30 | Users Manual - English - Page 26
YOUR SEWING MACHINE CONNAÎTRE SA MACHINE À COUDRE CONOZCA SU MÁQUINA DE COSER CONHEÇA SUA MÁQUINA DE COSTURA 1 2 3 2 1 3 A B 5 4 4 6 C D Upper (Needle) Threading 1 Spool pin 2 Thread guide 3 Thread Take-up Lever 4 Upper (needle) Tension 5 Thread Check Spring 6 Lower Thread Guide - Brother International LS30 | Users Manual - English - Page 27
KNOWING YOUR SEWING MACHINE CONNAÎTRE SA MACHINE À COUDRE CONOZCA SU MÁQUINA DE COSER CONHEÇA SUA MÁQUINA DE COSTURA 1 2 3 2 1 3 y, a continuación, hacia delante, a través de la ranura derecha situada en la parte anterior de la máquina. 4. Tire del hilo hacia abajo desde la ranura derecha pas - Brother International LS30 | Users Manual - English - Page 28
SEWING MACHINE CONNAÎTRE SA MACHINE À COUDRE CONOZCA SU MÁQUINA DE COSER CONHEÇA SUA MÁQUINA DE COSTURA Drawing Up The Bobbin Thread Remontée du fil inférieur 1. Raise the presser foot and the needle to their highest positions. 2. With your left hand, hold the end of the upper thread parte - Brother International LS30 | Users Manual - English - Page 29
DE COSTURA Twin-Needle Sewing (Option) Your sewing machine is designed for twin needle sewing, which allows you to sew using two upper threads. You can use the same color or two different colors of thread for decorative stitches. Be sure that the two upper threads used for threading the twin needle - Brother International LS30 | Users Manual - English - Page 30
KNOWING YOUR SEWING MACHINE CONNAÎTRE SA MACHINE À COUDRE CONOZCA SU MÁQUINA DE COSER CONHEÇA SUA MÁQUINA PARA INSTALAR EL PORTACARRETES EXTRA Coloque el portacarretes vertical extra en el orificio previsto en la parte superior derecha de la máquina. Coloque el segundo carrete de hilo en el eje tal - Brother International LS30 | Users Manual - English - Page 31
32 32 KNOWING YOUR SEWING MACHINE CONNAÎTRE SA MACHINE À COUDRE CONOZCA SU MÁQUINA DE COSER CONHEÇA SUA MÁQUINA DE COSTURA Thread Tension Tension du fil Thread tension will affect the quality of your stitches. It may need to be adjusted when you change fabric or thread type. La tension du fil - Brother International LS30 | Users Manual - English - Page 32
SEWING MACHINE CONNAÎTRE SA MACHINE À COUDRE CONOZCA SU MÁQUINA DE COSER CONHEÇA SUA MÁQUINA DE COSTURA NOTE: The bobbin thread tension has already been adjusted at the factory for general use. For most sewing applications, no adjustment is needed. When sewing with thin thread D 2 1 2 1 22 - Brother International LS30 | Users Manual - English - Page 33
SA MACHINE À COUDRE CONOZCA SU MÁQUINA DE COSER CONHEÇA SUA MÁQUINA DE COSTURA CHART OF SEWING FABRICS, NEEDLES AND THREAD COMBINATIONS VERY THIN LIGHTWEIGHT MEDIUM WEIGHT HEAVYWEIGHT KNITS SEWING FABRICS Fine tricot, Fine lace, Thin linen, Silk, Organza, Chiffon NEEDLE SIZES #65/9 THREAD SIZES - Brother International LS30 | Users Manual - English - Page 34
KNOWING YOUR SEWING MACHINE CONNAÎTRE SA MACHINE À COUDRE CONOZCA SU MÁQUINA DE COSER CONHEÇA SUA MÁQUINA DE COSTURA TABLA DE COMBINACIONES ENTRE TEJIDOS, AGUJAS E HILOS MUY FINO LIGERO MEDIO PESADO PRENDAS DE - Brother International LS30 | Users Manual - English - Page 35
STITCH LENGTH STITCH WIDTH NEEDLE POSITION PRESSER FOOT NEEDLE F-4 0 M, L, R (For twin needle sewing, always set at M.) Zigzag Single or Twin Starting Sewing 1. Raise the needle to its highest position and lift the presser foot lever. 2. Pull up the bobbin thread inferior hacia la parte de atrás - Brother International LS30 | Users Manual - English - Page 36
the needle as a pivot point. 3. Lower the presser foot and start sewing in the new direction. NOTE: For twin needle sewing, raise the needle when changing the sewing direction. Finishing Sewing (fig. B) Reverse stitching is used to lock the threads at the end of the seam or wherever reinforcement is - Brother International LS30 | Users Manual - English - Page 37
STITCHING POINTS DROITS ET POINTS ZIGZAG PUNTADAS RECTAS Y ZIGZAG PONTOS RETO E ZIG-ZAG Sewing Fabric Edges Les bords For sewing thin fabric: While pulling both the needle and bobbin threads toward the back of the machine, start sewing o cartón bajo la parte posterior del prensatelas para elevarlo - Brother International LS30 | Users Manual - English - Page 38
guiding it over the feed dogs with your hands. (Feeding will be easier if the fabric is slightly stretched, or if the sewing machine Be sure that you are using the correct sized needle. (See page 23) s'assurer que tela doblada o cartón bajo la parte posterior del prensatelas para elevarlo.) Si la - Brother International LS30 | Users Manual - English - Page 39
fil entre les branches du pied-de-biche, vers l'arrière de la machine. Sewing on Very Thin Fabric An underlay of thin paper will act as a stablizer and will help to eliminate skipped stitches and fabric puckering when sewing on very thin fabric. Les tissus très légers Utiliser une fine feuille de - Brother International LS30 | Users Manual - English - Page 40
shown in fig.A. Do not pull the fabric; let the machine do the work. If you pull the fabric, the needle may either bend or break. However, when sewing on special fabrics, such as tricot, crepes, knits, etc., we recommend that you support the fabric both in front and in back of the - Brother International LS30 | Users Manual - English - Page 41
Stitch Set the stitch length between 1 and 4 for a simple zigzag stitch. NOTE: Zigzag stitching requires less upper thread tension than straight stitching. 1. With the stitch length set between 0 and 1, sew 5-6 straight stitches for reinforcement. 2. Set the stitch de la machine. Point bourdon - Brother International LS30 | Users Manual - English - Page 42
STRAIGHT AND ZIGZAG STITCHING POINTS DROITS ET POINTS ZIGZAG PUNTADAS RECTAS Y ZIGZAG PONTOS RETO E ZIG-ZAG Puntada zigzag Larga de puntada Ancho de puntada Posición de la aguja Prensatelas - Brother International LS30 | Users Manual - English - Page 43
table on the next page. M, L, R Zigzag Single or Twin Various decorative stitches can be obtained by sewing with the Satin Stitch according to the instructions on the following page. NOTE: When using a twin needle, be sure to use a stitch width of less than 3 and set the needle position selector to - Brother International LS30 | Users Manual - English - Page 44
from 0 to 5, then from 5 to 0 while depressing the foot control at an even speed. NOTE: For twin needle sewing, repeatedly move the stitch width knob from 0 to 3, then from 3 to 0. Repeatedly move the stitch width knob from 0 to 5, then from 5 to 0 more slowly than for the shape above to make round - Brother International LS30 | Users Manual - English - Page 45
BUILT-IN STITCHES POINTS INCLUS PUNTADAS INCORPORADAS PONTOS EMBUTIDOS Aguja Posición de la aguja L Aguja simple M R Aguja doble M L Aguja simple M R Aguja doble M L Aguja simple M R Aguja doble M Patrón cosido - Brother International LS30 | Users Manual - English - Page 46
Turn the balance wheel counterclockwise if necessary.) Step C: Final Bar Tack 1. Set the stitch width to 5. 2. Sew 3-6 stitches. 3. Stop the machine when the needle is in the fabric on the left side of the stitch (position C). (Turn the balance wheel conterclockwise if necessary.) Step D: Left Row - Brother International LS30 | Users Manual - English - Page 47
BUTTONHOLE AND BUTTON SEWING COUTURE DE BOUTONNIÈRES ET DE BOUTONS OJALES Y COSTURA DE BOTONES COMO CASEAR E PREGAR BOTÕES Para coser ojales Largo de puntada Ancho de puntada - Brother International LS30 | Users Manual - English - Page 48
the needle is in the fabric and at the right side of the stitches. (position C) Step D: Right Row 1. Set the needle position at R, stitch width at 2 and stitch length at F. 2. Sew until the needle reaches the other bar tack. 3. Stop the machine when the needle is in the fabric and at the right side - Brother International LS30 | Users Manual - English - Page 49
BUTTONHOLE AND BUTTON SEWING COUTURE DE BOUTONNIÈRES ET DE BOUTONS OJALES Y COSTURA DE BOTONES COMO CASEAR E PREGAR BOTÕES Método alternativo para coser ojales. Paso A: Remate delantero 1. Ajuste - Brother International LS30 | Users Manual - English - Page 50
between the holes in the button and sew on the button as previously explained. 2. After sewing about 10 stitches, remove the fabric from the machine leaving a longer upper thread (about 15 cm (6")) in order to form a thread shank. 3. Pull the upper thread through one of the holes on the button - Brother International LS30 | Users Manual - English - Page 51
BUTTONHOLE AND BUTTON SEWING COUTURE DE BOUTONNIÈRES ET DE BOUTONS OJALES Y COSTURA el revés del tejido y anúdelos para asegurar el botón. 8. Quite la placa de zurcir levantando la parte delantera, para poder seguir con una costura normal. 1 Ranura delantera de la placa de zurcir Para crear una - Brother International LS30 | Users Manual - English - Page 52
See fig. B. Sew through the fabric close to the edge of the zipper guiding the zipper foot along the zipper teeth. 5. To sew the opposite side ère, libérer le pied en relevant le levier situé à l'arrière du support, installer le pied pour fermeture à glissière de l'autre côté de la fermeture et - Brother International LS30 | Users Manual - English - Page 53
largo de los dientes de la cremallera. 5. Para coser el lado opuesto de la cremallera, suelte la pata al subir la palanca situada en la parte posterior del soporte, instale la pata en el otro lado de la cremallera y siga cosiendo, pasando la aguja por la hendidura del otro lado. 1 Pata - Brother International LS30 | Users Manual - English - Page 54
2 environ) de façon à ce que le fil inférieur se trouve du côté envers du tissu. 2. Sew a single row or evenly-spaced multiple rows of Straight Stitches. 3. Pull the lower thread(s) to gather the fabric. 2. Faire une seule ligne ou plusieurs lignes de points droits à intervalles égaux. 3. Tirer - Brother International LS30 | Users Manual - English - Page 55
APLICAÇÕES Darning Reprisage STITCH LENGTH STITCH WIDTH NEEDLE POSITION sewing alternating between gently drawing the work away from you and pulling it toward you. With the darning plate on the machine las manos. 5. Repita este movimiento hasta que la parte que va a zurcirse se llene con líneas - Brother International LS30 | Users Manual - English - Page 56
superposés sous le pied-de-biche et coudre. 2. Place the overlapping edges under the presser foot and sew. NOTE: A decorative touch can be added by using the Satin Stitch or a Decorative Stitch to attach the lace. REMARQUE : Il est possible d'embellir la couture de la dentelle à l'aide d'un point - Brother International LS30 | Users Manual - English - Page 57
cut design to the fabric in the location where desired. 2. Carefully sew around the edge of the cutout design with a Zigzag Stitch in the short stitch length. 1 Applique stitching 3. Cut away the surplus fabric outside of the stitching. 4. Remove the basting, if necessary. Pour créer une applique - Brother International LS30 | Users Manual - English - Page 58
. 1. Both the upper and lower threads should be the same color as the fabric. 2. Fold back the fabric to the desired location of the hem as shown in fig. A. Then, fold the edge of the fabric as in fig. B. Leave a 6 mm (1/4") overlap at the edge. 3. Sew 5-6 stitches on the fold as in fig - Brother International LS30 | Users Manual - English - Page 59
the left side of the zigzag stitch is sewn and misses the edge of the fabric with the right side of the stitch. Sew with this needle position along la aguja penetre el tejido al coser la parte izquierda de la puntada zigzag y sobrepase la orilla al coser la parte derecha. Cosa con la aguja en esta - Brother International LS30 | Users Manual - English - Page 60
Lower the presser foot making sure the cord is centered and sew using the zigzag stitch. Guide the cord by hand along the path which you wish to 1. Ajuste el ancho de la puntada para que la aguja pase justo por ambas partes del cordón. 2. Coloque el cordón en el tejido donde debe coserse. 3. Baje - Brother International LS30 | Users Manual - English - Page 61
stitches to hold the end of the thread. 6. Grip the hoop with the thumb and forefingers of both hands while pressing the fabric with the middle and third fingers and supporting the outside of the hoop with your smaller fingers. Monogramming 1. Sew à la position de départ en tournant le volant et - Brother International LS30 | Users Manual - English - Page 62
(para bordados) en el derecho del tejido 3. Estire el tejido en un bastidor tan firmemente como pueda con el revés del tejido en la parte inferior del círculo interior. 4. Coloque la tela debajo de la aguja y baje la barra del prensatelas, aunque no haya ninguno puesto. 5. Girando la ruedecilla - Brother International LS30 | Users Manual - English - Page 63
from the outlet. 2. Loosen the face plate screw as shown in fig. A. 3. Remove the face plate from the machine as illustrated in fig. B. 4. Replace the sewing light bulb. See fig. C. 1 Bulb 2 Loosen 3 Tighten 5. Reattach the face plate and fasten the screw as shown in fig. D. 1. Retirer la fiche de - Brother International LS30 | Users Manual - English - Page 64
used more than one hour a day. If the machine is used more often, oil every day. Sewing machine oil is available from your local sewing machine dealer or service center. Do not apply too much oil as it may get on your thread and fabric. REMARQUE: La machine doit être huilée une fois par semaine si - Brother International LS30 | Users Manual - English - Page 65
the free arm. 3. Take out the bobbin case by opening its latch and pulling it out thread with a brush from the retaining ring, hook, driver and race body . 5 Driver 6 Race body 2. A cloth dampened with machine oil screws. 2. Clean the lint from the upper part of the feed dogs and shuttle race body - Brother International LS30 | Users Manual - English - Page 66
alimentadores (fig. C) 1. Retire la placa de agujas aflojando los tornillos con una moneda o un destornillador. 2. Con un cepillo, limpie la pelusa de la parte superior de los alimentadores y de la pista de la lanzadera. Remoção do Gancho da Lançadeira 1. Eleve a agulha até a sua posição mais alta - Brother International LS30 | Users Manual - English - Page 67
ENTRETIEN MANTENIMIENTO MANUTENÇÃO Performance Checklist Whenever sewing difficulties are encountered, review the section in this instruction manual that details the operation you are performing to make sure you are correctly using the machine. If the problem continues, the following checklist may - Brother International LS30 | Users Manual - English - Page 68
BREAKS MACHINE IS NOISY OR SLOW MACHINE DOES NOT START Stitch length dial is set at no feeding. Needle is not correctly inserted. Lint is clinging to the bottom of the needle plate. Power supply plug is removed from outlet. M Page 9 No M The combination of needle size/ thread size/fabric - Brother International LS30 | Users Manual - English - Page 69
améliorer le fonctionnement de la machine. Si les problèmes persistent, contacter le centre de service le plus proche. LE FIL quate. M Page 21 No M La bobine de fil n'est pas correcte- ment en place. M Page 22 No M Le fil inférieur n'est pas correcte- ment en place. M Page 23 No M Il - Brother International LS30 | Users Manual - English - Page 70
MANUTENÇÃO LE TISSU NE PASSE PAS CORRECTEMENT L'AIGUILLE SE CASSE LA MACHINE FAIT DU BRUIT OU FONCTIONNE LENTEMENT LA MACHINE NE SE MET PAS EN MARCHE Le sélecteur de longueur de point du butoir de la canette. M Page 14 No No M M M M CONTACTER LE CENTRE DE SERVICE LOCAL 60 - Brother International LS30 | Users Manual - English - Page 71
con dificultades al coser, vuelva a consultar la parte de este manual de instrucciones que detalla la operación que está M Pagina 15, 17 No M La aguja utilizada no es correcta. M Pagina 21 M No Pagina 22 M No M El carrete está mal colocado. El hilo inferior está mal enhebrado. M Pagina 24 No - Brother International LS30 | Users Manual - English - Page 72
MAINTENANCE ENTRETIEN MANTENIMIENTO MANUTENÇÃO EL TEJIDO NO ARRASTRA BIEN LA AGUJA SE ROMPE LA MÁQUINA ES RUIDOSA O FUNCIONA MUY DESPACIO LA MÁQUINA NO ARRANCA El selector de largo de puntada está puesto para que el tejido no arrastre. M Pagina 9 No M La combinación tamaño de aguja/ - Brother International LS30 | Users Manual - English - Page 73
que encontrar dificuldades durante a costura, reveja a seção neste manual de instruções que detalha a operação em execução, para instalado. M Página 15 Não M A linha inferior está muito esticada. M Página 22 Não M A passagem da linha inferior não está correta. M Página 6 Não M - Brother International LS30 | Users Manual - English - Page 74
MAINTENANCE ENTRETIEN MANTENIMIENTO MANUTENÇÃO O TECIDO NÃO AVANÇA BEM QUEBRA DA AGULHA A MÁQUINA ESTÁ LENTA OU RUIDOSA A MÁQUINA NÃO ARRANCA O seletor de comprimento do ponto está ajustado para não avançar. A agulha não está corretamente inserida. Fiapos aderidos na base da chapa de - Brother International LS30 | Users Manual - English - Page 75
fabrics for future use. It may become necessary to reship the sewing machine. Improper packing or improper packing fabric could result in damage during shipping. Instructions for repacking the machine are illustrated. Remballage de la machine Garder le carton et le matériel d'emballage pour un - Brother International LS30 | Users Manual - English - Page 76
Light Bulb Replacement 53 Switch 5 Sewing on Very Thin Fabric 29 Shuttle Hook Removal 55 Shuttle Race Cleaning 55 Spool Installing 16 Steadying the Machine 8 Stitch Length Knob 9 Stitch Width Knob 11 Straight Stitching 25 T Threading Bobbin 15 Needle 16 Thread Tension 21 Troubleshooting - Brother International LS30 | Users Manual - English - Page 77
de la couture 26 Sélecteur de largeur de point 11 Sélecteur de longueur de point 9 Sélecteur de tension supérieure 21 Stabiliser la machine 8 T Tableau des combinaisons tissus/aiguilles/ fils 23 Tension de fil 21 V Vérification de fonctionnement 59-60 L Lampe Interrupteur 5 Remplacement de - Brother International LS30 | Users Manual - English - Page 78
INDEX INDEX ÍNDICE ÍNDICE REMISSIVO Página A Accesorios 3 Aguja Cambio 6 Comprobación 6 Enhebrado 17 Selector de posición 12 Alimentador Limpieza 56 Aplicaciones 47 B Bobinado de la canilla 14 Bombilla Cambio de la bombilla 53 Interruptor 5 Bordados 51 C Cambio de la bombilla 53 - Brother International LS30 | Users Manual - English - Page 79
adeira 56 Lista de Inspeção do Desempenho 63-64 Lubrificação 54 Luz de Costura Interruptor 5 Substituição da Lâmpada 53 M Monogramas 52 Página P Partes Principais 2 Passagem da Linha Agulha 17 Bobina 15 Passagem da Linha Inferior (da Bobina 15 Passagem da Linha Superior 17 Ponto Chuleado - Brother International LS30 | Users Manual - English - Page 80
INDEX INDEX ÍNDICE ÍNDICE REMISSIVO 70 - Brother International LS30 | Users Manual - English - Page 81
INDEX INDEX ÍNDICE ÍNDICE REMISSIVO 71 - Brother International LS30 | Users Manual - English - Page 82
ENGLISH FRANÇAIS ESPAÑOL PORTUGUÊS XD0774-2212 Printed in China
-
 1
1 -
 2
2 -
 3
3 -
 4
4 -
 5
5 -
 6
6 -
 7
7 -
8
-
9
-
10
-
11
-
12
-
13
-
14
-
15
-
16
-
17
-
18
-
19
-
20
-
21
-
22
-
23
-
24
-
25
-
26
-
27
-
28
-
29
-
30
-
31
-
32
-
33
-
34
-
35
-
36
-
37
-
38
-
39
-
40
-
41
-
42
-
43
-
44
-
45
-
46
-
47
-
48
-
49
-
50
-
51
-
52
-
53
-
54
-
55
-
56
-
57
-
58
-
59
-
60
-
61
-
62
-
63
-
64
-
65
-
66
-
67
-
68
-
69
-
70
-
71
-
72
-
73
-
74
-
75
-
76
-
77
-
78
-
79
-
80
-
81
-
82
 |
 |
