Brother International MFC-J4710DW Quick Setup Guide - English
Brother International MFC-J4710DW Manual
 |
View all Brother International MFC-J4710DW manuals
Add to My Manuals
Save this manual to your list of manuals |
Brother International MFC-J4710DW manual content summary:
- Brother International MFC-J4710DW | Quick Setup Guide - English - Page 1
Quick Setup Guide Start Here MFC-J4510DW MFC-J4710DW Thank you for choosing Brother, your support is important to us and we value your business. Your Brother product is engineered and manufactured to the highest standards to deliver reliable performance, day-in and day-out. Please read the Product - Brother International MFC-J4710DW | Quick Setup Guide - English - Page 2
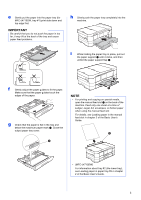
manual feed slot cover, or the control panel. Doing this may cause the machine to slip out of your hands. Carry the machine by sliding your hands into the handhold indentations located on each side of the machine. For detailed information, see the Product Safety Guide. a Pull the paper tray (for MFC - Brother International MFC-J4710DW | Quick Setup Guide - English - Page 3
, open the manual feed slot a on the back of the machine. Feed only one sheet at a time of Ledger, Legal, A3, envelopes, or thicker paper when using the manual feed slot. For details, see Loading paper in the manual feed slot in chapter 2 of the Basic User's Guide. 1 • (MFC-J4710DW) For information - Brother International MFC-J4710DW | Quick Setup Guide - English - Page 4
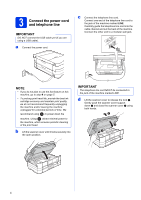
guide the telephone line cord into the cable channel and out the back of the machine. Connect the other end to a modular wall jack. NOTE • If you do not plan to use the fax feature on this machine, go to step 4 on page 5. • To prolong print head life, provide the best ink cartridge - Brother International MFC-J4710DW | Quick Setup Guide - English - Page 5
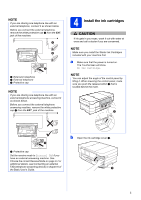
are sharing one telephone Ink Cartridges included with your machine first. a Make sure that the power is turned on. The Touchscreen will show No Ink Cartridge. NOTE You can adjust the angle of the control panel by lifting it. When lowering the control Guide. b Open the ink cartridge cover a. 1 5 - Brother International MFC-J4710DW | Quick Setup Guide - English - Page 6
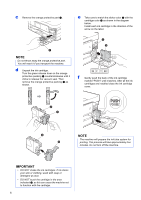
match the sticker color a with the cartridge color b as shown in the diagram below. Install each ink cartridge in the direction of the arrow on the label. 1 NOTE Do not throw away the orange protective part. You will need it if you transport the machine. d Unpack the ink cartridge. Turn the green - Brother International MFC-J4710DW | Quick Setup Guide - English - Page 7
and/or cartridges. To protect your investment and obtain premium performance from the Brother machine, we strongly recommend the use of Genuine Brother Supplies. 5 Check the print quality NOTE Make sure you put paper in the paper tray (for MFC-J4710DW, tray #1, the upper tray) for the initial setup - Brother International MFC-J4710DW | Quick Setup Guide - English - Page 8
(MFC-J4710DW) For your machine to produce the best print quality and to feed the correct paper size, the paper type and size must be set to match the paper in the tray. For details on the types and sizes of paper supported, see Paper Size and Type in chapter 2 of the Basic User's Guide. NOTE - Brother International MFC-J4710DW | Quick Setup Guide - English - Page 9
faxes? Brother uses the term "Distinctive Ring" but telephone companies may have other names for this service such as Custom Ringing, RingMaster, Personalized Ring, Teen Ring, Ident-A-Call, and Smart Ring. See Distinctive Ring in chapter 6 of the Basic User's Guide for instruction on setting - Brother International MFC-J4710DW | Quick Setup Guide - English - Page 10
User's Guide. a Press . b Press All Settings. c Swipe up or down, or press a or b to display Initial Setup. Press Initial Setup. d change it, press d or c to move the cursor to the incorrect one. Press and then re-enter the correct one business or other entity or other individual sending the - Brother International MFC-J4710DW | Quick Setup Guide - English - Page 11
see Transmission Verification Report in chapter 4 of the Basic User's Guide. 13 Set Tone or Pulse dialing mode (Canada only) Your machine comes set for Tone dialing service. If you have a Pulse dialing service (rotary), you need to change the dialing mode. a Press . b Press All Settings. c Swipe up - Brother International MFC-J4710DW | Quick Setup Guide - English - Page 12
16 Set the Time Zone You can set the time zone on the machine for your location. For example, the time zone for Eastern Time in the USA and Canada is UTC-05:00. a Press . b Press 00:00 01.01.2012 (Date and Time). c Swipe up or down, or press a or b to display Time Zone. Press Time Zone. d Enter your - Brother International MFC-J4710DW | Quick Setup Guide - English - Page 13
a CD-ROM drive you can download the latest drivers, manuals and utilities for your model from the Brother Solutions Center at http://solutions.brother.com/. Some software applications included on the CD-ROM may not be available as a download. For USB interface cable Windows®, go to page 14 Macintosh - Brother International MFC-J4710DW | Quick Setup Guide - English - Page 14
-ROM includes Nuance™ PaperPort™ 12SE. This software supports Windows® XP Home (SP3 or greater), XP Professional (SP3 or greater), XP Professional x64 Edition (SP2 or greater), Windows Vista® (SP2 or greater) and Windows® 7. Update to the latest Windows® Service Pack before installing MFL-Pro Suite - Brother International MFC-J4710DW | Quick Setup Guide - English - Page 15
, click Next. g When the On-Line Registration screen is displayed, follow the on-screen instructions. Click Next. h If you do not want to set your machine as the default printer, uncheck Set as Default Printer and click Next. IMPORTANT Make sure that the cable does not restrict the cover from - Brother International MFC-J4710DW | Quick Setup Guide - English - Page 16
XML Paper Specification Printer Driver The XML Paper Specification Printer Driver is the most suitable driver for Windows Vista® and Windows® 7 when printing from applications that use the XML Paper Specification documents. Please download the latest driver by accessing the Brother Solutions Center - Brother International MFC-J4710DW | Quick Setup Guide - English - Page 17
Windows® Macintosh USB USB Macintosh For USB interface users (Mac OS X v10.5.8, 10.6.x, 10.7.x) 18 Before you install Make sure your machine is connected to the power and your Macintosh is ON. You must be - Brother International MFC-J4710DW | Quick Setup Guide - English - Page 18
support down b and close the scanner cover c using both hands. 1 3 2 d Please wait for the software to install. After the installation, the Brother software will search for the Brother your machine. f When this screen appears, click Add Printer. Choose your machine from the list. Click Add and - Brother International MFC-J4710DW | Quick Setup Guide - English - Page 19
is added to Brother ControlCenter2. You can easily scan, share and organize photos and documents using Presto! PageManager. a On the Brother Support screen, click the Presto! PageManager to go to the Presto! PageManager download site, and follow the on-screen instructions. Finish The installation - Brother International MFC-J4710DW | Quick Setup Guide - English - Page 20
-ROM includes Nuance™ PaperPort™ 12SE. This software supports Windows® XP Home (SP3 or greater), XP Professional (SP3 or greater), XP Professional x64 Edition (SP2 or greater), Windows Vista® (SP2 or greater) and Windows® 7. Update to the latest Windows® Service Pack before installing MFL-Pro Suite - Brother International MFC-J4710DW | Quick Setup Guide - English - Page 21
, guide both cables through the cable channel with one on top of the other. d Lift the scanner cover to release the lock a. Gently push the scanner cover support down • For Windows Vista® and Windows® 7, when the User Account Control screen appears click Continue or Yes. • If the Brother screen does - Brother International MFC-J4710DW | Quick Setup Guide - English - Page 22
54926. If you still have trouble with your network connection, add UDP ports 137 and 161. Confirm your settings by following the on-screen instructions. e The installation of the Brother drivers will automatically start. The installation screens appear one after another. IMPORTANT DO NOT cancel - Brother International MFC-J4710DW | Quick Setup Guide - English - Page 23
XML Paper Specification Printer Driver The XML Paper Specification Printer Driver is the most suitable driver for Windows Vista® and Windows® 7 when printing from applications that use the XML Paper Specification documents. Please download the latest driver by accessing the Brother Solutions Center - Brother International MFC-J4710DW | Quick Setup Guide - English - Page 24
and your Macintosh is ON. You must be logged on with Administrator rights. NOTE • For Mac OS X v10.5.0 to 10.5.7 users, upgrade to Mac OS X v10.5.8 - 10.7.x. • If you have previously set up your machine for a wireless network and then want to set it up on a wired network, you should check that the - Brother International MFC-J4710DW | Quick Setup Guide - English - Page 25
push the scanner cover support down b and close the scanner cover c using both hands. 1 3 2 c Choose Wired Network Connection (Ethernet), and then click Next. Follow the on-screen instructions. d Please wait for the software to install. After the installation, the Brother software will search for - Brother International MFC-J4710DW | Quick Setup Guide - English - Page 26
• You can find your machine's MAC Address (Ethernet Address) and IP Address Guide. • If this screen appears, click OK. f When this screen appears, click Add Printer. you press Scan and choose a scan option. (For more information, see Network Scanning in the Software User's Guide.) The installation - Brother International MFC-J4710DW | Quick Setup Guide - English - Page 27
, share and organize photos and documents using Presto! PageManager. a On the Brother Support screen, click the Presto! PageManager to go to the Presto! PageManager download site, and follow the on-screen instructions. 22 Install MFL-Pro Suite on additional computers (if needed) If you want to use - Brother International MFC-J4710DW | Quick Setup Guide - English - Page 28
your machine in Ad-hoc mode (connected to a wireless-capable computer without an access point/router) you can find instructions in the Network User's Guide on the CD-ROM. You can view the Network User's Guide by following the instructions below. 1 Turn on your computer. Insert the CD-ROM into your - Brother International MFC-J4710DW | Quick Setup Guide - English - Page 29
Network Users 19 Choose your wireless setup method The following instructions will offer three methods for setting up your Brother machine on a wireless network. Choose the method you prefer for your environment. a Setup using the installation CD-ROM and a USB cable (Windows® and Macintosh) You need - Brother International MFC-J4710DW | Quick Setup Guide - English - Page 30
methods b and c, start your wireless setup by pressing the Wi-Fi button on the Touchscreen. b Manual setup from the control panel using the Setup Wizard (Windows®, Macintosh and mobile devices) If your wireless access point/router does not support WPS (Wi-Fi Protected Setup™) or AOSS™, write down - Brother International MFC-J4710DW | Quick Setup Guide - English - Page 31
instructions provided with your firewall software for information on how to add the following network ports. For network scanning, add UDP port 54925. For network PC-Fax receiving, add UDP port 54926. If you still have trouble with your network connection, add UDP ports 137 and 161. Wireless - Brother International MFC-J4710DW | Quick Setup Guide - English - Page 32
machine. h When the following screen appears, the wizard will search for wireless networks available to your machine. Choose the SSID that you wrote down for the SSID you can manually add it by clicking the Advanced button. Follow the on-screen instructions for entering the Name (SSID), and then - Brother International MFC-J4710DW | Quick Setup Guide - English - Page 33
will remain unchanged if you click Cancel. • If you want to manually enter the IP address settings of your machine, click Change IP Address and enter the necessary IP address settings for your network. • If the wireless setup failure screen appears, click Retry. l Click Next to continue to install - Brother International MFC-J4710DW | Quick Setup Guide - English - Page 34
with the application. To download the User's Guide for the application you are using, please go to the manuals download selection on your model's home page of the Brother Solutions Center at http://solutions.brother.com/. To install MFL-Pro Suite, continue to step 21. For Windows® users: Now go to - Brother International MFC-J4710DW | Quick Setup Guide - English - Page 35
with the application. To download the User's Guide for the application you are using, please go to the manuals download selection on your model's home page of the Brother Solutions Center at http://solutions.brother.com/. To install MFL-Pro Suite, continue to step 21. For Windows® users: Now go to - Brother International MFC-J4710DW | Quick Setup Guide - English - Page 36
within about 3.3 feet (one meter) from the wireless access point when you are configuring the wireless settings. - If your wireless access point/router is using MAC address filtering, confirm the MAC address of the Brother machine is allowed in the filter. 2. If you manually entered the SSID and - Brother International MFC-J4710DW | Quick Setup Guide - English - Page 37
, change the authentication and encryption methods of the wireless access point/router. Your machine supports the following authentication methods: authentication method encryption method WPA-Personal WPA2-Personal Open TKIP AES AES WEP None (without encryption) Shared key WEP If your problem - Brother International MFC-J4710DW | Quick Setup Guide - English - Page 38
-ROM includes Nuance™ PaperPort™ 12SE. This software supports Windows® XP Home (SP3 or greater), XP Professional (SP3 or greater), XP Professional x64 Edition (SP2 or greater), Windows Vista® (SP2 or greater) and Windows® 7. Update to the latest Windows® Service Pack before installing MFL-Pro Suite - Brother International MFC-J4710DW | Quick Setup Guide - English - Page 39
Wireless Network Windows® d When this screen appears, choose Change the Firewall port settings to enable network connection and continue with the installation. (Recommended) and click Next. f The installation of the Brother drivers will automatically start. The installation screens appear one - Brother International MFC-J4710DW | Quick Setup Guide - English - Page 40
XML Paper Specification Printer Driver The XML Paper Specification Printer Driver is the most suitable driver for Windows Vista® and Windows® 7 when printing from applications that use the XML Paper Specification documents. Please download the latest driver by accessing the Brother Solutions Center - Brother International MFC-J4710DW | Quick Setup Guide - English - Page 41
drivers & software (Mac OS X v10.5.8, 10.6.x, 10.7.x) 21 Before you install d The Brother software will search for the Brother device in your wireless your wireless settings fail, the Wireless Device Setup Wizard screen appears. Follow the on-screen instructions to complete the wireless - Brother International MFC-J4710DW | Quick Setup Guide - English - Page 42
Wireless Network Macintosh f The installation of the Brother drivers will automatically start. Please wait for the software to install. NOTE • You can find your machine's MAC Address (Ethernet Address) and IP Address by printing out the Network Configuration Report. See Printing the Network - Brother International MFC-J4710DW | Quick Setup Guide - English - Page 43
, share and organize photos and documents using Presto! PageManager. a On the Brother Support screen, click the Presto! PageManager to go to the Presto! PageManager download site, and follow the on-screen instructions. Macintosh 24 Install MFL-Pro Suite on additional computers (if needed) If you - Brother International MFC-J4710DW | Quick Setup Guide - English - Page 44
Windows® 1 Install optional applications FaceFilter Studio and BookScan & Whiteboard Suite supported by Reallusion, Inc FaceFilter Studio is an easy-to-use borderless photo printing application. The BookScan Enhancer software can correct your scanned screen. c Click the Download button and choose a - Brother International MFC-J4710DW | Quick Setup Guide - English - Page 45
network settings of the internal Print/Scan server to the factory default, please cables once this is complete. Entering Text for Wireless Settings Press to cycle between lower case and and want to change it, move the cursor to the incorrect one. Press and then re-enter the correct one. You can - Brother International MFC-J4710DW | Quick Setup Guide - English - Page 46
"KASAGO TCP/IP" software developed by ZUKEN ELMIC,Inc. Get inspired. If you're using Windows®, double-click the Brother CreativeCenter icon on your desktop to access our FREE website with many ideas and resources for personal and professional use. Mac users can access Brother CreativeCenter at this
-
 1
1 -
 2
2 -
 3
3 -
 4
4 -
 5
5 -
 6
6 -
 7
7 -
8
-
9
-
10
-
11
-
12
-
13
-
14
-
15
-
16
-
17
-
18
-
19
-
20
-
21
-
22
-
23
-
24
-
25
-
26
-
27
-
28
-
29
-
30
-
31
-
32
-
33
-
34
-
35
-
36
-
37
-
38
-
39
-
40
-
41
-
42
-
43
-
44
-
45
-
46
 |
 |

1
Start Here
Quick Setup Guide
USA/CAN Version 0
MFC-J4510DW
MFC-J4710DW
Thank you for choosing Brother, your support is important to us and we value your business. Your Brother product
is engineered and manufactured to the highest standards to deliver reliable performance, day-in and day-out.
Please read the Product Safety Guide first before you set up your machine. Then, please read this Quick Setup
Guide for the correct setup and installation.
1
Unpack the machine and check the components
Most of the illustrations in this Quick Setup Guide show the MFC-J4510DW
.
The components included in the box may differ depending on your country
.
WARNING
Plastic bags are used in the packing of your machine. Plastic bags are not toys. To avoid the danger
of suffocation, keep these bags away from babies and children and dispose of them correctly.
WARNING
WARNING
indicates a potentially hazardous situation which, if not avoided, could result in death
or serious injuries.
CAUTION
CAUTION
indicates a potentially hazardous situation which, if not avoided, may result in minor
or moderate injuries.
IMPORTANT
IMPORTANT
indicates a potentially hazardous situation which, if not avoided, may result in
damage to property or loss of product functionality.
NOTE
Notes tell you how you should respond to a situation that may arise or give tips about how the
operation works with other features.
Starter Ink
Cartridges
Black
Yellow
Cyan
Magenta
Quick Setup Guide
CD-ROM
Basic User’s Guide
Product Safety Guide
Telephone Line Cord
NOTE
•
Save all packing materials and the box in case for any reason you must ship your machine.
•
You need to purchase the correct interface cable for the interface you want to use (for USB or network
connection).
USB cable
It is recommended to use a USB 2.0 cable (Type A/B) that is no more than 6 feet (2 meters) long.
Network cable
Use a straight-through Category5 (or greater) twisted-pair cable for 10BASE-T or 100BASE-TX Fast
Ethernet Network.