Brother International MFC-J6510DW Quick Setup Guide - English
Brother International MFC-J6510DW Manual
 |
UPC - 012502626626
View all Brother International MFC-J6510DW manuals
Add to My Manuals
Save this manual to your list of manuals |
Brother International MFC-J6510DW manual content summary:
- Brother International MFC-J6510DW | Quick Setup Guide - English - Page 1
of the illustrations in this Quick Setup Guide show the MFC-J6710DW. The components included in the box may differ depending on your country. Starter Ink Cartridges Black Yellow Cyan Magenta Quick Setup Guide Installation CD-ROM Documentation CD-ROM Basic User's Guide Safety and Legal booklet - Brother International MFC-J6510DW | Quick Setup Guide - English - Page 2
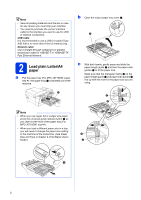
Network. 2 Load plain Letter/A4 paper a Pull the paper tray (For MFC-J6710DW, paper tray #1, the upper tray) a completely out of the machine. b Open the output paper tray cover a. 1 c With both hands, gently press and slide the paper length guide a and then the paper side guides b to fit the paper - Brother International MFC-J6510DW | Quick Setup Guide - English - Page 3
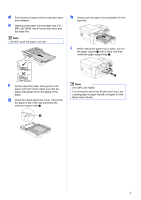
paper jams and misfeeds. e Gently put the paper into the paper tray (For MFC-J6710DW, tray #1) print side down and top edge first. Note DO NOT push the paper in too far. h Slowly push the paper tray completely into the machine. i While holding the paper tray in place, pull out the paper support - Brother International MFC-J6510DW | Quick Setup Guide - English - Page 4
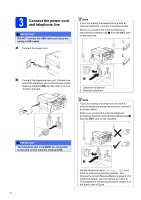
If you are sharing one telephone line with an external telephone answering machine, connect it as shown below. Before you connect the external telephone Mode on page 9. For additional details, see Connecting an external TAD (telephone answering device) in chapter 6 of the Basic User's Guide. - Brother International MFC-J6510DW | Quick Setup Guide - English - Page 5
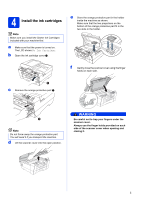
4 Install the ink cartridges Note Make sure you install the Starter Ink Cartridges included with your machine first. a Make sure that the power is turned on. The LCD shows No Ink Cartridge. b Open the ink cartridge cover a. e Store the orange protective part in the holder inside the machine as - Brother International MFC-J6510DW | Quick Setup Guide - English - Page 6
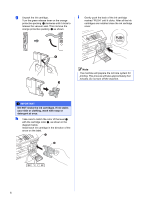
the machine. IMPORTANT DO NOT shake the ink cartridges. If ink stains your skin or clothing, wash with soap or detergent at once. h Take care to match the color of the lever a with the cartridge color b, as shown in the diagram below. Install each ink cartridge in the direction of the arrow on the - Brother International MFC-J6510DW | Quick Setup Guide - English - Page 7
. • If you mix the colors by installing an ink cartridge in the wrong position, clean the print head several times after correcting the cartridge installation. (See Cleaning the print head in Appendix A of the Basic User's Guide.) • Once you open an ink cartridge, install it in the machine and use - Brother International MFC-J6510DW | Quick Setup Guide - English - Page 8
machine to produce the best print quality and feed the correct paper size, the paper type and size must be set to match the paper in the tray. For details on the types and sizes of paper supported, See Paper Size and Type in chapter 2 of the Basic User's Guide. Note (For MFC-J6710DW) You can change - Brother International MFC-J6510DW | Quick Setup Guide - English - Page 9
TAD and fax messages are printed. Choose External TAD as your receive mode. See the instructions below. For additional information see Connecting an external TAD (telephone answering device) in chapter 6 of the Basic User's Guide. Will you be using your Brother machine on a dedicated fax line - Brother International MFC-J6510DW | Quick Setup Guide - English - Page 10
10 Set your Station ID You should store your name and fax number to be printed on all fax pages that you send. For details, see Entering Text in Appendix C of the Basic User's Guide. a Press Menu. b Press a or b to choose Initial Setup Press key 2 3 4 5 6 7 8 9 One time A D G J M P T W Two times - Brother International MFC-J6510DW | Quick Setup Guide - English - Page 11
in chapter 4 of the Basic User's Guide. 12 Set Tone or Pulse dialing mode (Canada only) Your machine comes set for Tone dialing service. If you have Pulse dialing service (rotary), you need to change the dialing mode. a Press Menu. b Press a or b to choose Initial Setup. Press OK. c Press a or b to - Brother International MFC-J6510DW | Quick Setup Guide - English - Page 12
into this slot. (Please note that only one sheet can be used at a time.) Use the manual feed slot to print or copy on envelopes, labels or thicker paper. For details, see Loading paper in the manual feed slot in chapter 2 of the Basic User's Guide. b Put the sheet face up in the ADF (Automatic - Brother International MFC-J6510DW | Quick Setup Guide - English - Page 13
® Macintosh USB 17 Choose your connection type These installation instructions are for Windows® 2000 Professional/XP Home/XP Professional (x32/x64 Edition), Windows Vista®, Windows® 7, and Mac OS X (versions 10.4.11, 10.5.x and 10.6.x). Note For Windows Server® 2003 (x32/x64 Edition)/2003 R2 (x32 - Brother International MFC-J6510DW | Quick Setup Guide - English - Page 14
software supports Windows® XP Home (SP3 or greater), XP Professional (SP3 or greater), Windows Vista® (SP2 or greater) and Windows® 7. Update to the latest Windows® Service Pack before installing MFL-Pro Suite. For Windows® 2000 (SP4 or greater), when the ScanSoft™ PaperPort™11SE download screen - Brother International MFC-J6510DW | Quick Setup Guide - English - Page 15
Choose Local Connection, and then click Next. The installation continues. Windows® b Connect the USB Connect the USB cable a Lift the scanner cover into the open position. c Carefully guide the USB cable into the cable channel and out the back of the machine. Connect the cable to your computer - Brother International MFC-J6510DW | Quick Setup Guide - English - Page 16
to Install Optional Applications on page 38. Note XML Paper Specification Printer Driver The XML Paper Specification Printer Driver is the most suitable driver when printing from applications that use the XML Paper Specification documents. Please download the latest driver by accessing the Brother - Brother International MFC-J6510DW | Quick Setup Guide - English - Page 17
below. LAN USB Note • For the latest drivers and information on the Mac OS X you are using, visit http://solutions.brother.com/. • For Mac OS X 10.4.0 to 10.4.10 users, upgrade to Mac OS X 10.4.11 - 10.6.x. 19 Connect the USB cable IMPORTANT • DO NOT connect the machine to a USB port on a keyboard - Brother International MFC-J6510DW | Quick Setup Guide - English - Page 18
the software to install, it will take about 30 seconds. After the installation, the Brother software will search for the Brother device. 18 Note To use Image Capture for scanning on Mac OS X 10.6.x, please install the CUPS Printer Driver, which can be downloaded from the Brother Solutions Center at - Brother International MFC-J6510DW | Quick Setup Guide - English - Page 19
latest Windows® Service Pack before installing MFL-Pro Suite. For Windows® 2000 (SP4 or greater), when the ScanSoft™ PaperPort™11SE download screen appears during the installation of MFL-Pro Suite, follow the on-screen instructions. 19 Connect the network cable a Lift the scanner cover into the open - Brother International MFC-J6510DW | Quick Setup Guide - English - Page 20
and then reinserting the CD-ROM or double-click the start.exe program from the root folder, and continue from b to install MFL-Pro Suite. • For Windows Vista® and Windows® 7, when the User Account Control screen appears, click Allow or Yes. d Choose Wired Network Connection, and then click Next. 20 - Brother International MFC-J6510DW | Quick Setup Guide - English - Page 21
one machine connected on the network, it will be chosen automatically. Note For Windows Vista® and Windows® 7, when the Windows Security screen appears, click the check box and click Install to complete the installation correctly. g When the User's Guides screen is displayed, click View Manuals - Brother International MFC-J6510DW | Quick Setup Guide - English - Page 22
, see the Network User's Guide. • XML Paper Specification Printer Driver The XML Paper Specification Printer Driver is the most suitable driver when printing from applications that use the XML Paper Specification documents. Please download the latest driver by accessing the Brother Solutions Center - Brother International MFC-J6510DW | Quick Setup Guide - English - Page 23
rights. Note • For the latest drivers and information on the Mac OS X you are using, visit http://solutions.brother.com/. • For Mac OS X 10.4.0 to 10.4.10 users, upgrade to Mac OS X 10.4.11 - 10.6.x. • If you have previously set up your machine for a wireless network and then want to set it up - Brother International MFC-J6510DW | Quick Setup Guide - English - Page 24
being used, guide both cables through the cable channel with one on top of the other. d Gently close the scanner cover using the finger holds on each side. c Choose Wired Network Connection, and then click Next. Follow the on-screen instructions. d Please wait for the software to install, it will - Brother International MFC-J6510DW | Quick Setup Guide - English - Page 25
, you must set the Boot Method to Static by using the control panel. For more information, see the Network User's Guide. • To use Image Capture for scanning on Mac OS X 10.6.x, please install the CUPS Printer Driver, which can be downloaded from the Brother Solutions Center at http://solutions - Brother International MFC-J6510DW | Quick Setup Guide - English - Page 26
mode (connected to a wireless capable computer without an access point/router) you can find instructions in the Network User's Guide on the documentation CD-ROM. Also you can download the Network User's Guide by following the instructions below. 1 Turn on your computer. Insert the installation CD - Brother International MFC-J6510DW | Quick Setup Guide - English - Page 27
For Wireless Network Users 19 Confirm your network environment (Infrastructure Mode) The following instructions will offer two methods for installing your Brother machine in a wireless network environment. a If your wireless access point/router does not support WPS (Wi-Fi Protected Setup) or AOSS - Brother International MFC-J6510DW | Quick Setup Guide - English - Page 28
code on the printed report and refer to Troubleshooting on page 30. Wireless setup is now complete. A four level indicator on the bottom of your machine's LCD will show the wireless signal strength of your access point/router. To install MFL-Pro Suite, continue to step 21. For Windows® Users: Now go - Brother International MFC-J6510DW | Quick Setup Guide - English - Page 29
the user's guide for your wireless access point/router for instructions. e A connection result message appears for 60 seconds on the LCD and a wireless LAN report will automatically be printed. If the connection failed, check the error code on the printed report and refer to Troubleshooting on page - Brother International MFC-J6510DW | Quick Setup Guide - English - Page 30
For Wireless Network Users Troubleshooting Please do not contact Brother Customer Service for assistance without the wireless security information. We cannot assist you in locating your network security settings. How can I find the wireless security information (SSID and Network Key) 1) You - Brother International MFC-J6510DW | Quick Setup Guide - English - Page 31
Reconfirm the wireless network settings. See How can I find the wireless security information (SSID and Network Key) on page 30 to confirm. For ad-hoc mode, change the authentication and encryption methods of your computer for the wireless setting. Your machine supports Open authentication method - Brother International MFC-J6510DW | Quick Setup Guide - English - Page 32
Wireless Network Windows® Install the drivers & software (Windows® 2000 Professional/XP Home/XP Professional/Windows Vista®/Windows® 7) 21 Before you install b The CD-ROM Top menu will appear. Click Initial Installation. a Make sure that your computer is ON and you are logged on with - Brother International MFC-J6510DW | Quick Setup Guide - English - Page 33
for Windows® 2000) Note • If your wireless settings fail, the Wireless Device Setup Wizard will appear during the installation of MFL-Pro Suite. Confirm your settings by following the on-screen instructions. If you encounter this failure, go to step 19-a on page 27 and setup the wireless connection - Brother International MFC-J6510DW | Quick Setup Guide - English - Page 34
Wireless Network Windows® g The installation of the Brother drivers will automatically start. The installation screens appear one after another. IMPORTANT DO NOT cancel any of the screens during the installation. It may take a few seconds for all screens to appear. 23 Finish and restart a Click - Brother International MFC-J6510DW | Quick Setup Guide - English - Page 35
Paper Specification Printer Driver is the most suitable driver when printing from applications that use the XML Paper Specification documents. Please download the latest driver by accessing the Brother Solutions Center at http://solutions.brother.com/. Windows® Windows® Macintosh Wireless Network - Brother International MFC-J6510DW | Quick Setup Guide - English - Page 36
. Note • For the latest drivers and information on the Mac OS X you are using, visit http://solutions.brother.com/. • For Mac OS X 10.4.0 to 10.4.10 users, upgrade to Mac OS X 10.4.11 - 10.6.x. d The Brother software will search for the Brother device in your wireless network. If the machine is - Brother International MFC-J6510DW | Quick Setup Guide - English - Page 37
the control panel. For more information, see the Network User's Guide. • To use Image Capture for scanning on Mac OS X 10.6.x, please install the CUPS Printer Driver, which can be downloaded from the Brother Solutions Center at http://solutions.brother.com/. 37 Windows® Macintosh Wireless Network - Brother International MFC-J6510DW | Quick Setup Guide - English - Page 38
the computer. • The computer must be connected to the Internet. • Make sure you are logged on with Administrator rights. • This application is not available for Windows Server® 2003/2008 series. a Open the top menu again by ejecting and then reinserting the installation CD-ROM or by double-clicking - Brother International MFC-J6510DW | Quick Setup Guide - English - Page 39
them. The keys for 0, # and l do not have printed letters because they are used for special characters. By pressing the proper number key repeatedly, you can access the character you want. For configuring wireless network settings Press Key One time Two times Three times Four times Five times - Brother International MFC-J6510DW | Quick Setup Guide - English - Page 40
about the ink cartridges for your machine, visit http://www.brother.com/original/ or contact your local Brother re-seller. Ink cartridge Black LC75BK ( Devicescape Software, Inc. Get inspired. Double-click the Brother CreativeCenter icon on your desktop to access a FREE web site with many ideas and
-
 1
1 -
 2
2 -
 3
3 -
 4
4 -
 5
5 -
 6
6 -
 7
7 -
8
-
9
-
10
-
11
-
12
-
13
-
14
-
15
-
16
-
17
-
18
-
19
-
20
-
21
-
22
-
23
-
24
-
25
-
26
-
27
-
28
-
29
-
30
-
31
-
32
-
33
-
34
-
35
-
36
-
37
-
38
-
39
-
40
 |
 |
1
Start Here
Quick Setup Guide
USA/CAN Version 0
MFC-J6510DW
MFC-J6710DW
Please read Safety and Legal booklet first before you set up your machine. Then, please read this Quick Setup
Guide for the correct setup and installation.
1
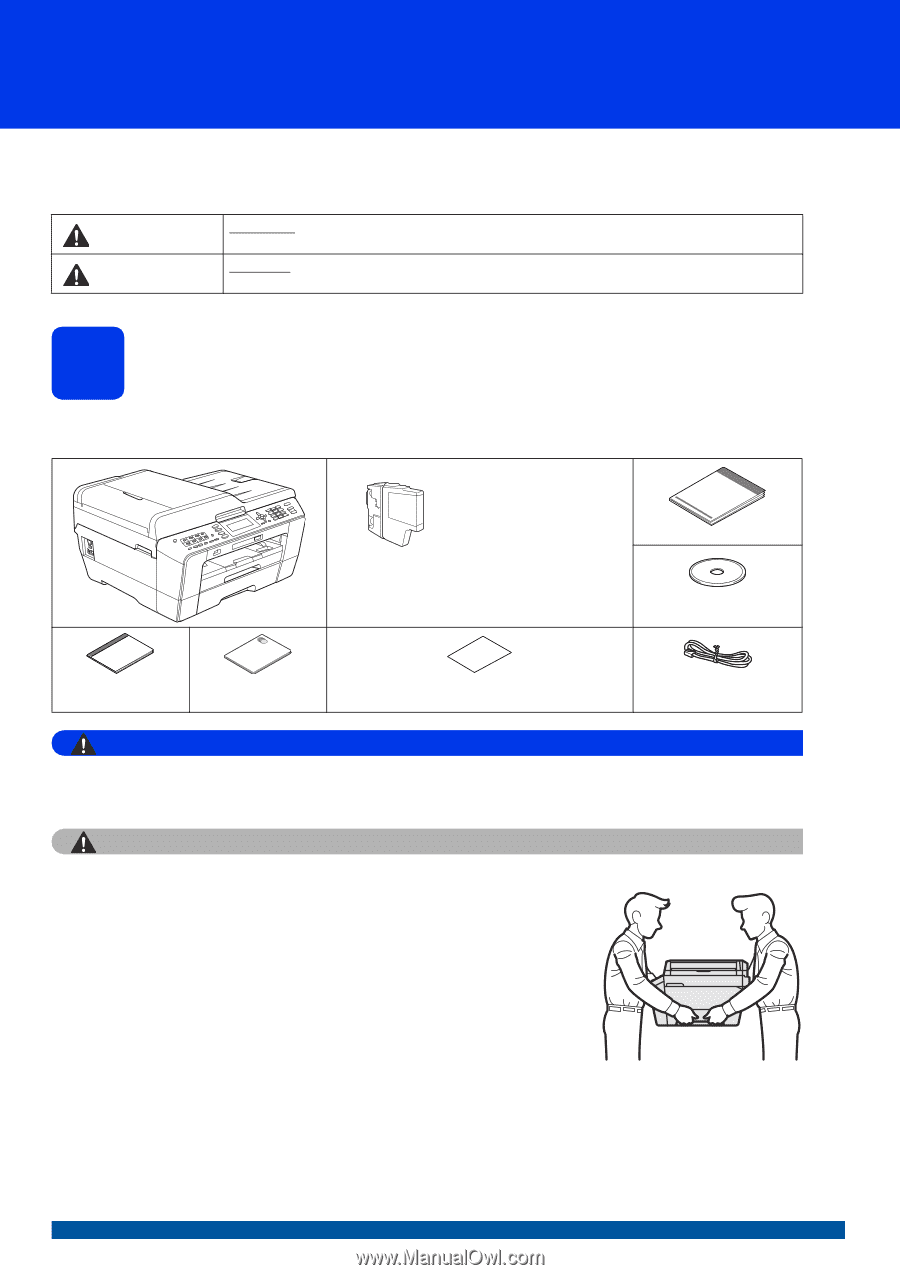
Unpack the machine and check the components
Most of the illustrations in this Quick Setup Guide show the MFC-J6710DW
.
The components included in the box may differ depending on your country
.
WARNING
Plastic bags are used in the packing of your machine. Plastic bags are not toys. To avoid the danger
of suffocation, keep these bags away from babies and children and dispose of them properly.
CAUTION
(For MFC-J6710DW)
To prevent injuries when moving or lifting this machine, make sure to
use at least two people. Be careful not to pinch your fingers when you
set the machine back down.
a
Remove the protective tape and film covering the machine, and also from
the LCD.
b
Make sure you have all components.
WARNING
WARNING
indicates a potentially hazardous situation which, if not avoided, could result in death
or serious injuries.
CAUTION
CAUTION
indicates a potentially hazardous situation which, if not avoided, may result in minor
or moderate injuries.
Starter Ink
Cartridges
Black
Yellow
Cyan
Magenta
Quick Setup Guide
Installation CD-ROM
Documentation CD-ROM
Basic User’s Guide
Safety and Legal
booklet
Product Registration Sheet (USA only)
Telephone Line Cord