Brother International MacBroidery„ Embroidery Lettering Software for Mac |
Brother International MacBroidery„ Embroidery Lettering Software for Mac Manual
 |
View all Brother International MacBroidery„ Embroidery Lettering Software for Mac manuals
Add to My Manuals
Save this manual to your list of manuals |
Brother International MacBroidery„ Embroidery Lettering Software for Mac manual content summary:
- Brother International MacBroidery„ Embroidery Lettering Software for Mac | - Page 1
MacBroidery™ Embroidery Lettering Software for Mac Instruction Manual - Brother International MacBroidery„ Embroidery Lettering Software for Mac | - Page 2
ii MacBroidery™ Embroidery Lettering Software Copyright © Copyright 2012 Pulse Microsystems Ltd. All rights reserved. This instruction manual and software are copyrighted by the developer of the software, Pulse Microsystems Ltd. All rights reserved. US Patent Nos. 5 270 939; 5 343 401; 5 430 658; 5 - Brother International MacBroidery„ Embroidery Lettering Software for Mac | - Page 3
Table of Contents Learning about the Workspace 3 Parts of the Workspace 4 Templates Window 5 Toolbar Buttons 6 Customizing the Toolbar 7 Tabs 8 Properties Tab 8 Edit Tab 10 Garments Tab 11 Object List 12 Redraw Bar 13 Workspace Viewing tools 14 Pan Tool 14 Zoom Tool 14 Fit to Screen - Brother International MacBroidery„ Embroidery Lettering Software for Mac | - Page 4
2 MacBroidery™ Embroidery Lettering Software Creating and Editing New Designs 27 Creating New Designs 28 Creating a Design from a Template 28 Opening from a File 30 Saving Designs 30 Text and Design Tools on the Toolbar 32 Add New Text 32 Adding Embroidery Designs 33 Properties Tab - an - Brother International MacBroidery„ Embroidery Lettering Software for Mac | - Page 5
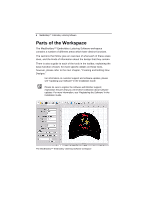
CHAPTER 1: Learning about the Workspace Before you start using the MacBroidery™ Embroidery Lettering Software, we recommend that you learn the basic arrangement of the design workspace. This section covers: • The different parts of the workspace environment. • An introduction to - Brother International MacBroidery„ Embroidery Lettering Software for Mac | - Page 6
Installation Guide. Please be sure to register the software with Brother support; registration ensures that you will receive notification about software updates. For more information, see "Registering the Software" in the Installation Guide. The MacBroidery™ Embroidery Lettering Software workspace - Brother International MacBroidery„ Embroidery Lettering Software for Mac | - Page 7
set up new designs. Templates are displayed in a separate window each time you open MacBroidery™ Embroidery Lettering Software; you can also open this window by selecting the New design button. The templates window elements of a template, please refer to the "Design Editing" section of this manual. - Brother International MacBroidery„ Embroidery Lettering Software for Mac | - Page 8
6 MacBroidery™ Embroidery Lettering Software Toolbar Buttons The MacBroidery™ Embroidery Lettering Software toolbar is located at to add pre-existing design (e.g. Accents, Borders, or appliqués) or browse for embroidery files to add to the current design. Select: Selects objects in the design window - Brother International MacBroidery„ Embroidery Lettering Software for Mac | - Page 9
of the current design, including a preview of the thread colors used, and the number of stitches. Customizing the Toolbar In MacBroidery™ Embroidery Lettering Software, you can customize the toolbars to contain the tools that you use most often. To open the Customize panel, select View-Customize - Brother International MacBroidery„ Embroidery Lettering Software for Mac | - Page 10
8 MacBroidery™ Embroidery Lettering Software Tabs The tabs are found on the left side of the workspace. In the tabs, you will find tools and settings for setting up, editing, and transforming design objects (lettering and designs). The sections that follow present a general view of the functions of - Brother International MacBroidery„ Embroidery Lettering Software for Mac | - Page 11
Learning about the Workspace 9 Properties tab, showing settings available when a text segment is selected. - Brother International MacBroidery„ Embroidery Lettering Software for Mac | - Page 12
10 MacBroidery™ Embroidery Lettering Software Edit Tab The Edit tab is where you will find the tools that you can use to modify the design, or individual objects in the - Brother International MacBroidery„ Embroidery Lettering Software for Mac | - Page 13
from the design. Garments Tab The Garments tab displays a wide variety of garment images, which you can display in the MacBroidery™ Embroidery Lettering Software workspace view. These garments come in various styles (e.g. cap, Tshirt, jersey, etc.) and colors, and can be used as backgrounds when - Brother International MacBroidery„ Embroidery Lettering Software for Mac | - Page 14
12 MacBroidery™ Embroidery Lettering Software 2 Click on the desired garment image in the Garment the garment preview in the design workspace Object List The Object List displays the each individual embroidery segment in the current design, separated by color. Open the Object list by clicking on - Brother International MacBroidery„ Embroidery Lettering Software for Mac | - Page 15
Learning about the Workspace 13 Redraw Bar The Redraw bar gives you a preview of how the current design will sew out. It controls which parts of the design will be shown in the design window. You can move the slider by dragging the round button, to see a design as it will look sewn to a particular - Brother International MacBroidery„ Embroidery Lettering Software for Mac | - Page 16
14 MacBroidery™ Embroidery Lettering Software You can navigate through the design using the controls on Redraw bar, as follows: Press: Right arrow Left arrow + sign - sign To do the following: - Brother International MacBroidery„ Embroidery Lettering Software for Mac | - Page 17
Learning about the Workspace 15 View Actual Size Click the Back to 1:1 tool to have the design appear with its true measurements: that is, 1 centimeter equals 1 centimeter on-screen. Back to 1:1 is useful when you have used Zoom and want to go back and view the design based on its measurements. Grid - Brother International MacBroidery„ Embroidery Lettering Software for Mac | - Page 18
thread length for each. An example of the thread break-down from a MacBroidery™ Embroidery Lettering Software design worksheet Status Line Along the bottom of the MacBroidery™ Embroidery Lettering Software workspace, you see the status line. The status line gives some useful information about - Brother International MacBroidery„ Embroidery Lettering Software for Mac | - Page 19
Learning about the Workspace 17 Preferences Use the Preferences dialog to choose global settings that apply to the workspace and the current design. You can open the preferences dialog by selecting the Preferences button on the toolbar. - Brother International MacBroidery„ Embroidery Lettering Software for Mac | - Page 20
18 MacBroidery™ Embroidery Lettering Software Recipe Setting Recipes contain fabric settings that are applied that you create, and the fabric settings of the selected recipe will be applied to all the lettering your create in the design. In order to have the recipe apply to a design, the recipe - Brother International MacBroidery„ Embroidery Lettering Software for Mac | - Page 21
the hoop that is displayed in the workspace window serves as a guide for sizing and positioning your design. To choose the hoop: 1 option to select "MultiNeedle" hoops. This applies only if you have a MultiNeedle embroidery machine. If you check this box, the list of hoop formats will change to - Brother International MacBroidery„ Embroidery Lettering Software for Mac | - Page 22
20 MacBroidery™ Embroidery Lettering Software 5 Click on the desired hoop to select it. The selected hoop image appears in the workspace. Creating a Custom Hoop You can also create your own - Brother International MacBroidery„ Embroidery Lettering Software for Mac | - Page 23
-down list. 5 Click Apply. The new hoop shows in your design window. Units of Measurement You can change the units that are used by the software on the Preferences panel. These measurements apply to the rulers, the Properties (height) and the design dimensions in the status bar. To choose the system - Brother International MacBroidery„ Embroidery Lettering Software for Mac | - Page 24
22 MacBroidery™ Embroidery Lettering Software Background Settings You can change the background color of the workspace, if desired. This can be used, for example, to change the background to a darker - Brother International MacBroidery„ Embroidery Lettering Software for Mac | - Page 25
. 2 Select Background Fabric from the list. The Fabrics folder opens in a new dialog box. This folder contains a list of fabric images that come with the software; you may also use this dialog to browse elsewhere on your computer for other images to be used for backgrounds. - Brother International MacBroidery„ Embroidery Lettering Software for Mac | - Page 26
simulation of what your design will look like when sewn out on your fabric. When you save the image in the Fabrics folder of MacBroidery™ Embroidery Lettering Software, they will be available for you to use in the usual way from the Preferences dialog. The following procedure explains how to open up - Brother International MacBroidery„ Embroidery Lettering Software for Mac | - Page 27
Learning about the Workspace 25 6 Drag the saved image or images from their current folder into the Fabrics folder. The new fabric image will now appear in the fabrics list in the workspace. When selected, it will appear in the original size, and be tiled to fit your workspace. Grid Settings Grid - Brother International MacBroidery„ Embroidery Lettering Software for Mac | - Page 28
26 MacBroidery™ Embroidery Lettering Software - Brother International MacBroidery„ Embroidery Lettering Software for Mac | - Page 29
CHAPTER 2: Creating and Editing New Designs This section covers: • Using templates to create a design • Editing embroidery designs in the workspace • Arranging and editing objects using the Edit tab - Brother International MacBroidery„ Embroidery Lettering Software for Mac | - Page 30
Creating New Designs You can start a new design in MacBroidery™ Embroidery Lettering Software using either the New Design tool, or the Open tool. Note that only one embroidery file can be open at a time. So, if you have a design open in the workspace already, the program will have to close it - Brother International MacBroidery„ Embroidery Lettering Software for Mac | - Page 31
Creating and Editing New Designs 29 2 Select one of the templates by double-clicking on its thumbnail. The selected template appears in your workspace. Some placeholder text will appear in the place where the word "TEXT" is shown in the template, and a placeholder design appears in the place where - Brother International MacBroidery„ Embroidery Lettering Software for Mac | - Page 32
as a USB drive), to open the design from. You can open both outline files (*.BRFM) and stitch files (e.g. *.PES, *.JEF, etc) in MacBroidery™ Embroidery Lettering Software. Note that only one design page can be open at a time. So, if you have a design open in the workspace already, the program will - Brother International MacBroidery„ Embroidery Lettering Software for Mac | - Page 33
the same way. Note that, if you have added designs imported into the current design from other sources (i.e., not created in MacBroidery™ Embroidery Lettering Software), those components of the design will not have outlines associated with them, even if the overall design is saved in *.BRFM (outline - Brother International MacBroidery„ Embroidery Lettering Software for Mac | - Page 34
32 MacBroidery™ Embroidery Lettering Software Text and Design Tools on the Toolbar Besides the in the Text field. 6 Make any necessary changes to your lettering using the various fields on the Properties panel (for example, font, letter height, slant, etc.) For more details, see "Properties of - Brother International MacBroidery„ Embroidery Lettering Software for Mac | - Page 35
place them in your design using only the mouse buttons. These designs come pre-loaded with your MacBroidery™ Embroidery Lettering Software. You can also use the Add Design tool to import other embroidery files from other design collections. This will merge the file into the current design When an - Brother International MacBroidery„ Embroidery Lettering Software for Mac | - Page 36
34 MacBroidery™ Embroidery Lettering Software 4 Place the mouse pointer at the position you would like the added design to be placed. 5 Click and drag the mouse; as you drag, note - Brother International MacBroidery„ Embroidery Lettering Software for Mac | - Page 37
in your workspace; the outline indicates the size and orientation of the design, before it is actually generated in the workspace. 6 Click Open. The selected embroidery file will be merged into the current design. - Brother International MacBroidery„ Embroidery Lettering Software for Mac | - Page 38
36 MacBroidery™ Embroidery Lettering Software Properties Tab - an Overview The Properties tab displays - and allows you to adjust - properties of the selected text or design object. Note that the text - Brother International MacBroidery„ Embroidery Lettering Software for Mac | - Page 39
will appear on the Properties panel. The sections that follow give a guide to the text properties that can be modified on the text tab. is selected on the Properties panel. To choose an envelope: 1 Select the lettering segment in the workspace. 2 In the tabs area, click on the Properties panel - Brother International MacBroidery„ Embroidery Lettering Software for Mac | - Page 40
38 MacBroidery™ Embroidery Lettering Software Font To change the font of a text segment: 1 Select the text panel, there is a tool which displays all the characters (letters, numbers, and other marks) that can be entered for available embroidery fonts. For example, some fonts only allow you to enter - Brother International MacBroidery„ Embroidery Lettering Software for Mac | - Page 41
. If the spacing is set to less than zero, then the spacing between letters decreases; if it is set to a value greater than zero, than the apply. 4 Click Apply to save your changes. You see your text's letter spacing altered accordingly. Sewing Order The sew order property determines at what point - Brother International MacBroidery„ Embroidery Lettering Software for Mac | - Page 42
™ Embroidery Lettering Software 2 Click on the arrows button on the right of the Pattern field. You see a list of patterns. 3 From the Pattern list, select a pattern. 4 Click Apply. The fill of your text segment will be accordingly. Density Setting Satin stitch density is measured in embroidery - Brother International MacBroidery„ Embroidery Lettering Software for Mac | - Page 43
in a segment to compensate for the tendency of fabric to "pull together" when embroidery is sewn overtop of it. The amount of pull compensation (if any) required can be used to change the height and vertical alignment of the letters at the beginning and end of the selected text. There are two fields - Brother International MacBroidery„ Embroidery Lettering Software for Mac | - Page 44
42 MacBroidery™ Embroidery Lettering Software Color Change You can use the color field in the Properties panel to change individual colors of designs or lettering segments. A large number of manufacturers' thread charts come loaded with the software. You select the chart you want to use, and then - Brother International MacBroidery„ Embroidery Lettering Software for Mac | - Page 45
the Apply button. The color of the selected segment will change to match your selection. Kerning Text Segments Kerning refers to the space between adjacent letters. You can adjust the kerning of a text segment to make it more visually appealing, or to make it fit in a tighter space. You can adjust - Brother International MacBroidery„ Embroidery Lettering Software for Mac | - Page 46
44 MacBroidery™ Embroidery Lettering Software 3 Click the Apply button to apply the change. You see the lettering altered accordingly. To move letters farther apart: 1 Select your text segment. 2 In the Text box (on the Properties panel), enter the "greater than" sign (>) between the letters you - Brother International MacBroidery„ Embroidery Lettering Software for Mac | - Page 47
the original color, and the following ones are assigned arbitrary "placeholder" colors (until you chose your own). 4 To apply your chosen color to each letter or sub-segment do the following: In the colors area of the Properties tab, click the blue arrow button to display the list of thread - Brother International MacBroidery„ Embroidery Lettering Software for Mac | - Page 48
46 MacBroidery™ Embroidery Lettering Software Select the color you want to change from this list. panel. In the Properties panel, click the Apply button. The letter or sub-segment changes to the chosen color. 5 Repeat step 4) for each letter or sub-segment in the text. The text segment with new - Brother International MacBroidery„ Embroidery Lettering Software for Mac | - Page 49
, or groups of objects in the design can be easily modified with the Editing tools in MacBroidery™ Embroidery Lettering Software. The tools on the Edit tab allow you to modify existing embroidery objects, including both designs and text. Align Tools The Align Tools can be used to align different - Brother International MacBroidery„ Embroidery Lettering Software for Mac | - Page 50
48 MacBroidery™ Embroidery Lettering Software 2 Click on one of the following tools: Center: Moves all the selected objects to the center of the hoop. Horizontal Center: All selected objects are - Brother International MacBroidery„ Embroidery Lettering Software for Mac | - Page 51
reflect the changes. Edit and Arrange Tools Edit tools The Edit tools of MacBroidery™ Embroidery Lettering Software can be used to rotate the selected object through a right angle (90º) and cases where this is a problem, you can use the Arrange tools to change the layer order of the selected object. - Brother International MacBroidery„ Embroidery Lettering Software for Mac | - Page 52
50 MacBroidery™ Embroidery Lettering Software Using Arrange tools: 1 Select the object you want to move in the layer order. 2 Do one of the following: Click the Send to back layer. - Brother International MacBroidery„ Embroidery Lettering Software for Mac | - Page 53
35 Bottom tool (Align) 11, 48 Bring to front 50 C Changing colors in text 42 Changing lettering shapes 37 Color changes (within text segments) 44-46 Color Palette 45 Creating lettering slanted lettering 40 Customizing the toolbar 7 D Deleting objects 32 Density 40 Density Setting for text 40 Design - Brother International MacBroidery„ Embroidery Lettering Software for Mac | - Page 54
52 MacBroidery™ Embroidery Lettering Sofware H Hoop settings 19-21 Hoops Creating a custom hoop 20 MultiNeedle hoops 19 Selecting the hoop size 19 Horizontal Center tool (Align) 10, 48 K Kerning 43 Kerning text segments 43-44 Keystrokes 38 L Left tool (Align) 10, 48 Lettering 40 Changing envelopes - Brother International MacBroidery„ Embroidery Lettering Software for Mac | - Page 55
53 T Templates Window 5 Text Changing the Fill Pattern 39 Density Setting 40 Drop Caps 41 Kerning 43-44 Pull Compensation 41 Slant setting 40 Spacing 39 Text (entering) 39 Text Alignment 40 Text height 39 Text Properties 37-43, 44 Tools, editing 10 Top tool (Align) 11, 48 U Units of Measurement 21 V
-
 1
1 -
 2
2 -
 3
3 -
 4
4 -
 5
5 -
 6
6 -
 7
7 -
8
-
9
-
10
-
11
-
12
-
13
-
14
-
15
-
16
-
17
-
18
-
19
-
20
-
21
-
22
-
23
-
24
-
25
-
26
-
27
-
28
-
29
-
30
-
31
-
32
-
33
-
34
-
35
-
36
-
37
-
38
-
39
-
40
-
41
-
42
-
43
-
44
-
45
-
46
-
47
-
48
-
49
-
50
-
51
-
52
-
53
-
54
-
55
 |
 |

MacBroidery™
Embroidery Lettering Software
for Mac
Instruction Manual