Brother International PR655 PE-DESIGN NEXT CW Instruction Manual PRCW1
Brother International PR655 Manual
 |
View all Brother International PR655 manuals
Add to My Manuals
Save this manual to your list of manuals |
Brother International PR655 manual content summary:
- Brother International PR655 | PE-DESIGN NEXT CW Instruction Manual PRCW1 - Page 1
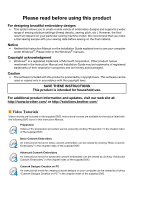
Instruction Manual Video Tutorials Included on DVD With Instruction Manual, view the instructional movies providing supplementary information about cutwork creation. Please visit us at http://solutions.brother.com where you can get product support and answers to frequently asked questions (FAQs). - Brother International PR655 | PE-DESIGN NEXT CW Instruction Manual PRCW1 - Page 2
copyright laws. This software can be used or copied only in accordance with the copyright laws. SAVE THESE INSTRUCTIONS This product is intended for household use. For additional product information and updates, visit our web site at: http://www.brother.com/ or http://solutions.brother.com/ ■ Video - Brother International PR655 | PE-DESIGN NEXT CW Instruction Manual PRCW1 - Page 3
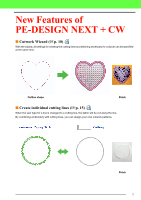
cutting lines (cp. 15) 4 When the sew type for a line is changed to a cutting line, the fabric will be cut along the line. By combining embroidery with cutting lines, you can design your own cutwork patterns. Finish 1 - Brother International PR655 | PE-DESIGN NEXT CW Instruction Manual PRCW1 - Page 4
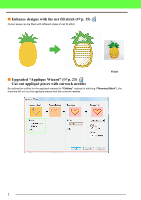
" (cp. 23) 4 Cut out appliqué pieces with cutwork needles By setting the outline for the appliqué material to "Cutting", instead of stitching ("Running Stitch"), the machine will cut out the appliqué pieces with the cutwork needles. 2 - Brother International PR655 | PE-DESIGN NEXT CW Instruction Manual PRCW1 - Page 5
the menu list on the "Options" window, your PE-DESIGN is not upgraded yet. Refer to the Installation Guide to install the PE-DESIGN NEXT + CW. ■ Set the "Machine Type" to multi-needle embroidery machine 4 For the Cutwork functions to be available in PE-DESIGN NEXT + CW, click on "Home" tab and then - Brother International PR655 | PE-DESIGN NEXT CW Instruction Manual PRCW1 - Page 6
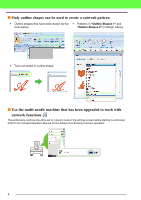
outline shape ■ Use the multi-needle machine that has been upgraded to work with cutwork functions 2 The embroidery machine should be set to cutwork mode in the settings screen before starting to embroider. Refer to the included Operation Manual for the details of embroidery machine operation. 4 - Brother International PR655 | PE-DESIGN NEXT CW Instruction Manual PRCW1 - Page 7
/saving/exporting the cutwork patterns 14 Detailed Settings for the Net Fill Stitch 15 4 Using the net fill stitch in Layout & Editing 15 Tutorial 2: Creating Cutwork Patterns From Favorite Embroidery Patterns 17 Step1 Importing a pattern...17 Step2 Drawing outlines to create cutting lines 18 - Brother International PR655 | PE-DESIGN NEXT CW Instruction Manual PRCW1 - Page 8
Getting Started Getting Started Layout & Editing Window Cutwork patterns, combining embroidery and cutting with cutwork needles, can be created using this software. Let's look at the new functions that are added with the upgrade. 5 13 46 2 1 "Attributes" When an outline shape is selected, - Brother International PR655 | PE-DESIGN NEXT CW Instruction Manual PRCW1 - Page 9
can be edited only with a version of PE-DESIGN NEXT + CW that has the cutwork functions enabled. • Created cutwork patterns can be used only with embroidery machines upgraded for cutwork. • With PE-DESIGN NEXT + CW, the line sew type "Cutting" changes to "Running Stitch" in the following situations - Brother International PR655 | PE-DESIGN NEXT CW Instruction Manual PRCW1 - Page 10
Creating Cutting Lines Creating Cutting Lines 4 By changing the sew type for a line to a cutting line, fabric can be cut along the line. Finish a Note: Cutting lines can be created from outline shapes. ( cp. 4) Specifying cutting lines in Layout & Editing 2. Specify the settings in the "Sewing - Brother International PR655 | PE-DESIGN NEXT CW Instruction Manual PRCW1 - Page 11
them with scissors after the cutting step is finished. • When making a cutting line for an appliqué piece, be sure to select "Leave uncut sections". 2 Use Cutting only The cut edges will be cleanly finished. Select this setting for patterns where the cut edges will be left exposed, for example - Brother International PR655 | PE-DESIGN NEXT CW Instruction Manual PRCW1 - Page 12
Creating a Cutwork Pattern Filled with Net Stitching (Cutwork Wizard) Tutorial 1: Creating a Cutwork Pattern Filled with Net Stitching (Cutwork Wizard) 4 By using the "Cutwork Wizard", a cutwork pattern can easily be created. The sample file for this tutorial can be found at the following location - Brother International PR655 | PE-DESIGN NEXT CW Instruction Manual PRCW1 - Page 13
be used if multiple outline shapes (outlines and inside regions) are selected. • If a line of the pattern crosses itself, the Cutwork Wizard will not be available. a Note: If "Machine Type" (on the "Design Page" tab of the "Design Settings" dialog box) is set to a single-needle embroidery machine - Brother International PR655 | PE-DESIGN NEXT CW Instruction Manual PRCW1 - Page 14
this setting to cut the fabric with a machine installed with cutwork needles. (1) Stabilize Cut settings specified in the wizard are stored with the software and recalled the next time that the wizard is fabric has been cut. In order to prevent embroidery from losing its shape after it has been cut - Brother International PR655 | PE-DESIGN NEXT CW Instruction Manual PRCW1 - Page 15
after cutting in "Covering Satin Stitch". Satin stitching is sewn along the edges of inner cutouts. The zigzag stitch or the stem stitch is used as an underlay for the satin stitching. For this example, select "Yes". Pattern 1 Pattern 2 Select the parameters according to the procedure from step - Brother International PR655 | PE-DESIGN NEXT CW Instruction Manual PRCW1 - Page 16
media. For details, refer to "Transferring Data" in the Instruction Manual for PE-DESIGN NEXT. Transferring directly to a machine's memory Cutwork patterns can be transferred to embroidery machines that can be connected to a computer using a USB cable. For details, refer to "Transferring Data" in - Brother International PR655 | PE-DESIGN NEXT CW Instruction Manual PRCW1 - Page 17
Detailed Settings for the Net Fill Stitch Detailed Settings for the Net Fill Stitch 4 If the net fill stitch is used, net-like embroidery can be created in specified regions. In addition to the "Cutwork Wizard", these settings can be specified in Layout & Editing. Finish a Note: Cutting lines can - Brother International PR655 | PE-DESIGN NEXT CW Instruction Manual PRCW1 - Page 18
Detailed Settings for the Net Fill Stitch Expert mode 1 2 3 4 Hint view A preview of the pattern appears with the selected settings applied. By moving the pointer over each setting, a preview of the setting can be displayed. 5 Click to switch the attributes between those for Beginner mode and - Brother International PR655 | PE-DESIGN NEXT CW Instruction Manual PRCW1 - Page 19
Tutorial 2: Creating Cutwork Patterns From Favorite Embroidery Patterns Tutorial 2: Creating Cutwork Patterns From Favorite Embroidery Patterns In this tutorial, create heirloom style cutwork with Richelieu bars. The sample file for this tutorial can be found at the following location. Documents ( - Brother International PR655 | PE-DESIGN NEXT CW Instruction Manual PRCW1 - Page 20
Tutorial 2: Creating Cutwork Patterns From Favorite Embroidery Patterns c Click 1, then 2, then 3 to select curves)" of "Drawing Shapes " in the chapter of "Basic Layout & Editing Operations" of the Instruction Manual for PE-DESIGN NEXT. b Click in the "Line Sew Type" selector (1) and then select - Brother International PR655 | PE-DESIGN NEXT CW Instruction Manual PRCW1 - Page 21
detailed procedure, refer to "Reshaping Embroidery Patterns" in the chapter of "Basic Layout & Editing Operations" of the Instruction Manual for PE-DESIGN NEXT. e Repeat : • The settings specified in the wizard are stored with the software and recalled the next time that the wizard is started. 19 - Brother International PR655 | PE-DESIGN NEXT CW Instruction Manual PRCW1 - Page 22
Tutorial 2: Creating Cutwork Patterns From Favorite Embroidery Patterns c Specify running stitching along the edge before cutting in "Stabilize Cut Edge". For this example, select "Yes". g Specify satin stitching after cutting in "Covering - Brother International PR655 | PE-DESIGN NEXT CW Instruction Manual PRCW1 - Page 23
Tutorial 2: Creating Cutwork Patterns From Favorite Embroidery Patterns Step 4 Specify color in cutwork outlines a In the "Sewing Order" pane, while holding down the Ctrl key, select all frames for outlines (3, 4, 7 and 8 for - Brother International PR655 | PE-DESIGN NEXT CW Instruction Manual PRCW1 - Page 24
Tutorial 2: Creating Cutwork Patterns From Favorite Embroidery Patterns c Click 1, then double-click 2 to add the lines of satin stitching that cross over the cutting lines around the area to be cut out. 1 - Brother International PR655 | PE-DESIGN NEXT CW Instruction Manual PRCW1 - Page 25
indicate its outline. Embroidery machines upgraded for cutwork and installed with the cutwork needles can use the data for the cutting lines to automatically cut out the appliqué pieces. For details on embroidering appliqués, refer to the Operation Manual included with the machine. The sample file - Brother International PR655 | PE-DESIGN NEXT CW Instruction Manual PRCW1 - Page 26
b Memo: For details, refer to "Hole sewing" in the Instruction Manual for PE-DESIGN NEXT. Step 2 Using the "Applique Wizard" a Select the outer pattern, and then this setting to sew the cutting line with a machine installed with an embroidery needle, then cut along the cutting line with scissors. - Brother International PR655 | PE-DESIGN NEXT CW Instruction Manual PRCW1 - Page 27
"Yes" then "V Stitch". b Memo: For details on setting "Stroke", "Interval" and "Pitch", refer to "E/V stitch" in "Sewing attributes" of Instruction Manual for PEDESIGN NEXT. g Specify hole sewing in "Create an applique with hole sewing". Satin Stitch E Stitch V Stitch (default) f Specify the - Brother International PR655 | PE-DESIGN NEXT CW Instruction Manual PRCW1 - Page 28
Tutorial 3: Creating an Appliqué with a Design that has Cutouts (Applique Wizard) h Click "OK" to exit the Applique Wizard. b Memo: • The shape of appliqué material appears as below, depending on the "Create an applique with hole sewing" is checked or not. When the "Create an applique with hole - Brother International PR655 | PE-DESIGN NEXT CW Instruction Manual PRCW1 - Page 29
English
-
 1
1 -
 2
2 -
 3
3 -
 4
4 -
 5
5 -
 6
6 -
 7
7 -
8
-
9
-
10
-
11
-
12
-
13
-
14
-
15
-
16
-
17
-
18
-
19
-
20
-
21
-
22
-
23
-
24
-
25
-
26
-
27
-
28
-
29
 |
 |
Instruction Manual
Please visit us at
where you can get
product support and answers to frequently asked questions (FAQs).
Video Tutorials Included on DVD
With Instruction Manual, view the instructional
movies providing supplementary information
about cutwork creation.