Brother International PS-1250 Users Manual - Multi
Brother International PS-1250 Manual
 |
View all Brother International PS-1250 manuals
Add to My Manuals
Save this manual to your list of manuals |
Brother International PS-1250 manual content summary:
- Brother International PS-1250 | Users Manual - Multi - Page 1
• \ IP ,i• i 1 ,..Ii., O/ , , i• _,i•/_, 0/ , / 1 \ i/ \i/ /I\ / I\ 1 1 \i•/ - \I/ /1' '1 1% 1 O/ -•/1' 1 ,I, -•/1' 1 O/ .1 1' 1 -.I,•- /I s• 1 1 O/ -•- \I/ ..._,..1 \ Le ..... O, OPERATION MANUAL ,1 , O, ,,O0,,11,..,..... ,.01,,?.,, MANUAL DE INS1RUCCIONES .,,„00111 - Brother International PS-1250 | Users Manual - Multi - Page 2
- Brother International PS-1250 | Users Manual - Multi - Page 3
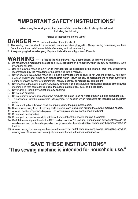
,or changing the presser foot, and the like. 15. Always unplug the sewing machine from the electrical outlet when removing covers, lubricating, or when making any of the user service adjustments mentioned in the instruction manual. "SAVE THESE INSTRUCTIONS" "This sewing machine is intended for - Brother International PS-1250 | Users Manual - Multi - Page 4
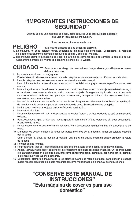
se describe en este manual. Usar unicamente los accesorios recomendados por el fabricante y que vienen especificados en este manual. 3. Nunca haga funcionar clavija y no del cable. 10. Mantener los dedos alejados de todas las partes movibles de la maquina. Tener un cuidado especial con la aguja. 11. - Brother International PS-1250 | Users Manual - Multi - Page 5
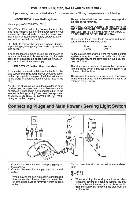
from the socket outlet. Turn on or off the switch for the main power and sewlight. Turn on 0 Turn off When servicing the sewing machine, or when removing covers or changing lamps, the machine or the electrical set must be disconnected from the supply by removing the plug from the socket outlet. - Brother International PS-1250 | Users Manual - Multi - Page 6
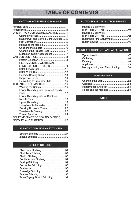
YOUR SEWING MACHINE Principal parts 1 Accessories 3 OPERATING YOUR SEWING MACHINE 4 Connecting Plugs 4 Main Power and Sewing Light Switches ....5 Foot Controller 5 Replacing the Needle 6 Checking the Needle 6 Changing the Presser Foot 7 Extension Table(Accessories) 7 VARIOUS - Brother International PS-1250 | Users Manual - Multi - Page 7
INDICE CONOZCA SU MAQUINA DE COSER Elernentos principales 1 Accesorios 3 Funcionamiento de la maquina de coser 4 Conexion de los enchufes 4 Interruptor principal y de luz 5 Pedal 5 Cambio de la aguja 6 Verificacion de la aguja 6 Cambio del prensatelas 7 Soporte de accesorios ( - Brother International PS-1250 | Users Manual - Multi - Page 8
Principal parts Elementos principales 3 4 1 1 8 6 9 10 III 1 - Brother International PS-1250 | Users Manual - Multi - Page 9
KNOWING YOUR SEWING MACHINE CONOZCA SU MAQUINA DE COSER C) BOBBIN WINDER DEVICE Winds the thread onto the bobbin to be used for the lower thread. C) STITCH LENGTH Controls the tension of the upper thread. © EXTENSION TABLE & ACCESSORIES COMPARTMENT ® REVERSE SEWING BUTTON Push for stitching in the - Brother International PS-1250 | Users Manual - Multi - Page 10
step-BH Model (1 pc.) Buttonhole Foot for 4 step-BH Model (1 pc.) C) Button Sewing Foot (1 pc.) C) Spool Holder (Large) (1 pc.) (11) Spool Holder (Small) (1 pc.) C) Brush (1 pc.) @ Extra Spool Pin (1 pc.) C) Screwdriver (1 pc.) Seam Ripper (1 pc.) Parts Code for Zigzag Presser Foot: X51953-051 Foot - Brother International PS-1250 | Users Manual - Multi - Page 11
Plugs 1. Connect The three-prong plug into the machine. It is located between the foot controller and the power supply plug on the cord. 2. Connect the power supply plug into a wall outlet. CAUTION 1. When changing the light bulb or when the sewing machine is not in use, the power supply plug must - Brother International PS-1250 | Users Manual - Multi - Page 12
should be taken that nothirg is placed on the foot controller when the machine is not in use. (:). Foot controller: Model N Note (For U.S.A. only): This foot controller can be used for sewing machine models PS1000, PS1250 and PS1800. Pedal AIpresionarligeramenteelpedal, la maquina funcionate a baja - Brother International PS-1250 | Users Manual - Multi - Page 13
SEWING MACHINE CONOZCA SU MAQUINA DE COSER Replacing the Needle 1. Remove the power supply plug from the outlet. 2. Raise the needle bar to its highest position. 3. Lower the presser foot con una moneda. 5. Introduzca otra aguja, con la parte redonda cara a usted. Hay que meterla lo mas adentro - Brother International PS-1250 | Users Manual - Multi - Page 14
Changing the Presser Foot It may be necessary to change the presser foot according to your sewing needs. SNAP Suelte elprensatelas levantando la palanca que hay en la parte trasera del soporte. 3. Coloque otro prensatelas en la 0 lowExtension Table (Accessories) The accessories are stored in the - Brother International PS-1250 | Users Manual - Multi - Page 15
KNOWING YOUR SEWING MACHINE CONOZCA SU fv1AOUINA DE COSER VARIOUS CONTROLS Pattern Selection Dial To select a stitch, simply turn the Pattern Selection Dial, located on the right side of the machine. The Pattern Selection Dial may be turned in either direction. The following page shows the - Brother International PS-1250 | Users Manual - Multi - Page 16
at -. ID .0' H° I < I e c! ) t 1 1 -...- III IiIlIi STITCH NAME RECOMMENDED WDTH RECOMMENDED PAGE IN [mm(inch)] LENGTH [mni(Inch)] INSTRUCTIONS 1-STEP AUTOMATIC 3-5 F-1.5 40 BUTTONHOLE (1/8-13/64) (1/64-1/16) 4-STEP AUTOMATIC 3-5 1-1.5 42 BUTTONHOLE (1/8-13/64) (1/64-1/161 STRAIGHT - Brother International PS-1250 | Users Manual - Multi - Page 17
Anchos y largos recomendados para cada puntada KNOWING YOUR SEWING MACHINE CONOZCA SU MAOUINA OE COSER PUNTADA = = ac .--• d ID .0' RI 2,5 (3/32) Fija 2,5 (3/32) Fija 2,5 (3/32) Fija 2,5 (3/32) Fija 2,5 (3/32) PAGINA DEL MANUAL 40 42 27 30 31 32 33 31 34 34 35 35 36 36 36 37 37 38 37 37 39 27 10 - Brother International PS-1250 | Users Manual - Multi - Page 18
The "0" setting does not feed the material. This is used for sewing on a button. The"F"area isusedformakinga SatinStitch(a close zigzag stitch) which needed for making the Satin Stitch varies according to the material and thread being used. To determine the exact dial position, you should first - Brother International PS-1250 | Users Manual - Multi - Page 19
KNOW NG YOUR SEWING MACHINE CONOZCA SU MAOUINA DE COSER Stitch Width Dial Depending on the stitch selected, you may need to adjust the stitch width. The numbers marked on - Brother International PS-1250 | Users Manual - Multi - Page 20
Button in as far as possible and hold in that position while pressing lightly on the foot pedal. To sew forward, release the Reverse Sewing Button. The machine will then sew forward. Reverse sewing is used for back tacking and reinforcing seams. Pulsador de retroceso Para coser hacia arras, apriete - Brother International PS-1250 | Users Manual - Multi - Page 21
KNOWING YOUR SEWING MACHINE CONOZCA SU MAOUINA DE COSER Drop Feed Lever Use the Drop Feed Lever to raise or lower the feed dogs according to the job that is being done. When monogramming, embroidering, darning or sewing on buttons, the feed dogs should be lowered. (The garment will not be fed.) - Brother International PS-1250 | Users Manual - Multi - Page 22
accesorios 450, THREADING THE MACHINE Enhebrado de la maquina Winding the Bobbin Bobinado de la canillai 1. Place a spool of thread onto the horizontal spool pin and firmly hold it with a spool holder so that the spool of thread will not turn. Pass the thread through the thread guide as shown - Brother International PS-1250 | Users Manual - Multi - Page 23
KNOWING YOUR SEWING MACHINE CONOZCA SU MAQUINA DE COSER 2. Pass the end of the thread through the hole on the bobbin from the inside. Place the bobbin onto the bobbin winder shaft and slide the bobbin winder shaft to the right. Turn the bobbin clockwise, by hand, until the spring on the shaft - Brother International PS-1250 | Users Manual - Multi - Page 24
Threading with Quick-set Needle Plate 1. Raise the needle to its highest position by turning the balance wheel toward you (counterclockwise) and raise the presser foot Deslizar el bot6n a) Tapa 3. Insert bobbin and deliver threadend through the slit, then pull the thread to cut. NOTE: Make sure that - Brother International PS-1250 | Users Manual - Multi - Page 25
SEWING MACHINE CONOZCA SU MAQUINA DE COSER Lower Threading without Quick-set Needle Plate 1. Raise the needle to its highest position by turning the balance wheel toward you (counterclockwise) and raise the presser foot 3. Insert the bobbin into the shuttle and deliver the thread through the slit. - Brother International PS-1250 | Users Manual - Multi - Page 26
LI3S0.0 30 VIVII7011141 VOZON09 3NIHOVLA1 ONINOS anoi, ONIMONN Upper Threading 1. Raise the presser foot using the Presser Foot Lever. 2. Raise the needle to its highest position by turning thebalance wheeltowardyou(counterclockwise). Enhebrado superior 1. Levanteelprensate/as conlapalanca - Brother International PS-1250 | Users Manual - Multi - Page 27
YOUR SEWING MACHINE CONOZCA SU MAQUINA DE COSER 4. Deliver the upper thread as shown in this diagram. 4. Enhebre el hilo superior tal como indica el diagrama. 0 5. Make sure to guide the thread through the thread take-up lever from the right to the left. C) Thread take-up lever 6. Place thread - Brother International PS-1250 | Users Manual - Multi - Page 28
Threader The needle threader can be used to thread the needle more easily. 1. Lower the presser foot lever. Lowerthe threader slightlyandpositionthethread under the guide. Needle threader ® Guide 2. Move the threader to its lowest position and guide the thread under the hook which passes through the - Brother International PS-1250 | Users Manual - Multi - Page 29
bobbin in a large loop. 4. Pull oi..t about 15 cm (6") of both threads and place them between the toes of the presser foot to the right toward the back of the machine and pull toward the back of the machine straight behind the presser foot. (1) Upper thread ® Lower thread hacia la parte posterior de - Brother International PS-1250 | Users Manual - Multi - Page 30
VNII-10VIN rIS VOZON00 BNIH0VIAI ONIM3S 811OA 0NIMONN Twin Needle Sewing Your sewing machine is designed for twin needle sewing, which allows you to sew with two top threads. You can use the same color or two different colors of thread for making decorative stitches. Any of the patterns, except the - Brother International PS-1250 | Users Manual - Multi - Page 31
KNOWING YOUR SEWING MACHINE CONOZ^A SU MAQUINA DE COSER Thread Tension Thread tension will affect the quality of your stitches. It may need to be adjusted when you change fabric or thread type. NOTE: It is recommended that a test sample be made on a fabric scrap before sewing on your project. - Brother International PS-1250 | Users Manual - Multi - Page 32
OF SEWING FABRICS, NEEDLES AND THREADS SEWING FABRICS NEEDLE SIZE THREAD SIZES VERY Muslin 9 11 14 (Supplied with your machine) Cotton: 80 Synthetic Fine Mercerized Cotton Cotton thread size from the above chart. 2. Use the same size thread for the upper and lower threads (spool and bobbin). 25 - Brother International PS-1250 | Users Manual - Multi - Page 33
KNOWING YOUR SEWING MACHINE CONOZCA SU MAQUINA DE COSER Tabla de relacion entre tejidos, hilos y agujas Tejidos Tamarlo de aguja Tamaiio de hilo Muy fino Ligero Medio Pesado Algodon: - Brother International PS-1250 | Users Manual - Multi - Page 34
presser foot lever. 3. Pull the upper thread toward the back of the presser foot. 4. Place the fabric under the presser foot and position the needle 1 cm (3/8") from the edge of the fabric. 5. Lower the presser foot. 6. To backtack, push down the Reverse Sewing superior hacia la parte de atras del - Brother International PS-1250 | Users Manual - Multi - Page 35
Sewing Direction 1. Stop the machine at the point where you wish to change direction with the needle still in the fabric. 2. Raise the presser foot and direccion tal como ilustrado. Finishing Sewing Reverse stitching is used to lock the threads at the endof theseamorwhereverreintorcementisneeded. - Brother International PS-1250 | Users Manual - Multi - Page 36
to the left side. 4. Cut both threads with the thread cutter located on the left side of the machine. C) Thread cutter 5. To prepare the machine for the next seam, pull about 10 cm (4") of thread through the toes of the presser foot toward the back of the machine. Para retlrar el tejido de la - Brother International PS-1250 | Users Manual - Multi - Page 37
select the Stitch Length and the Stitch Width. It is recommended to sew using the Straight Stitchat the beginning and end of the Zigzag Stitches. ). Puntada de realce Cuando se define ellargo de la puntada en la parte "F", se coseran puntadas tupidas (puntada zigzag muy cerradas) que pueden servir - Brother International PS-1250 | Users Manual - Multi - Page 38
los tejidos elasticos. SVOV8OddOONI StfaViNfid gOliMAMOM: 1. Both the threads should be the same color as the fabric. 2. Fold Set the Pattern Selection Dial to either 4 or 7 and set the stitch length and width. 4. Sew on the fold as in fig. C. 5. When the fabric is unfolded you will have a Blind - Brother International PS-1250 | Users Manual - Multi - Page 39
fabric on the bias, placing it under the presser foot so that the straight stitches are sewn on the seamline and the zigzag stitches are sewn slightly over the folded edge. 3. This stitch requires a tighter thread tension than normal. 4. Sew at a slow speed. Puntada ondas Modeb de puntada (Puntada - Brother International PS-1250 | Users Manual - Multi - Page 40
two pieces of fabric together and is very effective when sewing knitted fabrics. When nylon thread is used, the stitch will not be visible. 1. Place the edge of the two pieces of fabric together and center them under the presser foot. 2. Sew them together using the Elastic Stitch taking care to keep - Brother International PS-1250 | Users Manual - Multi - Page 41
) Stitch Length Stitch Width F-1.5 3-5 This machine automatica ly produces a Scallop Stitch which may Sew the Scallop Stitch along the edge of the material. 3. If desired, trim around the scallop with scissors to create a scalloped edge. Be careful not to cut the thread. Ondas decorativas Model - Brother International PS-1250 | Users Manual - Multi - Page 42
Decorative Stitching Pattern (Lightning Stitch) # (Bead Stitch) Stitch Length Stitch Width 5 F-1 3-5 These two stitches can be used for making decorative top stitching and for smocking. Set the Pattern Selection Dial to Lightning Stitch or Bead Stitch. Puntadas decorativas Modelo de puntada - Brother International PS-1250 | Users Manual - Multi - Page 43
Selection Dial to Link Stitch, Fagoting Stitch or Leaf Stitch. 3. Stitch along the edge, pulling both threads slightly when beginning to sew. • Use thicker than normal threads for sewing. 4. After sewing, remove the basting and the paper. Finish by tying knots on the reverse side at the beginning - Brother International PS-1250 | Users Manual - Multi - Page 44
sewing stretch materials. 1. Set the Pattern Selection Dial to Comb Stitch, Arrowhead Stitch, Slant Overlock Stitch or Elastic Overlock Stitch. 2. Position the fabric under the presser foot de unos 6 mm (1/4") dado que asi permite a la parte derecha (zigzag) de la puntada enganchar la orilla cortada - Brother International PS-1250 | Users Manual - Multi - Page 45
hemming blankets, tablecloths or draperies or when embroidering. 1. Set the Pattern Selection Dial to Feather Stitch. 2. Place the fabric right side up and sew 1 cm (3/8") from the edge of the fabric. 3. Trim close to the stitching. This stitch will prevent the fabric from unravelling. Modelo de - Brother International PS-1250 | Users Manual - Multi - Page 46
Zigzag Stretch Stitch) Fixed 2.5 3-5 This stitch can be used to sew heavyweight stretch fabrics wherever a Zigzag Stitch could be used. The Triple . Set thePatternSelectionDialtoTripleZigzagStretch Stitch. Triple puntada zigzag elastica Model° de puntada Largo depuntada Anchodepuntada . : ( - Brother International PS-1250 | Users Manual - Multi - Page 47
foot and set the Pattern Selection Dial to Buttonhole. 3. Draw up the lower thread. 4. Lower the presser foot aligning the marks on the foot thread, start the machine. 8. Buttonhole stitching is done in order, 1-4, as shown in fig. D. 9. Stop the machine parte SEWING OJALES Y COSTURA DE BOTONES 40 - Brother International PS-1250 | Users Manual - Multi - Page 48
and on the fabric. 0 Starting mark on the fabric G) Marks on the foot ® Botton plate 0 Alineelasmarcas delprensatelas conlas del tejido. (;) Marca de inicio en el tejido. Marcas en elprensatelas. (:) Placa para botones. A 2 3 B 4 C PUSH D 0 0 0 0 S3NaLO13 30 van1SOO A S3717TC ONIM3S - Brother International PS-1250 | Users Manual - Multi - Page 49
the fabric under the presser foot so that the center of the front bar tack mark is directly under the center of the presser foot and aligned with the 3. Primero, se cose elremate de la parte delantera delojal. Coloque el tejido debajo delprensatelas de BUTTON SEWING OJA LES V COSTURA DE BOTONES Pr\ - Brother International PS-1250 | Users Manual - Multi - Page 50
is at the left side of the stitch and raise the needle. 1. Turn the Pattern Selection Dial to c (same position as a). 2. Lower the presser foot and sew 5 to 6 stitches. 3. Stop the machine when the needle is at the right side of the stitch and raise the needle from the nraterial. 1. Set the Pattern - Brother International PS-1250 | Users Manual - Multi - Page 51
90 degrees counterclockwise and sew Straight Stitches to the end of the front bar tack of the buttonhole. 2. Remove the material from the machine. It is recommended that Ponga el selector de largo de puntada en "F" y cosa la parte izquierda del ojal en un pedazo de tejido, observando como se - Brother International PS-1250 | Users Manual - Multi - Page 52
izquierda, apriete o suelte el tornillo para ajuste lino del ojal tal como se describe a continuacion. Si la parte derecha es demasiada gruesa, con el destornillador grande incluido, gire el tornillo en elsentidodel-. Silapartederecha es demasiada fina, gire dicho tornillo en el sentido del +. - Brother International PS-1250 | Users Manual - Multi - Page 53
is 1.5 mm, set the stitch width to 1.5. 2. Change the foot to the button sewing foot. 3. Lower the feed dogs by setting the Drop Feed Lever to the a slow speed, sew approximately 10 stitches. 6. Remove the material from the machine. Cut the upper and lower threads and tie both threads at the back of - Brother International PS-1250 | Users Manual - Multi - Page 54
presser foot, install the zipper foot on the other side of the zipper and continue sewing using the other side notch. O Zipper foot 0 Right pin for sewing the left side of the zipper • Left pin for sewing !a pata al apretar el tot& situado en su parte posterior, instale la pata en el otro lado de la - Brother International PS-1250 | Users Manual - Multi - Page 55
the portion to be darned under the presser foot together with a fabric underlay for reinforcement. 4. Lower the presser foot. 5. Begin sewing alternating between gently drawing the work away from you and pulling it toward you. With the darning plate on the machine the feed dogs will not move the - Brother International PS-1250 | Users Manual - Multi - Page 56
fabric into a shape to be used as a decoration on a garment or project. 1. Baste the cut design to the fabric in the location where desired. 2. Carefully sew around the edge of the cutout design with a Zigzag Stitch in the fine stitch length. 3. Cut away the surplus fabric outside of the stitching - Brother International PS-1250 | Users Manual - Multi - Page 57
with the underside of the fabric on the bottom of the inside hoop. 5. Place the work under the needle and lower the presser bar with the foot removed. 6. Pull the lower thread up through the work at the starting position by turning the balance wheel and make a few holding stitches. 7. Grip the hoop - Brother International PS-1250 | Users Manual - Multi - Page 58
S3NOIOVOI7dV A SOld0S300V 30 OSn SNOI1VOrlddV aNV SINMINOVIIV omsn MONOGRAMMING 1. Sew, moving the hoop slowly along the lettering at a constant speed. 2. Secure with a few straight stitches at the end of the last letter. Monogramas 1. Cosa moviendo - Brother International PS-1250 | Users Manual - Multi - Page 59
plate screw as shown in fig. A. 3. Remove the face plate from the machine as illustrated in fig. B. Cambio de la bombilla 1. Desenchufe Ia maquina. 2. la maquina tal como se indica en la fig. B. A II II 4. Replace the sewing light bulb. See fig. C. ® Bulb (?) Loosen ® Tighten 5. Reattach the face - Brother International PS-1250 | Users Manual - Multi - Page 60
Cleaning 1. Remove the power supply plug from the outlet. 2. Raise the needle and the presser foot. 3. Loosen the presser foot screw and the needle clamp screw to remove the presser foot holder and the needle. See fig. A. 4. Remove the needle plate. See fig. B. Qi Coin Limpieza 1. Retire la clavija - Brother International PS-1250 | Users Manual - Multi - Page 61
® Impulse, ® Muelle 0 0 0 0 5 Performance Checklist Whenever sewing difficulties are encountered, review thesectionin thisinstructionmanual that details the operation you are performing to make sure you are correctly using the machine. If the problem continues, the following check list may help - Brother International PS-1250 | Users Manual - Multi - Page 62
CIINIIMEM1741 €IMMMD!IOCIZ Upper thread is not correctly installed. Lower thread is tangled. Needle is incorrectly inserted. Thread tension is Thread tension is incorrect. too tight. Page 19 iNo Upper thread is tangled. Page 22 I N° Bobbin is not threaded properly in the shuttle hook - Brother International PS-1250 | Users Manual - Multi - Page 63
LISTADO DE POSIBLES INCIDENCIAS ROTURA DEL ROTURA DEL HILO SUPERIOR HILO INFERIOR SALTO DE PUNTADAS SAGAS EN LAS PUNTADAS ARRUGAS EN EL TEJIDO ilLIIEERIMMIIA GWM7=JIHM3 Elhilo superior no esta bien enhebrado El hilo inferior esta enredado La aguja esta mal colocada La tension de los hilos - Brother International PS-1250 | Users Manual - Multi - Page 64
pull the fabric. Page 19 No No Drop feed lever is in down position. Page 4 iNo Main power switch is turned off. Page 5 No The bobbin winder shaft is slid to the right. Page 15 No Foot controller is not used correctly. Page 5 No Page 14 No CONTACT YOUR LOCAL - Brother International PS-1250 | Users Manual - Multi - Page 65
IZBMM?IIA RiEMWIZl1MZil: LISTADO DE POSIBLES INCIDENCIAS EL TEJIDO NO ARRASTRA BIEN LA AGUJA SE ROMPE LA MAQUINA ES RUIDOSA O FUNCIONA MUY DESPACIO LA MAQUINA NO ARRANCA El selector de largo de puntada esta puesto para que el tejido no alimente La aguja esta mal colocada Haypolvo en la placa - Brother International PS-1250 | Users Manual - Multi - Page 66
Keep the cartonandpackingmaterials forfutureuse. It may become necessary to reship the sewing machine. Improper packing or improper packing material could result in damage during shipping. Instructions for repacking the machine are illustrated below. Embalaje de la maquina Guarde la caja de carton - Brother International PS-1250 | Users Manual - Multi - Page 67
A Accessories Applique Arrowhead Stitch B Bead Stitch Blind Hem Stitch Buttonhole Buttonhole Fine Adjustment Button Sewing C Changing Presser Foot Changing the Bulb Changing the Needle Cleaning Comb Stitch Connecting Plugs D Darning Double Action Stitch Drawing Up Lower Thread Drop Feed Lever E - Brother International PS-1250 | Users Manual - Multi - Page 68
Parts 1 R Relative Chart of Sewing Fabrics, Needles and Threads 25 Repacking 59 Reverse Sewing Button 13 S Scallop Stitch 34 Sewing Stretch Blind Stitch 27 31 T Thread Tension Triple Stretch Stitch Triple Zigzag Stretch Stitch Troubleshooting Twin Needle Sewing 24 27 39 55, 57 23 - Brother International PS-1250 | Users Manual - Multi - Page 69
NOTE - Brother International PS-1250 | Users Manual - Multi - Page 70
NOTA - Brother International PS-1250 | Users Manual - Multi - Page 71
- Brother International PS-1250 | Users Manual - Multi - Page 72
ENGLISH ESPAISIOL 194348-111 Printed in Taiwan
-
 1
1 -
 2
2 -
 3
3 -
 4
4 -
 5
5 -
 6
6 -
 7
7 -
8
-
9
-
10
-
11
-
12
-
13
-
14
-
15
-
16
-
17
-
18
-
19
-
20
-
21
-
22
-
23
-
24
-
25
-
26
-
27
-
28
-
29
-
30
-
31
-
32
-
33
-
34
-
35
-
36
-
37
-
38
-
39
-
40
-
41
-
42
-
43
-
44
-
45
-
46
-
47
-
48
-
49
-
50
-
51
-
52
-
53
-
54
-
55
-
56
-
57
-
58
-
59
-
60
-
61
-
62
-
63
-
64
-
65
-
66
-
67
-
68
-
69
-
70
-
71
-
72
 |
 |
\I/
•I/
•I/
•
I/
\I/
•I/
\I/
NI/
d/
•I/
\I/
\I/
•I/
\
IP
/I's
II"
.
1
1`
,
/I•
•
/I\
,
I•
,
I•
,
g•
,
i•
,
i•
-Ts
,
I
,
,
I•
,
i•
i
1
/
..i,
O,
,
I
.
,
i•
/
/
,i,
0,
_•_
/
1
\
i/
\i/
/I\
/I\
1
1
\i/
\I/
•-
/1‘
'1
1
%
1
1
O/
,I,
-•-
-•-
/1‘
/1‘
1
1
O/
.I,
—•—
.1
1‘
/I
s
•
1
1
O/
\I/
—•-
1
1
.....
\
Le
,
OPERATION
MANUAL
_
...,..
,,
O,
O,
MANUAL
DE
INS1RUCCIONES
0,
,,
....
,,...
1
1
0,
0,
,,...
„I.
1
1
O
,
..,
,,..
1
1
0,
"I,
,,.
?
1
.,,
'I,
_•_
/i•
"1"
,
1
1
•I/
•I/
/l•
/i•
1
1
•I/
•I/
/i•
/i•
1
1
•I/
•I
. /
--
/I•
/i•
1
?
•I/
bather
,i,
1
J1
,I,
,I,
O,
,I,
„I,
,I,
„I,
,I,
O,
„I,
,i,