Brother International PS-21 Users Manual - English
Brother International PS-21 Manual
 |
View all Brother International PS-21 manuals
Add to My Manuals
Save this manual to your list of manuals |
Brother International PS-21 manual content summary:
- Brother International PS-21 | Users Manual - English - Page 1
Operation Manual - Brother International PS-21 | Users Manual - English - Page 2
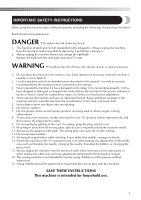
from the electrical outlet when removing covers, lubricating, or when making any other user servicing adjustments mentioned in the instruction manual. 16. This sewing machine is not intended for use by young children or infirm persons without supervision. 17. Young children should be supervised - Brother International PS-21 | Users Manual - English - Page 3
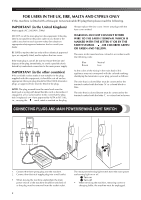
unattended, the main power switch of the machine should be switched off or the plug must be removed from the socket outlet. 2 The main power/sewing light switch turns the main power and sewing light on or off. 1 Turn on 2 Turn off • When servicing the machine, removing covers or changing bulbs, the - Brother International PS-21 | Users Manual - English - Page 4
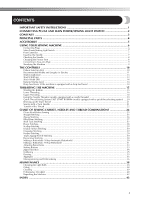
CONTENTS IMPORTANT SAFETY INSTRUCTIONS 1 CONNECTING PLUGS AND MAIN POWER/SEWING LIGHT SWITCH 2 CONTENTS ...3 PRINCIPAL PARTS ...4 ACCESSORIES ...5 USING YOUR SEWING MACHINE 6 Connecting Plugs ...6 Main Power/Sewing Light Switch ...7 Foot Controller ...7 Inserting the Needle ...7 Checking the - Brother International PS-21 | Users Manual - English - Page 5
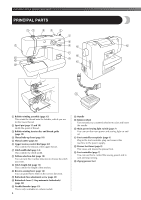
KNOWING YOUR SEWING MACHINE PRINCIPAL PARTS 1 Bobbin-winding assembly (page 15) This winds the thread onto the bobbin, which you use for the lower thread. 2 Spool pin (page 15 and 18) Holds the spool of thread. 3 Bobbin-winding tension disc and thread guide (page 15) 4 Thread take-up lever (page - Brother International PS-21 | Users Manual - English - Page 6
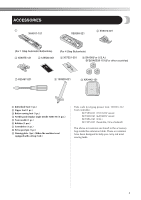
9 XA3442-121 1 Buttonhole foot (1 pc.) 2 Zipper foot (1 pc.) 3 Button sewing foot (1 pc.) 4 Needle pack (regular single needle HAX130) (3 pcs.) 5 Twin .) 8 Extra spool pin (1 pc.) 9 Darning plate (1pc.) (When the machine is not equipped with a Drop Feed.) Parts code for zigzag presser foot: 138135 - Brother International PS-21 | Users Manual - English - Page 7
KNOWING YOUR SEWING MACHINE USING YOUR SEWING MACHINE WARNING ● Use only regular household electricity for the power source. Using other power sources may result in fire, electric shock, or damage to the machine. ● Turn off the main power and remove the plug in the following circumstances: • When - Brother International PS-21 | Users Manual - English - Page 8
/ XL-5510/XL-5610/XL-5710/PS-21. . Inserting the Needle CAUTION ● Turn the main power switch off before you change the needle. If you leave the main power on and step on the foot controller, the machine will start and you may be injured. ● Only use sewing-machine needles for home use. Other needles - Brother International PS-21 | Users Manual - English - Page 9
use extreme force when loosening or tightening the needle clamp screw, otherwise certain parts of the sewing machine may be damaged. With the flat side of the needle toward the 5 back of the machine, insert the needle until it touches the needle stopper. Tighten the needle clamp. 1 3 2 1 Screwdriver - Brother International PS-21 | Users Manual - English - Page 10
presser foot is in the correct place, the bar should snap in. Converting to Free-arm Style Free-arm sewing is convenient for sewing tubular and hard-to-reach areas. To change your machine to the free-arm style, lift out the extension table attachment. 1 Lift the bottom of the extension table up - Brother International PS-21 | Users Manual - English - Page 11
KNOWING YOUR SEWING MACHINE THE CONTROLS Pattern Selection Dial pattern selection dial in the opposite direction until the desired stitch is displayed. 1 Pattern selection dial ■ 21 Stitches 1 2 3 4 5 6 7 8 9 10 11 12 13 14 15 16 17 18 19 20 21 ■ 17 Stitches 1 2 3 4 5 6 7 8 9 10 11 12 13 14 15 - Brother International PS-21 | Users Manual - English - Page 12
19 LEAF STITCH 3-5 (1/8-3/16) 20 TREE STITCH 3-5 (1/8-3/16) 21 LEGS STITCH 3-5 (1/8-3/16) Recommended Length [mm (inch)] -1.5 2.5 (3/32) Fixed 2.5 (3/32) Fixed 2.5 (3/32) Fixed 2.5 (3/32) Fixed 2.5 (3/32) Page in Instructions 30 25, 34, 35 26, 33, 36 27 27 28 27 28 29 - - 25 30 29 29 - Brother International PS-21 | Users Manual - English - Page 13
KNOWING YOUR SEWING MACHINE ■ 17 Stitches Pattern 1 Stitch Name 1-STEP AUTOMATIC BUTTONHOLE Recommended Width [mm (inch)] 3-5 Length [mm (inch)] -1.5 (1/64-1/16) -4 (1/64-3/16) 1-4 (1/16-3/16) -1.5 (1/64-1/16) Page in Instructions 30 25, 34, 35 26, 33, 36 27 27 28 27 28 29 25 30 29 29 29 29 30 - Brother International PS-21 | Users Manual - English - Page 14
STITCH. With the "0" setting material is not fed. This is used when sewing on a button. The " " range is for making a satin stitch (close stretch stitch. SS 1 10 2 2 3 1 ■ Adjusting the stretch stitching The machine is adjusted at the factory so that the stretch stitching can be sewn with the - Brother International PS-21 | Users Manual - English - Page 15
lever in as far as possible and hold it in that position while you lightly push the foot controller. To sew forward, release the reverse sewing lever. The machine will then sew forward. Note ● The dial cannot be turned past SS -". Do not forcefully turn the stitch length dial out of the allowable - Brother International PS-21 | Users Manual - English - Page 16
SFB (XA5539-151)) that has been designed for this sewing machine. Using of any other bobbin may cause damage to the machine. ● The bobbin was designed specifically for this sewing machine. If bobbins from older models are used, the machine will not operate correctly. Use only the enclosed bobbin or - Brother International PS-21 | Users Manual - English - Page 17
KNOWING YOUR SEWING MACHINE CAUTION ● Make sure you follow the instructions carefully. If you do 2 Wound poorly ● The bobbin was designed specifically for this sewing machine. If bobbins from older models are used, the machine will not operate correctly. Use only the enclosed bobbin or bobbins - Brother International PS-21 | Users Manual - English - Page 18
CAUTION ● To reduce the risk of injury from moving parts, be sure to turn off the machine before servicing it. In addition, be sure to close the shuttle cover. A-2 A-3 1 1 Tension case is not properly placed back into the machine, it will fall out from the shuttle immediately after you start - Brother International PS-21 | Users Manual - English - Page 19
KNOWING YOUR SEWING MACHINE Upper Threading 1 2 4 3 1 Spool pin 2 Thread guide CAUTION ● Make sure you thread the machine properly, otherwise the thread could tangle and break the needle. Set the main power switch to "O". Raise the presser foot lever and turn the balance 1 - Brother International PS-21 | Users Manual - English - Page 20
thread. ● If you incorrectly feed the thread you may cause sewing problems. Using the Needle Threader (models equipped with a needle threader) Set threader lever 3 Guide Pull down the needle threader lever as much 4 as possible, and then turn the lever toward the back of the machine (away from you - Brother International PS-21 | Users Manual - English - Page 21
SEWING MACHINE While lightly holding the thread, turn the 5 needle threader lever toward the front of the machine needle toward the back of the sewing machine. 2 1 Bobbin case 2 be used with home sewing machine needles size 75/11- machine. Start sewing as usual. (It is not necessary to 5 - Brother International PS-21 | Users Manual - English - Page 22
Sewing with a Twin Needle We have designed your machine so you can sew with machine. ● When using the twin needle, make sure the stitch width dial is not set above "3" since this may cause the needle to hit the needle plate and break. ● Do not sew of the machine. Put the second spool of thread onto the - Brother International PS-21 | Users Manual - English - Page 23
SEWING MACHINE ■ Twin Needle Threading You should thread each needle separately. Threading the Right Needle 1 Follow the same instructions for thread through the thread guide above the needle before you pass it through the eye of the left needle. 2 1 3 ■ Possible Problems If the Tension Is - Brother International PS-21 | Users Manual - English - Page 24
Correct tension Correct tension is important as too much or too little tension will weaken your seams or cause puckers on your fabric. 2 1 2 1 1 Reverse 2 Surface 23 - Brother International PS-21 | Users Manual - English - Page 25
KNOWING YOUR SEWING MACHINE CHART OF SEWING FABRICS, NEEDLES AND THREAD COMBINATIONS Fabric Type Mediumweight fabrics Lightweight fabrics Heavyweight fabrics Stretch fabrics or break the needle. Also, the seam may be uneven, the fabric may pucker, or the machine may skip stitches. 24 - Brother International PS-21 | Users Manual - English - Page 26
CAUTION ● To avoid being injured, watch the needle carefully while you are using the machine. Keep your hands away from moving parts. ● Do not stretch or pull the fabric during sewing, otherwise the needle may be damaged and you may be injured. ● Do not use bent or broken needles, otherwise you - Brother International PS-21 | Users Manual - English - Page 27
the fabric out 2 gently to the left-hand side. Cut both threads with the thread cutter on the 3 left-hand side of the machine. We recommend that you sew using the Straight Stitch at the beginning and end of the zigzag stitches. 1 1 Thread cutter 26 ■ SATIN STITCH Setting the Zigzag Stitch length - Brother International PS-21 | Users Manual - English - Page 28
trousers, without the stitch showing. Use the Blind Hem Stitch when sewing on non-stretch fabrics, and the Stretch Blind Hem Stitch for the Blind Hem 3 Stitch or Stretch Blind Hem Stitch, and then set the stitch length. Sew on the fold as in fig. C. 4 When the fabric is unfolded you will have a - Brother International PS-21 | Users Manual - English - Page 29
KNOWING YOUR SEWING MACHINE Elastic Stitching Stitch Stitch Stitch Name Pattern Length Width [mm (inch)] [mm (inch)] Elastic Stitch -2.5 3-5 (1/64-3/32) (1/8-3/16) You can use the Elastic Stitch for mending, sewing elastic or joining fabric. Each is explained below. Set the pattern - Brother International PS-21 | Users Manual - English - Page 30
stitches to join together seams and finish them in one operation. The Overlock Stitches are also useful for sewing stretch materials while the Arrowhead Stitch is ideal for sewing the edge of a blanket. Set the pattern selection dial to the Elastic 1 Overlock, Stretch Overlock or Arrowhead. Feather - Brother International PS-21 | Users Manual - English - Page 31
KNOWING YOUR SEWING MACHINE The stitch will prevent the fabric from unravelling. Making a Buttonhole (1-Step fabric. Attach the buttonhole foot and set the pattern 2 selection dial to " ". You need to sew the front bar tack first. Lower 3 the presser foot to align the marks on the foot with - Brother International PS-21 | Users Manual - English - Page 32
The bar tacks of the buttonhole are sewn in 7 the order shown. 3 2 4 1 Stop the machine when buttonhole stitching is 8 finished. ■ Making a Buttonhole on Stretch Fabrics When sewing buttonholes on stretch fabric, the buttonhole stitching is sewn over a gimp thread. Using tailor's chalk, mark the - Brother International PS-21 | Users Manual - English - Page 33
stitches. Step Step 1 (Front bar tack) Sewn section a Pattern a/c c a 1. Set the pattern selection dial to "a". 2. Lower the presser foot and sew 5 to 6 stitches. 3. Stop the machine when the needle is at the left side of the stitches, and then raise the needle from the material. Step 2 (Left - Brother International PS-21 | Users Manual - English - Page 34
For example, if the distance between the holes is 1.5 mm (1/16"), set the stitch width to "1.5". Attach the button sewing foot. 2 Place the darning plate on the needle plate. 3 (On a machine equipped with a drop feed lever, lower the feed dogs by setting the drop feed lever to the up position.) 33 - Brother International PS-21 | Users Manual - English - Page 35
KNOWING YOUR SEWING MACHINE Put a button between the foot and the fabric 4 and make sure that the needle enters the holes without hitting the button. If it hits, see step 1. At a slow speed, sew about 10 stitches. 5 Zipper Insertion Stitch Stitch Stitch Name Pattern Length Width [mm (inch - Brother International PS-21 | Users Manual - English - Page 36
Stitch Name Straight Stitch Stitch Pattern Length [mm (inch)] Any To sew the opposite side of the zipper, release 6 the foot by raising the material. 4 Place the darning plate on the needle plate. 1 (On a machine equipped with a drop feed lever, lower the feed dogs by setting the drop feed - Brother International PS-21 | Users Manual - English - Page 37
SEWING MACHINE to the fabric at the desired 1 location. Carefully sew around the edge of the cutout 2 using a for sewing a Monogram and Embroidering Place the darning plate on the needle plate. 1 (On a machine equipped the needle does not hit a pin during sewing, as the needle can break. You may - Brother International PS-21 | Users Manual - English - Page 38
the drop feed lever to the down position so that the feed dogs are raised. CAUTION ● Keep fingers away from moving parts, especially needles. ■ Monogram Sew by moving the hoop slowly along the 1 lettering at a constant speed. Secure with a few straight stitches at the end 2 of the last letter. Memo - Brother International PS-21 | Users Manual - English - Page 39
to 3 drops of oil at each point indicated by the arrows. Note ● Use only a bulb of the same type and rated 15 W. Replace the sewing light bulb. 4 1 2 3 1 Bulb 2 Loosen 3 Tighten Operate the machine at a fast speed for a 3 short time without thread installed. Be sure to wipe any excess oil off the - Brother International PS-21 | Users Manual - English - Page 40
lint and thread from 1 the retaining ring, hook, driver and race body with a brush. Wipe lint from the shuttle race using a cloth 2 dampened with machine oil. Clean the shuttle hook as described in step 2. 3 When reinstalling the removed parts, hold the 4 retaining ring in place with the notch at - Brother International PS-21 | Users Manual - English - Page 41
KNOWING YOUR SEWING MACHINE Performance Checklist Whenever sewing difficulties are encountered, first review the manual section about the operation that you are performing, to make sure you are using the machine correctly. If the problem persists, the following checklist may help improve the - Brother International PS-21 | Users Manual - English - Page 42
FABRIC DOES NOT FEED PROPERLY NEEDLE BREAKS MACHINE IS NOISY OR SLOW MACHINE DOES NOT START Stitch length dial is set at no feeding. Needle is not correctly inserted. Lint is slid toward the bobbin presser. Page 15 No Feed dogs are lowered. Page 14 No CONTACT YOUR LOCAL SERVICE CENTER 41 - Brother International PS-21 | Users Manual - English - Page 43
KNOWING YOUR SEWING MACHINE Repacking the Machine Keep the carton and packing materials for future use. You may have to take or send the machine to be repaired or wish to move the machine. If you do not pack it properly, or do not use the right packing material, the machine could be damaged. - Brother International PS-21 | Users Manual - English - Page 44
39 Finishing Sewing 26 Foot Controller 7 Foot Controller Connecting 6 Foot Controller Operating 7 Free-arm Sewing 9 Free-arm Style 9 G Gathering 35 H Hole for Extra Spool Pin 21 I Inserting Recommended Widths and Lengths for Stitches 11 Repacking the Machine 42 Reverse Sewing Lever 14 43 - Brother International PS-21 | Users Manual - English - Page 45
26 Scallop Stitch 11, 12, 28 Sewing Buttons 33 Sewing Light Bulb Replacement 38 Sewing Light Switch 2, 7 Sewing with a Twin Needle 21 Shell Tuck Stitch 11, 12, 13, 27 Shuttle Hook Removal 39 Shuttle Race Cleaning 39 Spool pin 15, 18 Steadying the Machine 9 Stitch Length Dial 13 Stitch - Brother International PS-21 | Users Manual - English - Page 46
English 885-458 XC7363-121 Printed in China
-
 1
1 -
 2
2 -
 3
3 -
 4
4 -
 5
5 -
 6
6 -
 7
7 -
8
-
9
-
10
-
11
-
12
-
13
-
14
-
15
-
16
-
17
-
18
-
19
-
20
-
21
-
22
-
23
-
24
-
25
-
26
-
27
-
28
-
29
-
30
-
31
-
32
-
33
-
34
-
35
-
36
-
37
-
38
-
39
-
40
-
41
-
42
-
43
-
44
-
45
-
46
 |
 |
Operation Manual