Brother International QL 550 Software Users Manual - English
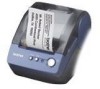
Brother International QL 550 - P-Touch B/W Direct Thermal Printer Manual
 |
UPC - 012502610519
View all Brother International QL 550 manuals
Add to My Manuals
Save this manual to your list of manuals |
Brother International QL 550 manual content summary:
- Brother International QL 550 | Software Users Manual - English - Page 1
Introduction BROTHER QL-500/550/650TD/1050/1050N Software User's Guide Creating Labels (For Windows) Creating Labels (For Macintosh) QL-500 QL-650TD QL-550 QL-1050/1050N 1 Appendix - Brother International QL 550 | Software Users Manual - English - Page 2
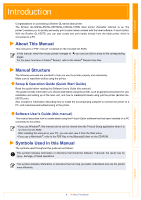
Introduction Creating Labels (For Windows) Contents Contents 2 Introduction 4 About This Manual ...4 Manual Structure ...4 Symbols Used in this Manual 4 Creating Labels (For Windows 5 Label Creation Overview 5 From Label Creation to Printing 5 How to Use P-touch Editor 7 Starting P-touch - Brother International QL 550 | Software Users Manual - English - Page 3
Introduction Creating Labels (For Windows) How to use the User's Guide (HTML Manual 56 Appendix 58 Sharing the printer ...58 Using this printer as a Shared Printer 58 Using the PS-9000 Print Server (sold separately 58 Controlling with - Brother International QL 550 | Software Users Manual - English - Page 4
information describing how to install the accompanying software to connect the printer to a PC, and maintenance/troubleshooting of the printer. Software User's Guide (this manual) This manual describes how to create labels using the P-touch Editor software that has been installed on a PC connected - Brother International QL 550 | Software Users Manual - English - Page 5
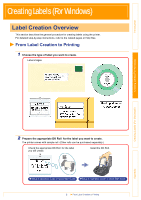
procedure for creating labels using the printer. For detailed step-by-step instructions, refer to the related pages or Help files. From Label Creation to Roll. ÎSetup & Operation Guide or Quick Start Guide ÎSetup & Operation Guide or Quick Start Guide 5 From Label Creation to Printing Appendix - Brother International QL 550 | Software Users Manual - English - Page 6
select templates with machine side operation. So use the ESC/P command, which can transfer templates. Select a template Transfer Print ÎSetup & Operation Guide Printing using the PC After creating a template with your PC, create and print the label using the printer. P-touch Transfer Manager - Brother International QL 550 | Software Users Manual - English - Page 7
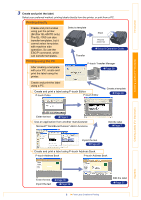
Introduction Creating Labels (For Windows) How to Use P-touch Editor This section explains the procedure for creating various kinds of labels using P-touch Editor. Starting P-touch Editor 1 Click [Start]-[All Programs (Programs)]- [Brother P-touch]-[P-touch Editor 4.2]. You can also start the P- - Brother International QL 550 | Software Users Manual - English - Page 8
Introduction Creating Labels (For Windows) Layout window The layout window consists of the following seven sections: 1 2 3 4 5 6 7 1 Menu Commands are categorized under each menu (File, Edit, View, and Insert) by function. 2 Standard toolbar A group of frequently used commands (New Layout, - Brother International QL 550 | Software Users Manual - English - Page 9
Introduction Creating Labels (For Windows) Creating an Address Label This section describes the process of creating an address label. 1 In the Page properties box, select [Standard Address Label] from the [Label Format] list box. If the Page property box is not shown in the Property dock, click to - Brother International QL 550 | Software Users Manual - English - Page 10
Introduction Printing a Label This section explains the procedure for printing a label you have created. 1 In the Print property box, set the number of copies to be printed to [1] and click . The label is printed. If the Print property box is not shown in the Property dock, click to display - Brother International QL 550 | Software Users Manual - English - Page 11
Introduction Creating Labels (For Windows) By clicking in the [Print] dialog box, you can select more detailed settings. For example, you can specify that priority be given to printing quality or printing speed when printing labels. When you print labels that require higher quality, such as - Brother International QL 550 | Software Users Manual - English - Page 12
Introduction Creating Labels (For Windows) Creating Different Types of Labels The following are examples of the labels that can be created using various functions of the P-touch Editor. Refer to the Creating Labels section in the P-touch Editor Help for further details. Help Section Sample Label - Brother International QL 550 | Software Users Manual - English - Page 13
Introduction Creating Labels (For Windows) Using the P-touch Editor Help The P-touch Editor Help offers detailed information on available features and explains on how to use the Ptouch Editor. Opening the Help files 1 Starting P-touch Editor Refer to Î"Starting P-touch Editor" on page 7. The - Brother International QL 550 | Software Users Manual - English - Page 14
. The [Print] dialog box appears. 4 Specify the [Printer] item and click . The Help information is printed. Select a normal printer that supports general paper sizes, such as Letter. Creating Labels (For Windows) Creating Labels (For Macintosh) Appendix 14 Using the P-touch Editor Help - Brother International QL 550 | Software Users Manual - English - Page 15
on the database function, refer to Î"Using external database files" on page 23. • The label list can be exported only in the CSV format. • Supported database file formats are: mdb (Microsoft® Access ), xls (Microsoft® Excel), csv, and txt. • To create labels using the Add-In function of the P-touch - Brother International QL 550 | Software Users Manual - English - Page 16
Introduction Creating Labels (For Windows) Switching the Label List view There are two ways to display the Label List/Database window: Record View and Form View. To change the view, right-click in the Label List/Database window, and select either Record View or Form View. „Record View This view - Brother International QL 550 | Software Users Manual - English - Page 17
Introduction Creating Labels (For Windows) Entering data In the following example, type an address and a name in the Body field. 1 Right-click in the Label List/Database window, and click [Create New Record]. You can also display the menu by rightclicking on the record selector. A new record is - Brother International QL 550 | Software Users Manual - English - Page 18
Introduction Creating Labels (For Windows) Layout Styles The Layout Style function allows you to create labels using label list information in a simple way. „What is a Layout Style? • The Layout Style function lets you use a variety of saved label layouts easily. • You can also save new layouts - Brother International QL 550 | Software Users Manual - English - Page 19
Introduction „Using a Layout Style to create labels 1 With the Label List/Database window displayed, click [Format]-[Apply Layout Style]. If [Format] is not displayed, click on the layout work area once. The [Apply Layout Style] dialog box appears. 2 Select a layout suitable for the label you - Brother International QL 550 | Software Users Manual - English - Page 20
Introduction „Creating and registering a new Layout Style When there is no layout style appropriate for the label you want to create, you can create a new layout style. You can then save it as a new layout style for later use. 1 Click [File]-[New]. The [New] dialog box appears. 2 Click [New - Brother International QL 550 | Software Users Manual - English - Page 21
Introduction 7 Click [File]-[Save As]. The [Save As] dialog box appears. 8 Move to the folder in which you want to save the label layout. Creating Labels (For Windows) Creating Labels (For Macintosh) 9 From the [Save As] type pull down, select [Layout Style Template]. Enter the [File name] and - Brother International QL 550 | Software Users Manual - English - Page 22
Introduction Creating Labels (For Windows) Printing labels from the Label List 1 Click in the Print properties. The [Print] dialog box appears. 2 Choose the Print Options. Refer to Î"Print Options and label cutting" on page 10. 3 In [Print Range], specify the records to be printed. Print Range - Brother International QL 550 | Software Users Manual - English - Page 23
section describes the procedure for creating barcode labels with a database. The following example uses a Microsoft® Excel file as a database. The supported database file formats are: mdb (Microsoft® Access®), xls (Microsoft® Excel), csv, and txt. 1 Prepare a database file. The following example - Brother International QL 550 | Software Users Manual - English - Page 24
Introduction Creating Labels (For Windows) 5 Specify how the file will be opened, and click . The Database window appears. • Connect as read-only. Used to print the original data. The data cannot be edited. • Create a copy that can be edited. Allows you to update the database. The original - Brother International QL 550 | Software Users Manual - English - Page 25
Introduction Creating Labels (For Windows) 10 Select [Bar Code]. The database content is merged into the layout work area as bar code data. Change the format and settings of the bar code as needed. 11 Click in the Print properties. The [Print] dialog box appears. If you want to print just the - Brother International QL 550 | Software Users Manual - English - Page 26
the text you want to print and clicking on the P-touch icon, you can create and print labels quickly and easily. • The Add-In function supports the following applications: Microsoft® Word 97/2000/2002/2003, Microsoft® Excel 97/2000/2002/2003, and Microsoft® Outlook® 2000/2002/2003 • After the Add-In - Brother International QL 550 | Software Users Manual - English - Page 27
Introduction Microsoft Word With the Add-In function, you can directly copy the text selected in Microsoft® Word to a label layout. Creating labels using Microsoft Word 1 Open a Microsoft® Word document and select the text you want to print. 2 1 2 On the Microsoft® Word standard toolbar, click . - Brother International QL 550 | Software Users Manual - English - Page 28
Introduction Creating Labels (For Windows) Icon Button name Function Zoom controls Used to zoom in or zoom out on the label layout, or to select the magnification using the pull-down list. Edit button Used to edit the currently displayed label with the P-touch Editor. Help button Opens the - Brother International QL 550 | Software Users Manual - English - Page 29
Introduction Creating Labels (For Windows) Microsoft Excel With the Add-In function, you can directly copy text selected in Microsoft® Excel to a label layout. Creating labels using Microsoft Excel 1 Open a Microsoft® Excel worksheet and select the cells that contain the text you want to include - Brother International QL 550 | Software Users Manual - English - Page 30
Introduction • For details on how to automatically add the selected text to a label list, refer to "How to add the Microsoft® Excel text to a label list" described below. • For details on the Toolbar of the Add-In Preview window, refer to Î"Toolbar in the Add-In Preview window" on page 27. • If - Brother International QL 550 | Software Users Manual - English - Page 31
Introduction Microsoft Outlook With the Add-In function, you can directly copy the text selected in Microsoft® Outlook® to a label layout. Items you can import are: Contacts, Calendar items, Deleted Items, Drafts, Inbox, Journal, Notes (text in the Notes dialog box is not available), Outbox, Sent - Brother International QL 550 | Software Users Manual - English - Page 32
Introduction Creating Labels (For Windows) How to add the Microsoft Outlook text to a label list If you want to register the text in the label list, check the [Record In Label List] check box in the Add-In Preview window. New records are automatically created in the label list and the selected - Brother International QL 550 | Software Users Manual - English - Page 33
Introduction Creating Labels (For Windows) How to Use the P-touch Address Book This section describes the procedure for creating labels from contacts efficiently using the P-touch Address Book. Starting the P-touch Address Book 1 Click [Start]-[All Programs(Programs)]- [Brother P-touch]-[P-touch - Brother International QL 550 | Software Users Manual - English - Page 34
Introduction Creating Labels (For Windows) Layout window The layout window consists of the following eight sections: 1 2 3 4 5 6 7 8 1 Menu bar Commands are categorized under each menu (File, Edit, View, and Insert) by function. 2 Standard toolbar A group of frequently used commands (such as - Brother International QL 550 | Software Users Manual - English - Page 35
Deletes the contact that is currently selected. Image Allows you to insert an image for a contact. The following file types are supported: • Bitmap (*.bmp, *.dib) • JPEG file (*.jpg, *.jpeg) • TIFF file (uncompressed)(*.tif ) • GIF file (*.gif ) • Icon (*.ico) • Windows Meta File(*.wmf, *.emf - Brother International QL 550 | Software Users Manual - English - Page 36
Introduction Creating Labels (For Windows) Importing the Contact Data The CSV format files and Outlook® Contacts data can be imported and used as P-touch Address Book contacts. Importing the contact data in CSV format 1 Click [File]-[Import]-[CSV File]. The [Open] dialog box appears. 2 Select a - Brother International QL 550 | Software Users Manual - English - Page 37
Introduction Creating Labels (For Windows) Importing the Outlook contact data 1 Click [File]-[Import]-[Outlook Contacts]. The [Fields to Import] dialog box appears. 2 Assign [CSV/Outlook Fields] to [Address Book Fields] and click . Every Outlook® Contacts field is imported, even if the same - Brother International QL 550 | Software Users Manual - English - Page 38
Introduction Printing the Label This section explains how to print a created label. 1 Click . The labels are printed. 2 Cut off the printed label using the Cut button or the Cut lever (Brother QL-500) of the printer. In the [Print] dialog box, if [Auto Cut] is checked in [Options], the printed - Brother International QL 550 | Software Users Manual - English - Page 39
Introduction Creating Labels (For Windows) How to Use P-touch Transfer Manager & P-touch Library The P-touch Transfer Manager is basically for the QL-650TD.The QL-1050 can also transfer templates, but it cannot select templates with machine side operation. So use the ESC/P command, which can - Brother International QL 550 | Software Users Manual - English - Page 40
Introduction Creating Labels (For Windows) Explanations of the Icons Icon Button name Transfer (Only for P-touch Transfer Manager) Backup (Only for P-touch Transfer Manager) Open Print (Only for P-touch Library) Printer Settings (Only for P-touch Transfer Manager) Search Function Transfers - Brother International QL 550 | Software Users Manual - English - Page 41
transfer data to the folder you made. The data that can be transferred depends on your printer model. For details, refer to your printer's manual. 4 Key Assign numbers are automatically assigned to transfer data within the folder you made in previous step. To change a number, right click the data - Brother International QL 550 | Software Users Manual - English - Page 42
Introduction 5 Select the data or folder you want to transfer,then click . The transfer confirmation message is displayed. 6 Click [Yes]. The data in the folder selected with the folder view is transferred to the printer. If you have selected specific data in the list view, only that selected - Brother International QL 550 | Software Users Manual - English - Page 43
Introduction Creating and transferring a new message (QL-650TD only) 1 Select the QL-650TD Configurations folder or any folder under it. 2 Right click, then select [New Message]. The message file [Edit] dialog box is displayed. Creating Labels (For Windows) 3 Select the number for the message to - Brother International QL 550 | Software Users Manual - English - Page 44
Introduction Backing up label templates This transfers label templates and other data in the printer to the PC. • Backed up data can not be edited on the PC. • For some printer model specifications, it may not be possible to retransfer backed-up data to a printer of a different model than the one - Brother International QL 550 | Software Users Manual - English - Page 45
Introduction Creating Labels (For Windows) Changing printer settings from the PC 1 Connect the PC and the printer by cable and switch on the printer power. The printer model name is displayed in the folder view. 2 Select the printer, then click . The [Printer Settings] dialog box is displayed. - Brother International QL 550 | Software Users Manual - English - Page 46
Introduction Creating Labels (For Windows) Starting up the P-touch Library You can start up the P-touch Library and edit and print labels. You can not transfer data or back up data from the printer by using the P-touch Library. To transfer or back up data, select the View menu [Mode]-[P-touch - Brother International QL 550 | Software Users Manual - English - Page 47
Introduction Searching labels You can search label templates registered in the P-touch Library. 1 Click . The [Search] dialog box is displayed. Creating Labels (For Windows) Creating Labels (For Macintosh) 2 Check the items to be used as search conditions and set the search items. The search - Brother International QL 550 | Software Users Manual - English - Page 48
to the sections indicated for details related to each operation, or to the "User's Guide (HTML Manual)". Refer to "How to use the User's Guide (HTML Manual)" on page 56 for how to use the "User's Guide (HTML Manual)". Procedure for Creating and Printing Labels 1 Choose the label you want to create - Brother International QL 550 | Software Users Manual - English - Page 49
Introduction 3 Create and print the label. Choose a method for creating and printing the label: using only the printer, or creating the text using an application on the computer. P-touch Editor P-touch Editor Entering text ÎPage 53 Creating labels ÎPage 53 The template downloading feature, Add - Brother International QL 550 | Software Users Manual - English - Page 50
to create a wide range of labels using the P-touch Editor. This section gives an overview of the P-touch Editor. Refer to the "User's Guide (HTML Manual)" for details. Starting the P-touch Editor 1 Double-click the [Applications] folder of the drive, where the P-touch Editor is installed. The - Brother International QL 550 | Software Users Manual - English - Page 51
Introduction Layout Window The layout window has the following six features. 1 4 2 3 5 6 Creating Labels (For Windows) Creating Labels (For Macintosh) 1 Draw Toolbar Provides tools for selecting objects, entering text and drawing graphics. 2 Print Toolbar Provides print preview display, - Brother International QL 550 | Software Users Manual - English - Page 52
Introduction Creating Labels (For Windows) 6 Property Dock Page property, font property, layout property, text property are available. Click the buttons on the property dock to display and close the property box. Property Name Function Page Properties Sets the size and the orientation of the - Brother International QL 550 | Software Users Manual - English - Page 53
Introduction Creating Labels (For Windows) Creating an Address Label This section describes the process of creating an address label on Mac OS® X 10.3.9 as an example. 1 Click on in the Property dock. The page properties box is displayed. 2 Select "Standard Address Label". • The label format in - Brother International QL 550 | Software Users Manual - English - Page 54
Introduction Printing the Label This section describes the printing process for a created label. 1 Click on in the print bar. A dialog for print settings is displayed. 2 Select "1" for Copies in the print properties box and then click . The label is printed. Creating Labels (For Windows) - Brother International QL 550 | Software Users Manual - English - Page 55
„Roll Setting Introduction Creating Labels (For Windows) Creating Labels (For Macintosh) Settings Length Margin Auto Tape cut (other than the QL-500) Cut at every xx labels (QL-1050/1050N) Cut at end (QL-650TD/1050/ 1050N) Mirror Printing Quality Give Priority to print speed Give priority to - Brother International QL 550 | Software Users Manual - English - Page 56
at this point, the file on the CD-ROM may be viewed. The installation window is displayed. 4 Follow the instructions displayed on the screen and install the folder. The "User's Guide (HTML Manual)" is installed. Opening the User's Guide (HTML Manual) 1 Double-click the [main.htm] icon in the [User - Brother International QL 550 | Software Users Manual - English - Page 57
User's Guide (HTML Manual) Window „Main Window Introduction Creating Labels (For Windows) Creating Labels (For Macintosh) 1 2 1 Main Menu Operation methods are Description Window The operation methods for the selected items are displayed. 57 How to use the User's Guide (HTML Manual) Appendix - Brother International QL 550 | Software Users Manual - English - Page 58
in a 10BASE-T/100BASE-TX network environment. PS-9000 Network hub Brother QL-Series Network cable USB cable For PS-9000 setup details, refer to the instruction manual for the PS-9000 print server. The PS-9000 comes packed with the QL-1050N. 58 Using this printer as a Shared Printer Appendix - Brother International QL 550 | Software Users Manual - English - Page 59
Introduction Creating Labels (For Windows) Controlling with the ESC/P Commands Brother QL-650TD/ 1050/1050N Only Descriptions in this section apply only to the functions provided by the Brother QL-650TD/1050/1050N. Fonts and several bar codes are embedded within this printer. You can send - Brother International QL 550 | Software Users Manual - English - Page 60
Introduction Creating Labels (For Windows) Printing Directly from Other Applications You can use this printer to print directly from most Windows® application, by installing the printer driver. Because the paper size for this printer is different from other regular printers, you may not be able to - Brother International QL 550 | Software Users Manual - English - Page 61
Introduction • [Graphics] Tab You can set "Halftones", "Brightness", and "Contrast" in this tab. • [Option] Tab You can set "Auto cut" with number of labels between cuts, "Mirror Printing", "Cut at end", and "Unit" in this tab. The cutting options will vary according to the model. 4 Close the [ - Brother International QL 550 | Software Users Manual - English - Page 62
Introduction Printing from Other Applications We will use Microsoft® Word as an example. 1 Click [File]-[Print]. The [Print] dialog box appears. 2 Select "Brother QL-500/550/650TD/1050/ 1050N". You can change the settings of the Printer Driver from the [Printer Properties] dialog box which - Brother International QL 550 | Software Users Manual - English - Page 63
Complete] dialog box appears. 4 Click . Appendix 5 Close the [Add or Remove Programs] dialog. P-touch Editor has been uninstalled. The P-touch Address Book, and Software User's Guide (PDF Manual) can also be uninstalled by following this procedure. 63 For Windows - Brother International QL 550 | Software Users Manual - English - Page 64
Introduction Creating Labels (For Windows) Uninstalling the Printer Driver 1 Turn off the Brother QL-500/550/650TD/1050/1050N. 2 From [Control Panel], open the [Printers and Faxes (Printers)] window. For details, refer to Windows® Help. 3 Select "Brother QL-500/550/650TD/1050/ 1050N", and click [ - Brother International QL 550 | Software Users Manual - English - Page 65
Introduction Creating Labels (For Windows) 2 Click . 3 Delete [Applications]-[P-touch Editor 3.2] folder. Before delete the [P-touch Editor 3.2] folder, please check if any necessary file is saved in it. P-touch Editor has been uninstalled. Uninstalling the Printer Driver 1 Turn off the Brother QL - Brother International QL 550 | Software Users Manual - English - Page 66
port 120V AC 60Hz 0.8A 5.7 (W) × 7.6 (D) × 5.9 (H) inch 146 (W) × 196 (D) × 152 (H) mm Approx. 2.8 lb (1.3 kg) (Without DK Rolls) Automatic cutter (Brother QL-550) Manual cutter (Brother QL-500) ON/OFF button ( ) FEED button, CUT button PRINT button, MENU button CANCEL button, OK button UP button - Brother International QL 550 | Software Users Manual - English - Page 67
to 35°C) Operating Humidity 20% to 80% (without condensation) *1 The PC should meet Microsoft®'s recommendations for the OS installed. *2 PS-9000 does not support Mac. So QL-1050N is not used in Mac environment. *3 The RS-232C interface is required when printing with ESC/P commands. *4 Required
-
 1
1 -
 2
2 -
 3
3 -
 4
4 -
 5
5 -
 6
6 -
 7
7 -
8
-
9
-
10
-
11
-
12
-
13
-
14
-
15
-
16
-
17
-
18
-
19
-
20
-
21
-
22
-
23
-
24
-
25
-
26
-
27
-
28
-
29
-
30
-
31
-
32
-
33
-
34
-
35
-
36
-
37
-
38
-
39
-
40
-
41
-
42
-
43
-
44
-
45
-
46
-
47
-
48
-
49
-
50
-
51
-
52
-
53
-
54
-
55
-
56
-
57
-
58
-
59
-
60
-
61
-
62
-
63
-
64
-
65
-
66
-
67
 |
 |
1
Introduction
Creating Labels (For Windows)
Creating Labels (For Macintosh)
Appendix
BROTHER QL-500/550/650TD/1050/1050N
Software User's Guide
QL-650TD
QL-550
QL-1050/1050N
QL-500