Brother International Quattro 2 6700D Users Manual - Multi
Brother International Quattro 2 6700D Manual
 |
View all Brother International Quattro 2 6700D manuals
Add to My Manuals
Save this manual to your list of manuals |
Brother International Quattro 2 6700D manual content summary:
- Brother International Quattro 2 6700D | Users Manual - Multi - Page 1
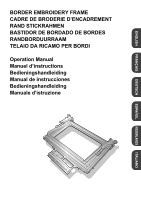
ÑOL NEDERLANDS ITALIANO BORDER EMBROIDERY FRAME CADRE DE BRODERIE D'ENCADREMENT RAND STICKRAHMEN BASTIDOR DE BORDADO DE BORDES RANDBORDUURRAAM TELAIO DA RICAMO PER BORDI Operation Manual Manuel d'instructions Bedieningshandleiding Manual de instrucciones Bedieningshandleiding Manuale d'istruzione - Brother International Quattro 2 6700D | Users Manual - Multi - Page 2
- Brother International Quattro 2 6700D | Users Manual - Multi - Page 3
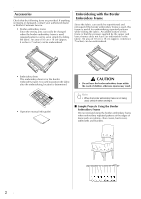
CONTENTS Accessories...2 Embroidering with the Border Embroidery Frame 2 Sample Projects Using the Border Embroidery Frame 2 Selecting a Pattern ...3 Hooping the Fabric in the Border Embroidery Frame 5 Attaching the Border Embroidery Frame to the Embroidery Unit 6 Embroidering the First Pattern - Brother International Quattro 2 6700D | Users Manual - Multi - Page 4
, otherwise injuries may result. • Operation manual (this guide) Note • When the border embroidery frame is not being used, unlock it before storing it. ■ Sample Projects Using the Border Embroidery Frame We recommend using the border embroidery frame when embroidery repeated patterns at the edges - Brother International Quattro 2 6700D | Users Manual - Multi - Page 5
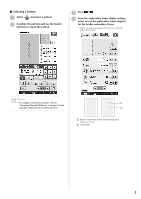
* Of the 14 settings available, there are two for border embroidery frames. Memo • For details on the border function, refer to "Designing Repeated Patterns" in chapter 6 of the Operation Manual for the sewing machine. a b a Border embroidery frame embroidering area (18 cm × 10 cm) b Center line - Brother International Quattro 2 6700D | Users Manual - Multi - Page 6
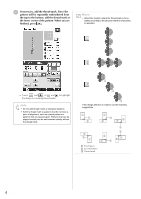
the location where the thread mark is to be added according to the direction that the embroidery is repeated. → Touch and , or and to highlight the design for inserting thread marks the design direction is rotated, use the following suggestions. a First Pattern b Second Pattern c Thread mark 4 - Brother International Quattro 2 6700D | Users Manual - Multi - Page 7
fabric and excess part of the stabilizer material within the border embroidery frame (in the same way as when the normal embroidery frame is used). Otherwise, misaligned patterns may result. ■ Hooping the Fabric in the Border Embroidery Frame a With a chalk pen, mark the fabric with a line drawn - Brother International Quattro 2 6700D | Users Manual - Multi - Page 8
Embroidery Frame to the Embroidery Unit CAUTION • After firmly hooping the fabric in the border embroidery frame, attach the frame to the embroidery unit. Otherwise, the needle area. a b a Embroidery frame holder b Guide on border embroidery frame f Remove the embroidery sheet, and then pull the - Brother International Quattro 2 6700D | Users Manual - Multi - Page 9
the pattern may not embroider correctly or the presser foot may strike the border embroidery frame and cause injuries. b Thread the machine, and then start embroidering. CAUTION • Do not touch the border embroidery frame while embroidering. → When embroidering is finished, the thread mark is sewn - Brother International Quattro 2 6700D | Users Manual - Multi - Page 10
to its initial position, even after the thread is cut, turn off the machine, manually move the carriage, and then remove the border embroidery frame. • Only move the embroidery unit carriage when the machine is turned off. a Pattern embroidered first b Position of pattern to be embroidered next - Brother International Quattro 2 6700D | Users Manual - Multi - Page 11
thread mark at the end of previous embroidery. For this example, align the needle position with the upper center of the next pattern. When you are finished, press . d Use to align the needle position with the point of the thread mark. a a Needle position Note • After turning the handwheel to - Brother International Quattro 2 6700D | Users Manual - Multi - Page 12
e After aligning the needle position for the beginning of embroidering, remove the thread mark. Note the procedure starting with "Removing the Border Embroidery Frame". CAUTION • If the sewing machine is turned off, then turned on again with the border embroidery frame attached or if you try to - Brother International Quattro 2 6700D | Users Manual - Multi - Page 13
FRANÇAIS TABLE DES MATIÈRES Accessoires...12 Broderie à l'aide du cadre de broderie de bord 12 Exemples de projets avec le cadre de broderie de bord 12 Sélection d'un motif ...13 Mise en place du tissu dans le cadre de broderie de bord 15 Fixation du cadre de broderie de bord à l'unité de - Brother International Quattro 2 6700D | Users Manual - Multi - Page 14
ment est manquant ou endommagé, contactez votre revendeur agréé ou le service client Brother. • Cadre de broderie de bord Etant donné que la zone le tissu une fois que la zone à broder est déterminée. • Manuel d'instructions (ce guide) ATTENTION • Ne laissez pas le cadre de broderie de bord à portée - Brother International Quattro 2 6700D | Users Manual - Multi - Page 15
de broderie de bordure. Mémo • Pour plus de détails sur la fonction de bordure, reportez-vous à la section "Conception de motifs répétés" du chapitre 6 du Manuel d'instructions de la machine à coudre. a b a Zone de broderie du cadre de broderie de bord (18 cm × 10 cm) b Ligne centrale 13 - Brother International Quattro 2 6700D | Users Manual - Multi - Page 16
e Au besoin, ajoutez un repère. Etant donné que le motif sera répété tout au long du tissu, ajoutez un repère au centre inférieur du motif. Lorsque vous avez terminé, appuyez sur . Mémo • Sélectionnez l'emplacement où ajouter le repère en fonction du sens de répétition de la broderie. → - Brother International Quattro 2 6700D | Users Manual - Multi - Page 17
f Appuyez sur . b Fixez le renfort de broderie au tissu à broder. Remarque • Lorsque vous brodez les bords du tissu, fixez un renfort de broderie plus large que le tissu, fixez fermement le tissu et le surplus de renfort dans le cadre de broderie de bord (de la même manière que lorsque vous - Brother International Quattro 2 6700D | Users Manual - Multi - Page 18
érieur et appuyez sur les leviers. Veillez à ce que le surplus de tissu replié ne se trouve pas dans la zone de broderie. a b a Support du cadre de broderie b Guide sur le cadre de broderie de bord f Retirez la feuille de broderie et tirez sur les quatre côtés du tissu pour tendre les fils - Brother International Quattro 2 6700D | Users Manual - Multi - Page 19
même niveau que le cadre de broderie de bord pour fixer le cadre au support. a a Levier de sécurité du cadre ATTENTION • Si le levier n'est le fil dans la machine et démarrez la broderie. ATTENTION • Ne touchez pas le cadre pendant que la machine brode. → Lorsque la machine a terminé de broder - Brother International Quattro 2 6700D | Users Manual - Multi - Page 20
hors tension, déplacez manuellement le chariot et retirez le cadre de broderie de bord. • Ne déplacez le chariot que lorsque la machine est hors tension. a Premier motif brodé b Position du motif à broder ensuite c Zone de broderie de la feuille de broderie b Fixez le cadre à l'unité de broderie - Brother International Quattro 2 6700D | Users Manual - Multi - Page 21
c permet de sélectionner le positionnement de l'aiguille à aligner avec le repère à la fin de la broderie précédente. Pour cet exemple, alignez la position de l'aiguille et le centre supérieur du motif suivant. Lorsque vous avez terminé, appuyez sur . d permet d'aligner - Brother International Quattro 2 6700D | Users Manual - Multi - Page 22
suivant. Pour continuer à broder un motif répété, répétez la procédure en commençant par "Retrait du cadre de broderie de bord". ATTENTION • Si la machine à coudre est mise hors tension, puis mise sous tension avec un cadre fixé ou si vous essayez de sélectionner un point sur l'écran Point de - Brother International Quattro 2 6700D | Users Manual - Multi - Page 23
DEUTSCH INHALT Zubehör...22 Sticken mit dem Bordüren-Stickrahmen 22 Beispiele für Stickereien mit dem Bordüren-Stickrahmen 22 Auswahl eines Musters ...23 Einspannen des Stoffes in den Bordüren-Stickrahmen 25 Einsetzen des Bordüren-Stickrahmens in die Stickeinheit 26 Sticken des ersten Musters - Brother International Quattro 2 6700D | Users Manual - Multi - Page 24
Sie, ob folgende Bauteile vorhanden sind. Sollte etwas fehlen oder beschädigt sein, wenden Sie sich bitte an Ihren Brother-Fachhändler oder den Brother-Kundenservice. • Bordüren-Stickrahmen Da es mit dem Randmuster-Stickrahmen leicht ist, den Stickbereich zu ändern, können wiederholte Stickmuster - Brother International Quattro 2 6700D | Users Manual - Multi - Page 25
■ Auswahl eines Musters a Wählen Sie und anschließend ein Muster. b Kombinieren Sie die Muster und verwenden Sie die Randfunktion, um das Muster zu wiederholen. c Drücken Sie . d Wählen Sie aus den Einstellungen in der Stickrahmen-Anzeige eine Einstellung für den Bordüren-Stickrahmen. * - Brother International Quattro 2 6700D | Users Manual - Multi - Page 26
e Fügen Sie bei Bedarf eine Garnmarkierung hinzu. Da das Muster wiederholt von oben nach unten gestickt wird, fügen Sie die Garnmarkierung unten in der Mitte des Musters hinzu. Wenn Sie fertig sind, drücken Sie . Anmerkung • Wählen Sie den Punkt, wo die Garnmarkierung hinzugefügt werden soll, - Brother International Quattro 2 6700D | Users Manual - Multi - Page 27
f Drücken Sie . b Befestigen Sie auf dem zu bestickenden Stoff ein Stickunterlegvlies. Hinweis • Befestigen Sie beim Sticken von Stoffkanten ein Stickunterlegvlies, das größer ist als der Stoff, und spannen Sie dann den Stoff und überstehendes Stickunterlegvlies fest in den BordürenStickrahmen - Brother International Quattro 2 6700D | Users Manual - Multi - Page 28
hineinragt. a b a Stickrahmenhalter b Führung am Bordüren-Stickrahmen f Nehmen Sie die Stickschablone heraus und ziehen Sie dann an den vier Stoffseiten um den Stoff zu straffen. Prüfen Sie zuletzt, dass der Stoff fest gespannt ist. 26 - Brother International Quattro 2 6700D | Users Manual - Multi - Page 29
Stickzeit je nach Stoff und Muster etwas länger sein als die Zeit, die im Bildschirm angezeigt wird. a Drücken Sie Stickbereichs. zur Prüfung des a a Pfeilmarkierungen e Senken Sie den Rahmensicherungshebel auf Bordüren-Stickrahmenhöhe ab, um den Bordüren-Stickrahmen im Stickrahmenhalter zu - Brother International Quattro 2 6700D | Users Manual - Multi - Page 30
. Hinweis • Stellen Sie die Stoffposition so ein, dass der Stickbereich des nächsten Musters innerhalb des Stickbereichs der Stickschablone liegt. VORSICHT • Hat sich der Faden verhaspelt und der Stickarm der Stickeinheit fährt auch nach dem Abschneiden des Fadens nicht in seine Ausgangsposition - Brother International Quattro 2 6700D | Users Manual - Multi - Page 31
diesem Beispiel die Nadelposition auf die obere Mitte des nächsten Musters. Wenn Sie fertig sind, die Garnmarkierung aus. drücken Sie . a a Nadelposition Hinweis • Prüfen Sie durch Drehen des Handrades die Nadelposition und drücken Sie dann die Taste „Nadelposition", um die Nadel anzuheben. 29 - Brother International Quattro 2 6700D | Users Manual - Multi - Page 32
e Entfernen Sie die Garnmarkierung, wenn die Nadelposition auf den Beginn der Stickerei eingestellt ist. Hinweis • Entfernen Sie die Garnmarkierung bevor Sie mit dem Sticken beginnen. Die Garnmarkierungsstiche können sich sonst mit den Musterstichen vermischen und sind dann nicht mehr so leicht - Brother International Quattro 2 6700D | Users Manual - Multi - Page 33
ESPAÑOL CONTENIDO Accesorios ...32 Bordado con el bastidor de bordado de bordes 32 Ejemplos de labores con el bastidor de bordado de bordes 32 Selección de un patrón ...33 Colocación de la tela en el bastidor de bordado de bordes 35 Colocación del bastidor de bordado de bordes en la unidad de - Brother International Quattro 2 6700D | Users Manual - Multi - Page 34
con su distribuidor autorizado o con el Servicio de atención al cliente de Brother. • Bastidor de bordado para bordes Dado que la zona de costura se fuera del alcance de los niños, pues podrían hacerse daño. • Manual de instrucciones (esta guía) Nota • Cuando no vaya a utilizar el bastidor de - Brother International Quattro 2 6700D | Users Manual - Multi - Page 35
para bastidores de bordado de bordes. Recuerde • Para obtener más información sobre la función de borde, consulte "Diseño de patrones repetidos" en el capítulo 6 del Manual de instrucciones de la máquina. a b a Área de bordado con bastidor de bordado de bordes (18 cm × 10 cm) b Línea central 33 - Brother International Quattro 2 6700D | Users Manual - Multi - Page 36
e Si es necesario, añada la marca de hilo. Puesto que el patrón se va a bordar repetidas veces desde la parte superior a la parte inferior, añada la marca de hilo en la parte central inferior del patrón. Cuando haya terminado, pulse . Recuerde • Seleccione la ubicación para la marca de hilo - Brother International Quattro 2 6700D | Users Manual - Multi - Page 37
f Pulse . b Aplique material estabilizador a la tela que desea bordar. Nota • Al bordar los bordes de la tela, utilice material estabilizador con un tamaño superior al de la tela y, a continuación, sujete firmemente la tela y el material estabilizador sobrante en el bastidor de bordado de bordes - Brother International Quattro 2 6700D | Users Manual - Multi - Page 38
e Coloque la hoja de bordado en el bastidor superior, alinee la línea de guía de la hoja de bordado con la marca (línea) de la tela y, a continuación, empuje las palancas de bloqueo izquierda y derecha hasta que queden ajustadas en su posición. ■ Colocación del bastidor de bordado de bordes en - Brother International Quattro 2 6700D | Users Manual - Multi - Page 39
d Deslice el bastidor de bordado de bordes en el soporte, asegurándose de alinear la marca de dirección del bastidor (U) con la marca de dirección del soporte (U). ■ Bordado del primer patrón Nota • Si se usa el bastidor de bordado de bordes, es posible que el tiempo de bordado sea ligeramente - Brother International Quattro 2 6700D | Users Manual - Multi - Page 40
■ Extracción del bastidor de bordado de bordes Nota • Antes de extraer el bastidor de bordado de bordes de la unidad de bordado, compruebe que el carro de la unidad de bordado se ha movido a su posición inicial. a Levante la palanca de fijación del bastidor y tire del bastidor de bordado de - Brother International Quattro 2 6700D | Users Manual - Multi - Page 41
c Utilice para seleccionar la posición de la aguja que se alineará con la marca de hilo al final del bordado anterior. Para este ejemplo, alinee la posición de la aguja con la parte central superior del siguiente patrón. Cuando haya terminado, pulse . d Utilice para alinear la posición de la - Brother International Quattro 2 6700D | Users Manual - Multi - Page 42
e Después de alinear la posición de la aguja para el inicio del bordado, retire la marca de hilo. Nota • Retire la marca de hilo antes de comenzar a bordar. De lo contrario, la puntada de la marca de hilo se podría combinar con la puntada del patrón y resultar difícil de retirar. f Borde el - Brother International Quattro 2 6700D | Users Manual - Multi - Page 43
INHOUDSOPGAVE Accessoires...42 Borduren met het randenborduurraam 42 Voorbeeldprojecten met het randenborduurraam 42 Patroon kiezen ...43 Stof in het randenborduurraam plaatsen 45 Randenborduurraam aan de borduurtafel bevestigen 46 Eerste patroon borduren ...47 Randenborduurraam verwijderen 48 - Brother International Quattro 2 6700D | Users Manual - Multi - Page 44
zijn. Als er iets ontbreekt of beschadigd is, neem dan contact op met de officiële dealer of de klantenservice van Brother. • Randborduurraam Aangezien het naaigebied gemakkelijk kan worden gewijzigd wanneer u het randborduurraam gebruikt, kunt u herhaalde patronen naaien door de stof gewoon te - Brother International Quattro 2 6700D | Users Manual - Multi - Page 45
■ Patroon kiezen a Selecteer patroon. en selecteer vervolgens een b Combineer de patronen en gebruik de randfunctie om het patroon te herhalen. c Druk op . d Selecteer uit de instellingen voor borduurraamdisplays een van de borduurraamdisplays voor het randenborduurraam. * Van de 14 - Brother International Quattro 2 6700D | Users Manual - Multi - Page 46
e Voeg zo nodig de draadmarkering toe. Aangezien het borduurpatroon van boven naar beneden wordt herhaald, moet u de draadmarkering midden onder aan het patroon toevoegen. Wanneer u klaar bent, drukt u op . Memo • Selecteer de plaats waar u de draadmarkering wilt toevoegen overeenkomend met - Brother International Quattro 2 6700D | Users Manual - Multi - Page 47
f Druk op . b Bevestig steunstof aan de stof die u wilt borduren. Opmerking • Wanneer u de randen van een stof borduurt, moet u steunstof bevestigen die groter is dan de stof. Zet vervolgens de stof en het overtollige deel van de steunstof stevig vast in het randenborduurraam (op dezelfde manier - Brother International Quattro 2 6700D | Users Manual - Multi - Page 48
e Plaats het borduurvel in het bovenraam. Plaats de lijn op het borduurvel op één lijn met de markering (lijn) op de stof en druk vervolgens de linker- en rechtervergrendelingshendel omlaag totdat deze vastklikken. a Vergrendelingshendels Memo • U kunt de stof ook in het randenborduurraam - Brother International Quattro 2 6700D | Users Manual - Multi - Page 49
zet, wordt het patroon mogelijk niet goed geborduurd, of kan de persvoet het randenborduurraam raken, waardoor u mogelijk letsel oploopt. b Rijg de machine in en begin met borduren. VOORZICHTIG • Raak het randenborduurraam niet aan tijdens het borduren. → Wanneer u klaar bent met borduren, wordt de - Brother International Quattro 2 6700D | Users Manual - Multi - Page 50
gegaan, ook niet nadat de draad is afgeknipt, zet u de machine uit. Verplaats de wagen handmatig en verwijder vervolgens het randenborduurraam. • Verplaats de wagen van de borduurtafel alleen wanneer de machine uit staat. a Eerste geborduurde patroon b Positie van volgende - Brother International Quattro 2 6700D | Users Manual - Multi - Page 51
c Selecteer met de naaldstand die samenvalt met de draadmarkering aan het einde van het vorige borduurwerk. In dit voorbeeld brengt u de naaldstand in één lijn midden boven het volgende patroon. Wanneer u klaar bent, drukt u op . d Breng met de naaldstand in één lijn met het punt van de - Brother International Quattro 2 6700D | Users Manual - Multi - Page 52
e Verwijder de draadmarkering nadat u de naaldstand voor het begin van het borduren hebt aangepast. Opmerking • Verwijder de draadmarkering voordat u gaat borduren. Anders wordt het stiksel van de draadmarkering mogelijk gecombineerd het het patroonstiksel. Dan is het moeilijk te verwijderen. f - Brother International Quattro 2 6700D | Users Manual - Multi - Page 53
SOMMARIO Accessori ...52 Ricamo con il telaio da ricamo per bordi 52 Progetti campione utilizzando il telaio da ricamo per bordi 52 Selezione di un disegno ...53 Inserimento del tessuto nel telaio da ricamo per bordi 55 Montaggio del telaio da ricamo per bordi all'unità da ricamo 56 Ricamo del - Brother International Quattro 2 6700D | Users Manual - Multi - Page 54
danneggiati, contattare il rivenditore o il Servizio di assistenza clienti Brother autorizzato. • Telaio da ricamo per bordi Poiché è ricamo per bordi alla portata dei bambini, perché potrebbe provocare lesioni. • Manuale d'istruzione (la presente guida) Nota • Quando non si utilizza il telaio - Brother International Quattro 2 6700D | Users Manual - Multi - Page 55
ai telai da ricamo per bordi. Promemoria • Per i dettagli sulla funzione di bordo, fare riferimento a "Realizzazione di disegni ripetuti" nel capitolo 6 del Manuale d'istruzioni della macchina da cucire. a b a Area di ricamo del telaio da ricamo per bordi (18 cm × 10 cm) b Linea centrale 53 - Brother International Quattro 2 6700D | Users Manual - Multi - Page 56
e Se necessario, aggiungere un segno di filo. Poiché il disegno sarà ricamato ripetutamente dalla parte superiore a quella inferiore, aggiungere il segno di filo sulla linea centrale del disegno. Al termine, premere . Promemoria • Selezionare il punto in cui aggiungere il segno di filo in base - Brother International Quattro 2 6700D | Users Manual - Multi - Page 57
f Premere . b Applicare al tessuto da ricamare del materiale stabilizzatore. Nota • Quando si ricamano i bordi del tessuto, applicare materiale stabilizzatore di dimensioni maggiori rispetto a quelle del tessuto, quindi unire saldamente il tessuto e la parte di materiale stabilizzatore in - Brother International Quattro 2 6700D | Users Manual - Multi - Page 58
e Posizionare il foglio per ricamo sul telaio superiore, allineare la linea di guida sul foglio per ricamo al segno (linea) sul tessuto, quindi spingere verso il basso le leve di blocco destra e sinistra finché non scattano in posizione. ■ Montaggio del telaio da ricamo per bordi all'unità da - Brother International Quattro 2 6700D | Users Manual - Multi - Page 59
d Far scorrere il telaio da ricamo per bordi nel supporto del telaio da ricamo, assicurandosi di allineare il segno freccia del telaio da ricamo per bordi (U) con il segno freccia del supporto del telaio da ricamo (U). ■ Ricamo del primo disegno Nota • Quando si utilizza il telaio da ricamo per - Brother International Quattro 2 6700D | Users Manual - Multi - Page 60
■ Rimozione del telaio da ricamo per bordi Nota • Prima di rimuovere il telaio da ricamo per bordi dall'unità da ricamo, assicurarsi che il carrello dell'unità da ricamo torni alla posizione iniziale. a Sollevare la leva di fissaggio del telaio e tirare il telaio da ricamo per bordi verso di sé. - Brother International Quattro 2 6700D | Users Manual - Multi - Page 61
c Utilizzare per selezionare la posizione dell'ago da allineare al segno di filo alla fine del ricamo precedente. Per questo esempio, allineare la posizione dell'ago alla parte centrale superiore del disegno successivo. Al termine, premere . d Utilizzare per allineare la posizione dell'ago al - Brother International Quattro 2 6700D | Users Manual - Multi - Page 62
e Dopo aver allineato la posizione dell'ago all'inizio del ricamo, rimuovere il segno di filo. Nota • Rimuovere il segno di filo prima di iniziare a ricamare. In caso contrario i punti del segno di filo potrebbero combinarsi con i punti del disegno rendendone difficile la rimozione. f Ricamare - Brother International Quattro 2 6700D | Users Manual - Multi - Page 63
- Brother International Quattro 2 6700D | Users Manual - Multi - Page 64
XE5086-001 Printed in Taiwan
-
 1
1 -
 2
2 -
 3
3 -
 4
4 -
 5
5 -
 6
6 -
 7
7 -
8
-
9
-
10
-
11
-
12
-
13
-
14
-
15
-
16
-
17
-
18
-
19
-
20
-
21
-
22
-
23
-
24
-
25
-
26
-
27
-
28
-
29
-
30
-
31
-
32
-
33
-
34
-
35
-
36
-
37
-
38
-
39
-
40
-
41
-
42
-
43
-
44
-
45
-
46
-
47
-
48
-
49
-
50
-
51
-
52
-
53
-
54
-
55
-
56
-
57
-
58
-
59
-
60
-
61
-
62
-
63
-
64
 |
 |
ENGLISH
FRANÇAIS
DEUTSCH
ESPAÑOL
NEDERLANDS
ITALIANO
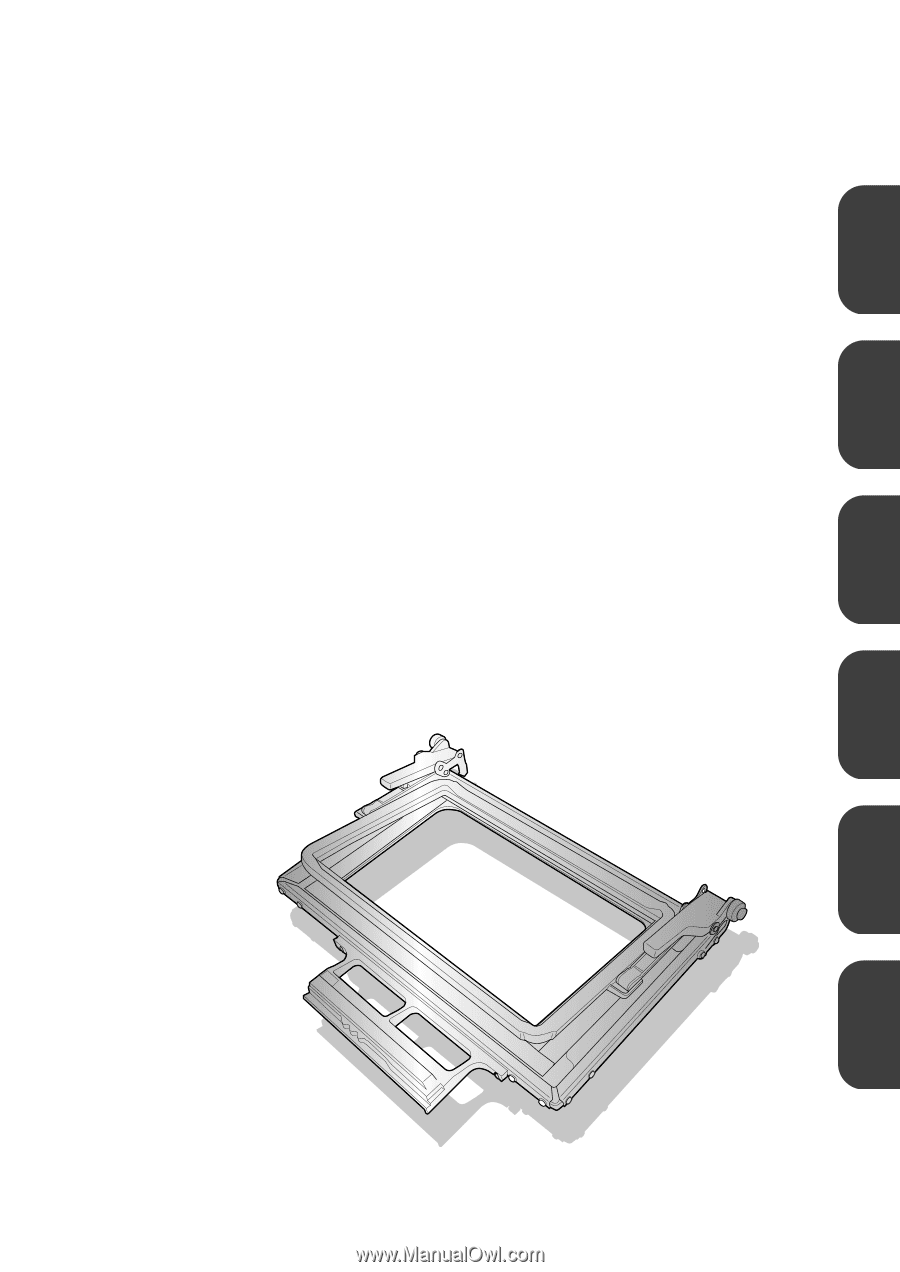
BORDER EMBROIDERY FRAME
CADRE DE BRODERIE D’ENCADREMENT
RAND STICKRAHMEN
BASTIDOR DE BORDADO DE BORDES
RANDBORDUURRAAM
TELAIO DA RICAMO PER BORDI
Operation Manual
Manuel d’instructions
Bedieningshandleiding
Manual de instrucciones
Bedieningshandleiding
Manuale d’istruzione