Brother International SL-1110 Instruction Manual - English
Brother International SL-1110 Manual
 |
View all Brother International SL-1110 manuals
Add to My Manuals
Save this manual to your list of manuals |
Brother International SL-1110 manual content summary:
- Brother International SL-1110 | Instruction Manual - English - Page 1
SL-1110 S-7550A INSTRUCTION MANUAL HIGH SPEED SINGLE NEEDLE STRAIGHT LOCK STITCHER Please read this manual before using the machine. Please keep this manual within easy reach for quick reference. - Brother International SL-1110 | Instruction Manual - English - Page 2
Thank you very much for buying a BROTHER sewing machine. Before using your new machine, please read the safety instructions and the explanations given in the instruction manual. With industrial sewing machines, it is normal to carry out work while positioned directly in front of moving parts such as - Brother International SL-1110 | Instruction Manual - English - Page 3
indications and their meanings This instruction manual and the indications and symbols that are used on the machine itself are provided in order to ensure safe operation of this machine and to prevent accidents and the symbol at left means "you must make the ground connection".) ENGLISH SL-1110 i - Brother International SL-1110 | Instruction Manual - English - Page 4
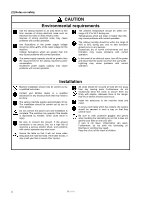
problems with correct operation. Installation Machine installation should only be carried out by a qualified technician. Contact your Brother dealer or a qualified electrician for any electrical work that may need to be done. The sewing machine the oil out of the reach of children. ii SL-1110 - Brother International SL-1110 | Instruction Manual - English - Page 5
have been removed, be absolutely sure to re-install them to their original positions and check that they operate correctly before using the machine. Any problems in machine operation which result from unauthorized modifications to the machine will not be covered by the warranty. SL-1110 iii - Brother International SL-1110 | Instruction Manual - English - Page 6
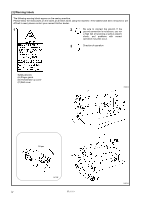
Warning labels The following warning labels appear on the sewing machine. Please follow the instructions on the labels at all times when using the machine. If the labels have been removed or are difficult to read, please contact your nearest Brother dealer. 1 2 Be sure to connect the ground. If - Brother International SL-1110 | Instruction Manual - English - Page 7
3 5-2. Ground wire connections 8 5-3. Lubrication 8 5-4. Checking the machine pulley rotating direction 8 6. PREPARATION BEFORE SEWING .... 9 6-1. Installing the needle 9 6-2. Removing the bobbin case 20 10-9. Adjusting the rotary hook lubrication amount 21 11. TROUBLESHOOTING 22 SL-1110 - Brother International SL-1110 | Instruction Manual - English - Page 8
length dial (9) Bobbin winder (12) Belt cover 2. MACHINE SPECIFICATIONS 3827M Use Max. sewing speed Max. stitch length Presser foot height Lifting lever Knee materials 5,500rpm (Normal sewing speed: 4,000rpm 5,000rpm) 4.2mm 5mm 6mm 13mm 0.8mm 1.2mm #11 - #18 #19 - #22 1 SL-1110 - Brother International SL-1110 | Instruction Manual - English - Page 9
the vibration of the sewing machine. Drill holes as as the motor. ・ Refer to the instruction manual for the motor for details on installing and Sewing speed 5,000rpm 4,000rpm 50Hz Motor pulley (Outer diameter) 130 110 V-belt 45 44 60Hz Motor pulley (Outer diameter) 115 90 V-belt 44 43 SL-1110 - Brother International SL-1110 | Instruction Manual - English - Page 10
Brother dealer or a qualified electrician for any electrical work that may need to be done. The sewing machine electric shock, and problems with correct operation may also occur. Install the belt cover to the machine head. 5-1. Installation Left (3) Knee lifter complying bar 3830M 3 SL-1110 - Brother International SL-1110 | Instruction Manual - English - Page 11
into the table hole. If the head rest (3) is not pushed in as far as it will go, the machine head will not be sufficiently stable when it is tilted back. 3831M 5. Knee lifter plate (1) Knee lifter plate (2) After adjustment is completed, securely tighten the nut (9). Within 13 mm 3835M SL-1110 4 - Brother International SL-1110 | Instruction Manual - English - Page 12
winder wheel (2) and the belt (3). 8. Belt cover 1. Loosen the three screws (1) on the machine side plate by 4 - 5 turns. 2. Tilt back the machine head, align the groove in the belt cover (2) with the stud (3) and the three screws (1), and then securely tighten screw (1)-A only. 3838M 5 SL-1110 - Brother International SL-1110 | Instruction Manual - English - Page 13
belt cover U (5) onto the machine pulley. 5. Tighten screws (1)-B, (1)-C and (4) to secure belt cover U (5). 3839M 3840M 6. Place belt cover D (7) so that it overlaps the belt cover (2) by 2 - 3 mm, and then provisionally tighten the two screws (8). 3841M SL-1110 (Continued on next page) 6 - Brother International SL-1110 | Instruction Manual - English - Page 14
tighten the nut (4) so that the two rubber cushions (2) and the washer (3) are securely clamped and so that the cotton stand (1) does not move. 3844M 7 SL-1110 - Brother International SL-1110 | Instruction Manual - English - Page 15
. 2. Depress the treadle slightly and check that the machine pulley starts to turn in the direction of the arrow (1). * If the direction of rotation is reversed, change the direction of rotation to the correct direction while referring to the instruction manual for the motor. 3847M SL-1110 8 - Brother International SL-1110 | Instruction Manual - English - Page 16
result in injury. 2119M 2120M 1. Turn the machine pulley to raise the needle until it is above the needle plate. 2. Pull the latch (1) of the bobbin case upward and then remove the bobbin case. 3. The bobbin (2) will come out when the latch (1) is released. For thick materials 0798M 9 SL-1110 - Brother International SL-1110 | Instruction Manual - English - Page 17
SEWING 6-3. Winding the lower thread CAUTION Do not touch any of the moving parts or press any objects against the machine while winding the lower thread, as this may result in personal injury or damage to the machine winder guide machine may operate if the treadle is machine thread guide (3). - Brother International SL-1110 | Instruction Manual - English - Page 18
injury. Turn the machine pulley and raise the thread take-up (1) before threading the upper thread. This will make threading easier and it will prevent the thread from coming out at the sewing start. 3850M 6-6. dial if the reverse lever (3) is pushed to the halfwaydown position. 3851M 11 SL-1110 - Brother International SL-1110 | Instruction Manual - English - Page 19
or damage to the machine. 7-1. Sewing 1. Turn on the power switch. 2. Depress the treadle to start sewing. 7-2. Backtacking When the reverse lever (1) is pressed during sewing, the feed direction will be reversed. When it is released, the feed direction will return to normal. 3852M SL-1110 12 - Brother International SL-1110 | Instruction Manual - English - Page 20
a result of the motor's inertia. Wait until the motor stops fully before starting work. The machine may operate if the treadle is depressed by mistake, which could result in injury. Good even stitches . 2. Adjust by turning the tension nut (2). Becomes weaker Becomes stronger 3853M 13 SL-1110 - Brother International SL-1110 | Instruction Manual - English - Page 21
out each day in order to maintain the performance of this machine and to ensure a long service life. Furthermore, if the sewing machine has not been used for a long period of time, the feed dog (3). 4. Install the needle plate (2) with the two screws (1). 2182M SL-1110 (Continued on next page) 14 - Brother International SL-1110 | Instruction Manual - English - Page 22
Nisseki Mitsubishi Sewing Lube 10N; VG10) specified by Brother. * If machine head to its original position. 13. Replace the needle if it is bent or if the tip is broken. 14. Check that the upper threads have been threaded correctly. (Refer to page 11.) 15. Carry out a test sewing. 3856M 15 SL-1110 - Brother International SL-1110 | Instruction Manual - English - Page 23
sewing machine should only be carried out by a qualified technician. Ask your Brother machine. Secure the table so that it will not move when tilting back the machine The machine may of the thread guide (3) when the with the machine specifications as base of the thread guide (3), and then measure the - Brother International SL-1110 | Instruction Manual - English - Page 24
center of the adjustable range for arm thread guide R (1). * To adjust the position, loosen the screw (2) and then move arm thread guide R (1). ・ When sewing thick material, move arm thread guide R (1) to the left. (The thread into the center of the groove in the presser foot. 1257M 17 SL-1110 - Brother International SL-1110 | Instruction Manual - English - Page 25
lower Becomes higher 1. Turn the pulley until the feed dog (1) rises to the highest position. 2. Tilt back the machine head. 3. Loosen the screw (2). 4. Turn the feed lifting shaft crank (3) to move the feed bracket (4) up of the feed dog (1). Lower the front Raise The front 3865M SL-1110 18 - Brother International SL-1110 | Instruction Manual - English - Page 26
bush D (2) as shown in the illustration when the needle bar (1) is at its lowest position. 1. Turn the machine pulley to set the needle bar (1) to its lowest position. 2. Remove the oil cap (3). 3. Loosen the screw tighten the set screws (4) and (6). Needle timing is retarded 3868M SL-1110 - Brother International SL-1110 | Instruction Manual - English - Page 27
of the needle bar bush D (2) as shown in the illustration. 1.8mm 2.2mm 1. Turn the machine pulley to raise the needle bar (1) from its lowest position until reference line (b) is aligned with the lower approximately 0 - 0.05 mm. 3. Securely tighten the set screws (5). 3869M SL-1110 20 - Brother International SL-1110 | Instruction Manual - English - Page 28
sheet (1) underneath the rotary hook (2) and hold it there. Then run the sewing machine at the normal sewing speed for 8 seconds. (Any type of paper can be used as the lubrication . 4. Check the lubrication amount again after the sewing machine has been used for approximately two hours. 21 SL-1110 - Brother International SL-1110 | Instruction Manual - English - Page 29
service. If the following remedies do not fix the problem, turn off the power switch and consult a qualified technician or the place of purchase. CAUTION Turn off the power switch and disconnect the power cord before carrying out troubleshooting while sewing 0470M Is the machine properly SL-1110 22 - Brother International SL-1110 | Instruction Manual - English - Page 30
11. TROUBLESHOOTING Problem 5 Skipped stitches at sewing start Thread unravelling at sewing start 6 Uneven seam 0749M 0473M 7 Large degree of puckering (excess tension) 8 Material slippage 0978M Possible cause Is the thread take-up lever at its highest position at the sewing start? Set the - Brother International SL-1110 | Instruction Manual - English - Page 31
11. TROUBLESHOOTING Problem 9 Lower thread is tangled at the sewing start. Lower thread the needle properly installed? If it is incorrect, install the needle correctly. Is the machine properly threaded? If it is incorrect, thread the thread correctly. Is the upper or * * * 9 19* 20* 19* SL-1110 24 - Brother International SL-1110 | Instruction Manual - English - Page 32
INSTRUCTION MANUAL http://www.brother.com/ SL-1110, S-7550A SA8760-101 2007.06.BC(1)
-
 1
1 -
 2
2 -
 3
3 -
 4
4 -
 5
5 -
 6
6 -
 7
7 -
8
-
9
-
10
-
11
-
12
-
13
-
14
-
15
-
16
-
17
-
18
-
19
-
20
-
21
-
22
-
23
-
24
-
25
-
26
-
27
-
28
-
29
-
30
-
31
-
32
 |
 |

SL-1110
S-7550A
HIGH SPEED SINGLE NEEDLE STRAIGHT LOCK STITCHER
Please read this manual before using the machine.
Please keep this manual within easy reach for quick reference.
INSTRUCTION MANUAL