Brother International SM2700 Operation Manual
Brother International SM2700 Manual
 |
View all Brother International SM2700 manuals
Add to My Manuals
Save this manual to your list of manuals |
Brother International SM2700 manual content summary:
- Brother International SM2700 | Operation Manual - Page 1
Manual Sewing Machine Product Code: 885-X06/X08/X09/X16/X18/X19/X26/X28/X29 888-X06/X08/X09/X16/X18/X19/X26/X28/X29 Manual de http://solutions.brother.com where you can get product support and answers to frequently asked questions (FAQs). Visítenos en http://solutions.brother.com donde hallar - Brother International SM2700 | Operation Manual - Page 2
Please read these safety instructions before attempting to use the machine. DANGER - To reduce the risk of electric shock: 1 Always unplug the machine from the electrical outlet immediately after using, when cleaning, when making any user servicing adjustments mentioned in this manual, or if you are - Brother International SM2700 | Operation Manual - Page 3
first follow the troubleshooting table in the back of the operation manual to inspect and adjust the machine yourself. If the problem persists, please consult your local authorized Brother dealer. Use this machine only for its intended use as described in this manual. Use accessories recommended by - Brother International SM2700 | Operation Manual - Page 4
SAFETY INSTRUCTIONS 1 1. KNOWING YOUR SEWING MACHINE 4 ACCESSORIES 4 Optional accessories 4 THE MAIN PARTS 5 Flat bed attachment 5 USING YOUR SEWING MACHINE 6 Connecting plugs 6 Main power and sewing light switch 7 Foot controller 7 Checking the needle 7 Replacing the needle 7 Changing - Brother International SM2700 | Operation Manual - Page 5
-001 No. Part Name 6 Bobbin (One is on machine) 7 Needle set (90/14 needle) 8 Oval screwdriver 9 Foot controller Part Code Americas Others SA156 SFB: XA5539-151 3-piece set: XE5328-001 2-piece set: XE7064-001 XE5241-001 See page 5 Note ● The included accessories vary depending on the - Brother International SM2700 | Operation Manual - Page 6
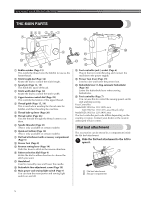
the tension of the upper thread. 6 Thread guide (Page 15, 19) This is used when winding the thread onto the bobbin and then threading the machine. 7 Thread take-up lever (Page 20) 8 Thread cutter (Page 26) Pass the threads through the thread cutter to cut them. 9 Needle threader (Page 21) (This - Brother International SM2700 | Operation Manual - Page 7
is being operated, turn off the main power and unplug the power supply cord. When restarting the sewing machine, follow the necessary procedure to correctly operate the machine. (For U.S.A. only) ● This appliance has a polarized plug (one blade wider than the other). To reduce the risk of electric - Brother International SM2700 | Operation Manual - Page 8
space 2 Level surface (bobbin cover, glass, etc.) Replacing the needle CAUTION ● Always turn off the machine before you change the needle. Otherwise, injuries may occur if the foot controller is accidentally pressed and the machine starts sewing. ● Only use sewing machine needles for home use. Other - Brother International SM2700 | Operation Manual - Page 9
screw counterclockwise to Changing the presser foot remove the needle. CAUTION 21 1 Use an oval screwdriver 2 Needle clamp screw • Do not use excessive force when loosening or tightening the needle clamp screw, otherwise certain parts of the sewing machine may be damaged. ● Always turn off the - Brother International SM2700 | Operation Manual - Page 10
KNOWING YOUR SEWING MACHINE Lower the presser foot lever and fix the 5 presser foot onto either direction. The next section shows recommended stitch lengths and widths. Stretch stitching Raise the needle by turning the handwheel toward you (counterclockwise) so that the mark on the wheel points - Brother International SM2700 | Operation Manual - Page 11
ZIGZAG STITCH BLIND HEM STITCH SHELL TUCK STITCH ELASTIC STITCH Recommended Width (mm (inch)) 3-5 (1/8 - 3/16) 0-5 (0-3/16) (Changes needle position) 0-5 (0-3/16) 3-5 (1/8-3/16) 3-5 (1/8-3/16) 3-5 (1/8-3/16) Recommended Length (mm (inch)) F-1.5 (1/64-1/16) Reference Page 36 1-4 (1/16-3/16) 30 - Brother International SM2700 | Operation Manual - Page 12
KNOWING YOUR SEWING MACHINE Pattern 53 37 27 7 7 7 Stitch Name STRETCH BLIND HEM STITCH Recommended Width (mm (inch STITCH 5 (3/16) 20 20 15 TRIPLE STRETCH STITCH 0-5 (0-3/16) (Changes needle position) 21 21 16 TRIPLE ZIGZAG STRETCH STITCH 3-5 (1/8-3/16) 22 22 17 ELASTIC - Brother International SM2700 | Operation Manual - Page 13
Pattern 53 37 27 25 25 20 Stitch Name COMB STITCH Recommended Width (mm (inch)) Recommended Length (mm (inch)) Reference Page 1 3-5 (1/8-3/16) / 1 Fixed 34 2.5 (3/32) 26 26 21 DECORATIVE STITCH 3-5 (1/8-3/16) / 1 Fixed 35 2.5 (3/32) 27 27 22 FAGOTING STITCH 3-5 (1/8-3/ - Brother International SM2700 | Operation Manual - Page 14
KNOWING YOUR SEWING MACHINE Pattern 53 37 27 43 -- 44 -- 45 -- 46 -- 47 -- 48 -- 49 -- 50 -- 51 -- 52 -- 53 -- Stitch Name LEAF STITCH TREE STITCH LEGS STITCH DECORATIVE STITCH - Brother International SM2700 | Operation Manual - Page 15
After adjusting the stitch width, slowly turn the handwheel toward you thread being used. To determine the exact dial position, (counterclockwise) controller. To sew forward, release the reverse sewing lever. The machine will then sew forward. 1 Stitch width dial Raise the needle by turning the - Brother International SM2700 | Operation Manual - Page 16
KNOWING YOUR SEWING MACHINE THREADING THE MACHINE Winding the bobbin CAUTION ● We designed the bobbin that comes with this machine. If you use bobbins from other models, the machine will not work properly. Only use the bobbin that comes with this machine or bobbins of the same type (part code: - Brother International SM2700 | Operation Manual - Page 17
controller. Cut the thread, slide the bobbin winder 0 shaft to the left and remove the bobbin. Note ● When the sewing machine is started or the handwheel is turned after winding the thread around the bobbin, the machine will make a clicking sound; this is not a malfunction. ● The needle bar does not - Brother International SM2700 | Operation Manual - Page 18
SEWING MACHINE CAUTION ● Not winding the bobbin properly may cause the thread tension to loosen, and may break the needle. Put the bobbin in so the thread comes out 4 in the direction shown by the arrow. 1 2 1 Wound evenly 2 Wound poorly Lower threading Install the bobbin wound with thread - Brother International SM2700 | Operation Manual - Page 19
rear of the machine (as shown in the illustration). • Draw up the lower thread before starting sewing. Refer to "Drawing up the lower thread" on page 22 after threading the upper thread. Lower threading (for models equipped with a quick-set bobbin) Install the bobbin wound with thread. This feature - Brother International SM2700 | Operation Manual - Page 20
YOUR SEWING MACHINE Upper threading 2 2 3 4 1 5 1 Spool pin 2 Thread guide (back) 3 Thread guide (front) 4 Thread take-up lever 5 Mark on the handwheel CAUTION ● When threading the upper thread, carefully follow the instructions. If the upper threading is not correct, the thread may - Brother International SM2700 | Operation Manual - Page 21
Needle bar thread guide Make sure you guide the thread through 7 the thread take-up lever from right to left as shown in the following illustration. 1 Thread the needle from front to back 9 leaving a thread tail of about 5 cm (2 inches). • If your sewing machine is equipped with a needle threader - Brother International SM2700 | Operation Manual - Page 22
a 75/11 through 100/16 home sewing machine needle. However, the needle threader cannot be used with a 65/9 home sewing machine needle. When using special thread such as transparent nylon thread or metallic thread, the needle threader cannot be used. ● Thread with a thickness of 130/120 or thicker - Brother International SM2700 | Operation Manual - Page 23
you). The hook will pull the thread through the needle. (2 inches) of thread toward the rear of the machine. 1 Raise the needle threader lever. 7 1 1 5 cm (2 inches) Note ● If you incorrectly feed the thread you may cause sewing problems. Pull the loop of the thread passed through 8 the eye of - Brother International SM2700 | Operation Manual - Page 24
YOUR SEWING MACHINE Pull out about 10 cm (4 inch) of both 3 threads and put them toward the back of the machine under the presser foot. 1 2 1 Upper thread 2 Lower thread ■ For models equipped with a quick-set bobbin You can begin sewing immediately without drawing up the bobbin thread. When sewing - Brother International SM2700 | Operation Manual - Page 25
of weight 20 or lower. It may cause machine malfunction. Memo ● The lower the thread number, the thicker the thread; and the larger the needle number, the thicker the needle. ■ Ball point needle Use the ball point needle when sewing on stretch fabrics or fabrics where skipped stitches easily occur - Brother International SM2700 | Operation Manual - Page 26
by hand, always turn it toward you (counterclockwise). Turning it the other way may cause the thread to tangle and damage the needle or fabric, and you may be injured. ● Do not start sewing without placing the fabric under the presser foot, otherwise the presser foot may be damaged. Starting - Brother International SM2700 | Operation Manual - Page 27
should be sewn. Use a piece of fabric and thread that are the same as those used for your project, and check the thread tension and stitch length and width. Lower the presser foot lever. 8 Changing the sewing direction 2 Stop the machine with the needle in the fabric at the point where you want - Brother International SM2700 | Operation Manual - Page 28
the top. 1 1 Stabilizer material or paper Sewing stretch fabrics First, baste the pieces of fabric together, and then sew without stretching the fabric. Sewing with a twin needle (Option) We have designed your machine so you can sew with this needle and two top threads. You can use the same color - Brother International SM2700 | Operation Manual - Page 29
injury or damage to the machine. Select a stitch. 5 CAUTION Thread the left needle. 1 Follow the same instructions for threading a single needle (see page 19). Thread the right needle. 2 Thread the right needle in the same way that you threaded the left needle using the thread from the spool on the - Brother International SM2700 | Operation Manual - Page 30
BASICS CAUTION ● When changing the sewing direction, be sure to raise the needle from the fabric, and then raise the presser foot lever and turn the fabric. Otherwise the needle may break or the machine may be damaged. Thread tension The tension of the thread will affect the quality of your - Brother International SM2700 | Operation Manual - Page 31
dial to "5" selects the left needle position; setting the dial to "0" selects the right needle position. Refer to "Stitch width dial" on page 14. Blind hem stitching ■ Top stitching and stretch materials You can use a straight stitch for top stitching and sewing lightweight fabrics. You can use - Brother International SM2700 | Operation Manual - Page 32
onto 7 the arm, make sure that the fabric feeds correctly, and then start sewing. 1 1 Arm After selecting a stitch, slowly turn the 8 handwheel toward you (counterclockwise) until the needle has moved from the right side to the left. Position the fabric under the presser foot, 9 and then adjust - Brother International SM2700 | Operation Manual - Page 33
on page 14. Elastic stitching Sew at a slow speed holding the fabric a with your hands, so that the needle slightly catches the fold of the sew using 2 the Elastic Stitch as shown. The Shell Tuck Stitch can be used to sew a picot (lacelike) edge on lightweight fabric. Adjust the thread tension - Brother International SM2700 | Operation Manual - Page 34
STITCHES ■ Joining fabric You can use the Elastic Stitch to join two pieces of fabric together and it is very effective when sewing knitted fabrics. If you are using nylon thread, the stitch will not be visible. Put the edge of the two pieces of fabric 1 together and center them under the - Brother International SM2700 | Operation Manual - Page 35
the stitch pattern, trim away any excess fabric after stitching. 3 Memo ● When sewing the Elastic Overlock Stitch, position the fabric so that its edge is on the left of the needle. 22 17 / 1 3-5 Fixed (1/8-3/16) Elastic 2.5 (3/32) Overlock Stitch 23 18 / 1 3-5 Fixed (1/8-3/16 - Brother International SM2700 | Operation Manual - Page 36
37 27 [mm (inch)] [mm (inch)] 21 16 / 1 3-5 Fixed (1/8-3/16) 2.5 (3/32) This stitch can be used wherever a zigzag stitch would be used to sew heavyweight stretch fabrics. The Triple Zigzag Stretch Stitch can also be used as a decorative top stitch. Stitch Name Pattern 53 37 27 19 - Stitch - Brother International SM2700 | Operation Manual - Page 37
before replacing the presser foot. Otherwise, injuries may occur if the foot controller is accidentally pressed and the machine starts sewing. ■ Making a buttonhole Using tailor's chalk, mark the position and 1 length of the buttonhole on the fabric. 2 1 Making a buttonhole (1-step automatic - Brother International SM2700 | Operation Manual - Page 38
mm (3/8 inch) 2 15 mm (9/16 inch) Pass the upper thread down through the 4 hole in the presser foot. The bar tacks of the buttonhole are sewn 8 in the order shown. 3 24 1 Stop the machine when buttonhole 9 stitching is finished. You need to sew the front bar tack first. 5 Lower the presser foot to - Brother International SM2700 | Operation Manual - Page 39
, insert them into the grooves, and then temporarily tie them there. 2 3 Set the stitch width to match the diameter 3 of the gimp thread. Start sewing. 4 1 Right side 2 Shorter 3 Longer After obtaining a satisfactory feed on the 3 right side, stitch the buttonhole and observe the feeding. If the - Brother International SM2700 | Operation Manual - Page 40
sewing. The needle may break and you may be injured. Pull the upper thread at the end of the 8 stitching to the wrong side of the fabric, and then tie it with the bobbin thread. X Use scissors to cut the upper thread and the bobbin thread at the beginning of the stitching. Turn off the machine - Brother International SM2700 | Operation Manual - Page 41
(3/32) Zipper Foot "I" CAUTION ● Do not turn on the machine while You can use the zipper foot "I" to sew different types of pressing down the foot controller. zippers, and can easily position it to the right or left side of the needle. When sewing with the zipper on the right side, attach With - Brother International SM2700 | Operation Manual - Page 42
machine while pressing down the foot controller. Begin sewing by alternating between 5 gently drawing the work away from you and pulling it toward you. Loosen the tension of the upper thread so 1 that the lower thread Turn off the machine. 1 Place the darning plate on the needle plate. Appliqués - Brother International SM2700 | Operation Manual - Page 43
onto the needle clamp screw. 1 2 Zigzag 3 Stitch 1-4 (1/16-3/16) 0-5 (0-3/16) The walking foot is very useful for sewing materials such as the 1 5 walking foot. 1 Presser foot screw Turn off the machine. 1 Raise the needle and the presser foot. 2 Loosen the presser foot screw to remove - Brother International SM2700 | Operation Manual - Page 44
quilting guide Use the quilting guide to sew parallel stitches that are equally spaced. Insert the stem of the quilting guide needle does not touch the presser foot. If the needle hits the presser foot, the needle may bend or break. Put the darning plate on the needle plate. 3 Turn on the machine - Brother International SM2700 | Operation Manual - Page 45
over the drawn design. 1 1 Quilting design The length of the stitch depends on how 6 quickly you move the fabric and on the machine's sewing speed. Sew while moving the fabric slowly. ■ Achieving an accurate seam allowance 1 2 3 4 1 Beginning of stitching 2 Align this mark with the edge of the - Brother International SM2700 | Operation Manual - Page 46
facing up) 4 under the presser foot. Lower the needle 3 mm (1/8 inch) from the edges of the fabric, lower the presser foot, and then sew 2 or 3 stitches. 1 After sewing 2 (3/4 inch) to 3 cm (1 1/8 8 inches) of the fabric, release the thread and guide the fabric from the front of the presser foot - Brother International SM2700 | Operation Manual - Page 47
center). Align the foot guide with the needle position. Set the pattern selection dial to the Zigzag 4 Stitch. Place the fabric under the foot so the foot 5 guide is aligned between both edges of the fabric. Lower the presser foot and start sewing. 6 Turn off the machine. 1 Attach the blind stitch - Brother International SM2700 | Operation Manual - Page 48
periodic oiling unnecessary. If problems occur, such as difficulty turning the handwheel or an unusual noise, immediately stop using the machine, and contact your authorized dealer or the nearest authorized service center. Turn off the machine and unplug it. 1 Raise the needle and the presser foot - Brother International SM2700 | Operation Manual - Page 49
; otherwise the upper thread may become tangled, the needle may break, or sewing performance may suffer. For a new bobbin case (part code: XE9326-001), contact your nearest authorized service center. ● Make sure that you fit the bobbin case properly, otherwise the needle may break. 3 6 1 ▲ mark - Brother International SM2700 | Operation Manual - Page 50
If you need additional help, the Brother Solutions Center offers the latest FAQs and troubleshooting tips. Visit us at " http://solutions.brother.com ". If the problem persists, contact your dealer or the nearest authorized service center. Symptom The sewing machine does not work. Fabric being sewn - Brother International SM2700 | Operation Manual - Page 51
or the nearest authorized service center. - You have not used a bobbin that has been Use a bobbin that has been designed for designed for this machine. this machine. 15 You have not wound the bobbin thread properly. Wind the bobbin thread properly. 15 The lower The bobbin is scratched or - Brother International SM2700 | Operation Manual - Page 52
the type of stitch that you want to sew. Adjust the tension of the upper thread. Remove the tangled thread. If the thread is tangled in the bobbin case, clean the bobbin case. Lengthen the stitch length. Remove the darning plate. Choose a thread and needle that are appropriate for the type of fabric - Brother International SM2700 | Operation Manual - Page 53
names 10 Straight stitching 30 Stretch stitching 9 T Thread cutter 26 Thread tension 29 , Threading lower 17 18 needle threader 21 twin needle 28 upper 19 Triple zigzag stretch stitching 35 Troubleshooting 49 , Twin needle attaching 8 27 sewing 27 U Upper tension control dial 29 Upper - Brother International SM2700 | Operation Manual - Page 54
, incendio, descarga eléctrica o lesiones. 2 Desenchufe siempre la máquina de la toma de corriente cuando realice cualquier ajuste mencionado en el manual de instrucciones: • Para desenchufarla, coloque el interruptor de la máquina en la posición con el símbolo "O" para apagarla, sujete después el - Brother International SM2700 | Operation Manual - Page 55
consulte primero la tabla de solución de problemas al final del manual de instrucciones para inspeccionar y ajustar la máquina usted mismo. Si el problema persiste, póngase en contacto con su distribuidor de Brother autorizado más cercano. Utilice esta máquina solamente para los fines descritos en - Brother International SM2700 | Operation Manual - Page 56
SÓLO PARA LOS USUARIOS DEL REINO UNIDO, IRLANDA, MALTA Y CHIPRE IMPORTANTE • Si debe cambiar el fusible del enchufe, utilice un fusible homologado por ASTA para BS 1362, es decir, que lleve la marca marca en el enchufe. correspondiente a la • Vuelva a colocar siempre la tapa del fusible. No - Brother International SM2700 | Operation Manual - Page 57
1 CONOZCA SU MÁQUINA DE COSER 1 ACCESORIOS Hemos diseñado estos accesorios para ayudarle a realizar fácilmente la mayoría de las tareas de costura. 1. 2. 3. 4. 5. 6. 7. 8. 9. N.º Nombre de la pieza 1 Pie para zig-zag "J" (en la máquina) 2 Pie para ojales "A" 3 Pie para cremalleras - Brother International SM2700 | Operation Manual - Page 58
(Página 9) Gire el selector en cualquier dirección para elegir el tipo de puntada que desee. E Rueda Permite subir y bajar la aguja de forma manual. F Tornillo de ajuste fino de los ojales (Página 38) G Interruptor de la alimentación y de luz de cosido (Página 7) Puede encender y apagar el - Brother International SM2700 | Operation Manual - Page 59
USO DE LA MÁQUINA DE COSER 1 ADVERTENCIA ● Utilice solamente electricidad doméstica regular para la alimentación de la máquina. El uso de otras fuentes de alimentación puede provocar incendios, descargas eléctricas o averías en la máquina. ● Asegúrese de que las clavijas del cable de corriente - Brother International SM2700 | Operation Manual - Page 60
CONOZCA SU MÁQUINA DE COSER Interruptor de la alimentación y de luz de cosido Este interruptor enciende y apaga la alimentación y la luz de cosido. Comprobación de la aguja La aguja de coser debe estar siempre recta y afilada para una costura óptima. 1 2 1 Encendido (hacia la marca 'I') 2 - Brother International SM2700 | Operation Manual - Page 61
PRECAUCIÓN PRECAUCIÓN ● Antes de cambiar la aguja, coloque tela o ● Asegúrese de insertar la aguja hasta que 1 papel debajo del pie prensatela para llegue al tope y apriete fuertemente el evitar que la aguja caiga en el orificio de tornillo de la presilla de la aguja con un la placa de - Brother International SM2700 | Operation Manual - Page 62
CONOZCA SU MÁQUINA DE COSER Baje la palanca del pie prensatela y ajuste 5 el pie en la lengüeta. Si el pie prensatela está en el lugar correcto, la varilla deberá ajustarse perfectamente. ■ Orientación para la colocación del pie prensatela 1 2 1 Lengüeta 2 Varilla CONTROLES PRECAUCIÓN ● Si - Brother International SM2700 | Operation Manual - Page 63
Dibujos y nombres de las puntadas ■ 53 puntadas (disponible únicamente en determinados modelos) 1 1 2 3 4 5 6 7 8 9 10 11 12 13 14 15 16 17 18 19 1 20 21 22 23 24 25 26 27 28 29 30 31 32 33 34 35 36 37 38 39 40 41 42 43 44 45 46 47 48 49 50 51 52 53 ■ 37 puntadas (disponible únicamente en - Brother International SM2700 | Operation Manual - Page 64
CONOZCA SU MÁQUINA DE COSER Dibujo 53 37 27 8 8 8 Nombre de la puntada PUNTADA FESTÓN 9 9 9 10 10 10 PUNTADA DE DOBLE ACCIÓN PUNTADA DE PUENTE 11 11 11 PUNTADA DE MURALLA 12 12 12 PUNTADA DE CONCHA ELÁSTICA 13 13 13 PUNTADA FESTÓN DOBLE 14 14 14 PUNTADA DE FLECHA 15 - Brother International SM2700 | Operation Manual - Page 65
Dibujo 53 37 27 Nombre de la puntada Anchura recomendada [mm (pulg.)] Longitud recomendada [mm (pulg.)] Página de referencia 1 27 27 22 VAINICA 3-5 (1/8-3/16) / 1 Fija 33 2,5 (3/32) 28 28 23 PUNTADA DECORATIVA 3-5 (1/8-3/16) / 1 Fija 33 2,5 (3/32) 29 29 24 PUNTADA DE - Brother International SM2700 | Operation Manual - Page 66
CONOZCA SU MÁQUINA DE COSER Dibujo 53 37 27 46 -- 47 -- 48 -- 49 -- 50 -- 51 -- 52 -- 53 -- Nombre de la puntada PUNTADA DECORATIVA PUNTADA DECORATIVA PUNTADA DECORATIVA PUNTADA DECORATIVA PUNTADA DECORATIVA PUNTADA DECORATIVA PUNTADA DECORATIVA PUNTADA DECORATIVA Anchura recomendada [mm (pulg - Brother International SM2700 | Operation Manual - Page 67
Control de longitud de puntada Cuando se selecciona la puntada recta o la puntada elástica triple, puede cambiarse la posición de la aguja de izquierda a derecha mediante el control de anchura de puntada. 1 Según el tipo de puntada seleccionado, es posible que necesite ajustar la longitud - Brother International SM2700 | Operation Manual - Page 68
CONOZCA SU MÁQUINA DE COSER ENHEBRADO DE LA MÁQUINA Devanado de la bobina PRECAUCIÓN ● Hemos diseñado la bobina que se proporciona con esta máquina. Si utiliza bobinas de otros modelos, la máquina no funcionará correctamente. Utilice exclusivamente la bobina suministrada con esta máquina o - Brother International SM2700 | Operation Manual - Page 69
Pase el extremo del hilo por el orificio de 3 la bobina desde el interior de la misma. Mientras sujeta el extremo del hilo, pise 6 suavemente el pedal para enrollar el hilo alrededor de la bobina unas cuantas veces. Después pare la máquina. 1 Coloque la bobina en el eje de la 4 devanadora y - Brother International SM2700 | Operation Manual - Page 70
CONOZCA SU MÁQUINA DE COSER PRECAUCIÓN ● Un devanado incorrecto de la bobina puede disminuir la tensión del hilo y romper la aguja. Coloque la bobina de modo que el hilo 4 salga en la dirección que indica la flecha. 1 2 1 Enrollado uniforme 2 Enrollado deficiente Enhebrado del hilo inferior - Brother International SM2700 | Operation Manual - Page 71
Vuelva a colocar la tapa de la bobina. 6 Coloque la proyección en la ranura de la sujeción de la pista y empuje para cerrar. Nota ● Si el hilo no se inserta correctamente a 1 través del resorte de ajuste de tensión de la caja de la bobina, puede producirse una tensión del hilo incorrecta. - Brother International SM2700 | Operation Manual - Page 72
CONOZCA SU MÁQUINA DE COSER Enhebrado del hilo superior 2 2 3 4 1 5 1 Portacarrete 2 Guía del hilo (parte trasera) 3 Guía del hilo (parte delantera) 4 Tirahilo 5 Marca de la rueda PRECAUCIÓN ● Para enhebrar el hilo superior, siga las instrucciones con precisión. Si el enhebrado del hilo - Brother International SM2700 | Operation Manual - Page 73
Mientras sujeta el hilo del carrete con la 5 mano derecha, pase el hilo hacia usted Coloque el hilo detrás de la guía por 8 encima de la aguja. por la ranura de la guía del hilo. • Asegúrese de que el resorte de la ranura engancha el hilo. • Para pasar fácilmente el hilo por detrás de la guía - Brother International SM2700 | Operation Manual - Page 74
CONOZCA SU MÁQUINA DE COSER Uso del enhebrador de aguja (para los modelos equipados con un enhebrador de aguja) Esta función está disponible únicamente en determinados modelos. PRECAUCIÓN ● El enhebrador de aguja puede utilizarse con una aguja de máquina de coser doméstica de 75/11 a 100/16. No - Brother International SM2700 | Operation Manual - Page 75
Mientras sujeta suavemente el hilo, gire la 6 palanca del enhebrador de aguja hacia la Pase el extremo del hilo por el pie 0 prensatela y, a continuación, saque unos parte delantera de la máquina (hacia usted). El ganchillo tirará del hilo a través 5 cm (2 pulg.) de hilo hacia la parte - Brother International SM2700 | Operation Manual - Page 76
CONOZCA SU MÁQUINA DE COSER Tire de los dos hilos unos 10 cm (4 pulg.) 3 y colóquelos en la parte trasera de la máquina, debajo del pie prensatela. 1 2 1 Hilo superior 2 Hilo inferior ■ Para los modelos equipados con una bobina rápida Puede comenzar a coser inmediatamente sin tener que tirar del - Brother International SM2700 | Operation Manual - Page 77
COMBINACIONES DE TELA, HILO Y AGUJA 1 Tipo de tela/Aplicación Telas medianas Telas finas Paño Tafetán Franela, gabardina Lino Punto Georgette Challis, satén Telas gruesas Telas elásticas Tejano Pana Tweed Tejido de punto Punto de lana Telas que se deshilachan con facilidad Hilo Tipo Hilo - Brother International SM2700 | Operation Manual - Page 78
FUNCIONES DE COSTURA BÁSICAS 2 FUNCIONES DE COSTURA BÁSICAS Lea lo siguiente antes de utilizar la máquina PRECAUCIÓN ● Para evitar lesiones, observe con atención la aguja mientras utiliza la máquina. Mantenga las manos alejadas de las piezas en movimiento. ● No estire ni empuje la tela durante - Brother International SM2700 | Operation Manual - Page 79
Mientras sujeta el extremo del hilo y la 7 tela con la mano izquierda, gire la rueda hacia usted (en sentido contrario a las manecillas del reloj) con la mano derecha para bajar la aguja al punto de inicio de la costura. Costura de prueba Debe coserse una prueba en un retal. Utilice una tela y - Brother International SM2700 | Operation Manual - Page 80
FUNCIONES DE COSTURA BÁSICAS Costura en telas finas Al coser en telas finas, las puntadas podrían no quedar alineadas o la tela podría no avanzar correctamente. En ese caso, coloque debajo de la tela un papel fino o un material estabilizador y cósalo junto con la tela. Cuando haya terminado de - Brother International SM2700 | Operation Manual - Page 81
■ Colocación del portacarrete adicional Introduzca el portacarrete adicional en el extremo del eje de la devanadora. Coloque el segundo carrete de hilo en el portacarrete adicional. 1 Eje de la devanadora 3 2 Portacarrete adicional 3 Carrete de hilo 2 PRECAUCIÓN ● Al utilizar la aguja - Brother International SM2700 | Operation Manual - Page 82
FUNCIONES DE COSTURA BÁSICAS PRECAUCIÓN ● Al cambiar la dirección de costura, asegúrese de levantar la aguja de la tela y, a continuación, suba la palanca del pie prensatela y gire la tela. De lo contrario, la aguja podría romperse o la máquina averiarse. Tensión del hilo La tensión del hilo - Brother International SM2700 | Operation Manual - Page 83
3 PUNTADAS DE COSTURA INCORPORADAS Costura recta Las puntadas rectas se utilizan para la costura básica. Es aconsejable que cosa utilizando la puntada recta al comienzo y al final de las puntadas de zig-zag. (Esto actúa de puntada de refuerzo). Nombre de la puntada Dibujo 53 37 27 Longitud - Brother International SM2700 | Operation Manual - Page 84
PUNTADAS DE COSTURA INCORPORADAS Dé la vuelta a la falda o los pantalones. 1 2 1 3 4 1 Tela del revés 2 Tela del derecho 3 Lado inferior 4 Borde de la tela Doble la tela a lo largo del borde del 2 dobladillo deseado y presione. 2 1 1 Tela del revés 2 Tela del derecho 3 Borde de la tela 4 - Brother International SM2700 | Operation Manual - Page 85
Anchura de la puntada Cosa a una velocidad baja. 3 1 2 Baje la palanca del pie prensatela. 0 • Si desea información sobre el cambio de la anchura de la puntada, consulte "Control de 1 Puntadas rectas 2 Puntadas de zig-zag anchura de puntada" en la página 14. Cosa a una velocidad baja - Brother International SM2700 | Operation Manual - Page 86
PUNTADAS DE COSTURA INCORPORADAS ■ Unión de trozos de tela La puntada elástica puede emplearse para unir dos trozos de tela y resulta muy eficaz a la hora de coser tejidos de punto. Si utiliza hilo de nylon, la puntada no se verá. Coloque juntos los bordes de los dos 1 trozos de tela y céntrelos - Brother International SM2700 | Operation Manual - Page 87
Cosa con el centro del pie prensatela 4 alineado con el centro de los dos trozos de tela. Ponga la tela debajo del pie prensatela de 1 forma que la línea de costura (o punta de flecha) esté a unos 3 mm (1/8 pulg.) a la izquierda del centro del pie prensatela. Una vez finalizada la costura, - Brother International SM2700 | Operation Manual - Page 88
PUNTADAS DE COSTURA INCORPORADAS Costura elástica en zig-zag triple Nombre de la puntada Dibujo 53 37 27 Longitud de la puntada [mm (pulg.)] Anchura de la puntada [mm (pulg.)] Puntada elástica en 21 16 zig-zag / 1 Fija 3-5 (1/8-3/16) triple 2,5 (3/32) Esta puntada puede emplearse en - Brother International SM2700 | Operation Manual - Page 89
4 COSTURA DE OJALES Y BOTONES PRECAUCIÓN ● Apague siempre la máquina antes de cambiar el pie prensatela. De lo contrario, podría lesionarse si el pedal se pisa accidentalmente y la máquina comienza a coser. ■ Realización de un ojal Con un trozo de tiza, marque en la tela la 1 posición y la - Brother International SM2700 | Operation Manual - Page 90
COSTURA DE OJALES Y BOTONES ■ Si el botón no cabe en la placa de la guía del botón Sume el diámetro y el grosor del botón y, a continuación, ajuste la placa de la guía del botón a la longitud calculada. (La distancia entre las marcas de la escala del pie prensatela es de 5 mm (3/16 pulg.).) Baje - Brother International SM2700 | Operation Manual - Page 91
Inserte un alfiler en el extremo de la b costura del ojal para evitar que la costura se corte y, a continuación, utilice un abridor de costura para cortar hacia el alfiler y abrir el ojal. 2 Una vez finalizada la costura, tire 5 suavemente del hilo galón para que no queden hilos flojos y - Brother International SM2700 | Operation Manual - Page 92
COSTURA DE OJALES Y BOTONES Coloque la placa de zurcir en la placa de 4 la aguja. 2 1 3 3 1 Tornillo de ajuste fino para ojales 2 Lado izquierdo 3 Aspecto del ojal Si el lado izquierdo está demasiado abierto, gire el tornillo de ajuste fino para ojales con un destornillador grande en la direcci - Brother International SM2700 | Operation Manual - Page 93
5 USO DE ACCESORIOS Y APLICACIONES PRECAUCIÓN Apague la máquina. 2 Coloque el pie para cremalleras "I". ● Apague siempre la máquina antes de cambiar el pie prensatela. De lo contrario, podría lesionarse si el pedal se pisa accidentalmente y la máquina comienza a coser. Costura de cremalleras - Brother International SM2700 | Operation Manual - Page 94
USO DE ACCESORIOS Y APLICACIONES Fruncidos Nombre de la puntada Puntada recta Dibujo 2 Longitud de la puntada [mm (pulg.)] 4 (3/16) Afloje la tensión del hilo superior de 1 forma que el hilo inferior descanse sobre la cara inferior del material. Cosa una sola fila (o muchas filas) de 2 - Brother International SM2700 | Operation Manual - Page 95
ACCESORIOS OPCIONALES Utilización del pie móvil Nombre Longitud de la Anchura de la Dibujo puntada de la puntada puntada [mm (pulg.)] [mm (pulg.)] Puntada 2 recta 1-4 (1/16-3/16) 2-3 (1/16-1/8) Enganche la horca de conexión del pie 4 móvil al tornillo de la presilla de la aguja. 1 - Brother International SM2700 | Operation Manual - Page 96
USO DE ACCESORIOS Y APLICACIONES Utilización de la guía de acolchados Utilice la guía de acolchados para coser puntadas paralelas con un espacio igual entre ellas. Introduzca la base de la guía de 1 acolchados en el orificio situado en la parte trasera del pie móvil o del soporte del pie - Brother International SM2700 | Operation Manual - Page 97
Utilice las dos manos para mantener la 5 tela bien estirada y muévala para coser sobre el diseño dibujado. 1 1 Diseño de acolchado La longitud de la puntada depende de la 6 rapidez con que mueva la tela y de la velocidad de cosido de la máquina. Cosa mientras mueve la tela lentamente. ■ Cómo - Brother International SM2700 | Operation Manual - Page 98
USO DE ACCESORIOS Y APLICACIONES Coloque la tela (con el revés hacia arriba) 4 debajo del pie prensatela. Baje la aguja 3 mm (1/8 pulg.) desde los bordes de la tela, baje el pie prensatela y, a continuación, cosa 2 ó 3 puntadas. 1 Después de coser entre 2 (3/4 pulg.) y 8 3 cm (1 1/8 pulg.) de la - Brother International SM2700 | Operation Manual - Page 99
Utilización del pie para puntada invisible Nombre de la puntada Longitud de Anchura de Dibujo la puntada la puntada [mm (pulg.)] [mm (pulg.)] 2 Puntada recta Cualquiera Cualquiera Puntada de zig-zag 3 1-4 0-5 (1/16-3/16) (0-3/16) Puntada 4 invisible para dobladillo Puntada 7 - Brother International SM2700 | Operation Manual - Page 100
ANEXO 6 ANEXO MANTENIMIENTO Restricciones para el engrase Para evitar que se dañe la máquina, no debe ser engrasada por el usuario. Esta máquina se fabricó con la cantidad de aceite necesaria ya aplicada para garantizar un funcionamiento correcto, lo que hace que el engrase periódico no sea - Brother International SM2700 | Operation Manual - Page 101
Coja la caja de la bobina y tire de ella 5 hacia la izquierda. Coloque la placa de la aguja y apriete los 8 tornillos. 1 Utilice el cepillo de limpieza o una 6 aspiradora para eliminar todo el polvo de la pista y la zona de alrededor. 1 2 1 Cepillo de limpieza 2 Pista • No aplique aceite - Brother International SM2700 | Operation Manual - Page 102
á consejos para la solución de problemas, así como la lista actualizada de preguntas y respuestas más frecuentes. Visítenos en " http://solutions.brother.com ". Si el problema persiste, póngase en contacto con su proveedor o con el servicio de reparaciones autorizado más cercano. Síntoma La máquina - Brother International SM2700 | Operation Manual - Page 103
Síntoma Causa posible Solución Página No ha enhebrado el hilo superior correctamente. (Por ejemplo, si no ha colocado el carrete correctamente o el hilo Corrija el enhebrado del hilo superior. 19 se ha salido de la guía por encima de la aguja.) El hilo tiene nudos o está enredado. - Brother International SM2700 | Operation Manual - Page 104
ANEXO Síntoma La tela está arrugada. Las puntadas quedan sueltas. No se puede utilizar el enhebrador de aguja. Al coser, el resultado de las puntadas no es el correcto. La tela no se arrastra bien. Causa posible No ha enhebrado el hilo superior correctamente o ha colocado la bobina de forma - Brother International SM2700 | Operation Manual - Page 105
ÍNDICE A , Accesorios 4 opcionales 4 42 Aguja cambio 7 combinaciones con tela e hilo 24 comprobación 7 , Aguja gemela colocación 8 27 costura 27 Aplicaciones 41 B Bobina , devanado 15 Bobina rápida 18 23 Botones costura 39 C Combinaciones de tela, hilo y aguja 24 Componentes - Brother International SM2700 | Operation Manual - Page 106
- Brother International SM2700 | Operation Manual - Page 107
- Brother International SM2700 | Operation Manual - Page 108
English Spanish 885-X06/X08/X09/X16/X18/X19/X26/X28/X29 888-X06/X08/X09/X16/X18/X19/X26/X28/X29 Printed in Vietnam XF4391-2012
-
 1
1 -
 2
2 -
 3
3 -
 4
4 -
 5
5 -
 6
6 -
 7
7 -
8
-
9
-
10
-
11
-
12
-
13
-
14
-
15
-
16
-
17
-
18
-
19
-
20
-
21
-
22
-
23
-
24
-
25
-
26
-
27
-
28
-
29
-
30
-
31
-
32
-
33
-
34
-
35
-
36
-
37
-
38
-
39
-
40
-
41
-
42
-
43
-
44
-
45
-
46
-
47
-
48
-
49
-
50
-
51
-
52
-
53
-
54
-
55
-
56
-
57
-
58
-
59
-
60
-
61
-
62
-
63
-
64
-
65
-
66
-
67
-
68
-
69
-
70
-
71
-
72
-
73
-
74
-
75
-
76
-
77
-
78
-
79
-
80
-
81
-
82
-
83
-
84
-
85
-
86
-
87
-
88
-
89
-
90
-
91
-
92
-
93
-
94
-
95
-
96
-
97
-
98
-
99
-
100
-
101
-
102
-
103
-
104
-
105
-
106
-
107
-
108
 |
 |

Operation Manual
Product Code: 885-X06/X08/X09/X16/X18/X19/X26/X28/X29
888-X06/X08/X09/X16/X18/X19/X26/X28/X29
Sewing Machine
Manual de instrucciones
Código de producto: 885-X06/X08/X09/X16/X18/X19/X26/X28/X29
888-X06/X08/X09/X16/X18/X19/X26/X28/X29
Máquina de coser
Visítenos en
donde hallará consejos para la solución
de problemas así como la lista de preguntas y respuestas más frecuentes.
Please visit us at
where you can get product
support and answers to frequently asked questions (FAQs).
ENGLISH
ESPAÑOL