Brother International VX-1120 Users Manual - English
Brother International VX-1120 Manual
 |
View all Brother International VX-1120 manuals
Add to My Manuals
Save this manual to your list of manuals |
Brother International VX-1120 manual content summary:
- Brother International VX-1120 | Users Manual - English - Page 1
OPERAffIrMiltAL M A L DE INSTRUCCIONES 474 - Brother International VX-1120 | Users Manual - English - Page 2
threading the bobbin. or changing the presser foot. 15. Always unplug the sewing machine from the electrical outlet when removing covers, lubricating, or when making any other user service adjustments mentioned in this instruction manual. "SAVE THESE INSTRUCTIONS" "This sewing machine is intended - Brother International VX-1120 | Users Manual - English - Page 3
se describe en este manual. Usar 0nicamente los accesorios recomendados por el fabricante y que vienen especificados en este manual. 3. Nunca haga funcionar clavija, no del cable. 10. Mantener los dedos alejados de todas las partes movibles de la maquina. Tener un cuidado especial con la aguja. 11. - Brother International VX-1120 | Users Manual - English - Page 4
USERS IN THE UK, EIRE, MALTA AND CYPRUS ONLY. If your sewing machine flexible cords is hazardous if engaged in a live socket outlet. In the event of replacing the plug power and sewlight. • Turn on • Turn off When servicing the sewing machine, or when removing covers or changing lamps, the machine - Brother International VX-1120 | Users Manual - English - Page 5
- Brother International VX-1120 | Users Manual - English - Page 6
44 Accessories 1 Oiling 45 OPERATING YOUR SEWING MACHINE 3 Cleaning 46 Connecting Plugs 3 Performance Checklist 47 Main Power and Sewing Light Switches 4 Repacking the Machine 52 Foot Controller 4 Replacing the Needle 5 Checking the Needle 5 INDEX Changing the Presser Foot - Brother International VX-1120 | Users Manual - English - Page 7
CONOZCA SU MAQU/NA DE COSER Elementos principales 1 Accesorios 1 Funcionamiento de la maquina de coser 3 Conexion de los enchufes 3 Interruptor principal y de luz 4 Pedal 4 Cambio de la aguja 5 Verificacion de la aguja 5 Cambio delprensatelas 6 Conversi6n en modalidad de brazo - Brother International VX-1120 | Users Manual - English - Page 8
83S0330 VIVII1OVIN r1S VOZONOD 2NIHOVIAI ONINOS anoA ONIMONN Principal parts 1 2 5 Elementos principales 6 4 6 9 1z 11 16 1 13 1 Accessories 19 8 0 0 0 Accesorios 128585-051 SO X52800-050 X57117-051 131096-001 1 130920-051 131865-051 - Brother International VX-1120 | Users Manual - English - Page 9
Shuttle Hook C) Bobbin Case C) Feed Dogs @ Needle is Needle Clamp Screw © Thread Guide/Bobbin Winding Tension Disc @ Spool Pin © Bobbin Winding Assembly Balance Wheel Foot Controller Receptacle © Presser Foot Lever © Main Power/Sewing Light Switch a Built-in Handle Accessories (9 Zipper Foot (1 pc - Brother International VX-1120 | Users Manual - English - Page 10
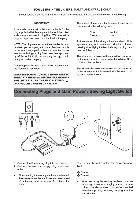
ns VOZONOO 3NIHOVIN ONIM3S ElnoA oNimoNN OPERATING YOUR SEWING MACHINE ecting Plugs 1. Connect the three-prong plug into the machine. It is located between the foot controller and the power supply pli,g on the cord. 2. Connect the power supply plug into a wall outlet. CAUTION 1. When changing - Brother International VX-1120 | Users Manual - English - Page 11
SEWING MACHINE CONOZCA SU MAQUINA DE COSER Main Power and Sewing Light Switches Interruptor principal y cli luz This switch turns the main power and sewing (For U.S.A. only): Th s foot controller can be used for sewing machine models VX1120, VX1140 and VX1250. Alpresionarligeramenteelpedal, la - Brother International VX-1120 | Users Manual - English - Page 12
anoik ONIMONN Si 1. Remove the power supply plug from the outlet. 2. Raise the needle bar to its highest position. 3. Lower the presser foot. 4. Remove the needle by loosening the needle clamp with a coin or screwdriver and pulling the needle down. 5. Insert a new needle as far as possible up - Brother International VX-1120 | Users Manual - English - Page 13
KNOWING YOUR SEWING MACHINE CONOZCA SU MAQUINA DE COSER It may be necessary to change the presser foot according to your sewing needs. 1. Raise the needle to its highest position by turning the balance wheel toward you (counterclockwise), then raise the presser foot lever. 2. Use a coin or - Brother International VX-1120 | Users Manual - English - Page 14
of the base plate to adjust its height until the sewing machine is stable. VARIOUS CONTROLS Length Knob The stitch length is regulated by turning this puede ajustarsu allure girando elcojinete de goma que se encuentra en la parte anterior izquierda de la placa de base hasta que la maquina quede - Brother International VX-1120 | Users Manual - English - Page 15
KNOWING YOUR SEWING MACHINE CONOZCA SU MAOUINA DE COSER To sew in reverse, press down the reverse sewing button as far as possible and hold it in that position while lightly depressing the foot controller. To sew forward, release the reverse sewing button. Reverse sewing is used for backtacking and - Brother International VX-1120 | Users Manual - English - Page 16
all stitches, but set it to other positions for the following applications. 1. Buttonhole Sewing (See page 29.) 2. Button Sewing (See page 32.) 3. Decorative Stitches (See page 26.) NOTE: 1. Do not move the selector while the needle is in the material. 2. Always set the selector to M when using the - Brother International VX-1120 | Users Manual - English - Page 17
KNOWING YOUR SEWING MACHINE CONOZCA SU MAQUINA DE COSER THREADING THE MACHINE Winding the Bobbin 1. Place the spool of thread on the spool pin and pass the thread around the bobbin winding tersion disc. ® Bobbin winding tension disc ® Bobbin winding Enhebrado de la maquina Bobinado de la canilla - Brother International VX-1120 | Users Manual - English - Page 18
controller. NOTE: The machine stops automatically when the bobbin is full. 6. When the machine stops, cut the thread, push the shaft to the left and remove the full bobbin from the shaft. CAUTION: Although the needle bar does not move when the bobbin winding shaft s slid toward the bobbin presser - Brother International VX-1120 | Users Manual - English - Page 19
YOUR SEWING MACHINE CONOZCA SU MAQUINA DE COSER 15 1. Raise the needle to its highest position by turning the balance wheel toward you (counterclockwise) and raise the presser foot lever. 2. Open the shuttle cover behind the extension table on the front of the machine and remove the bobbin case by - Brother International VX-1120 | Users Manual - English - Page 20
3NIH0M ONIMAS Lino), ONIMONN /lS ./.9ZON0,9 I pper (Needle) Threading 2 liado sup 1 4 el3SOL' 30 1. Raise the presser foot using the presser foot lever and turn the balance wheel toward you (counterclockwise) to raise the thread take-up lever to its highest position. 2. Pull up the spool pin - Brother International VX-1120 | Users Manual - English - Page 21
SEWING MACHINE CONOZCA SU MAQUINA DE COSER OO 4. Pull the thread down and around the upper tension control dial from the right to the left so the thread picks up the thread check spring. (See fig. A.) While holding the thread as shown in fig. B, pull it between the tension discs. C) Thread tension - Brother International VX-1120 | Users Manual - English - Page 22
Thread 1. Raise the presser foot and the needle to their highest positions. bobbin in a large loop. 4. Pull out about 15 cm (6') of both threads and place themtoward theback of themachine straight behind the presser foot los hilos y tireloshacia la parte trasera de la maquina, justo detras delprensatelas. - Brother International VX-1120 | Users Manual - English - Page 23
pass the thread through the thread guide above the needle before passing it through the eye of the left needle as shown in fig. B. (:) Right needle thread passes through this guide. Left needle thread passes in front of this guide. NOTE: 1. Use the zigzag presser foot. 2. Use a setting of less than - Brother International VX-1120 | Users Manual - English - Page 24
sewing applications no adjustment is needed. However, when sewing with thin thread on thin fabrics, the thread tension can not be adjusted enough with the Upper Tension Control Dial. Therefore, the thread tension bobbin thread tension as shown below. C-1 BOBBIN Increase the tension in the bobbin by - Brother International VX-1120 | Users Manual - English - Page 25
tension correcta dado que una tension insuficiente o demasiada tiran- te va a debilitar sus costuras o fruncir el tejido. 0 Reyes Derecho RELATIVE CHART OF SEWING FABRICS, NEEDLES AND THREADS SEWING FABRICS NEEDLE SIZES THREAD SIZES Muslin 11 14 (Supplied with your machine) Cotton: 60-80 Silk: - Brother International VX-1120 | Users Manual - English - Page 26
de punto simple, Prendas de punto doble, Jersey, Tricot de bola 14 Poliester envuelto de algod& NOTA: 1. Elija la aguja y el hilo correctos en la table arriba. 2. Utilice el mismo tamafio de hilo para los hilos superior e inferior (carrete y candle). 19 - Brother International VX-1120 | Users Manual - English - Page 27
ACUJA F-4 0 M. L. R. (Cuando use aguja gemelas, la posici6n siempre sera M) Zigzag Simple Starting Sewing Para empezar a coser 1. Raise the needle to its highest position and lift the presser foot lever. 1. Levante la aguja a suposicionmas alta ylevante la palanca del prensatelas. STRAIGHT AND - Brother International VX-1120 | Users Manual - English - Page 28
Changing Sewing Direction 1. Stop the machine at the point where you wish to change directions with the needle still in the fabric. If the needle ends in the up position turn the balance wheel toward you (counterclockwise) until the needle enters the fabric. 2. Raise the presser foot and turn the - Brother International VX-1120 | Users Manual - English - Page 29
) to bring the needle and thread take-up lever to their highest position. 3. Lift the presser foot and pull the fabric out gently to the left side. 4. Cut both threads using the thread cutter located on the back of the presser foot bar. C) Thread cutter 5. To prepare the machine for the next seam - Brother International VX-1120 | Users Manual - English - Page 30
; let the machine do the work. Simply guide the material with your fingers in front of the presser foot as shown in fig.A. If you pull the material, the needle may either bend or break. However, when sewing on special materials, such as tricot, crepes, knits, etc., we recommend that you support the - Brother International VX-1120 | Users Manual - English - Page 31
NEEDLE POSITION PRESSER FOOT NEEDLE 1-4 (For the Satin Stitch, set at F.) 1-5 (For twin needle sewing, always use a setting of less than 3.) M, L, R (For twin needle sewing . NOTA: La costura con puntadas zigzag necesita menos tension enelhilo superior quela costura conpuntadas rectas. 1. Cosa 5 - Brother International VX-1120 | Users Manual - English - Page 32
can be used for making buttonholes and decorative stitches or edging. NOTE: It is recommended that a test sample be made on a fabric scrap before sewing on your project. PUNTADAS DE REALCE Cuando ellargo de puntada este puesto en la zona F y que el ancho de puntada es superior a 1, la maquina - Brother International VX-1120 | Users Manual - English - Page 33
STITCH LENGTH STITCH WIDTH NEEDLE POSITION PRESSER FOOT NEEDLE Set between 0 and 1 (F) for the Satin Stitch. Li LARGO DE PUNTADA Ajustar entre 0 y 1(F) para cosecpuntadas de realce. See the table on the next page. ANCHO DE PUNTADA Wase la table en la siguiente pagina. M, L, R POSICIONDELA - Brother International VX-1120 | Users Manual - English - Page 34
more slowly than for the shape M above to make round patterns 111111 '111111 IIIIIHIIIIII• while depressing the foot control at an even speed. R iIIIIIIIIIIIIIPIIIIIMIIIIP NOTE: For twin needle sewing, repeat- M WO .INI. .113. .111...141., 1111. .4110...NIN. ININ el oil Nmo-olIDAIN-Mui-onp - Brother International VX-1120 | Users Manual - English - Page 35
Aguja Aguja simple Aguja doble Aguja simple Aguja doble Aguja simple Aguja doble Poslcion de la aguja Patron cosido Ajuste del ancho de puntada Mueva repetidamente elboton de L .,IIIII..-IIIII,..,IIIII-IIIII,. ancho de puntada a velocidad constante entre 0 y 5, y luego M entre 5 y 0 - Brother International VX-1120 | Users Manual - English - Page 36
LENGTH STITCH WIDTH NEEDLE POSITION PRESSER FOOT NEEDLE Set between 0 and 1 (F) for the Satin Stitch. See the instructions below. R ( the needle position to R. 2. Lower the presser foot over the top right corner of the buttonhole mark and sew 3-6 stitches. 3. Stop the machine when the needle is in - Brother International VX-1120 | Users Manual - English - Page 37
fabric slightly. Lower the presser foot. 3. Turn the balance wheel toward you (counterclockwise) to sew one stitch. This moves the needle from the left to the right. 4. Set the stitch width to 2. 5. Sew until the needle reaches the other bar tack. Stop the machine with the needle in the material on - Brother International VX-1120 | Users Manual - English - Page 38
OPTIONAL PROCEDURE FOR BUTTONHOLES Step A: Bar Tack 1. Set the needle position at "L..", stitch width at "5" and stitch length at "0". 2. Lower the presser foot and sew 3 to 4 stitches. 3. Stop the machine when the needle is in the material and at the left side of the stitches. (Position A) Step B: - Brother International VX-1120 | Users Manual - English - Page 39
in the button. 4. Lower the presser foot and check if the needle enters both holes of the button without hitting the button by turning the balance wheel counterclockwise a couple of times. 5. Slowly sew about 10 stitches. 6. Stop the machine and raise the needle from the material. 7. Remove the - Brother International VX-1120 | Users Manual - English - Page 40
sewing on heavier fabric. hacer una canilla de hilo en los botones. 1. Place a button between the presser foot indica 2. After sewing about 10 stitches, remove the fabric anteriormente. from the machine leaving a y el 4. With a normal sewing needle, pull the threads to botonydeunas vueltas - Brother International VX-1120 | Users Manual - English - Page 41
USING ATTACHMENTS AND APPLICATIONS USO DE ACCESORIOS Y APLICACIONES mama, Zipper Insertion STITCH LENGTH STITCH WIDTH NEEDLE POSITION PRESSER FOOT NEEDLE 2-3 0 M Zipper Foot Single The zipper foot is used to sew on various types of zippers and can easily be positioned to the right or left side - Brother International VX-1120 | Users Manual - English - Page 42
sewn from the bottom to the top. 4. For best results, the needle should be positioned on the side of the foot closest to the zipper. Sew through the fabric close to the edge of the zipper guiding the zipper foot along the zipper teeth. 1. Bajela aguja enunpedazo deLelaparahaceruna prueba y ajuste - Brother International VX-1120 | Users Manual - English - Page 43
DE ACCESORIOS Y APLICACIONES Gathering STITCH LENGTH STITCH WIDTH NEEDLE POSITION PRESSER FOOT NEEDLE 4 0 M Zigzag Single 1. Loosen the tension of the upper thread (to about 2) so that the lower thread lies on the underside of the material. 2. Sew a single row or evenly-spaced multiple rows of - Brother International VX-1120 | Users Manual - English - Page 44
filled with parallel lines of stitching. See fig. B. 'A 5. Repita la operaci0n hasta que elzurcido se haya completed° creando unascuantas lineas depuntadas paralelas. Vease fig. B. B STITCH LENGTH STITCH WIDTH NEEDLE POSITION PRESSER FOOT NEEDLE the location where desired. 2. Carefully sew - Brother International VX-1120 | Users Manual - English - Page 45
NEEDLE POSITION PRESSER FOOT NEEDLE 2-4 0 M Zigzag Single 1. Place the lace under he material leaving a 5 mm (1/5") overlap at the edge. 2. Place the overlapping edges under the presser foot and sew Se puede agregar una nota decorative al user las puntadas de realce o una puntada decorativa pare coser el - Brother International VX-1120 | Users Manual - English - Page 46
Set the stitch width knob so the needle will just clear both sides of the cording. 2. Place the cord on the fabric in the position where it will be sewn. 3. Lower the presser foot making sure the cord is centered and sew using the zigzag stitch. Guide the cord by handalong the path which you wishto - Brother International VX-1120 | Users Manual - English - Page 47
STITCH LENGTH STITCH WIDTH NEEDLE POSITION PRESSER FOOT NEEDLE 2-3 3-5 R Zigzag . 2. Fold back the fabric to the desired location of the hem as shown in fig. A. Then, fold width) and stitch length of 3-4. Quickly set the width to 2-3, sew 1 stitch and set the width back to 0. Repeat. 4. When the - Brother International VX-1120 | Users Manual - English - Page 48
presser foot so the needle enters the material when the left side of the zigzag stitch is sewn and misses the edge of the material with the right side of the stitch. Sew with this needle tejido al coser la parte izquierda de la puntada zigzag y sobrepase la orilla al coser la parte derecha. Cosa con - Brother International VX-1120 | Users Manual - English - Page 49
Monogramming and Embroidering STITCH LENGTH STITCH WIDTH NEEDLE POSITION PRESSER FOOT NEEDLE OTHERS Set at any position. 0-5 M both hands while pressing the fabric with the middle and third fingers and supporting the outside of the hoop with your smaller fingers. Monogramas y bordados - Brother International VX-1120 | Users Manual - English - Page 50
SO111OS300V 30 OSII SNOLLVOIlddV ONV SIN3INHOVIDY ONISf Monogramming 1. Sew moving the hoop slowly along the letteringat a • Embroidering 1. Stitch the outline of the design by moving the embroidery hoop. 2. Fill in he design alternately from the outline of the design to the inside and from the - Brother International VX-1120 | Users Manual - English - Page 51
face plate from the machine as illustrated in fig. B. Carnbio de la bombilla 1. Desenchufe la maquina. 2. Afloje el tornillo de la cubierta de la maquina tal como se indica en la fig. A. 3. Retire la cubierta de la maquina tal como se indica en la fig. B. A U 4. Replace the sewing light bulb. See - Brother International VX-1120 | Users Manual - English - Page 52
shouldbe oiled once a week if it is used more than one hour a day. If the machine is used more often, oil every day. Sewing machine oil is available from your local sewing machine dealer or service center. Donot apply too muchoil as it may get onyourthread and fabric. 1. Desenchufe la maquina - Brother International VX-1120 | Users Manual - English - Page 53
FMIliflOMflii] Removing the Shuttle Hook 1. Raise the needle to its highest position. 2. Open the shuttle cover on the front of the free arm. 3. Take out the bobbin case by opening itslatch and pulling it out from the shuttle race. 4. Slide the latch levers out from the retaining ring and remove - Brother International VX-1120 | Users Manual - English - Page 54
the needle plate using a coin or screw- driver to remove the screws. 2. Cleanthe lint from the upper part sewing difficulties are encountered, review the section in this instruction manual that details the operation you are performing to make sure you are correctly using the machine. If the problem - Brother International VX-1120 | Users Manual - English - Page 55
No Rohhin is not threaded properly in the shuttle hook. • Page 12 iNo Lower thread tension is too tight. • Page 17 No Inferior needle is used. • Page 5 No • The combina ion of needle size/ thread size/fabric is incorrect. • Page 15 iNo Threading is not correct. • Page 12-15 No • Wrong - Brother International VX-1120 | Users Manual - English - Page 56
EN EL TEJIDO WIEHIffMaM €1MCINEMIrl2 El hilo superior no esta bien enhebrado El hilo inferior esta enredado La aguja esta mal colocada La tension de los biros no es correcta La tension de los hilos es demasiada fuerte Pagina 13 iNo Pagina 15 I No Pagina 5 1No Pagina 17 El hilo superior esta - Brother International VX-1120 | Users Manual - English - Page 57
plug is removed from outlet. Page 3 iNo Inferior needle is used. Main power switch Insufficient oiling. is turned off. Page 5 No • The combination of needle size/ thread size/fabric is incorrect. 4 Page 45 Page 4 No • Foot controller is not used correctly. Page 5 No • Thread is - Brother International VX-1120 | Users Manual - English - Page 58
riMYINIIIIM117111 €fflZEMIMME9 LISTADO DE POSIBLES INCIDENCIAS EL TEJIDO NO ARRASTRA BIEN LA AGUJA SE ROMPE LA MAQUINA ES RUIDOSA O FUNCIONA MUY DESPACIO LA MAOUINA NO ARRANCA El selector de largo de puntada este puesto para que el tejido no alimente La aguja esta ma/ colocada Hay polvo en - Brother International VX-1120 | Users Manual - English - Page 59
and packing materials for future use. It may become necessary to reship the sewing machine. Improper packing or improper packing material could result in damage during shipping. Instructions for repacking the machine are illustrated below. Guarde la caja de carton y el embalaje porsiacaso necesita - Brother International VX-1120 | Users Manual - English - Page 60
Button Sewing C Cleaning Connecting Plugs Cording D Darning Decorative Stitches Drawing Up Lower Thread E Embroidering F Feed Dog Cleaning Foot Controller Free-arm Style 0 0 m G Gathering Guiding L Lace Lower Threading M Main Power Switch Monogramming N Needle Replacement Inspection - Brother International VX-1120 | Users Manual - English - Page 61
Stitch Length Knob 7 Stitch Width Knob 8 Straight Stitch 20 T Thin Fabric Sewing Thread Tension Troubleshooting Twin Needle Sewing 22 17 48, 50 16 U Upper Tension Control Dial 17 Upper Threading 13 w Winding the Bobbin 10 14 Modalidad brazo libre Monogramas 0 Ojales Pedal Puntada de - Brother International VX-1120 | Users Manual - English - Page 62
NOTE/NOTA - Brother International VX-1120 | Users Manual - English - Page 63
- Brother International VX-1120 | Users Manual - English - Page 64
IMPORTADOR: BROTHER INTERNATIONAL DE MEXICO S.A. ARQUIMEDES 219-A COL. CHAPULTEPEC MORALES MEXICO D.F. C.P. 11570 TEL (915)203 26 62 ANTES DE USAR LA MAQUINA LEA CUIDADOSAMENTE ESTE INSTRUCTIVO CARACTERISTICAS ELECTRICAS: Consumo de Potencia 90 W Tension Nominal 120 V ca Frecuencia 60 Hz
-
 1
1 -
 2
2 -
 3
3 -
 4
4 -
 5
5 -
 6
6 -
 7
7 -
8
-
9
-
10
-
11
-
12
-
13
-
14
-
15
-
16
-
17
-
18
-
19
-
20
-
21
-
22
-
23
-
24
-
25
-
26
-
27
-
28
-
29
-
30
-
31
-
32
-
33
-
34
-
35
-
36
-
37
-
38
-
39
-
40
-
41
-
42
-
43
-
44
-
45
-
46
-
47
-
48
-
49
-
50
-
51
-
52
-
53
-
54
-
55
-
56
-
57
-
58
-
59
-
60
-
61
-
62
-
63
-
64
 |
 |
OPERA
ff
IrMiltAL
M
A
L
DE
INSTRUCCIONES
474