Brother International XL-3030 Users Manual - English
Brother International XL-3030 Manual
 |
View all Brother International XL-3030 manuals
Add to My Manuals
Save this manual to your list of manuals |
Brother International XL-3030 manual content summary:
- Brother International XL-3030 | Users Manual - English - Page 1
OPERATION MANUAL MANUAL DE 1NSTRUCCIONES k )r brother® - Brother International XL-3030 | Users Manual - English - Page 2
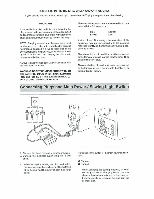
the needle, threading the bobbin, or changing the presser foot. 15. Always unplug the sewing machine from the electrical outlet when removing covers, lubricating, or when making any other user service adjustments mentioned in this instruction manual. "SAVE THESE INSTRUCTIONS" "This sewing machine is - Brother International XL-3030 | Users Manual - English - Page 3
must be removed from the socket outlet. Turn onor off the switch for the main power and sewlight. O Turn on O Turn off When servicing the sewing machine, or when removing covers or changing lamps, the machine or the electrical set must be disconnected from the supply by removing the plug from the - Brother International XL-3030 | Users Manual - English - Page 4
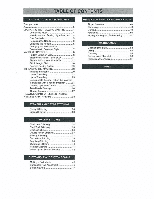
TABLE OF CONTENTS KNOWING YOUR SEWING MACHINE Principal parts 1 Accessories 3 OPERATING YOUR SEWING MACHINE 4 Connecting Plugs 4 Main Power and Sewing Light Switches ....5 Foot Controller 5 Replacing the Needle 6 Checking the Needle 6 Changing the Presser Foot 7 Converting to Free - Brother International XL-3030 | Users Manual - English - Page 5
4 Conoxi6n de los enchufes 4 !Motivator principal y de luz 5 Pedal 5 Cambio do la aguja 6 VerilicaciOn do la aguja 6 Cambio aguja)24 Para sacar el hilo de la canilla 25 Costura con aguja doble 26 TensiOn de los hilos 27 Tabla de refaciOn entre tejidos, hilos y agujas 29 USO - Brother International XL-3030 | Users Manual - English - Page 6
Principal parts Elementos principales 2 3 0 8 0 -a (1}b CC 8M= A 0 4. I C 1 - Brother International XL-3030 | Users Manual - English - Page 7
bobbin to be used far the lower thread. 0) SPOOL HOLDER Holds the sewing thread. ® STITCH LENGTH DIAL Controls the length of the stitches. ® PRESSER FOOT LEVER Raises and lowers the presser foot. ® UPPER TENSION CONTROL DIAL Controls the tension of the upper thread. (s) EXTENSION TABLE & ACCESSORIES - Brother International XL-3030 | Users Manual - English - Page 8
(I) Buttonhole Foot (1 pc.) * Zipper Foot (1 pc.) (3) Button Sewing Foot (1 pc.) (4) Needle Pack (Regular Single Needle No. 14) (3 Pm) (6) Twin Needle (1 pc.) (6) Bobbin (3 pcs.) 0) Darning Plate (1 pc.) (a) Screw Drivers (Large & Small) (2 pcs.) (i) Extra Spool Pin (1 pc.) (i0i Spool Holder (Large - Brother International XL-3030 | Users Manual - English - Page 9
It is located between the loot controller and the power supply plug on the cord. 2. Connect the power supply plug into a wall outlet. CAUTION 1. When changing the light bulb or when the sewing machine is not in use, the power supply plug must be disconnected from the wall socket to avoid electrical - Brother International XL-3030 | Users Manual - English - Page 10
that nothing is placed on the foot controller when the machine is not in use. (i) Foot controller: Model N Note (For U.S.A. only): This toot controller can be used for sewing machine models X13025, XL3027 and XL3030. Pedal Al presionar ligerarnenle el pedal, la maquina funcionani a baja velocidad - Brother International XL-3030 | Users Manual - English - Page 11
YOUR SEWING MACHINE CONOZCA SU MAOUINA DE COSER Replacing the Needle 1. Remove the no....ry supuly plug Irani the outlet 2. Raise the needle bar to its highest position. 3. Lower the presser foot. 4. Remove the needle by loosening the needle clamp with a coin. 5. Insert a different needle as - Brother International XL-3030 | Users Manual - English - Page 12
de golpe. Converting to Free-arm Style Free-arm sewing is convenient for sewing tubular and hard-to-reach areas on a garment. To change your machine to the free-arm style, simply lift out the extension table. O Lilt up on the extension table. @ Slide the extension table to the telt. Conversion - Brother International XL-3030 | Users Manual - English - Page 13
turn the Pattern Selection Dial, located on the right side of the machine. The stitch selection dial may be turned in either direction. All stitches length is the only other necessary adjustment. The following table indicates the preset width of each stitchand thereclarimendedrangeofits stitchlength - Brother International XL-3030 | Users Manual - English - Page 14
BUTTONHOLE STRAIGHT STITCH (Left needle position) STRAIGHT STITCH (Center needle position) ZIGZAG STITCH ZIGZAG /64) 5 (13/64) 5 (13/64) 5 (13/64) 5 (13/64) 0 RECOMMENDED PAGE IN LENGTH INSTRUCTIONS [mm(inch)] F-1.5 43 (1/64-1/16) 1.4 30 (3/64-5/32) 1.4 30 (3/64-5/32) F-4 33 (1/64.5132) - Brother International XL-3030 | Users Manual - English - Page 15
KN• WING Y • U • SEWING M • CHINE CONOZCA SUMAMMA DECOSER Largo recomendado para cada puntada PUNTA DA 2 3 4 5 (3/32) Fija 2,5 (3/32) Fija 2,5 (3/32) Fija 2,5 (3/32) Fija 25 (3/32) Fija Z5 (3/32) Fija 2.5 (3/32) PAGINA DEL MANUAL 43 30 30 33 33 33 34 35 36 34 37 37 38 38 39 4Q 41 40 40 42 30 10 - Brother International XL-3030 | Users Manual - English - Page 16
to give you instructions about how to make the correction. 1. When you slide the bobbin winder pin to the right for bobbin winding, the machine will only allow you to wind the bobbin and the message "BOBBIN WINDING' will appear on the display. 2. When you set the machine to sew a buttonhole, but the - Brother International XL-3030 | Users Manual - English - Page 17
Electronic Display (4 Line LCD) When a pattern is selec ted with the Pattern Selecting Dial, the pattern name @, recomended presser foot @, recommended stitch length 0 and instructions about thenext key tobepressed @are shownonthe display. (1) Stitch number and description (1) Recommended presser - Brother International XL-3030 | Users Manual - English - Page 18
of the following major categories based on the sewing information you need: Al) SEWING PATTERN A2) USING MACHINE A3) TROUBLE SHOOTING A4) FABRIC•THREAD•NEEDLE r , A4 )I'MAIL • TietrAS NEEDLE 1- * A3)TROUBLE SHOOTING F' AfltISING MACHINE AI/SEWING PATTERN (SELECT WITH A KEY AND PRESS 1 KEY) 3. When - Brother International XL-3030 | Users Manual - English - Page 19
KNOWING YOUR SEWING MACHINE CO,VOZCA SU MAOUINA DE COSEI? Uso de las teclas de instrucciones. (Ejemplo) Pantalla A E•1.5 I 1:OJAL O ± CAPREIAR IECIA 41 4 1. Presione !a lads A 2. Preston L4 tecla pars elegir - Brother International XL-3030 | Users Manual - English - Page 20
HACHDIP DI/WINDING BOBBIN rrnoume GHOSTING BlINELTLE BREAKS h4/FAIIMIC•THTIEND NEEDLE K) /NORMAL EMIG I /ATM/ BUTEN:MOLE POOPIA) A21USING MACHINE B2)REPLACING BOHRI N Al) TROUBLE SIER711NG R21UPPER TIIRPAD BREAKS AA1FABII C • THREAD• ugEr); 02I LIMIT FABRIC 2 }PULL OUT BACK OF FOOT.LET WPM IN - Brother International XL-3030 | Users Manual - English - Page 21
KNOWING YOUR SEWING MACHINE CONOZCA SU MAOUINA DE COSER Plangeneraldeinformacionenlapantalla decuatrolimas A 1:COAL P-I.5 IAPRETAR TECLA 11 A , B El/TEIIE0 MIRMAL (Ak AoTertop-Htto-Acum 11.2)TEJIDO FIND 21PETIRAR LA PARTS ATMS DEL PIONSAISLAS CULOCAR RI. 1 0v0N4 Y VIJAY( A.2) INA Di USO EU - Brother International XL-3030 | Users Manual - English - Page 22
instructions about how to make the correction. 1. When you slide the bobbin winder pin to the right for bobbin winding, the machine will only allow you to wind the bobbin and the message "BOBBIN WINDING SELECTED" will appear on the display. 2. When you set the machine to sew the main power switch oft - Brother International XL-3030 | Users Manual - English - Page 23
the main power switch off. (5)When the main power switch is does not feed the material. This is used for sewing on a button. The"F"areaisused formakinga Satin Stitch(a close making the Satin Stitch varies according to the material and thread being used. To determine the exact dial position, you - Brother International XL-3030 | Users Manual - English - Page 24
hold in that position while pressing rightly on the fool pedal. To sew forward, release the Reverse Sewing Button. The machine will then sew forward. Reverse sewing is used for backtacking and reinforcing seams. 0) Reverse sewing button Pulsador de retroceso Para coser hacia arras, apriete a tondo - Brother International XL-3030 | Users Manual - English - Page 25
THREADING THE MACHINE Winding the bobbin 1 . Change the Clutch Release Switch horn the needle mark to the bobbin mark. 2. Place a spool of thread onto the horizontal spool pinand firmly hold it witha spoolholder so that the spool of thread will not turn. Pass the thread through the thread guide as - Brother International XL-3030 | Users Manual - English - Page 26
bobbin. Continue winding the thread onto the bobbin by depressing the foot controller. NOTE: The machine stops automatically when thebobbinis full. 7. Cut the thread, push the shalt to the left and remove the full bobbin from the shaft. 8. Return the Clutch Release Switch back to the needle el pedal. - Brother International XL-3030 | Users Manual - English - Page 27
Lower Threading Enhebrado inferior 1. Raise the needle to its highest position by turning the balance wheel towardyou(counterclockwise) and raise the presser fool lever. 2. Open the shuttle cover behind the extension table on the front of the machine and remove the bobbin case by pulling its latch - Brother International XL-3030 | Users Manual - English - Page 28
the presser foot using the Presser Foot Lever as shown in fig. A below. 2. Raise the needle to its highest position by turning the balance wheel towardyou(counterclockwise). 3. Place a spoolof threadon the horizontalspoolpin andpressa spoof holder ontothe spoolpintohold the thread spool firmly in - Brother International XL-3030 | Users Manual - English - Page 29
machine is equipped with a needle threader) The needle threader can be used to thread the needle more easily. 1. Lower the presser loot lever. Lower thethreader slightlyandpositionthe thread under the guide. Oi Needle threader C) Guide 2. Move the threader to ils lowest position and guide the thread - Brother International XL-3030 | Users Manual - English - Page 30
balance wheel toward you (counterclockwise) until the needle moves down and back up again to its highest position. 3. The upper thread should have caught the lower threadina loop Pull the ripper thread toward you and the lower thread will come up from the bobbin in a large loop. 4. Pull out about 15 - Brother International XL-3030 | Users Manual - English - Page 31
of the machine near the horizontal spool pin. Place the second spool of thread onto the vertical spool pin as shown in fig. A. TWIN NEEDLE THREADING Each needle should be threaded separately. 1. Threading the Right Needle Follow the same instructions for single needle threading using the thread from - Brother International XL-3030 | Users Manual - English - Page 32
VOZON00 3NIHDVNI ONINGS tirtOA DNIMONN Thread Tension Thread tension wiIIaffect the quality of your stitches. It may need to be adjusted when you change fabric or thread type. NOTE: It is recommended that a test sampte be made on a fabric scrap before sewing on your project. Possible misadjustments - Brother International XL-3030 | Users Manual - English - Page 33
40-50 Corduroy. Canvas, Duck Mercerized Heavy Duty KNITS Single Knit, Double Knit. Jersey, Tricot Ball point 14 Cotton Wrapped Polyester NOTE: 1. Select the correct needle and thread size from the above chart. 2. Use the same size thread for the upper and lower threads (spool and bobbin). 28 - Brother International XL-3030 | Users Manual - English - Page 34
de punto simple, Prendas de punto doble, Jersey, Tricot de bola 14 Poliester envuelto de Wooden NOTA: 1. Elija fa aguja y el hilo correctos en la table ardba. 2. Office el mismo lamaiio de hilo pare los kilos superior e inferior (carrele y canine). 29 - Brother International XL-3030 | Users Manual - English - Page 35
threads toward the back of the presser foot. 4. Place the fabric under the presser foot and position the needle 1 cm (3/8") from the edge of the fabric. 5. Lower the presser foot. 6. To backtack, push the Reverse Sewing la parte apes retroceso y presione ligeramente el pedal. El retroceso sirve para - Brother International XL-3030 | Users Manual - English - Page 36
Sewing Direction 1. Stop the machine at the point where you wish to change directions with the needle still in the fabric. 2. Raise the presser foot and turn the fabric to line up its new direction using the needle LNG C) C) Finishing Sewing Reverse stitching is used to lock the threads at the endof - Brother International XL-3030 | Users Manual - English - Page 37
the Material from the Machine 1. Stop the machine. 2. Raise the needle to its highest position and make sure that the thread take-up lever is also in its highest position. 3. Lift the presser foot and pull the fabric out gently to the left side. 4. Cut both threads using the thread cutter located on - Brother International XL-3030 | Users Manual - English - Page 38
the Pattern Selection Dial. Then select the stitch length. It is recommended to sew using the Straight Stitch at the beginning and end of the Zigzag Stitches. . Puntada de realce Cuando se define ellargo dela puntada enla parte "F". se coserAn puntadas tupidas (puntada zigzag muy cerradas) quepueden - Brother International XL-3030 | Users Manual - English - Page 39
Puntada invisible Elastics (10) para los tejidos elasticos. 1. Both the threads should be the same color as the fabric. 2. Fold back the fabric 41overlap at the edge. 3. Set the Pattern Selection Dial to either 7 or 10. 4. Sew on the fold as in fig. C. 5. When the fabric is unfolded you will have - Brother International XL-3030 | Users Manual - English - Page 40
are sewn on the seamline and the zigzag stitches are sewn slightly over the folded edge. 3. This stitch requires a tighter thread tension than normal. 4. Sew at a slow speed. Puntada Ondas Namara depuntada 8 (Puntada Ondas) Largo de puntada F-3 La puntada ondas puede usarse pare coser una - Brother International XL-3030 | Users Manual - English - Page 41
stretch the elastic both in the front and behind the presser foot as shown in fig. B. JOINING FABRIC The Elastic Stitch can be used to join two pieces of fabric together and is very effective when sewing knitted fabrics. When nylon thread is used, the stitch will not be visible. 1. Place theedge of - Brother International XL-3030 | Users Manual - English - Page 42
11. nn L • Scallop Stitching P.attein 12 (Scallop Stitch) Stitch Length F-1.5 This machine automatically produces a Scallop Stitch which may be used as a decorative edging. 1. Set the Pattern Selection Dial to 12. 2. Sew the Scallop Stitch along the edge of the material. 3. If desired, trim - Brother International XL-3030 | Users Manual - English - Page 43
Decorative Stitching Pattern 13 (Lightning Stitch) 14 (Bead Stitch) Stitch Length F-1 These two stitches can be used for making decora live top stitching and for smocking Set the Pattern Selection Dial to 13 or 14. Puntadas decorativas 114/10merode punmda 13 (Pentode EscaJere) 14 (Puntada &Won - Brother International XL-3030 | Users Manual - English - Page 44
• Use thicker than normal threads for sewing. 4. After sewing, remove tho basting and the paper. Finish by tying knots on the reverse side at the beginning and the end of the seams. CO First needle drop Puntada Fagoting Mimosa do puntada 15 (Puntada Fagoting) Largo depunlada Fija 2,5 Estepuntada - Brother International XL-3030 | Users Manual - English - Page 45
edge of a blanket, while the Elastic Overlock and Slant Overlock Stitches are useful when sewing stretch materials. 1. Set the Pattern Selection Dial to 16, 18 or 19. 2. Position the fabric under the presser foot so that the seamline (or arrowhead point) is approximately 3 mm (1/8') to the left of - Brother International XL-3030 | Users Manual - English - Page 46
Feather Stitching isisi I Pattern 17(Feather Stitch) Stitch Length Fixed 2.5 Use the Feather Stitch as a decora ive top stitch o when hemming blankets, tablecloths or draperies o when embroidering. 1. Set the Pattern Selection Dial to 17. 2. Place the fabric right side up and seir1cm OM from the - Brother International XL-3030 | Users Manual - English - Page 47
Triple Zigzag Stretch Stitching Patient 20 (Tripe Zigzag Stretch Stitch) Stitch Length Fixed 2.5 This stitch can be used to sew heavyweight stretch fabrics wherever a Zigzag Stitch could be used. The Triple Zigzag Stretch Stitch can also be used as a decorative top stitch. Set the Pattern - Brother International XL-3030 | Users Manual - English - Page 48
foot with the marks on the fabric as shown in fig. A. The front bar tack will be sewn first. 5. Open the button plate and insert the button. See fig. B. 6. Lower the buttonhole lever and push it back slightly as in fig. C. 7. While gently holding the upper thread, start the machine la parte delantera - Brother International XL-3030 | Users Manual - English - Page 49
(1) Align the marks on the foot and on the fabric. O Starting mark on the fabric (0 Marks on the loot O Bolton plate QQ Mincelasmarcas delprenselelasconlas del WOO. O Marco do Thick) en ellefido ® - Brother International XL-3030 | Users Manual - English - Page 50
1. To secure the stitching, turn the material 90 degrees counterclockwise and sew Straight Stitches (3) to the end of the front bar tack of the buttonhole. 2. Remove the material from the machine. It is recommended that pins be placed across both ends of the buttonhole as protection against cutting - Brother International XL-3030 | Users Manual - English - Page 51
sentido del +. Esteajustepermiteoueambosladosdelojalpanazcan uniformes. (1) Dialde WOO depomade (7) Tomillo do ajuste lino de gal Qe Lado derecho En woo quo • II T GD 46 BUTTONHOLE AND BUTTON SEWING OJALES V C0STURA DE B0T0NES - Brother International XL-3030 | Users Manual - English - Page 52
and the fabricand make sure that the needle enters the holes without hitting the button. if it hits see step 1. 5. At a slow speed, sew approximately 10 stitches. 6. Remove the material from the machine. Cut the upper and lower threads and tie both threads at the back of the material. Costura - Brother International XL-3030 | Users Manual - English - Page 53
needle. When sewing the right side of the zipper, attach the shank to the left pin of the zipper foot. When sewing the left sideof the zipper,attach the shank to the right pin of the zipper foot simile la pate a! °prefer el baton situado en su parte posterior, instate la pats en el otro /ado de la cremallera - Brother International XL-3030 | Users Manual - English - Page 54
1. Set the Pattern Selection Dial to 3. 2. Loosen the tension of he upper thread (to about 2) so that the lower thread lies on the underside of the material. 3. Sew a single row or multiple rows of Straight Stitches. 4. Pull the lower thread(s) to gather the material. Fruncido Malteds 3 Largo de - Brother International XL-3030 | Users Manual - English - Page 55
into a shape to be used as a decoration on a garment or project. 1. Baste the cut design to the fabric in the location where desired. 2. Carefully sew around the edge of the cutout design with a Zigzag Stitch (patterns 4, 5 or 6) in the fine stitch length. 3. Cul away the surplus fabric outside of - Brother International XL-3030 | Users Manual - English - Page 56
with the underside of the fabric on the bottom of the inside hoop. 5. Place the work under the needle and lower the presser bar with the foot removed. 6. Pull the lower thread up through the work at the startingposition by turning thebalance wheeland make a few holding stitches. 7. Grip the hoop - Brother International XL-3030 | Users Manual - English - Page 57
USING ATTACHMENTS AND APPLICATIONS USO DE ACCESORIOS Y APLICACIONES MONOGRAMMING 1. Sew moving the hoop slowly along the lettering at a constant speed. 2. Secure with a few straight stitches at the end of the last letter. Monogramas 1. Cosa moviendo - Brother International XL-3030 | Users Manual - English - Page 58
from the machine as Illustrated in fig. B. Cambio de la bombilla 1. Desenchule la maquina. 2. Alloje el tornillo de la cubierta de la maquina tal como se indica en la fig. A. 3. Retire la cubierta de la maquina tat como se indica en Pa lig. B. reA- too l B fl 4. Replace the sewing light bulb - Brother International XL-3030 | Users Manual - English - Page 59
should be oiled once a week if it is used more than one hour a day. If the machine is used more often, oil every day. Sewing machine oil is available from your local sewing machine dealer or service center. Engrasado I. lksonchule magunia. 2. Ponga 2 ci 3 gotas de aceite en cada uno de los puntos - Brother International XL-3030 | Users Manual - English - Page 60
out as shown in fig. B. NOTE: When the needle is lowered, the shuttle hook cannot he rnmoved Cleaning the Shuttle Race 1. Remove any accumulated lint and thread from the retainingring,hook, driverandrace body with a brush. 2. A cloth dampened with machine oil should be used to wipe the shuttle race - Brother International XL-3030 | Users Manual - English - Page 61
ffEZIIIMEMIZTJ Performance Checklist Whenever sewing difficulties are encountered, review the sectionin thisinstructionmanual that details the operation you are performing to make sure you are correctly using the machine. If the problem continues, the following check list may help you to improve - Brother International XL-3030 | Users Manual - English - Page 62
not correctly installed. Page 23 Upper thread is tangled. Lower thread is tangled. 4 Page 25 Bobbin is not threaded properly in the shuttle hook. Needle is incorrectly inserted. I h read tension is incorrect. IN° Page 6 Page 27 Inferior needle is used. Thread tension is too tight. Page 27 No - Brother International XL-3030 | Users Manual - English - Page 63
Men enhebrado Clhit° inferior este enredadO • Pagina 23 No Regina 25 No La aguja cstd mal colocada La tension de los hilos no es coned!) iNo • Pagina 6 Peigina 27 No La tension de los hilos es demasiada (vette Pagano 27 I No Elhilo superior este enredado La canine no este bien enhebrada - Brother International XL-3030 | Users Manual - English - Page 64
/fabric IN° is incorrect. page 28 Inferior needle is used. Page 6 No Interior needle ' is used. The combine ion of needle size/ thread size/fabric is incorrect Insufficient oiling. Main power switch is turned off. Page 5.4 Page 5 No V Foot controller is not used correctly. Page 6 No - Brother International XL-3030 | Users Manual - English - Page 65
lama& de aguja/ grueso de hilo/ tejido no es correcta Pagina 54 Psigina 4 No El interruplor principal este apegado Pagina 5 N No So use bien el pedal Pagina 6 No • El /740 este enredado Pagina 29 No Se tira del tejido con demasiada luerza. Deje quo elarrastre .b aliment sobs. No tire delMid - Brother International XL-3030 | Users Manual - English - Page 66
the cation and packing materials for future use. It may become necessary to reship the sewing machine. Improper packing or improper packing material could result in damage during shipping. Instructions forrepacking themachine areillustrated below. Embalaje de la maquina Guarde la cap de carton y el - Brother International XL-3030 | Users Manual - English - Page 67
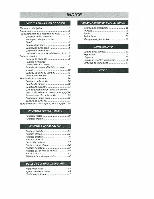
E Elastic Stitch Elastic Overlock Stitch Embroidering F Fagoting Stitch Feather Stitch Feed Dog Cleaning Foot Controller Free-arm Style G Gathering Lightning Stitch Lower Threading M Main Power Switch Monogramming N Needle Replacement Inspection Page 3 50 40 38 34 43 45 47 55 4 49 37 25 36 40 - Brother International XL-3030 | Users Manual - English - Page 68
Triple Stretch Stitch Triple Zigzag Stretch Stitch Troubleshooting Twin Needle Sewing 27 30 42 57, 59 26 U Upper Tension Control Dial 27 Upper Threading 23 va Winding the Bobbin 20 M Modalidad brazo fibre Monogramas O 0jales Pedal Puloador do rctrocoso Puntada de triple pespunte Puntada - Brother International XL-3030 | Users Manual - English - Page 69
NOTE - Brother International XL-3030 | Users Manual - English - Page 70
NOTA - Brother International XL-3030 | Users Manual - English - Page 71
•l a - Brother International XL-3030 | Users Manual - English - Page 72
English Spanish 194252.111 Printed in Taiwan
-
 1
1 -
 2
2 -
 3
3 -
 4
4 -
 5
5 -
 6
6 -
 7
7 -
8
-
9
-
10
-
11
-
12
-
13
-
14
-
15
-
16
-
17
-
18
-
19
-
20
-
21
-
22
-
23
-
24
-
25
-
26
-
27
-
28
-
29
-
30
-
31
-
32
-
33
-
34
-
35
-
36
-
37
-
38
-
39
-
40
-
41
-
42
-
43
-
44
-
45
-
46
-
47
-
48
-
49
-
50
-
51
-
52
-
53
-
54
-
55
-
56
-
57
-
58
-
59
-
60
-
61
-
62
-
63
-
64
-
65
-
66
-
67
-
68
-
69
-
70
-
71
-
72
 |
 |

OPERATION
MANUAL
MANUAL
DE
1NSTRUCCIONES
k
)r
brother®