Brother International XL 5130 Users Manual - English
Brother International XL 5130 - Free Arm Sewing Machine Manual
 |
View all Brother International XL 5130 manuals
Add to My Manuals
Save this manual to your list of manuals |
Brother International XL 5130 manual content summary:
- Brother International XL 5130 | Users Manual - English - Page 1
Instruction Manual Manual de instrucciones Manuel d'instructions - Brother International XL 5130 | Users Manual - English - Page 2
the needle, changing the needle, threading the bobbin, or changing the presser foot. 15. Always unplug the sewing machine from the electrical outlet when removing covers, lubricating, or when making any other user service adjustments mentioned in this instruction manual. 16. This sewing machine is - Brother International XL 5130 | Users Manual - English - Page 3
el fabricante y que vienen especificados en este manual. 3. Nunca haga funcionar la máquina de coser si el cordón de alimentación o la clavija están la clavija, no del cable. 10. Mantener los dedos alejados de todas las partes movibles de la máquina. Tener un cuidado especial con la aguja. 11. - Brother International XL 5130 | Users Manual - English - Page 4
instructions avant d'utiliser la machine." DANGER - Pour réduire le risque de décharge électrique: 1. Ne jamais laisser la machine sans surveillance lorsqu'elle est branchée. Toujours débrancher la machine . Retourner la machine à coudre auprès du revendeur autorisé ou du service technique le plus - Brother International XL 5130 | Users Manual - English - Page 5
USERS IN THE UK, EIRE, MALTA AND CYPRUS ONLY. If your sewing machine flexible cords is hazardous if engaged in a live socket outlet. In the event of replacing the plug power and sewlight. 1 Turn on 2 Turn off - When servicing the sewing machine, or when removing covers or changing lamps, the machine - Brother International XL 5130 | Users Manual - English - Page 6
KNOWING YOUR SEWING MACHINE PRINCIPAL PARTS 1 ACCESSORIES 3 OPERATING YOUR SEWING MACHINE 5 Connecting Plugs 5 Main Power and Sewing Light Switches 6 Foot Controller 6 Inserting the Needle 7 Checking the Needle 7 Changing the Presser Foot 8 Converting to Free-Arm Style 9 Steadying - Brother International XL 5130 | Users Manual - English - Page 7
ÍNDICE DEL CONTENIDO CONOZCA SU MÁQUINA DE COSER ELEMENTOS PRINCIPALES 2 ACCESORIOS 3 FUNCIONAMIENTO DE LA MÁQUINA DE COSER .... 5 Conexión de los enchufes 5 Interruptor principal y de luz 6 Pedal 6 Inserción de la aguja 7 Comprobación de la aguja 7 Cambio del prensatelas 8 Conversión en - Brother International XL 5130 | Users Manual - English - Page 8
Changement de pied-de-biche 8 Modèle bras libre 9 Pour stabiliser la machine 9 DESCRIPTIF DES DIFFERENTES COMMANDES ... 10 Sélecteur de modèle de point de point 16 Levier de couture en marche arrière 17 ENFILAGE DE LA MACHINE 18 Remplissage de la canette 18 Mise en place du fil inférieur 19 - Brother International XL 5130 | Users Manual - English - Page 9
SEWING MACHINE STRAIGHT AND ZIGZAG STITCHING BUILT-IN STITCHES PRINCIPAL PARTS 34 62 1 1 Bobbin winding assembly Winds the thread onto the bobbin to be used for the lower thread. 2 Spool pin A Holds the spool of thread. 3 Bobbin winding tension disc and thread guide 5 9 4 Thread - Brother International XL 5130 | Users Manual - English - Page 10
CONTENTS KNOWING YOUR SEWING MACHINE STRAIGHT AND ZIGZAG STITCHING BUILT-IN STITCHES ELEMENTOS Sert à tenir la bobine de fil à coudre. 3 Disque de tension pour le remplissage de la canette et guide-fil 4 Levier de remontée du fil 5 Coupe-fils 6 Sélecteur de tension supérieure Contrôle la - Brother International XL 5130 | Users Manual - English - Page 11
sewing foot (1 pc.) 4 Needle pack (regular single needle HA × 130) (3 pcs.) 5 Twin needle (1 pc.) 6 Bobbins (3 pcs.) 7 Screwdriver (1 pc.) 8 Extra spool pin (1 pc.) 9 1/4 Quilting foot (1 pc.) 0 Darning plate (1pc.) (When the machine is not equipped with a Drop Feed.) Parts code for zigzag presser - Brother International XL 5130 | Users Manual - English - Page 12
3 Button sewing foot (1 pc.) 4 Needle pack (regular single needle HA × 130) (3 pcs.) 5 Twin needle (1pc.) 6 Bobbins (3 pcs.) 7 Screwdriver (1 pc.) 8 Extra spool pin (1pc.) 9 Darning plate (1pc.) (When the machine is not equipped with a Drop Feed.) Parts code for zigzag presser foot: 138135-152 Foot - Brother International XL 5130 | Users Manual - English - Page 13
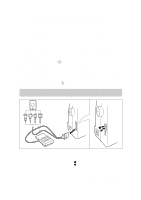
ZIGZAG STITCHING BUILT-IN STITCHES OPERATING YOUR SEWING MACHINE Connecting Plugs 1. Connect the power cord plug into the machine. 2. Connect the power supply plug into a wall outlet. CAUTION: 1. When changing the needle, bobbin or light bulb or when the sew- ing machine is not in use, it is - Brother International XL 5130 | Users Manual - English - Page 14
CONTENTS KNOWING YOUR SEWING MACHINE STRAIGHT AND ZIGZAG STITCHING BUILT-IN STITCHES A 1 2 B Main Power and Sewing Light Switches This switch turns the main power and sewing light on or off. (See fig. A.) 1 Turn on (toward the "I" mark) 2 Turn off (toward the "O" mark) Foot Controller When - Brother International XL 5130 | Users Manual - English - Page 15
KNOWING YOUR SEWING MACHINE STRAIGHT AND ZIGZAG STITCHING BUILT-IN STITCHES A 1 B Inserting the Needle 1 Turn power switch to "O". 1. Remove the power supply plug from the electrical outlet. 2. Raise the needle bar to its highest position. 3. Lower the presser foot. 4. If a needle is - Brother International XL 5130 | Users Manual - English - Page 16
CONTENTS KNOWING YOUR SEWING MACHINE STRAIGHT AND ZIGZAG STITCHING BUILT-IN STITCHES Changing the Presser Foot It may be necessary to change the presser foot according to your sewing needs. SNAP-ON TYPE Turn power switch to "O". 1. Raise the needle to its highest position by turning the - Brother International XL 5130 | Users Manual - English - Page 17
to Free-Arm Style Free-arm sewing is convenient for sewing tubular and hard-to-reach areas on garments. To change your machine to the free-arm los accesorios y sacarlo tirando de él. (Ver fig. A.) 1 Levante la parte inferior del soporte de accesorios hacia usted. 2 Tíre hacia afuera para sacarlo - Brother International XL 5130 | Users Manual - English - Page 18
CONTENTS KNOWING YOUR SEWING MACHINE STRAIGHT AND ZIGZAG STITCHING BUILT-IN STITCHES premier point est affiché, tournez le sélecteur de modèle dans le sens opposé jusqu'à ce que le point désiré soit affiché. XL5340/XR42 1 2 3 4 5 6 7 8 9 10 11 12 13 14 15 16 17 18 19 20 21 XL5232/XR34 1 - Brother International XL 5130 | Users Manual - English - Page 19
CONTENTS KNOWING YOUR SEWING MACHINE STRAIGHT AND ZIGZAG STITCHING BUILT-IN STITCHES RECOMMENDED WIDTHS AND LENGTHS FOR STITCHES PATTERN C A STITCH NAME RECOMMENDED WIDTH [mm (inch)] RECOMMENDED PAGE IN LENGTH INSTRUCTIONS [mm (inch)] 1 STEP AUTOMATIC BUTTONHOLE 3-5 -1.5 42 (1/8-13/ - Brother International XL 5130 | Users Manual - English - Page 20
CONTENTS KNOWING YOUR SEWING MACHINE STRAIGHT AND ZIGZAG STITCHING BUILT-IN STITCHES ANCHOS Y LARGOS DE PUNTADAS RECOMENDADOS PUNTADA C A NOMBRE ANCHO RECOMENDADO [mm (pulgadas)] LARGO PÁGINA DEL RECOMENDADO MANUAL [mm (pulgadas)] COSIDO AUTOMÁTICO DE 3-5 -1,5 43 OJALES CON UNA - Brother International XL 5130 | Users Manual - English - Page 21
CONTENTS KNOWING YOUR SEWING MACHINE STRAIGHT AND ZIGZAG STITCHING Fixe 39 2,5 POINT OVERLOCK ÉLASTIQUE 3-5 Fixe 39 2,5 POINT PLUME 3-5 Fixe 40 2,5 POINT FLÈCHE 3-5 Fixe 39 2,5 POINT DECORATIF 3-5 Fixe 41 2,5 POINT FEUILLE-CHEVRON 3-5 Fixe - 2,5 POINT D'ÉPINE 3-5 Fixe - Brother International XL 5130 | Users Manual - English - Page 22
CONTENTS KNOWING YOUR SEWING MACHINE STRAIGHT AND ZIGZAG STITCHING BUILT-IN STITCHES - SS 1 2 stitches. The position needed for making the Satin Stitch varies according to the material and thread being used. To determine the exact dial position, you should first test the stitch and - Brother International XL 5130 | Users Manual - English - Page 23
pattern to a stretch stitch. (See fig. A.) Adjusting the stretch stitching The sewing machine is adjusted during its production so that the stretch stitching can be sewn at the standard position " SS ". If different types of fabric or thread are used or the pattern does not have the correct shape - Brother International XL 5130 | Users Manual - English - Page 24
CONTENTS KNOWING YOUR SEWING MACHINE STRAIGHT AND ZIGZAG STITCHING BUILT-IN STITCHES 1 2 1 0 R 4 32 Triple Straight, you can change the needle position from left to right. NOTE: If the Straight Stitch or the Triple Straight is chosen, the needle position can be changed by adjusting the - Brother International XL 5130 | Users Manual - English - Page 25
CONTENTS KNOWING YOUR SEWING MACHINE STRAIGHT AND ZIGZAG STITCHING BUILT-IN STITCHES Reverse Sewing Lever To sew in reverse, press down the reverse sewing lever as far as possi- ble and hold it in that position while lightly stepping on the foot con- troller. To sew forward, release the - Brother International XL 5130 | Users Manual - English - Page 26
stops automatically when the bobbin is full. 6. When the machine stops, cut the thread, push the shaft to the left and remove the full bobbin from the shaft. CAUTION: Although the needle bar does not move when the bobbin winding shaft is slid toward the bobbin presser, the balance wheel will - Brother International XL 5130 | Users Manual - English - Page 27
KNOWING YOUR SEWING MACHINE STRAIGHT AND ZIGZAG STITCHING BUILT-IN STITCHES A B-1 1 2 B-2 B-3 3 C 2 4 Lower Threading Turn power switch to "O". 1. Raise the needle to its highest position by turning the balance wheel toward you (counterclockwise) and raise the presser foot lever - Brother International XL 5130 | Users Manual - English - Page 28
CONTENTS KNOWING YOUR SEWING MACHINE STRAIGHT AND ZIGZAG STITCHING BUILT-IN STITCHES 1 2 4 3 BUTTONHOLE AND BUTTON SEWING USING ATTACHMENTS AND APPLICATIONS A 4 23 1 C B D 4 4 E 5 Upper (Needle) Threading Turn power switch to "O". 1. Raise the presser foot lever and turn the - Brother International XL 5130 | Users Manual - English - Page 29
en le tirant vers soi et le faire passer par le chas. 6. Tirer le fil vers le bas et le faire passer derrière le guide-fils. 5 Guide-fils 7. Enfiler l'aiguille de l'avant vers l'arrière et tirer environ 5 cm de fil comme le montre la fig. E. REMARQUE: Si le fil n'est - Brother International XL 5130 | Users Manual - English - Page 30
CONTENTS KNOWING YOUR SEWING MACHINE STRAIGHT AND ZIGZAG STITCHING BUILT-IN STITCHES 1 2 3 1 2 4 5 7 6 6 Using the Needle Threader (when the machine is equipped with a needle threader) Turn power switch to "O". 1. Lower the presser foot lever. 2. Turn the balance wheel toward you ( - Brother International XL 5130 | Users Manual - English - Page 31
SEWING MACHINE STRAIGHT AND ZIGZAG STITCHING BUILT-IN STITCHES 1 2 3 1 2 4 5 BUTTONHOLE AND BUTTON SEWING gírela hacia la parte trasera de la má Guide-fil 4 Support du crochet 5 Aligner 5. Tenir légèrement le fil et tourner le levier de l'enfileur d'aiguille vers l'avant de la machine - Brother International XL 5130 | Users Manual - English - Page 32
presser foot and straight toward the back of the machine. 5. Start sewing as usual. (It is not necessary to draw up the bobbin thread.) (Refer to page 25) BUTTONHOLE AND BUTTON SEWING de él entre los talones del prensatelas en dirección a la parte trasera de la máquina. 5. Comience a coser de la - Brother International XL 5130 | Users Manual - English - Page 33
SEWING MACHINE STRAIGHT AND ZIGZAG STITCHING BUILT-IN STITCHES 1 2 Drawing Up Lower Thread 1. Raise the presser foot and the needle to their highest positions. 2. With your left hand, hold the end of the upper thread ambos hilos y colóquelos hacia la parte posterior de la máquina, justo detr - Brother International XL 5130 | Users Manual - English - Page 34
Twin-Needle Sewing Your sewing machine is designed for twin-needle sewing, which allows you to sew using two upper threads. You can use the same color or two different colors of thread for decorative stitches. Inserting The Twin Needle Insert the twin needle in the same way that a single needle is - Brother International XL 5130 | Users Manual - English - Page 35
CONTENTS KNOWING YOUR SEWING MACHINE STRAIGHT AND ZIGZAG STITCHING BUILT-IN STITCHES A 2 1 2 1 B 2 1 2 1 A-1 654 B-1 654 C 2 1 2 1 Thread Tension Thread tension will affect the quality of your stitches. It may need to be adjusted when you change fabric or thread type. NOTE: It - Brother International XL 5130 | Users Manual - English - Page 36
CONTENTS KNOWING YOUR SEWING MACHINE STRAIGHT AND ZIGZAG STITCHING BUILT-IN STITCHES Tensión de los hilos La tensión de los avoir des coutures solides sans que le tissu ne fronce. 1 Envers 2 Endroit BUTTONHOLE AND BUTTON SEWING USING ATTACHMENTS AND APPLICATIONS MAINTENANCE INDEX 28 - Brother International XL 5130 | Users Manual - English - Page 37
CONTENTS KNOWING YOUR SEWING MACHINE STRAIGHT AND ZIGZAG STITCHING BUILT-IN STITCHES CHART OF SEWING FABRICS, NEEDLES AND THREAD COMBINATIONS VERY THIN LIGHTWEIGHT MEDIUM WEIGHT HEAVYWEIGHT SEWING FABRICS Fine tricot, Fine lace, Thin linen, Silk, Organza, Chiffon Voile, Taffeta, Synthetics - Brother International XL 5130 | Users Manual - English - Page 38
CONTENTS KNOWING YOUR SEWING MACHINE STRAIGHT AND ZIGZAG STITCHING BUILT-IN STITCHES TABLEAU DES velours côtelé fin, tissus de confection, lin, mousseline #80/12 #90/14 (Livrés avec la machine) Coton: 60~80 Soie: "A" Synthétiques Mercerisé calibre 50 Coton: 50~60 Soie: "A" Synthétiques - Brother International XL 5130 | Users Manual - English - Page 39
. Starting Sewing 1. Turn the pattern selection dial to select the desired stitch. Set the pattern selection dial to Straight Stitch or Triple Stretch Stitch for the type of stitch required. 2. Raise the needle to its highest position and lift the presser foot lever. 3. Pull up the lower thread by - Brother International XL 5130 | Users Manual - English - Page 40
CONTENTS KNOWING YOUR SEWING MACHINE STRAIGHT AND ZIGZAG STITCHING BUILT-IN STITCHES A Changing Sewing Directions (fig. A) 1. Stop the machine at the point where you wish to change directions with the needle still in the fabric. 2. Raise the presser foot and turn the fabric to line up its - Brother International XL 5130 | Users Manual - English - Page 41
SEWING MACHINE STRAIGHT AND ZIGZAG STITCHING BUILT-IN STITCHES Removing the Material From the Machine 1. Stop the machine. 2. Raise the needle to its highest position and make sure that the thread take-up lever is also in its highest position. 3. Lift the presser foot en la parte izquierda de - Brother International XL 5130 | Users Manual - English - Page 42
CONTENTS KNOWING YOUR SEWING MACHINE STRAIGHT AND ZIGZAG STITCHING BUILT-IN STITCHES Zigzag Stitching Pattern (Zigzag Stitch) Stitch Length -4 Stitch Width 0-5 ZIGZAG STITCH Select the Zigzag Stitch with the pattern - Brother International XL 5130 | Users Manual - English - Page 43
CONTENTS KNOWING YOUR SEWING MACHINE STRAIGHT AND ZIGZAG STITCHING BUILT-IN STITCHES A B C D Blindhem Stitching Pattern (Blindhem Stitch) (Stretch Blindhem Stitch) Stitch Length -2 -1.5 Stitch Width Fixed 5 Fixed 3.5 The Blindhem Stitch is used to finish the edge of a project, like - Brother International XL 5130 | Users Manual - English - Page 44
sew a picot (lace-like) edge on lightweight fabric. 1. Set the pattern selection dial to the Shell Tuck Stitch. 2. This stitch requires a tighter thread tension than normal. 3. Place the fabric under the presser foot pied-de-biche de sorte que la machine puisse coudre des points droits sur la ligne - Brother International XL 5130 | Users Manual - English - Page 45
sewing knitted fabrics. If nylon thread is used, the stitch will not be visible. 1. Place the edges of the two pieces of fabric together and center them under the presser foot. 2. Sew y "2,5". 2. Coloque una tela de refuerzo debajo de la parte a remendar. 3. Siguiendo la línea de la rasgadura, - Brother International XL 5130 | Users Manual - English - Page 46
CONTENTS KNOWING YOUR SEWING MACHINE STRAIGHT AND ZIGZAG STITCHING BUILT-IN STITCHES A Scallop Stitching Pattern (Scallop Stitch) Stitch Length -1.5 Stitch Width 3-5 This machine automatically produces a Scallop Stitch which may be used as decorative edging. 1. Set the pattern selection - Brother International XL 5130 | Users Manual - English - Page 47
CONTENTS KNOWING YOUR SEWING MACHINE STRAIGHT AND ZIGZAG STITCHING BUILT-IN STITCHES A Overedge Stitching Pattern (Stretch Overlock Stitch) (Elastic Overlock Stitch) (Arrow Head Stitch) Stitch Length Fixed 2.5 Stitch Width 3-5 Fixed 5 These stitches are used to join together seams and - Brother International XL 5130 | Users Manual - English - Page 48
CONTENTS KNOWING YOUR SEWING MACHINE STRAIGHT AND ZIGZAG STITCHING BUILT-IN STITCHES Feather Stitching Pattern (Feather Stitch) Stitch Length Fixed 2.5 Stitch Width Fixed 5 Use the Feather Stitch as a decorative top stitch or when hemming blankets, tablecloths or draperies or when - Brother International XL 5130 | Users Manual - English - Page 49
CONTENTS KNOWING YOUR SEWING MACHINE STRAIGHT AND ZIGZAG STITCHING BUILT-IN STITCHES Triple Zigzag Stretch Stitching Pattern (Triple Zigzag Stretch Stitch) Stitch Length Fixed 2.5 Stitch Width 3-5 This stitch can be used to sew heavyweight stretch fabrics wherever a Zigzag Stitch would - Brother International XL 5130 | Users Manual - English - Page 50
KNOWING YOUR SEWING MACHINE STRAIGHT AND ZIGZAG STITCHING BUILT-IN STITCHES A B 1 2 - 3 C PUSH D 3 2 4 1 E PUSH Making a Buttonhole (1 Step Automatic Buttonhole) 4 Pattern Stitch Length Stitch Width Foot (1 Step Automatic -1.5 Buttonhole) Fixed 5 Buttonhole Foot NOTE - Brother International XL 5130 | Users Manual - English - Page 51
SEWING MACHINE STRAIGHT AND ZIGZAG STITCHING BUILT-IN STITCHES A B 1 4 2- 3 E PUSH C PUSH PUSH D 3 24 1 BUTTONHOLE AND BUTTON SEWING Se va a coser primero el remate de la parte delantera del ojal). 4. Abra la placa para re -1,5 automatique 1 pas) Fixe 5 Pied pour boutonnières - Brother International XL 5130 | Users Manual - English - Page 52
CONTENTS KNOWING YOUR SEWING MACHINE STRAIGHT AND ZIGZAG STITCHING BUILT-IN STITCHES Making a Buttonhole (4 Step Buttonhole) Pattern C (4 Step Buttonhole) A Stitch Length -1.5 Stitch Width Fixed 5 Foot Buttonhole Foot NOTE: 1. It is recommended to practice making a buttonhole on a scrap - Brother International XL 5130 | Users Manual - English - Page 53
D How to Sew 1. Set the pattern selection dial to "A". 2. Lower the presser foot and sew 5 to 6 stitches. 3. Stop the machine when the needle is at the de la punta- da y luego levante la aguja. 3er Paso (Remate de la parte trasera) C 1. Gire el selector de puntada en "C" (en la misma posición - Brother International XL 5130 | Users Manual - English - Page 54
CONTENTS KNOWING YOUR SEWING MACHINE STRAIGHT AND ZIGZAG STITCHING BUILT-IN STITCHES POUR manecillas del reloj y cosa unas puntadas rectas hasta el final de la línea del remate de la parte delantera. 2. Retire el tejido de la máquina. Se recomienda colocar alfileres en ambos remates del ojal - Brother International XL 5130 | Users Manual - English - Page 55
CONTENTS KNOWING YOUR SEWING MACHINE STRAIGHT AND ZIGZAG STITCHING BUILT-IN STITCHES 1 2 4 3 10 432 - SS 5 , the following adjustments can be made. 1. Set the Stitch Length Dial to " " and sew the buttonhole on a scrap of fabric while observing how the material is fed. 2. If the - Brother International XL 5130 | Users Manual - English - Page 56
CONTENTS KNOWING YOUR SEWING MACHINE STRAIGHT AND ZIGZAG STITCHING BUILT-IN STITCHES Ajuste fino de los ojales Si las de longueur de point 7 Vis d'équilibrage des boutonnières 8 Lèvre gauche 9 Au cas où BUTTONHOLE AND BUTTON SEWING USING ATTACHMENTS AND APPLICATIONS MAINTENANCE INDEX 48 - Brother International XL 5130 | Users Manual - English - Page 57
a button between the foot and the fabric and make sure that the needle enters the holes without hitting the button. If it hits, see step 1. 5. At a slow speed, sew approximately 10 stitches. 6. Remove the material from the machine. Cut the upper and lower threads and tie the two threads at the back - Brother International XL 5130 | Users Manual - English - Page 58
CONTENTS KNOWING YOUR SEWING MACHINE STRAIGHT AND ZIGZAG STITCHING BUILT-IN STITCHES le pied pour boutons. 3. Placer la plaque à repriser sur la plaque à aiguille. (Lorsque la machine est équipée d'un levier d'abaissement des griffes d'entraînement, abaisser les griffes en relevant le levier - Brother International XL 5130 | Users Manual - English - Page 59
the right or left side of the needle. When sewing the right side of the zipper, attach the presser foot holder to the left pin on the zipper foot. When sewing the left side of the zipper, attach the presser foot holder to the right pin on the zipper foot. (See fig. A.) 1. Set the pattern selection - Brother International XL 5130 | Users Manual - English - Page 60
CONTENTS KNOWING YOUR SEWING MACHINE STRAIGHT AND ZIGZAG STITCHING BUILT-IN STITCHES la orilla del tejido a 2 cm (3/4") y coloque la cremallera debajo de la parte doblada. 4. En XL5130, XR32, XL5232, XR34, XL5340 y RX42, utilice el ancho del selector de puntada para ajustar la posición de - Brother International XL 5130 | Users Manual - English - Page 61
to the Straight Stitch. 3. Place the portion to be darned under the presser foot together with a fabric underlay for reinforcement. 4. Remove the presser foot and presser foot holder, then lower the presser foot lifter. 5. Begin sewing alternating between gently drawing the work away from you and - Brother International XL 5130 | Users Manual - English - Page 62
CONTENTS KNOWING YOUR SEWING MACHINE STRAIGHT AND ZIGZAG STITCHING BUILT-IN STITCHES Appliques a garment or project. 1. Baste the cut design to the fabric in the desired location. 2. Carefully sew around the edge of the cutout design using a Zigzag Stitch with a fine stitch length. 3. Cut - Brother International XL 5130 | Users Manual - English - Page 63
as possible with the reverse side of the fabric under the inside hoop. 5. Place the work under the needle and lower the presser bar with the presser foot holder assembly removed. 6. Pull the lower thread up through the work at the starting position by turning the balance wheel and make a few holding - Brother International XL 5130 | Users Manual - English - Page 64
CONTENTS KNOWING YOUR SEWING MACHINE STRAIGHT AND ZIGZAG STITCHING BUILT-IN STITCHES Monogramming 1. Sew moving the hoop slowly . CAUTION: Keep fingers away from moving parts, especially needles. BUTTONHOLE AND BUTTON SEWING USING ATTACHMENTS AND APPLICATIONS Monogramas 1. Cosa - Brother International XL 5130 | Users Manual - English - Page 65
SEWING MACHINE STRAIGHT AND ZIGZAG STITCHING BUILT-IN STITCHES A B C 1 2 3 D Changing the Bulb 1. Remove the power supply plug from the outlet. 2. Loosen the face plate screw as shown in fig. A. 3. Remove the face plate from the machine as illustrated in fig. B. 4. Replace the sewing - Brother International XL 5130 | Users Manual - English - Page 66
YOUR SEWING MACHINE STRAIGHT AND ZIGZAG STITCHING BUILT-IN STITCHES Oiling 1. Remove the power supply plug from the outlet. 2. Remove the needle plate and the face plate. 3. Put 2 to 3 drops of oil at each point indicated by the arrows. 4. Run the machine at a fast speed without thread - Brother International XL 5130 | Users Manual - English - Page 67
SEWING MACHINE STRAIGHT AND ZIGZAG STITCHING BUILT-IN STITCHES A 1 Cleaning Removing the Shuttle Hook 2 1. Raise the needle to its highest position and remove the power supply plug from the outlet. 2. Remove the extension table and open the shuttle cover on the front of the free arm parte - Brother International XL 5130 | Users Manual - English - Page 68
this instruction manual that details the operation you are performing to make sure you are correctly using the machine. If the problem continues, the following checklist may help you to improve the operation. If you still have difficulties, contact your nearest service center. UPPER THREAD BREAKS - Brother International XL 5130 | Users Manual - English - Page 69
turned off. w Page 6 No w Foot controller is not used correctly. w Page 6 No w The bobbin winding shaft is slid toward the bobbin presser. w Page 18 No Feed dogs are lowered. No w w w w CONTACT YOUR LOCAL SERVICE CENTER BUTTONHOLE AND BUTTON SEWING USING ATTACHMENTS AND APPLICATIONS - Brother International XL 5130 | Users Manual - English - Page 70
CONTENTS KNOWING YOUR SEWING MACHINE STRAIGHT AND ZIGZAG STITCHING BUILT-IN STITCHES Listado de posibles incidencias Cada vez que se encuentre con dificultades al coser, vuelva a consultar la parte de este manual de instrucciones que detalla la operación que está realizando, para comprobar - Brother International XL 5130 | Users Manual - English - Page 71
CONTENTS KNOWING YOUR SEWING MACHINE STRAIGHT AND ZIGZAG STITCHING BUILT-IN STITCHES EL TEJIDO NO ARRASTRA BIEN LA AGUJA SE gina 18 No No w w w w PÓNGASE EN CONTACTO CON EL SERVICIO TÉCNICO LOCAL BUTTONHOLE AND BUTTON SEWING USING ATTACHMENTS AND APPLICATIONS MAINTENANCE INDEX 63 - Brother International XL 5130 | Users Manual - English - Page 72
CONTENTS KNOWING YOUR SEWING MACHINE STRAIGHT AND ZIGZAG STITCHING BUILT-IN STITCHES Liste de vérification en cas de défaillances En cas de problème, consulter d'abord le chapitre voulu dans le présent manuel pour s'assurer de la bonne utilisation de la machine. Si le problème persiste, la - Brother International XL 5130 | Users Manual - English - Page 73
SEWING MACHINE STRAIGHT AND ZIGZAG STITCHING BUILT-IN STITCHES L'ENTRAÎNEMENT DU TISSU N'EST PAS COR- RECT L'AIGUILLE CASSE LA MACHINE EST BRUYANTE OU LENTE LA MACHINE w w CONTACTER LE SERVICE TECHNIQUE LE PLUS PROCHE BUTTONHOLE AND BUTTON SEWING USING ATTACHMENTS AND APPLICATIONS MAINTENANCE - Brother International XL 5130 | Users Manual - English - Page 74
and packing materials for future use. It may become necessary to reship the sewing machine. Improper packing or improper packing material could result in damage during shipping. Instructions for repacking the machine are illustrated. IMPORTANT This packing material is designed to prevent damage in - Brother International XL 5130 | Users Manual - English - Page 75
Lever 17 Finishing a Seam 32-33 Foot Controller Connecting 5 Operating 6 Free-Arm Sewing 9 G Gathering 51 L Legs Stitch 11 Light Bulb Replacement 57 Lower Threading 19 M Main Power Switch 6 Monogramming 55 N Needle Inspection 7 Replacement 7 Threading 20 Threader 22 Page O Oiling 58 - Brother International XL 5130 | Users Manual - English - Page 76
Página A Accesorios 3 Aguja Cambio 7 Enhebrado 21 Enhebrador 23 Verificación 7 Ajuste fino de los ojales 48 Alimentador Limpieza 59 Palanca 17 Anchos de puntadas 12 Aplicaciones 54 B Bobina Canilla 18 Hilos 19, 24 Bobinado de la canilla 18 Bombilla Cambio de la bombilla 57 - Brother International XL 5130 | Users Manual - English - Page 77
Emballage 66 Enfilage Aiguille 21, 23 Canette 19, 24 Enfileur 23 Equilibrage de la machine 9 Equilibrage des boutonnières 48 F Fronces 52 G Graissage 58 Griffes d'entraînement Levier 17 Nettoyage 59 Guide de dépannage 64-65 I Installation de la bobine 21 Interrupteur principal 6 L Lampe
-
 1
1 -
 2
2 -
 3
3 -
 4
4 -
 5
5 -
 6
6 -
 7
7 -
8
-
9
-
10
-
11
-
12
-
13
-
14
-
15
-
16
-
17
-
18
-
19
-
20
-
21
-
22
-
23
-
24
-
25
-
26
-
27
-
28
-
29
-
30
-
31
-
32
-
33
-
34
-
35
-
36
-
37
-
38
-
39
-
40
-
41
-
42
-
43
-
44
-
45
-
46
-
47
-
48
-
49
-
50
-
51
-
52
-
53
-
54
-
55
-
56
-
57
-
58
-
59
-
60
-
61
-
62
-
63
-
64
-
65
-
66
-
67
-
68
-
69
-
70
-
71
-
72
-
73
-
74
-
75
-
76
-
77
 |
 |
Instruction Manual
Manual de instrucciones
Manuel d’instructions