Brother International XL-6562 Users Manual - English
Brother International XL-6562 Manual
 |
View all Brother International XL-6562 manuals
Add to My Manuals
Save this manual to your list of manuals |
Brother International XL-6562 manual content summary:
- Brother International XL-6562 | Users Manual - English - Page 1
as threading needle, changing needle, threading bobbin, or changing the presser foot, and the like. 15. Always unplug the machine from the electrical outlet when removing covers, lubricating, or when making any of the user service adjustments mentioned in the instruction manual. 16. The machine is - Brother International XL-6562 | Users Manual - English - Page 2
elle a été plongée dans du liquide. Retourner la machine à coudre au revendeur autorisé ou au service technique le plus proche afin qu'on puisse l'examiner, machine à coudre sans surveillance. 17. Ne jamais laisser les jeunes enfants jouer avec la machine. "CONSERVER CES INSTRUCTIONS" "Cette machine - Brother International XL-6562 | Users Manual - English - Page 3
especificados en este manual. 3. Nunca haga funcionar la máquina de coser si el cordón de alimentación de ventilación de la máquina de coser y el pedal sin acumulacíon de povo. Suciedad y restos de . 10. Mantener los dedos alejados de todas las partes movibles de la máquina. Tener un cuidado especial - Brother International XL-6562 | Users Manual - English - Page 4
in the plug. NOTE: The plug severed from the main leads must be destroyed as a plug with bared flexible cords is hazardous if engaged in a live socket outlet. In the event of replacing the plug fuse, use a fuse approved by ASTA to BS 1362, i.e. carrying the ASA mark, rating as marked on - Brother International XL-6562 | Users Manual - English - Page 5
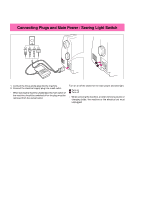
switch of the machine should be switched off or the plug must be removed from the socket outlet. Turn on or off the switch for the main power and sew-light. 1 Turn on 2 Turn off - When servicing the machine, or when removing covers or changing bulbs, the machine or the electrical set must unplugged - Brother International XL-6562 | Users Manual - English - Page 6
while sewing. Do not touch the balance wheel, thread take-up, needle, or other moving parts. 2. Remember to turn off the power switch and unplug the cord when: • Operation is completed • Replacing or removing the needle or any other parts • A power failure occurs during use • Maintaining the machine - Brother International XL-6562 | Users Manual - English - Page 7
en cousant. Ne touchez pas la poulie, le levier de remontée du fil, l'aiguille , ou autre pièces mobiles. 2. N'oubliez pas de mettre la machine hors tension et de la débrancher : • Son utilisation terminée • Lors du remplacement ou pour retirer toute autre pièce • A la suite d'une coupure de courant - Brother International XL-6562 | Users Manual - English - Page 8
• Deje la máquina desatendida 3. No deje ningún objeto encima del pedal. 4. Enchufe la máquina directamente a la toma de contacto de la pared 3. No deje caer o golpee la máquina. 4. Consulte siempre el manual de funcionamiento cuando tenga que reponer o instalar cualquier pieza, como el pie - Brother International XL-6562 | Users Manual - English - Page 9
TABLE OF CONTENTS KNOWING YOUR SEWING MACHINE PRINCIPAL PARTS 1 ACCESSORIES 3 Optional Accessories 3 OPERATING YOUR SEWING MACHINE 5 Connecting Plugs 5 Main Power/Sewing Light Switch 7 Foot Controller 8 Checking the Needle 9 Replacing the Needle 9 Changing the Presser Foot 11 Flat Bed - Brother International XL-6562 | Users Manual - English - Page 10
Remontée du fil de la canette 35 Couture avec l'aiguille jumelée 36 Tension des fils 38 COMBINAISONS TISSU/FIL/AIGUILLE 39 POINTS DROITS ET POINTS ZIGZAG quilting 1/4 74 ENTRETIEN Remplacement de l'ampoule 76 Nettoyage 78 Liste de vérification en cas de défaillances 81 Emballage de la machine - Brother International XL-6562 | Users Manual - English - Page 11
PRINCIPALES 2 ACCESORIOS 4 Accesorios opcionales 4 FUNCIONAMIENTO DE LA MÁQUINA DE COSER ......... 6 Conexión de los enchufes 6 Interrupteur principal/luz de cosido 7 Pedal 8 Verificación de la aguja 10 Cambio de la aguja 10 Cambio del prensatelas 11 Plataforma 12 DISTINTOS MANDOS 14 - Brother International XL-6562 | Users Manual - English - Page 12
the stitch width. 5 UPPER TENSION CONTROL DIAL (Page 38) Controls the tension of the upper thread. 6 BUTTONHOLE LEVER (Page 55) 7 NEEDLE THREADER (Page 33) 8 FLAT BED ATTACHMENT WITH ACCESSORY COMPART- MENT (Page 12, 25) 9 ZIGZAG PRESSER FOOT (Page 3, 11) : REVERSE SEWING LEVER (Page 24) Push for - Brother International XL-6562 | Users Manual - English - Page 13
SEWING MACHINE CONNAITRE SA MACHINE MODELE DE POINT (Page 14) Tourner dans l'une ou l'autre direction pour selectionner le point désiré E INTERRUPTEUR PRINCIPAL/DE LA LAMPE (Page 7) Sert à mettre la machine sous/hors tension et à allumer/éteindre la lampe d'éclairage. F CONNECTEUR DE LA PEDALE MANUAL/ - Brother International XL-6562 | Users Manual - English - Page 14
foot controller can be used for Model XL-6562, XL-6452, XR46. The above accessories are stored in the flat bed attachment. These accessories have been designed to help complete most sewing tasks. 1 SA107 XA8319-002 2 SA129 X81021-002 3 SA125 X80980-002 3 Optional Accessories 1 Walking Foot - Brother International XL-6562 | Users Manual - English - Page 15
SEWING MACHINE CONNAITRE SA MACHINE peut servir pour le modèle de machine à coudre XL6562, XL-6452, XR-46. Les accessoires mentionnés para la tope para carretes (mediana): X55260-153 Pedal: modelo N Códigos: J00360-051 (110/ (pour les autres pays) 3 Pied quilting 1/4" SA125 (pour les Etats-Unis) - Brother International XL-6562 | Users Manual - English - Page 16
cord. Do not subject the cord to heat. These things may damage the cord and cause fire or electric shock. If the cord or plug is damaged, take the machine to your authorized dealer for repairs before continuing use. • Unplug the power cord if the machine is not to be used for a long period of time - Brother International XL-6562 | Users Manual - English - Page 17
MÁQUINA DE COSER Conexión de los enchufes 1. Conecte la clavija del cordón de alimentación a la máquina. 2. Conecte el enchufe de alimentaci vous électrocuter. • Lorsque vous débranchez la machine, veuillez toujours mettre la machine hors tension en premier. Tenez toujours la fiche pour la retirer - Brother International XL-6562 | Users Manual - English - Page 18
KNOWING YOUR SEWING MACHINE CONNAITRE SA MACHINE A COUDRE CONOZCA SU MÁQUINA DE COSER Main Power/Sewing Light Switch This switch turns the main power/sewing light on or off. 1 Turn on (toward the "I" mark) 2 Turn off (toward the "O" mark) 1 2 Interrupteur principal/de la lampe Cet interrupteur - Brother International XL-6562 | Users Manual - English - Page 19
Foot Controller: Model N This foot controller can be used for Model XL-6562, XL-6452, XR-46. 1 Pédale Lorsque l'on appuie légèrement sur la pédale, la machine modèle de machine à coudre XL6562, XL-6452, XR-46. NOTA (sólo para EE UU): Pedal: modelo N Este pedal puede utilizarse para el modelo de - Brother International XL-6562 | Users Manual - English - Page 20
(bobbin cover, glass, etc.) * Place a level surface under the needle. Replacing the Needle CAUTION • Turn the main power switch to OFF before changing the needle. If the main power is left on and foot controller is stepped on, the machine will start and injury may result. • Use only sewing machine - Brother International XL-6562 | Users Manual - English - Page 21
por la parte superior y los laterales. Tire las agujas que estén dobladas. 1 Espacio paralelo 2 Superficie plana (tapa de la bobina, cristal, etc.) * Coloque la superficie plana debajo de la aguja. Cambio de la aguja ATTENTION • Avant de changer l'aiguille, mettez la machine hors tension. Si la - Brother International XL-6562 | Users Manual - English - Page 22
KNOWING YOUR SEWING MACHINE CONNAITRE SA MACHINE A COUDRE CONOZCA SU MÁQUINA DE COSER Changing the Presser Foot CAUTION • Always turn off the power before changing the presser foot. If the power is on and controller is stepped on, the machine will start and may cause injury. • Always use the - Brother International XL-6562 | Users Manual - English - Page 23
KNOWING YOUR SEWING MACHINE CONNAITRE SA MACHINE A COUDRE CONOZCA SU MÁQUINA DE COSER Flat Bed Attachment The accessories are stored in a compartment under the flat bed attachment cover, which can be opened by flipping it toward you. Plateau Les accessoires sont rangés dans - Brother International XL-6562 | Users Manual - English - Page 24
KNOWING YOUR SEWING MACHINE CONNAITRE SA MACHINE A COUDRE CONOZCA SU MÁQUINA DE COSER XL-6562 1 2 3 4 5 6 7 8 9 10 11 to set the needle in the highest position before selecting the pattern. If the needle is in the down position when the Pattern Selection Dial is turned, the needle, presser foot, or - Brother International XL-6562 | Users Manual - English - Page 25
KNOWING YOUR SEWING MACHINE CONNAITRE SA MACHINE A COUDRE CONOZCA SU MÁQUINA DE COSER XL-6452 XR-46 1 2 3 4 5 6 7 8 9 10 il suffit de tourner le sélecteur de modèles situé sur le côté droit de la machine, dans l'une ou l'autre direction. A la page suivante, vous trouverez une liste des plages - Brother International XL-6562 | Users Manual - English - Page 26
SEWING MACHINE CONNAITRE SA MACHINE A COUDRE CONOZCA SU MÁQUINA DE COSER RECOMMENDED WIDTHS AND LENGTHS FOR STITCHES (Model XL-6562) PATTERN STITCH NAME RECOMMENDED WIDTH [mm(inch)] 1-STEP AUTOMATIC BUTTONHOLE Fixed 2.5 (3/32) SS Fixed 2.5 (3/32) INSTRUCTION MANUAL PAGE 55 42, 63, 65 45, 62, - Brother International XL-6562 | Users Manual - English - Page 27
SEWING MACHINE CONNAITRE SA MACHINE A COUDRE CONOZCA SU MÁQUINA DE COSER RECOMMENDED WIDTHS AND LENGTHS FOR STITCHES (Model XL-6452, XR-46) PATTERN STITCH NAME RECOMMENDED WIDTH [mm(inch)] 1-STEP AUTOMATIC BUTTONHOLE 2.5 (3/32) SS Fixed 2.5 (3/32) INSTRUCTION MANUAL PAGE 55 42, 63, 65 45, 62 - Brother International XL-6562 | Users Manual - English - Page 28
KNOWING YOUR SEWING MACHINE CONNAITRE SA MACHINE A COUDRE CONOZCA SU MÁQUINA DE COSER LONGUEURS ET LARGEURS RECOMMANDEES POUR CHAQUE POINT (Modèle XL-6562) MODÈLE NOM DU POINT LARGEUR RECOMMANDÉE LONGUEUR RECOMMANDÉE (EN MM) (EN MM) BOUTONNIÈRE AUTOMATIQUE EN 1 PHASE POINT DROIT POINT ZIGZAG - Brother International XL-6562 | Users Manual - English - Page 29
KNOWING YOUR SEWING MACHINE CONNAITRE SA MACHINE A COUDRE CONOZCA SU MÁQUINA DE COSER LONGUEURS ET LARGEURS RECOMMANDEES POUR CHAQUE POINT (Modèle XL-6452, XR-46) MODÈLE NOM DU POINT LARGEUR RECOMMANDÉE LONGUEUR RECOMMANDÉE (EN MM) (EN MM) BOUTONNIÈRE AUTOMATIQUE EN 1 PHASE POINT DROIT POINT - Brother International XL-6562 | Users Manual - English - Page 30
YOUR SEWING MACHINE CONNAITRE SA MACHINE A COUDRE CONOZCA SU MÁQUINA DE COSER ANCHOS Y LARGOS RECOMENDADOS PARA CADA PUNTADA (Modelo XL-6562) Fija 2,5 (3/32) SS Fija 2,5 (3/32) SS Fija 2,5 (3/32) SS Fija 2,5 (3/32) PÁGINA DEL MANUAL 56 42, 64, 65 45, 62, 66, 68 46 47 48 46 50 49 53 51 51 42 54 - Brother International XL-6562 | Users Manual - English - Page 31
YOUR SEWING MACHINE CONNAITRE SA MACHINE A COUDRE CONOZCA SU MÁQUINA DE COSER ANCHOS Y LARGOS RECOMENDADOS PARA CADA PUNTADA (Modelo XL-6452, Fija 2,5 (3/32) SS Fija 2,5 (3/32) SS Fija 2,5 (3/32) SS Fija 2,5 (3/32) PÁGINA DEL MANUAL 56 42, 64, 65 45, 62, 66, 68 46 47 48 46 50 49 53 51 42 54 53 - Brother International XL-6562 | Users Manual - English - Page 32
setting does not feed the material. This is used for sewing on a button. The "F" area is used for making a Satin Stitch (a dense zigzag stitch) which can be used in making buttonholes and decorative stitches. The position needed for making the Satin Stitch varies according to the material and thread - Brother International XL-6562 | Users Manual - English - Page 33
KNOWING YOUR SEWING MACHINE CONNAITRE SA MACHINE A COUDRE CONOZCA SU MÁQUINA DE COSER Sélecteur de dans la plage indiqué par A, le tissu n'avancera pas correctement et le tissu ou la machine risque d'être endommagé. Selector de largo de puntada Según la puntada seleccionada, puede ser necesario - Brother International XL-6562 | Users Manual - English - Page 34
KNOWING YOUR SEWING MACHINE CONNAITRE SA MACHINE A COUDRE CONOZCA SU MÁQUINA DE COSER 1 5 64 10 1 STITCH. 1 Stitch width dial CAUTION Do not adjust the stitch width while the needle is in the fabric. Otherwise, the needle or fabric may be damaged. NOTE: When you choose the Straight Stitch or the - Brother International XL-6562 | Users Manual - English - Page 35
YOUR SEWING MACHINE CONNAITRE SA MACHINE A COUDRE CONOZCA SU MÁQUINA DE COSER Reverse Sewing Lever Reverse sewing is used for back tacking and reinforcing seams. To sew in reverse, push the Reverse Sewing Lever in as far as possible and hold in that position while pressing lightly on the foot pedal - Brother International XL-6562 | Users Manual - English - Page 36
KNOWING YOUR SEWING MACHINE CONNAITRE SA MACHINE A COUDRE CONOZCA SU MÁQUINA DE COSER Converting to Free-arm Style Free-arm sewing is convenient for sewing tubular and hard-toreach areas on a garment. To change your machine to the free-arm style, simply lift out the flat bed attachment. 1 Slide the - Brother International XL-6562 | Users Manual - English - Page 37
SEWING MACHINE CONNAITRE SA MACHINE A COUDRE CONOZCA SU MÁQUINA DE COSER THREADING THE MACHINE Winding the Bobbin 1 2 CAUTION • If the thread spool and/or spool cap are set incorrectly, the thread passer le fil dans le guide-fil comme indiqué par les pointillés sur la machine. PRECAUCIÓN • Si el - Brother International XL-6562 | Users Manual - English - Page 38
beginning to sew or manually turning the balance wheel. CAUTION Be sure to follow the process described. If the thread is not cut completely, and the bobbin is wound, when the thread runs low it may tangle around the bobbin and cause the needle to break. CAUTION Setting the bobbin improperly may - Brother International XL-6562 | Users Manual - English - Page 39
YOUR SEWING MACHINE CONNAITRE SA MACHINE áticamente porque la canilla está llena, retire el pie del pedal. PRECAUCIÓN Cuando extraiga la bobina, no presione la base de Si vous n'installez pas correctement la canette, il se peut que la tension du fil se relâche, que l'aiguille casse et que vous vous - Brother International XL-6562 | Users Manual - English - Page 40
YOUR SEWING MACHINE CONNAITRE SA MACHINE A COUDRE CONOZCA SU MÁQUINA DE COSER 1 2 1 2 Lower Threading CAUTION Setting the bobbin improperly may cause the thread tension to loosen, breaking the needle and resulting in injury. 1 Wound evenly 2 Wound poorly CAUTION Be sure to turn off the power. If - Brother International XL-6562 | Users Manual - English - Page 41
SEWING MACHINE CONNAITRE SA MACHINE A COUDRE CONOZCA SU MÁQUINA DE COSER Enfilage inférieur Enhebrado inferior ATTENTION Si vous n'installez pas correctement la canette, il se peut que la tension pisa accidentalmente el pedal y la má luego presione ligeramente en la parte derecha (vea la flecha - Brother International XL-6562 | Users Manual - English - Page 42
the guide above the needle. NOTE: If the thread take-up lever is lowered, the upper thread can not be wrapped around the thread take-up lever. Be sure to raise the Presser Foot Lever and the thread take-up before feeding the upper thread. Incorrectly feeding the thread may cause sewing problems. - Brother International XL-6562 | Users Manual - English - Page 43
YOUR SEWING MACHINE CONNAITRE SA MACHINE A COUDRE no se mueva. El final del hilo debe proceder de la parte inferior del carrete. ATTENTION • Si la bobine et/ou le levier releveur. 2 Releveur de fil 6. Placer le fil derrière le guide-fils, au-dessus de l'aiguille. REMARQUE: Si le releveur de fil est - Brother International XL-6562 | Users Manual - English - Page 44
SEWING MACHINE CONNAITRE SA MACHINE A COUDRE CONOZCA SU MÁQUINA DE COSER 1 2 3 1 2 4 5 6 5 Using Needle Threader Turn power switch to "O". 1. Lower the presser foot lever. 2. Turn the balance wheel toward you (counter-clockwise) to raise the needle holder to the highest position. 1 Needle holder - Brother International XL-6562 | Users Manual - English - Page 45
SEWING MACHINE CONNAITRE SA MACHINE 3 Guide-fil 4 Support du crochet 5. Tenir légèrement le fil et tourner le levier de l'enfileur d'aiguille vers l'avant de la machine la palanca del enhebrador lo máximo posible y gírela hacia la parte trasera de la máquina (en sentido contrario a usted). Asegúrese - Brother International XL-6562 | Users Manual - English - Page 46
YOUR SEWING MACHINE CONNAITRE SA MACHINE A COUDRE CONOZCA SU MÁQUINA DE COSER Drawing Up Lower Thread 1. While lightly holding the end of the upper thread, slowly turn the balance wheel to the front (counter-clockwise) once by hand to lower and then raise the needle. 2. Pull on the upper thread to - Brother International XL-6562 | Users Manual - English - Page 47
SU MÁQUINA DE COSER Twin Needle Sewing Your machine is designed for twin needle sewing, which allows you to sew with two top threads. You can use the same color or two different colors of thread for making decorative stitches. Any of the patterns, except the buttonhole pattern, can be sewn with - Brother International XL-6562 | Users Manual - English - Page 48
the machine near the horizontal spool pin. Place the second spool of thread onto the vertical spool pin as shown in fig. A. TWIN NEEDLE THREADING Each needle should be threaded separately. 1. Threading the Right Needle Follow the same instructions for single needle threading using the thread from - Brother International XL-6562 | Users Manual - English - Page 49
KNOWING YOUR SEWING MACHINE CONNAITRE SA MACHINE A COUDRE CONOZCA SU MÁQUINA DE COSER A 2 1 3 5 4 B 2 6 1 3 C 4 2 1 3 4 5~4~ 3 5~4~ 3 Thread Tension Thread tension will affect the quality of your stitches. It may need to be adjusted when you change fabric or thread type. NOTE: It is - Brother International XL-6562 | Users Manual - English - Page 50
KNOWING YOUR SEWING MACHINE CONNAITRE SA MACHINE A COUDRE CONOZCA SU MÁQUINA DE COSER FABRIC/THREAD/NEEDLE COMBINATIONS Fabric Medium weight fabric Lightweight fabric Heavyweight fabric Stretch fabric Broadcloth Taffeta Flannel, Gabardine Lawn, Batiste Georgette Challis, Satin Denim Corduroy - Brother International XL-6562 | Users Manual - English - Page 51
KNOWING YOUR SEWING MACHINE CONNAITRE SA MACHINE A COUDRE CONOZCA SU MÁQUINA DE COSER COMBINACIONES DE TEJIDO/HILO/AGUJA Tejido Tejido mediano Tejido ligero Tejido pesado Tejido elástico Paño Tafetán Franela, Gabardina - Brother International XL-6562 | Users Manual - English - Page 52
• If stitches become bunched, lengthen the stitch length setting before continuing sewing. Otherwise, the needle may break and cause injury. • Always use the correct presser foot. If the wrong presser foot is used, the needle may strike the presser foot and bend or break, resulting in injury. • When - Brother International XL-6562 | Users Manual - English - Page 53
SEWING 1. Turn the Pattern Selection Dial to show your desired stitch in the Pattern Indication Window. Setting the Pattern Selection Dial to Straight Stitch or Triple Stretch Stitch is required. 2. Raise the needle to its highest position and lift the presser foot lever. 3. Pull the upper thread - Brother International XL-6562 | Users Manual - English - Page 54
needle as a turning point. 3. Lower the presser foot and start sewing in the new direction. FINISHING SEWING Reverse stitching is used to lock the threads sur 1 cm à partir du bord du tissu.Removing the Material from the Machine. CAMBIO DE SENTIDO DE COSTURA 1. Pare la máquina donde quiera cambiar - Brother International XL-6562 | Users Manual - English - Page 55
MACHINE 1. Stop the machine. Raise the needle to its highest position and make sure that the thread take-up lever is also in its highest position. 2. Lift the presser foot and pull the fabric out gently to the left side. 3. Cut both threads with the thread ubicado en la parte izquierda de la - Brother International XL-6562 | Users Manual - English - Page 56
set the stitch length in the "F" range and set the desired stitch width. When sewing a satin stitch, use a slightly loose upper thread tension to produce more beautiful stitches. * If you use the Cler-view Foot define el largo de la puntada en la parte "F", se coserán puntadas tupidas (puntada zigzag - Brother International XL-6562 | Users Manual - English - Page 57
and the Stretch Blind Hem Stitch for stretch fabrics. 1. Both the threads should be the same color as the fabric. 2. Fold back the overlap at the edge. 3. Set the Pattern Selection Dial to Blind Hem Stitch or Stretch Blind Hem Stitch and set the stitch length and width. 4. Sew on the fold as in fig - Brother International XL-6562 | Users Manual - English - Page 58
. 1. Set the Pattern Selection Dial to Shell Tuck Stitch. 2. Sew the fabric on the bias, placing it under the presser foot so that the straight stitches are sewn on the seamline and the zigzag stitches are sewn slightly over the folded edge. 3. This stitch requires a tighter thread tension than - Brother International XL-6562 | Users Manual - English - Page 59
sewing elastic or joining fabric. Each is explained below. Set sewing knitted fabrics. When nylon thread is used, the stitch will not be visible. 1. Place the edge of the two pieces of fabric together and center them under the presser foot. 2. Sew coud, tendre l'élastique de part et d'autre du pied- - Brother International XL-6562 | Users Manual - English - Page 60
Stitch Length F-3 SS Stitch Width 3-5 3-5 These stitches are used for joining two pieces of fabric, for example, when making patchwork. Set the Pattern Selection Dial to Double Action Stitch, Bridging Stitch, etc. BUILT-IN STITCHES POINTS INCLUS PUNTADAS INCORPORADAS Point renforcé Puntada de - Brother International XL-6562 | Users Manual - English - Page 61
as a decorative edging. 1. Set the Pattern Selection Dial to Scallop Stitch. 2. Sew the Scallop Stitch along the edge of the material. 3. If desired, trim around the scallop with scissors to create a scalloped edge. Be careful not to cut the thread. * If you use the Clear-view Foot, it is easy to - Brother International XL-6562 | Users Manual - English - Page 62
Stitch Width 3-5 5 3-5 5 These stitches can be used for making decorative top stitching and for smocking. Set the Pattern Selection Dial to Triangle Stitch, Bead Stitch, etc. * If you use the Satin Stitch Foot, it is easy to see the fabric and to produce more beautiful stitches. BUILT-IN STITCHES - Brother International XL-6562 | Users Manual - English - Page 63
of paper leaving a small space between them. 2. Set the Pattern Selection Dial to Fagoting Stitch or Link stitch. 3. Stitch along the edge, pulling both threads slightly when begin- ning to sew. • Use thicker than normal threads for sewing. 4. After sewing, remove the basting and the paper. Finish - Brother International XL-6562 | Users Manual - English - Page 64
Stitches are useful when sewing stretch materials. 1. Set the Pattern Selection Dial to sewing the Elastic Overlock Stitch, position the fabric so that its edge is on the left of the needle 5 mm (3/16") dado que así permite a la parte derecha (zigzag) de la puntada enganchar la orilla cortada del - Brother International XL-6562 | Users Manual - English - Page 65
Feather Stitch as a decorative top stitch or when hemming blankets, tablecloths or draperies or when embroidering. 1. Set the Pattern Selection Dial to Feather Stitch. 2. Place the fabric right side up and sew 1 cm (3/8") from the edge of the fabric. 3. Trim close to the stitching. This stitch will - Brother International XL-6562 | Users Manual - English - Page 66
3 Button holder 4 Mark on fabric 5 Line on presser foot 6. Hold the upper thread and step down on the foot controller to begin sewing. CAUTION Pulling the thread too strongly may bend or break the needle, and lead to injury. 7. Stitches 1, 2, 3 and 4 are sewn, then stop the machine. BUTTONHOLE AND - Brother International XL-6562 | Users Manual - English - Page 67
újela suavemente hacia la parte trasera de la máquina machine coud les points 1, 2, 3 et 4 puis elle s'arrête. PRECAUCIÓN Si tira del hilo demasiado, puede doblar o romper la aguja y causar lesiones. 7. Las puntadas 1, 2, 3 y 4 se hayan cosido, pare la máquina de coser. BUTTONHOLE AND BUTTON SEWING - Brother International XL-6562 | Users Manual - English - Page 68
do not fit into the button holder plate Add the button diameter to its thickness, then set the buttonhole presser foot scale to this measurement. The Diámetro + grosor (2,5 cm (1")) 6 0,5 cm (3/16") BUTTONHOLE AND BUTTON SEWING COUTURE DE BOUTONNIERES ET DE BOUTONS OJALES Y COSTURA DE BOTONES 57 - Brother International XL-6562 | Users Manual - English - Page 69
sew Straight Stitches to the end of the front bar tack of the buttonhole. 2. Remove the material from the machine. It is recommended that pins be placed across both ends of the buttonhole hasta el final de la línea del remate de la parte delantera. 2. Retire el tejido de la máquina. Se recomienda - Brother International XL-6562 | Users Manual - English - Page 70
enclosed large screwdriver in the + direction. This adjustment allows both sides of the buttonhole to appear uniform. 6 Stitch length dial 7 Buttonhole fine adjusting screw 8 Right row 9 Adjusted stitch BUTTONHOLE AND BUTTON SEWING COUTURE DE BOUTONNIERES ET DE BOUTONS OJALES Y COSTURA DE BOTONES - Brother International XL-6562 | Users Manual - English - Page 71
-. Si la parte derecha es demasiada fina, gire dicho tornillo en el sentido del +. Este ajuste permite que ambos lados del ojal parezcan uniformes. 6 Dial de longitud de puntada 7 Tornillo de ajuste fino de ojal 8 Lado derecho 9 Puntada ajustada BUTTONHOLE AND BUTTON SEWING COUTURE DE BOUTONNIERES - Brother International XL-6562 | Users Manual - English - Page 72
thread and lower thread. 2. Pull the buttonhole lever slightly toward you. 3. Sew about 10 stitches with no fabric, upper thread, or lower thread in the machine. 4. Place the fabric under the presser foot, and set the upper and lower thread . Si se empuja hacia la parte posterior de la máquina la - Brother International XL-6562 | Users Manual - English - Page 73
. 6. Remove the material from the machine. Cut the upper and lower threads and tie both threads at the back of the material. CAUTION Make sure the needle does not strike the button during sewing. The needle may break, leading to injury. BUTTONHOLE AND BUTTON SEWING COUTURE DE BOUTONNIERES ET DE - Brother International XL-6562 | Users Manual - English - Page 74
does not strike the zipper during sewing. If the needle strikes the zipper, the needle may break, leading to injury. Gathering Pattern Stitch Length 4 1. Set the Pattern Selection Dial to Straight Stitch. 2. Loosen the tension of the upper thread so that the lower thread lies on the underside of - Brother International XL-6562 | Users Manual - English - Page 75
de la fermeture à glissière. 5. Cuesa a partir de la parte inferior de la cremallera hacia la parte superior, por ambos lados. Para mejores resultados, se debe colocar la de modèle de point sur le point droit. 2. Relâcher la tension du fil supérieur afin que le fil inférieur reste tendu à l'envers - Brother International XL-6562 | Users Manual - English - Page 76
needle plate as shown in fig. A. Connect the power supply plug into a wall outlet. 2. Set the Pattern Selection Dial to Straight Stitch. 3. Place the portion to be darned under the presser foot together with a fabric for reinforcement. 4. Lower the presser foot. 5. Begin sewing la parte de - Brother International XL-6562 | Users Manual - English - Page 77
. 4. Remove the basting, if necessary. * If you use the Clear-view Foot, it is easy to see the fabric and to produce more beautiful stitches. NOTE CAUTION Be careful that the needle does not strike a basting pin during sewing. Striking a pin can cause the needle to break, resulting in injury. - Brother International XL-6562 | Users Manual - English - Page 78
Stitch Length Stitch Width Any Any Foot None PREPARING FOR MONOGRAMMING AND EMBROIDERING 1. Remove the power supply plug from the outlet. And place the darning plate on the needle plate as shown in fig. A. Connect the power supply plug into a wall outlet. 2. Set the Pattern Selection Dial to the - Brother International XL-6562 | Users Manual - English - Page 79
rieur. 5. Placer l'ouvrage sous l'aiguille et abaisser la barre sans pied du piedde-biche. 6. Tirer le fil inférieur à travers l'ouvrage, au point de départ. Pour ce faire, tourner le volant vers soi et piquer quelques points de maintien. 7. Saisir le tambour des deux mains, avec le pouce et l'index - Brother International XL-6562 | Users Manual - English - Page 80
the connecting lever to the needle clamp, install the walking foot to the presser bar. (See fig B) 5. Lower the presser foot lever and then tighten the accessory presser bar holder fixing screw. (See fig.C) 1 Forked part of operation lever 2 Presser bar holder 1 Use a screwdriver CAUTION • Use the - Brother International XL-6562 | Users Manual - English - Page 81
Support de la barre du pied 1 Utiliser un tournevis ATTENTION • Utilisez le tournevis pour bien serrer la vis. Si la vis n'est pas suffisamment serrée, l'aiguille risque de toucher le pied-debiche et de vous blesser. • N'oubliez pas de faire tourner le volant vers l'avant de la machine parte - Brother International XL-6562 | Users Manual - English - Page 82
machine quilting. 1. Remove the power supply plug from the outlet. 2. Raise the needle and the presser foot. 3. Loosen the presser foot screw to remove the presser foot holder. (See fig.A) 4. Attach the quilting foot, making sure that part indicated by A in the illustration is above the needle clamp - Brother International XL-6562 | Users Manual - English - Page 83
quilts avec effet de ressort sert à repriser ou à assembler librement des bouts de tissu à la machine Utilisez le tournevis pour bien serrer la vis du support de piedde-biche. Si la vis n'est pas . • Gire la rueda de graduación hacia la parte delantera de la máquina de coser para comprobar que - Brother International XL-6562 | Users Manual - English - Page 84
ACCESSORIES Using the 1/4-Inch Quilting Foot Pattern (Straight Stitch) Stitch Length 2-2.5 Stitch Width 2.5 (center) The 1/4-Inch Quilting Foot is used to sew fixed seam allowance 6.5 mm (1/4") when piecing together a quilt. (See fig.A) 1. Set the Pattern Selection Dial to Straight Stitch. Set - Brother International XL-6562 | Users Manual - English - Page 85
de point sur 2,5 (au centre). 2. Remplacer le pied-de-biche par le pied quilting 1/4". 1 Marge de couture (6,5 mm) 3. Placer le pied sur le tissu et coudre coser costuras con una anchura fija de 6,5 mm (1/4") al juntar las partes de un acolchado (véase fig. A). 1. Sitúe el selector de puntadas - Brother International XL-6562 | Users Manual - English - Page 86
burns, give the light bulb time to cool before changing it. 1. Remove the power supply plug from the outlet. 2. Loosen the screw on the reverse side of sewing head as shown in fig. A. 3. Remove the light cover from the machine as illustrated in fig. A. 4. Replace the sewing light bulb. (See fig - Brother International XL-6562 | Users Manual - English - Page 87
changer l'ampoule, mettez la machine hors tension et débranchez-la. Si la machine est sous tension lorsque l'ampoule est changée, une podrá sufrir una descarga eléctrica. Si la máquina está enchufada y pisa el pedal, podría hacerse daño. • Para evitar quemaduras, deje enfriar la bombilla antes de - Brother International XL-6562 | Users Manual - English - Page 88
to unplug the machine before cleaning it. Otherwise, electric shock or injury may result. 1. Remove the power supply plug from the outlet. 2. Raise the needle and the presser foot. 3. Loosen the presser foot screw and the needle clamp screw to remove the presser foot holder and the needle. (See fig - Brother International XL-6562 | Users Manual - English - Page 89
de fixation de l'aiguille afin de pouvoir déposer le support du pied-de-biche et l'aiguille. Voir fig. de la plaque d'aiguille est inséré dans la machine. Soulever légèrement l'arrière de la plaque d' PRECAUCIÓN Gire la rueda de graduación hacia la parte delantera de la máquina. Si gira la rueda en - Brother International XL-6562 | Users Manual - English - Page 90
PERFORMANCE CHECK LIST Whenever sewing difficulties are encountered, review the section in this instruction manual that details the operation you are performing to make sure you are correctly using the machine. If the problem continues, the following check list may help you to improve the operation. - Brother International XL-6562 | Users Manual - English - Page 91
NEEDLE BREAKS MACHINE IS MACHINE DOES NOISY OR SLOW NOT START Stitch Length Dial is set at no feeding. ("0") Needle is not correctly inserted. Lint is clinging to the bottom of the needle plate. Power supply plug is removed from outlet. Page 21 No The combination of needle size/thread - Brother International XL-6562 | Users Manual - English - Page 92
sent manuel pour s'assurer de la bonne utilisation de la machine. Si le problème persiste, la liste de vérification vous mettre en contact avec le service technique agréé le plus proche. est emmêlé. L'aiguille est mal installée. Mauvaise tension des fils. Le fil est trop tendu. Page - Brother International XL-6562 | Users Manual - English - Page 93
les griffes entraîner le tissu sans le tirer. Page 32 Non Non Le levier des boutonnières est poussé vers l'arrière de la machine. Page 56 Non Page 28 Non La pédale n'est pas utilisée correctement. Page 8 Non CONTACTER LE CENTRE TECHNIQUE LE PLUS PROCHE 82 - Brother International XL-6562 | Users Manual - English - Page 94
LISTADO DE POSIBLES INCIDENCIAS Cada vez que encuentre dificultades al coser, vuelva a consultar la parte de este manual de instrucciones que detalla la operación que está realizando, para comprobar que usa correctamente la máquina. Si el problema persiste, el siguiente listado le puede - Brother International XL-6562 | Users Manual - English - Page 95
solos. No tire del tejido. Página 32 No No La palanca de ojales está colocada hacia atrás. Página 28 No No se usa bien el pedal Página 8 No Página 56 No PONGASE EN CONTACTO CON EL SERVICIO TECNICO LOCAL 84 - Brother International XL-6562 | Users Manual - English - Page 96
, XL-6562 Model XR-46 Repacking the Machine Keep the carton and packing materials for future use. It may become necessary to reship the machine. Improper packing or improper packing material could result in damage during shipping. Instructions for repacking the machine are illustrated. * Hard case - Brother International XL-6562 | Users Manual - English - Page 97
51 Triple Stretch Stitch 42 Triple Zigzag Stretch Stitch 54 Troubleshooting 79 Twin Needle Sewing 36 U Upper Tension Control Dial 38 Upper Threading 31 Using Neadle Threader 33 W Walking Foot 3, 69 Winding the Bobbin 26 Z Zigzag Presser Foot 3, 11 Zigzag Stitch 45, 62, 66, 67 Zipper - Brother International XL-6562 | Users Manual - English - Page 98
la pedale du rheostat 6 Coursière 78 Couture avec l'aiguille jumelée 36 Crochet de la navette 78 D Devidoir 26 E Emballage de la machine 85 Enfilage inférieur 30 Enfileur 34 Equilibrage des boutonnières 60 F Fenetre d'indication du modele de point 14 Feston 50 Feston double 51 G Guide de - Brother International XL-6562 | Users Manual - English - Page 99
Palanca del prensatelas 32 Pata de cremalleras 4, 64 Patchwork 52 Pedal 8 Pie caminante 4, 70 Pista de la lanzadera 78 Plataforma 65 Puntada triángulo 51 Puntada zigzag 45, 62, 66, 68 R Receptáculo del pedal 6 S Selector de ancho de puntada 23 Selector de largo de puntada 14, 22 Selector
-
 1
1 -
 2
2 -
 3
3 -
 4
4 -
 5
5 -
 6
6 -
 7
7 -
8
-
9
-
10
-
11
-
12
-
13
-
14
-
15
-
16
-
17
-
18
-
19
-
20
-
21
-
22
-
23
-
24
-
25
-
26
-
27
-
28
-
29
-
30
-
31
-
32
-
33
-
34
-
35
-
36
-
37
-
38
-
39
-
40
-
41
-
42
-
43
-
44
-
45
-
46
-
47
-
48
-
49
-
50
-
51
-
52
-
53
-
54
-
55
-
56
-
57
-
58
-
59
-
60
-
61
-
62
-
63
-
64
-
65
-
66
-
67
-
68
-
69
-
70
-
71
-
72
-
73
-
74
-
75
-
76
-
77
-
78
-
79
-
80
-
81
-
82
-
83
-
84
-
85
-
86
-
87
-
88
-
89
-
90
-
91
-
92
-
93
-
94
-
95
-
96
-
97
-
98
-
99
 |
 |

"IMPORTANT SAFETY INSTRUCTIONS"
When using this machine, basic safety precautions should always be taken ,
including the following:
"Read all instructions before using."
DANGER –
To reduce the risk of electric shock:
1. The machine should never be left unattended when plugged in. Always unplug this machine from the electrical outlet
immediately after using and before cleaning.
2.
Always unplug before changing the light bulb.
Replace bulb with same type rated 15 watts.
WARNING –
To reduce the risk of burns, fire, electric shock, or injury to persons:
1.
Do not allow this machine to be used as a toy. Close attention is necessary when the machine is used by or near children.
2.
Use this machine only for its intended use as described in this manual. Use only accessories recommended by the
manufacturer as contained in this manual.
3.
Never operate this machine if it has a damaged cord or plug, if it is not working properly, if it has been dropped or damaged,
or dropped into water. Return the machine to the nearest authorized dealer or service center for examination, repair,
electrical or mechanical adjustment.
4.
Never operate the machine with any air openings blocked. Keep ventilation openings of the machine and foot control free
from the accumulation of lint, dust, and loose cloth.
5.
Never drop or insert any object into any opening.
6.
Do not use outdoors.
7.
Do not operate where aerosol (spray) products are being used or where oxygen is being administered.
8.
To disconnect, turn the main switch to the symbol “O” position which represents off, then remove plug from outlet.
9.
Do not unplug by pulling on cord. To unplug, grasp the plug, not the cord.
10. Keep fingers away from all moving parts. Special care is required around the machine needle.
11. Always use the proper needle plate. The wrong plate can cause the needle to break.
12. Do not use bent needles.
13. Do not pull or push fabric while stitching. It may deflect the needle causing it to break.
14. Switch the machine to the symbol “O” position
when making any adjustments in the needle area, such as threading
needle, changing needle, threading bobbin, or changing the presser foot, and the like.
15.
Always unplug the machine from the electrical outlet when removing covers, lubricating, or when making any of the user
service adjustments mentioned in the instruction manual.
16. The machine is not intended for use by young children or infirm persons without supervision.
17. Young children should be supervised to ensure that do not play with this machine.
"SAVE THESE INSTRUCTIONS"
"This machine is intended for household use."