Brother International BES-100E BE-100 Workbook - English - Page 112
Troubleshooting
 |
View all Brother International BES-100E manuals
Add to My Manuals
Save this manual to your list of manuals |
Page 112 highlights
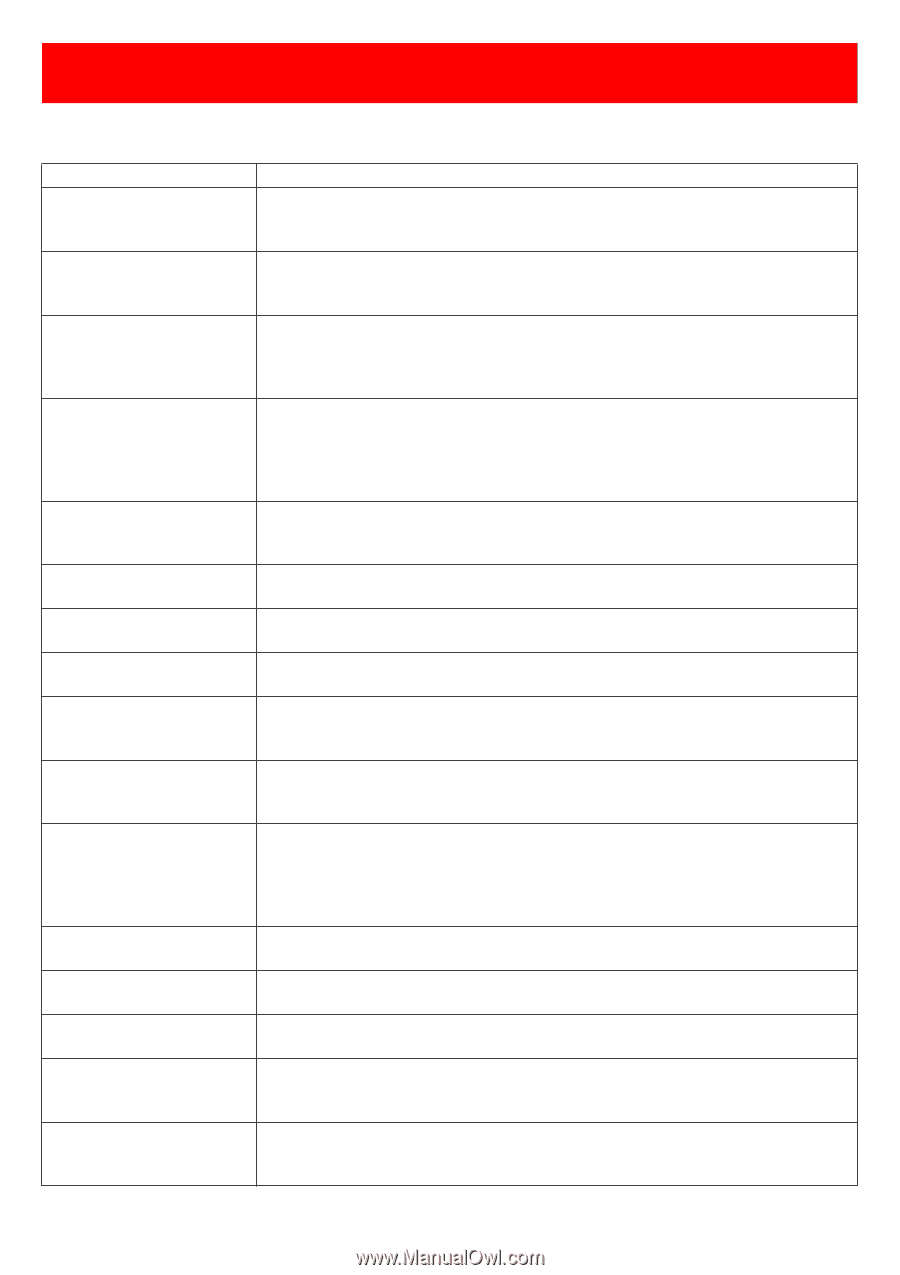
Troubleshooting s Thread breaks Cause Incorrect position of hook retaining finger Holding loose end of thread during start-up Thread color Excessive friction Bruised cone Using tape to tie off loose thread ends Old, dry thread Too tight or inconsistent twist on the thread Lint build-up in tension discs, throat plate or bobbin case Build-up of thread behind hook Incorrect needle depth Improper timing Trimmer mechanism not working properly Needle too close to hole in throat plate Too much or incorrect adhesive spray Bent needle tip Action If the hook is set too close to the needle or the retaining finger is bent, the thread can't pass through. Make adjustment in position or replace bent retaining finger. Pulling the thread too tight and either wrapping it around the holding disc or holding it in your hand causes the needle to bend and the needle and/or thread to break. Some colors are more susceptible to thread breaks than others due to the amount of chemical processing involved. For example, some dark colors require more or stronger dye solutions, which place increased stress on the thread. Replace thread. Increased friction between the needle and thick or abrasive fabrics or backings can cause the needle to heat up, breaking the thread. This can also happen on fabric or backings with excessive chemical coatings or treatments. Reduce machine speed, use a Teflon-coated needle, apply silicone spray to the thread or re-punch the design with longer stitch lengths. Bruising occurs when thread cones fall on the floor, causing the lower windings to loosen and catch as the thread spools off. Pull off the affected portion of the thread or replace the cone. Tape leaves a residue that causes friction and breaks. Pull off the affected portion and don't use tape. Replace thread. Thread becomes brittle with age and prolonged exposure to light, air, and heat. Store new thread in a cool, dark place. Replace cone of thread. Clean these areas with canned air or a brush. Using a brush or tweezers, remove thread build-up on the hook shaft. In severe cases, the build-up may push the hook out of alignment and affect timing. If this happens, remove the hook, clean the area and reset the timing. Commonly occurring after hitting the hoop or throat plate, this problem shows up when the thread splits and one ply continues to sew while the other peels back. The thread eventually breaks, leaving previous stitching thinned out. Reset needle depth, and possibly timing, according to machine instructions. Also check for needle damage. This causes many problems, such as broken needles, poor stitching (or no stitching) in addition to thread breaks. Thread ends may not be cut cleanly or thread ends may be cut too short, activating your machine's thread break detectors. Adjust trimmers This causes thread to fray and eventually break. Adjust throat plate and/or needle position. Use only spray adhesives designed for embroidery applications-and use sparingly! Excess adhesive build-up on needles causes them to drag and break threads. Replace the needle and examine your adhesive application technique. Usually happens after the needle hits an impenetrable object (hoop, throat plate, hook). Replace the needle. (Also check the hook for burrs and the timing after hitting a hard object.) 109
-
 1
1 -
2
-
3
-
4
-
5
-
6
-
7
-
8
-
9
-
10
-
11
-
12
-
13
-
14
-
15
-
16
-
17
-
18
-
19
-
20
-
21
-
22
-
23
-
24
-
25
-
26
-
27
-
28
-
29
-
30
-
31
-
32
-
33
-
34
-
35
-
36
-
37
-
38
-
39
-
40
-
41
-
42
-
43
-
44
-
45
-
46
-
47
-
48
-
49
-
50
-
51
-
52
-
53
-
54
-
55
-
56
-
57
-
58
-
59
-
60
-
61
-
62
-
63
-
64
-
65
-
66
-
67
-
68
-
69
-
70
-
71
-
72
-
73
-
74
-
75
-
76
-
77
-
78
-
79
-
80
-
81
-
82
-
83
-
84
-
85
-
86
-
87
-
88
-
89
-
90
-
91
-
92
-
93
-
94
-
95
-
96
-
97
-
98
-
99
-
100
-
101
-
102
-
103
-
104
-
105
-
106
-
 107
107 -
 108
108 -
 109
109 -
 110
110 -
 111
111 -
 112
112 -
 113
113 -
 114
114 -
 115
115 -
 116
116 -
 117
117 -
118
-
119
 |
 |