Brother International BES-100E BE-100 Workbook - English - Page 27
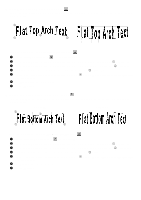
Using the Double Arch Text tool, Using the Single Arch Text tool
 |
View all Brother International BES-100E manuals
Add to My Manuals
Save this manual to your list of manuals |
Page 27 highlights
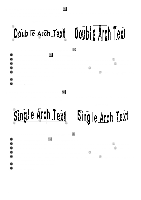
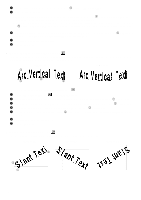
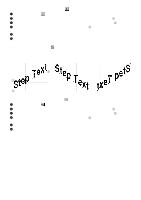
s Using the Double Arch Text tool ( ) This tool arranges text inside an outline that is arched on both the top and bottom. The arches bow in opposite directions and can bow either in or out. Figure 32 Figure 33 3 4 1 2 To create a text shape using the Double Arch Text tool ( ): 1 Click the Double Arch Text tool ( ) in the Lettering palette. 2 Click in the design area to specify the desired location for the left end of the baseline (1 in figure 32). 3 Click in the design area to specify the desired location for the right end of the baseline (2 in figure 32). 4 Click above the baseline to specify the desired height of the text (3 in figure 32). 5 Drag the lower arch of the outline until the arches have the desired curve (4 in figure 32). The Text tab of the Text Properties dialog box appears. 6 In the Text box, type the desired text. 7 Click the OK button. s Using the Single Arch Text tool ( ) This tool arranges text inside an outline that is arched on both the top and bottom. The arches bow in the same direction and can bow either up or down. Figure 34 Figure 35 3 4 1 2 To create a text shape using the Single Arch Text tool ( ): 1 Click the Single Arch Text tool ( ) in the Lettering palette. 2 Click in the design area to specify the desired location for the left end of the baseline (1 in figure 34). 3 Click in the design area to specify the desired location for the right end of the baseline (2 in figure 34). 4 Click above the baseline to specify the desired height of the text (3 in figure 34). 5 Drag the lower arch of the outline until the arches have the desired curve (4 in figure 34). The Text tab of the Text Properties dialog box appears. 6 In the Text box, type the desired text. 7 Click the OK button. 24
-
 1
1 -
2
-
3
-
4
-
5
-
6
-
7
-
8
-
9
-
10
-
11
-
12
-
13
-
14
-
15
-
16
-
17
-
18
-
19
-
20
-
21
-
 22
22 -
 23
23 -
 24
24 -
 25
25 -
 26
26 -
 27
27 -
 28
28 -
 29
29 -
 30
30 -
 31
31 -
 32
32 -
33
-
34
-
35
-
36
-
37
-
38
-
39
-
40
-
41
-
42
-
43
-
44
-
45
-
46
-
47
-
48
-
49
-
50
-
51
-
52
-
53
-
54
-
55
-
56
-
57
-
58
-
59
-
60
-
61
-
62
-
63
-
64
-
65
-
66
-
67
-
68
-
69
-
70
-
71
-
72
-
73
-
74
-
75
-
76
-
77
-
78
-
79
-
80
-
81
-
82
-
83
-
84
-
85
-
86
-
87
-
88
-
89
-
90
-
91
-
92
-
93
-
94
-
95
-
96
-
97
-
98
-
99
-
100
-
101
-
102
-
103
-
104
-
105
-
106
-
107
-
108
-
109
-
110
-
111
-
112
-
113
-
114
-
115
-
116
-
117
-
118
-
119
 |
 |