Brother International BES-100E BE-100 Workbook - English - Page 5
Getting Started - key
 |
View all Brother International BES-100E manuals
Add to My Manuals
Save this manual to your list of manuals |
Page 5 highlights
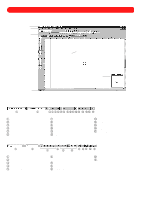
Getting Started Chapter 1: General Information IMPORTANT INFORMATION: PLEASE READ BEFORE STARTING EXERCISES. s Creating a new file To create a new file containing an empty design area: 1 On the File drop-down menu, click New. The Design Info dialog box appears. NOTE: A new file can also be created by clicking the New button ( ) in the Ribbon bar. 2 Specify the desired settings for the new file. 3 Click the OK button. A new blank design area appears. NOTE: To open a design from the "Sample" folder and edit it, see chapter 27. s Resuming a halted exercise If you hear a "beep-beep" sound and are not able to continue the exercise, a punchpoint may have been misplaced somewhere in the design area. Press the Backspace key to delete this point. If there are several misplaced punchpoints, continue pressing the Backspace key until all misplaced punchpoints are deleted and you are able to continue with the exercise. s Zooming To enlarge (zoom in on) a specific area of the design: 1 Click the Zoom tool ( ) in the Stock toolbar. 2 Move the pointer near the area to be enlarged, and then, while holding down the left mouse button, drag the pointer over the desired area. 3 Release the left mouse button when the area to be enlarged is enclosed in the zoom selection box. To enlarge the design (zoom in): x Click the Zoom In button ( ) in the Ribbon bar. To reduce the design (zoom out): x Click the Zoom Out button ( ) in the Ribbon bar. s Displaying the entire design To display the entire design (for example, after zooming in or scrolling through it): x On the Zoom drop-down menu, click Fit to Window. 2
-
 1
1 -
 2
2 -
 3
3 -
 4
4 -
 5
5 -
 6
6 -
 7
7 -
 8
8 -
 9
9 -
 10
10 -
 11
11 -
12
-
13
-
14
-
15
-
16
-
17
-
18
-
19
-
20
-
21
-
22
-
23
-
24
-
25
-
26
-
27
-
28
-
29
-
30
-
31
-
32
-
33
-
34
-
35
-
36
-
37
-
38
-
39
-
40
-
41
-
42
-
43
-
44
-
45
-
46
-
47
-
48
-
49
-
50
-
51
-
52
-
53
-
54
-
55
-
56
-
57
-
58
-
59
-
60
-
61
-
62
-
63
-
64
-
65
-
66
-
67
-
68
-
69
-
70
-
71
-
72
-
73
-
74
-
75
-
76
-
77
-
78
-
79
-
80
-
81
-
82
-
83
-
84
-
85
-
86
-
87
-
88
-
89
-
90
-
91
-
92
-
93
-
94
-
95
-
96
-
97
-
98
-
99
-
100
-
101
-
102
-
103
-
104
-
105
-
106
-
107
-
108
-
109
-
110
-
111
-
112
-
113
-
114
-
115
-
116
-
117
-
118
-
119
 |
 |