Brother International BES-100E BE-100 Workbook - English - Page 64
Opening a non-DOS file, Displaying multiple files at the same time, Outputting a design
 |
View all Brother International BES-100E manuals
Add to My Manuals
Save this manual to your list of manuals |
Page 64 highlights
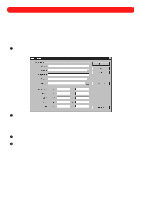
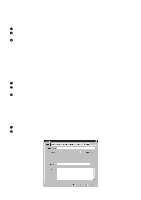
NOTE: To view thumbnails of the files, click the Thumbnails button. The Thumbnails dialog box appears. To view thumbnails of files in a different folder, click the Browse button. The Browse for Folder dialog box appears. Select the desired folder, and then click the OK button. To search for a specific file in the design library, click the Search Library button. The Search Library dialog box appears. For more information about this dialog box, see Searching the design library in chapter 28. For information about opening a file that is not in a DOS format, see Opening non-DOS files below. 4 Click the Open button. NOTE: Stitch files can also be opened by clicking Open on the File drop-down menu, then selecting "All Files (*.*)" in the Files of type drop-down list. All DOS-based files saved in the selected folder, including stitch files, are displayed. s Opening a non-DOS file To open a file that is not in a DOS format (.fdr, .fmc, .zsk, and .bes): 1 On the File drop-down menu, click Open or Open Stitch File. Either the Open or the Open Stitch File dialog box appears. 2 Click the Non-Dos Data button. The Non-Dos Data tab of the Open Stitch File dialog box appears. 3 In the Drive drop-down list, select the drive containing the desired file. 4 In the Data Type drop-down list, select the format for the file that you wish to open. 5 In the list below the Drive drop-down list, select the desired file 6 Click the OK button. NOTE: Since the computer is DOS-formatted, non-DOS designs cannot be on the computer's hard disk. Opening a non-DOS design in BE-100, then saving the file on the hard disk automatically saves the file in the .bdf format. s Displaying multiple files at the same time To display multiple open files at the same time: 1 Open all of the files that you wish to display at the same time. 2 On the Window drop-down menu, click Tile. All open files are tiled within the window. NOTE: To display the entire design within a window, click the title bar of the window, and then click Fit to Window on the Zoom drop-down menu. s Outputting a design To output a design: 1 Insert a floppy disk into the floppy disk drive of your computer. 2 On the File drop-down menu, click Output Design. The Output Design dialog box appears. NOTE: A design can also be output by clicking the Output Design button ( ) in the Ribbon bar. 3 In the Machine drop-down list on the General tab, select the type of machine on which the design will be sewn. 4 In the File name box, type the desired file name. 5 Click the OK button. 61
-
 1
1 -
2
-
3
-
4
-
5
-
6
-
7
-
8
-
9
-
10
-
11
-
12
-
13
-
14
-
15
-
16
-
17
-
18
-
19
-
20
-
21
-
22
-
23
-
24
-
25
-
26
-
27
-
28
-
29
-
30
-
31
-
32
-
33
-
34
-
35
-
36
-
37
-
38
-
39
-
40
-
41
-
42
-
43
-
44
-
45
-
46
-
47
-
48
-
49
-
50
-
51
-
52
-
53
-
54
-
55
-
56
-
57
-
58
-
 59
59 -
 60
60 -
 61
61 -
 62
62 -
 63
63 -
 64
64 -
 65
65 -
 66
66 -
 67
67 -
 68
68 -
 69
69 -
70
-
71
-
72
-
73
-
74
-
75
-
76
-
77
-
78
-
79
-
80
-
81
-
82
-
83
-
84
-
85
-
86
-
87
-
88
-
89
-
90
-
91
-
92
-
93
-
94
-
95
-
96
-
97
-
98
-
99
-
100
-
101
-
102
-
103
-
104
-
105
-
106
-
107
-
108
-
109
-
110
-
111
-
112
-
113
-
114
-
115
-
116
-
117
-
118
-
119
 |
 |