Brother International BES-100E BE-100 Workbook - English - Page 90
is needed.
 |
View all Brother International BES-100E manuals
Add to My Manuals
Save this manual to your list of manuals |
Page 90 highlights
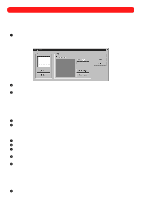
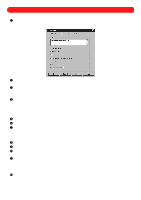
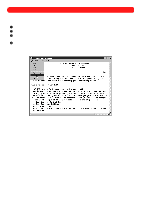
G Click the OK button. The text appears around the bells. NOTE: To display the entire design, click Fit to Window on the Zoom drop-down menu. To adjust the kerning (the spacing between characters) for the entire text: H Using the Move tool ( ), select only the text shape. "Dancing ants" (moving dashes) appear around it. I Click the Text Effects button ( appears. ) in the Text bar. The Text Effects tab of the Text Properties dialog box J In the Character kerning group box, select Custom, and then type "90%" in the Custom box. To adjust the kerning between specific characters: K Click the Reshape tool ( ), and then hold down the Shift key and click the magenta kerning handles between the "C" and "A", and between the "A" and "T" of "CATERING". The kerning handles change to light pink. L Move the pointer over a selected kerning handle, and then drag it to the left to bring the characters closer together. M Click the Reshape tool ( ), and then click the kerning handle between the "E" and "R" of "CATERING". The kerning handle changes to light pink. N Turn on Num Lock, and then press the number key 6 of the numeric keypad three or four times to nudge the kerning handle to the right and move the characters further apart. NOTE: Instead of dragging the kerning handle, the handle is nudged since only a small amount of space is needed. To output the design: O Insert a floppy disk into the floppy disk drive of your computer. P On the File drop-down menu, click Output Design. The Output Design dialog box appears. NOTE: A design can also be output by clicking the Output Design button ( ) in the Ribbon bar. Q In the Machine drop-down list on the General tab, select "Brother". R In the File name box, type "wedbel". S Click the OK button. The design is saved on the floppy disk as a .dst file (a stitch file), which is a file format that the machine can read. NOTE: To save this design as a .bdf file (which can be edited), click Save As on the File drop-down menu. The Save As dialog box appears. Select the "DESIGNS" folder of the "BES" folder in the Save in drop-down list, type "Wedding Bell Catering" in the File name box, select "BES Files (*.bdf)" in the Save as type drop-down list, and then click the Save button. 87
-
 1
1 -
2
-
3
-
4
-
5
-
6
-
7
-
8
-
9
-
10
-
11
-
12
-
13
-
14
-
15
-
16
-
17
-
18
-
19
-
20
-
21
-
22
-
23
-
24
-
25
-
26
-
27
-
28
-
29
-
30
-
31
-
32
-
33
-
34
-
35
-
36
-
37
-
38
-
39
-
40
-
41
-
42
-
43
-
44
-
45
-
46
-
47
-
48
-
49
-
50
-
51
-
52
-
53
-
54
-
55
-
56
-
57
-
58
-
59
-
60
-
61
-
62
-
63
-
64
-
65
-
66
-
67
-
68
-
69
-
70
-
71
-
72
-
73
-
74
-
75
-
76
-
77
-
78
-
79
-
80
-
81
-
82
-
83
-
84
-
 85
85 -
 86
86 -
 87
87 -
 88
88 -
 89
89 -
 90
90 -
 91
91 -
 92
92 -
 93
93 -
 94
94 -
 95
95 -
96
-
97
-
98
-
99
-
100
-
101
-
102
-
103
-
104
-
105
-
106
-
107
-
108
-
109
-
110
-
111
-
112
-
113
-
114
-
115
-
116
-
117
-
118
-
119
 |
 |