Brother International Entrepreneur PR-650 Users Manual - English - Page 224
Hooping techniques
 |
View all Brother International Entrepreneur PR-650 manuals
Add to My Manuals
Save this manual to your list of manuals |
Page 224 highlights
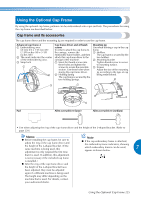
APPENDIX 2. Cut-away stabilizer is excellent for medium- to heavyweight knits, however it can also be used on woven material. It will hold a large number of stitches and with two or three layers can hold a tremendous amount of stitches. This type of backing is also available in black for those who want the inside of their garments to look as good as the outside. Black stabilizer is very useful on similarly colored garments of lightweight fabrics. The black backing is less likely to show through as compared to white backing. 3. Self-adhesive (peel-and-stick) backing is used on those difficult-to-hoop fabrics. This backing is applied (with sticky side up) to the underside of the frame, enabling your fabric to "stick on" the exposed surface in the embroidery area. When the embroidery is finished, the fabric can be removed, the excess backing can be disposed of and the process repeated. 4. Tear-away stabilizer can be used on mediumweight woven fabrics and sturdy fabrics such as canvas, poplin and denim. This stabilizer will hold many stitches especially when used in two or more layers. This type of stabilizer is made of a non-woven material that enables it to easily be torn away from the edges of your embroidery design when it is completed. This stabilizer is also available in black. 5. Water-soluble stabilizer is useful when you need to keep the nap or pile, for example, on towels, from interfering with the placement of stitches. Fabrics such as terry cloth, corduroy, velvet and faux fur are examples of materials that have a nap or pile that can actually penetrate embroidery stitches as your machine sews. The result is an unfinished and often sloppy appearance when fibers of the fabric poke out between the finished stitches of an embroidery design. In these situations, watersoluble stabilizer is used as a topping to hold the fibers of the fabric flat so the stitches can be placed on top neatly and accurately. Watersoluble stabilizer is also used as a backing when stitching lace or other motifs where the desired result is only the stitching. This is accomplished with water-soluble stabilizer, which can easily be pulled off of the fabric after embroidering is completed and any remnants can easily be dissolved with water. Watersoluble stabilizer is also used as a backing on towels, where you often need some stabilization, but any remnants of a formal backing must not be visible in the finished product. Hooping techniques "Use the right tool for the right job" is a statement many of us have heard throughout the years. This statement holds true even in the embroidery industry. The wrong size or type of embroidery frame may result in poor design alignment during sewing or damage the product altogether. You can take a perfectly created design and ruin the final results by simply not using the correct frame size, type or technique designed for its application. ■ Frame Basics Tubular frames: This type of frame allows tubular fabric or pre-assembled garments to be placed around the hook assembly. It allows embroidering of the front of a garment without stitching through the back of it. Cap frames: These are specialized embroidery frames (hoops) designed to hold caps for embroidering. They are available in a variety of styles for various machines, with two basic styles: one that allows sewing a flattened cap (for use on a flat machine) or one that allows sewing the cap in its natural curved shape (for use on a tubular machine). Hooping fabric: The framed fabric and backing should be perfectly flat and free of wrinkles or bubbles. If there are bubbles or wrinkles that must be removed, be sure that you pull on the fabric and backing together. Pull no more than is necessary to make the fabric flat and smooth. Overstretching the fabric during this process may cause puckers around the finished design when the frame is removed. Gaps may also be generated between design parts. Inner/outer frame positioning: There should be a slight ridge (3 mm (1/8 inch)) of fabric and backing below the outer frame on the back side. Tighten the screw only if the inner frame feels loose. Avoid overtightening the screw as this will cause puckers in the fabric and may "strip" the screw. 222
-
 1
1 -
2
-
3
-
4
-
5
-
6
-
7
-
8
-
9
-
10
-
11
-
12
-
13
-
14
-
15
-
16
-
17
-
18
-
19
-
20
-
21
-
22
-
23
-
24
-
25
-
26
-
27
-
28
-
29
-
30
-
31
-
32
-
33
-
34
-
35
-
36
-
37
-
38
-
39
-
40
-
41
-
42
-
43
-
44
-
45
-
46
-
47
-
48
-
49
-
50
-
51
-
52
-
53
-
54
-
55
-
56
-
57
-
58
-
59
-
60
-
61
-
62
-
63
-
64
-
65
-
66
-
67
-
68
-
69
-
70
-
71
-
72
-
73
-
74
-
75
-
76
-
77
-
78
-
79
-
80
-
81
-
82
-
83
-
84
-
85
-
86
-
87
-
88
-
89
-
90
-
91
-
92
-
93
-
94
-
95
-
96
-
97
-
98
-
99
-
100
-
101
-
102
-
103
-
104
-
105
-
106
-
107
-
108
-
109
-
110
-
111
-
112
-
113
-
114
-
115
-
116
-
117
-
118
-
119
-
120
-
121
-
122
-
123
-
124
-
125
-
126
-
127
-
128
-
129
-
130
-
131
-
132
-
133
-
134
-
135
-
136
-
137
-
138
-
139
-
140
-
141
-
142
-
143
-
144
-
145
-
146
-
147
-
148
-
149
-
150
-
151
-
152
-
153
-
154
-
155
-
156
-
157
-
158
-
159
-
160
-
161
-
162
-
163
-
164
-
165
-
166
-
167
-
168
-
169
-
170
-
171
-
172
-
173
-
174
-
175
-
176
-
177
-
178
-
179
-
180
-
181
-
182
-
183
-
184
-
185
-
186
-
187
-
188
-
189
-
190
-
191
-
192
-
193
-
194
-
195
-
196
-
197
-
198
-
199
-
200
-
201
-
202
-
203
-
204
-
205
-
206
-
207
-
208
-
209
-
210
-
211
-
212
-
213
-
214
-
215
-
216
-
217
-
218
-
 219
219 -
 220
220 -
 221
221 -
 222
222 -
 223
223 -
 224
224 -
 225
225 -
 226
226 -
 227
227 -
 228
228 -
 229
229 -
230
-
231
-
232
-
233
-
234
-
235
-
236
-
237
-
238
-
239
-
240
-
241
-
242
-
243
-
244
-
245
-
246
-
247
-
248
-
249
-
250
-
251
-
252
-
253
-
254
-
255
-
256
-
257
-
258
-
259
-
260
-
261
-
262
-
263
-
264
-
265
-
266
-
267
-
268
-
269
-
270
-
271
-
272
-
273
-
274
-
275
-
276
-
277
-
278
-
279
-
280
 |
 |