Brother International Entrepreneur PR-650 Users Manual - English - Page 227
Using the Optional Cap Frame
 |
View all Brother International Entrepreneur PR-650 manuals
Add to My Manuals
Save this manual to your list of manuals |
Page 227 highlights
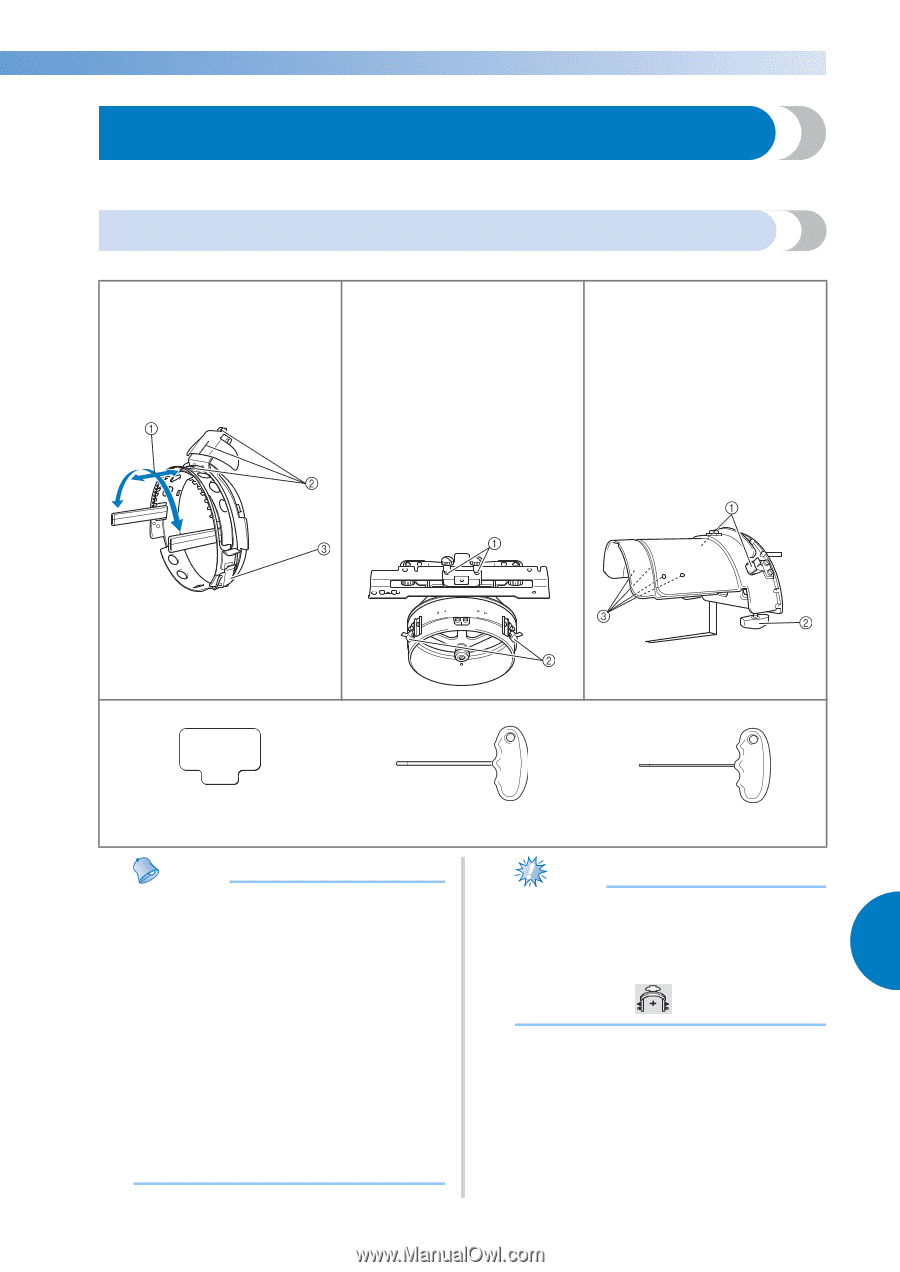
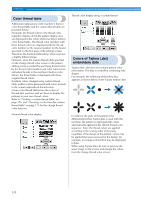
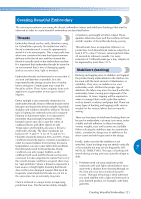
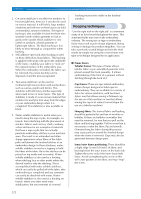
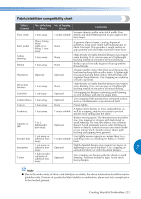
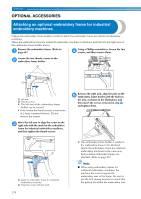
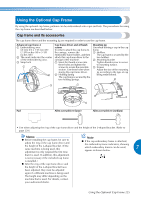
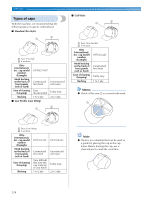
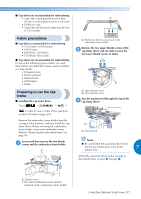
Using the Optional Cap Frame By using the optional cap frame, patterns can be embroidered onto caps and hats. The procedures for using the cap frame are described below. Cap frame and its accessories The cap frame driver and the mounting jig are required in order to use the cap frame. Advanced cap frame 2 1 Embroidering area: 60 mm (H) × 130 mm (W) (2-3/8 inches (H) × 5-1/8 inches (W)) 2 The mark indicates the center of the embroidering area. 3 Snap lock Cap frame driver and 4 thumb screws In order to attach the cap frame to the carriage, remove the embroidery frame holder, and then attach this cap frame driver to the carriage of the machine. 1 Insert the thumb screws into these holes and tighten the screws to secure the movable section. Use these holes when storing this cap frame driver. 2 Holding Spring The cap frame is secured by the two holding Springs. Mounting jig Use when framing a cap in the cap frame. 1 Holders The cap frame is secured by the two holders. 2 Mounting bracket Tighten thumb screw to secure to mounting surface. 3 Screws Adjust the size of the mounting jig according to the type of cap being embroidered. Pad Allen screwdriver (large) Allen screwdriver (medium) • Use when adjusting the ring of the cap frame driver and the height of the L-shaped bracket. (Refer to page 229.) Memo ● Before installing the cap frame, be sure to adjust the ring of the cap frame driver and the height of the L-shaped bracket. (If the same machine is being used, this adjustment is only required the first time that it is used. In addition, this adjustment is not necessary if the included cap frame is installed.) ● After the ring of the cap frame driver and the height of the L-shaped bracket have been adjusted, they must be adjusted again if a different machine is being used. The height may differ depending on the machine that is used. For details, contact your authorized dealer. Note ● If the cap embroidery frame is attached, the embroidery frame indicators, showing which embroidery frames can be used, 7 appear as shown below. Using the Optional Cap Frame 225
-
 1
1 -
2
-
3
-
4
-
5
-
6
-
7
-
8
-
9
-
10
-
11
-
12
-
13
-
14
-
15
-
16
-
17
-
18
-
19
-
20
-
21
-
22
-
23
-
24
-
25
-
26
-
27
-
28
-
29
-
30
-
31
-
32
-
33
-
34
-
35
-
36
-
37
-
38
-
39
-
40
-
41
-
42
-
43
-
44
-
45
-
46
-
47
-
48
-
49
-
50
-
51
-
52
-
53
-
54
-
55
-
56
-
57
-
58
-
59
-
60
-
61
-
62
-
63
-
64
-
65
-
66
-
67
-
68
-
69
-
70
-
71
-
72
-
73
-
74
-
75
-
76
-
77
-
78
-
79
-
80
-
81
-
82
-
83
-
84
-
85
-
86
-
87
-
88
-
89
-
90
-
91
-
92
-
93
-
94
-
95
-
96
-
97
-
98
-
99
-
100
-
101
-
102
-
103
-
104
-
105
-
106
-
107
-
108
-
109
-
110
-
111
-
112
-
113
-
114
-
115
-
116
-
117
-
118
-
119
-
120
-
121
-
122
-
123
-
124
-
125
-
126
-
127
-
128
-
129
-
130
-
131
-
132
-
133
-
134
-
135
-
136
-
137
-
138
-
139
-
140
-
141
-
142
-
143
-
144
-
145
-
146
-
147
-
148
-
149
-
150
-
151
-
152
-
153
-
154
-
155
-
156
-
157
-
158
-
159
-
160
-
161
-
162
-
163
-
164
-
165
-
166
-
167
-
168
-
169
-
170
-
171
-
172
-
173
-
174
-
175
-
176
-
177
-
178
-
179
-
180
-
181
-
182
-
183
-
184
-
185
-
186
-
187
-
188
-
189
-
190
-
191
-
192
-
193
-
194
-
195
-
196
-
197
-
198
-
199
-
200
-
201
-
202
-
203
-
204
-
205
-
206
-
207
-
208
-
209
-
210
-
211
-
212
-
213
-
214
-
215
-
216
-
217
-
218
-
219
-
220
-
221
-
 222
222 -
 223
223 -
 224
224 -
 225
225 -
 226
226 -
 227
227 -
 228
228 -
 229
229 -
 230
230 -
 231
231 -
 232
232 -
233
-
234
-
235
-
236
-
237
-
238
-
239
-
240
-
241
-
242
-
243
-
244
-
245
-
246
-
247
-
248
-
249
-
250
-
251
-
252
-
253
-
254
-
255
-
256
-
257
-
258
-
259
-
260
-
261
-
262
-
263
-
264
-
265
-
266
-
267
-
268
-
269
-
270
-
271
-
272
-
273
-
274
-
275
-
276
-
277
-
278
-
279
-
280
 |
 |