Brother International Entrepreneur PR-650 Users Manual - English - Page 243
Setting up the optional, bobbin winder, Connecting the AC adapter
 |
View all Brother International Entrepreneur PR-650 manuals
Add to My Manuals
Save this manual to your list of manuals |
Page 243 highlights
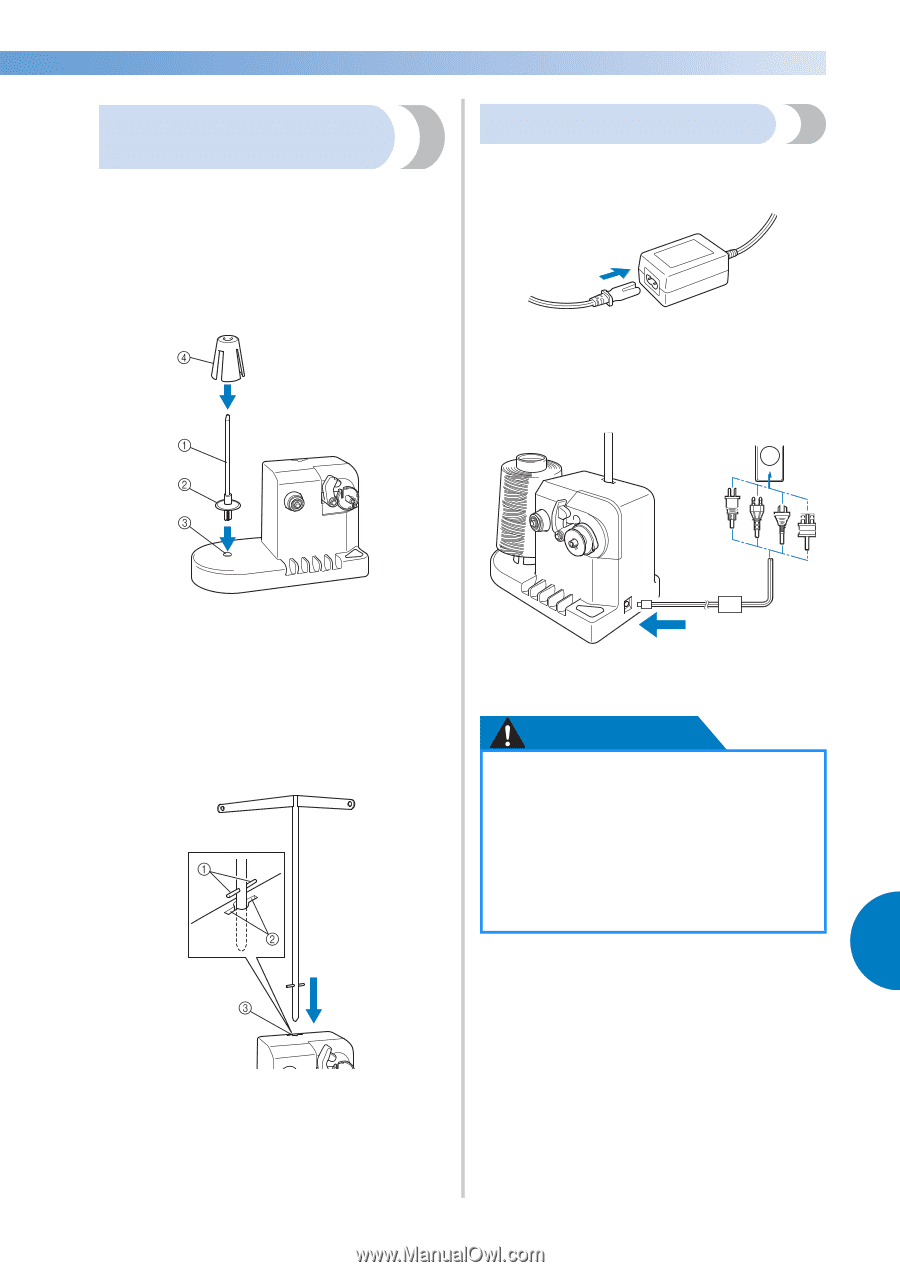
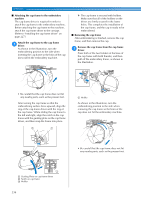
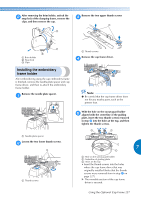
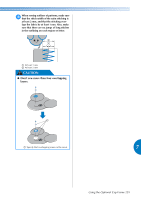
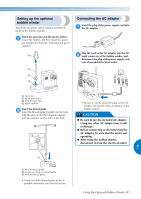
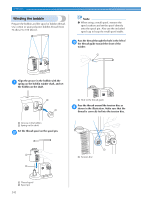
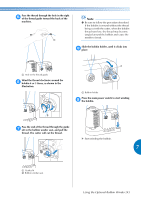
Setting up the optional bobbin winder Attach the spool pin, spool cushion and thread guide to the bobbin winder. Insert the spool pin and the spool cushion. 1 Lower the holder, and then insert the spool pin straight into the hole. And insert the spool cushion. Connecting the AC adapter Insert the plug of the power supply cord into 1 the AC adapter. Plug the cord on the AC adapter into the DC 2 input connector of the bobbin winder, and then insert the plug of the power supply cord into a household electrical outlet. 1 Spool pin 2 Spool pin holder 3 Hole for spool pin 4 Spool cushion Insert the thread guide. 2 Insert the thread guide straight into the hole with the pins on the thread guide aligned with the notches on the sides of the hole. • Be sure to firmly insert the plug on the AC adapter into the DC input connector of the bobbin winder. CAUTION ● Be sure to use the included AC adapter. Using any other AC adapter may result in damage. ● Before connecting or disconnecting the AC adapter, be sure that the unit is not operating. ● After using the bobbin winder, disconnect it from the electrical outlet. 7 1 Pins on thread guide 2 Notches on hole for thread guide 3 Hole for thread guide • Firmly insert the thread guide as far as possible and make sure that it is secure. Using the Optional Bobbin Winder 241
-
 1
1 -
2
-
3
-
4
-
5
-
6
-
7
-
8
-
9
-
10
-
11
-
12
-
13
-
14
-
15
-
16
-
17
-
18
-
19
-
20
-
21
-
22
-
23
-
24
-
25
-
26
-
27
-
28
-
29
-
30
-
31
-
32
-
33
-
34
-
35
-
36
-
37
-
38
-
39
-
40
-
41
-
42
-
43
-
44
-
45
-
46
-
47
-
48
-
49
-
50
-
51
-
52
-
53
-
54
-
55
-
56
-
57
-
58
-
59
-
60
-
61
-
62
-
63
-
64
-
65
-
66
-
67
-
68
-
69
-
70
-
71
-
72
-
73
-
74
-
75
-
76
-
77
-
78
-
79
-
80
-
81
-
82
-
83
-
84
-
85
-
86
-
87
-
88
-
89
-
90
-
91
-
92
-
93
-
94
-
95
-
96
-
97
-
98
-
99
-
100
-
101
-
102
-
103
-
104
-
105
-
106
-
107
-
108
-
109
-
110
-
111
-
112
-
113
-
114
-
115
-
116
-
117
-
118
-
119
-
120
-
121
-
122
-
123
-
124
-
125
-
126
-
127
-
128
-
129
-
130
-
131
-
132
-
133
-
134
-
135
-
136
-
137
-
138
-
139
-
140
-
141
-
142
-
143
-
144
-
145
-
146
-
147
-
148
-
149
-
150
-
151
-
152
-
153
-
154
-
155
-
156
-
157
-
158
-
159
-
160
-
161
-
162
-
163
-
164
-
165
-
166
-
167
-
168
-
169
-
170
-
171
-
172
-
173
-
174
-
175
-
176
-
177
-
178
-
179
-
180
-
181
-
182
-
183
-
184
-
185
-
186
-
187
-
188
-
189
-
190
-
191
-
192
-
193
-
194
-
195
-
196
-
197
-
198
-
199
-
200
-
201
-
202
-
203
-
204
-
205
-
206
-
207
-
208
-
209
-
210
-
211
-
212
-
213
-
214
-
215
-
216
-
217
-
218
-
219
-
220
-
221
-
222
-
223
-
224
-
225
-
226
-
227
-
228
-
229
-
230
-
231
-
232
-
233
-
234
-
235
-
236
-
237
-
 238
238 -
 239
239 -
 240
240 -
 241
241 -
 242
242 -
 243
243 -
 244
244 -
 245
245 -
 246
246 -
 247
247 -
 248
248 -
249
-
250
-
251
-
252
-
253
-
254
-
255
-
256
-
257
-
258
-
259
-
260
-
261
-
262
-
263
-
264
-
265
-
266
-
267
-
268
-
269
-
270
-
271
-
272
-
273
-
274
-
275
-
276
-
277
-
278
-
279
-
280
 |
 |