Brother International Entrepreneur PR-650 Users Manual - English - Page 46
Editing the Embroidery Pattern
 |
View all Brother International Entrepreneur PR-650 manuals
Add to My Manuals
Save this manual to your list of manuals |
Page 46 highlights
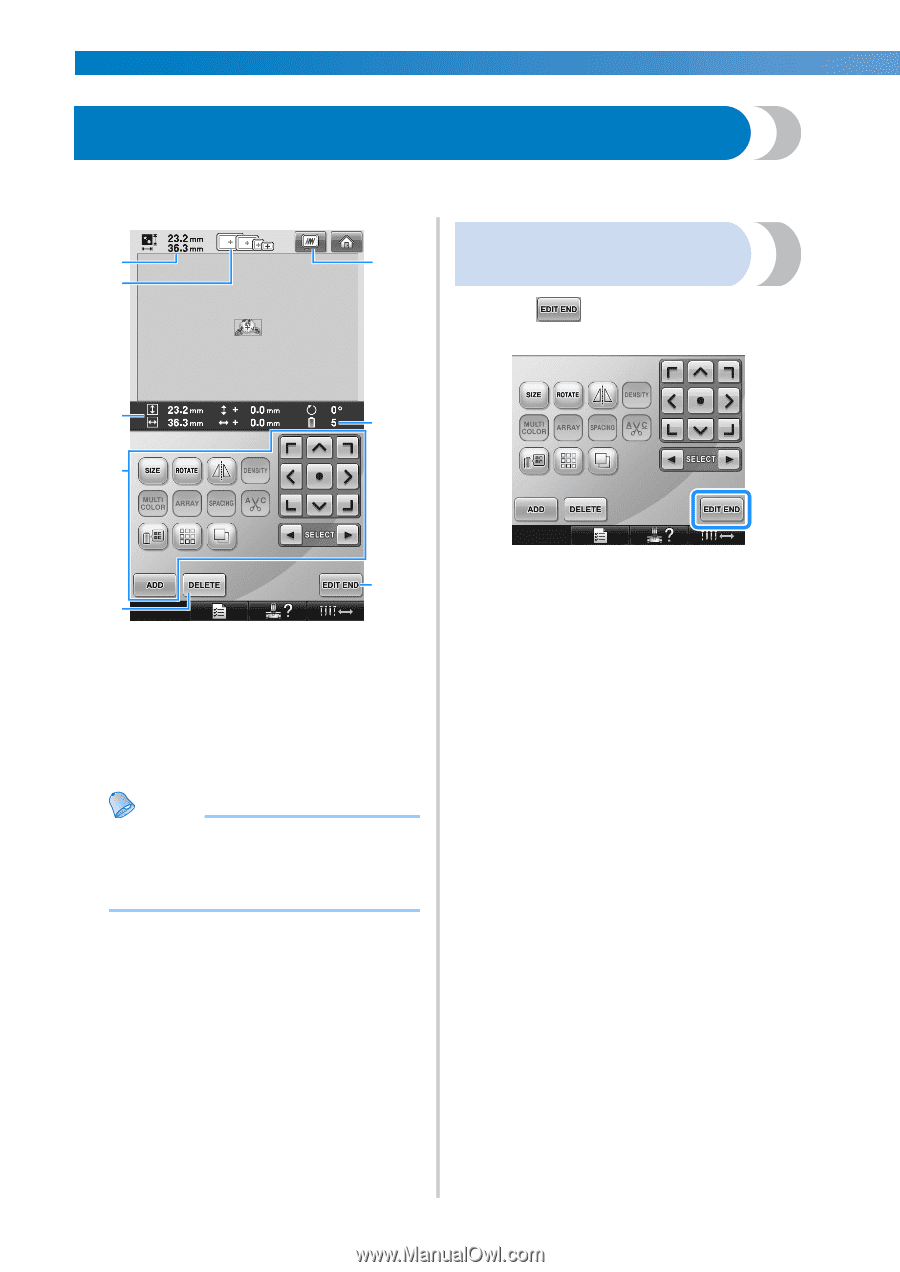
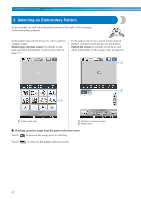
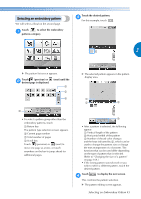
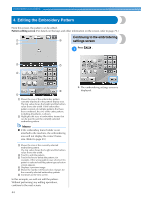
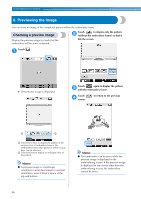
EMBROIDERING TUTORIAL 4. Editing the Embroidery Pattern From this screen, the pattern can be edited. Pattern editing screen (For details on the keys and other information on the screen, refer to page 73.) Continuing to the embroidering 1 6 settings screen 2 Press . 1 3 7 4 8 5 1 Shows the size of the embroidery pattern currently displayed in the pattern display area. The top value shows the height and the bottom value shows the width. If the embroidery pattern consists of multiple patterns that have been combined, the size of the entire pattern, including all patterns, is shown. 2 Highlights the sizes of embroidery frames that can be used to sew the currently selected embroidery pattern. Memo ● If the embroidery frame holder is not attached to the machine, the embroidering area will not display the correct frame size. (Refer to page 49.) 3 Shows the size of the currently selected embroidery pattern. The top value shows the height and the bottom value shows the width. 4 Touch to edit the pattern. 5 Touch this key to delete the pattern, for example, if the wrong pattern was selected. No pattern is selected and the pattern type selection screen appears. 6 Displays a preview image. 7 Shows the number of thread color changes for the currently selected embroidery pattern 8 Continues to the next screen. In this example, we will not edit the pattern. Without performing any editing operations, continue to the next screen. 44 X The embroidering settings screen is displayed.
-
 1
1 -
2
-
3
-
4
-
5
-
6
-
7
-
8
-
9
-
10
-
11
-
12
-
13
-
14
-
15
-
16
-
17
-
18
-
19
-
20
-
21
-
22
-
23
-
24
-
25
-
26
-
27
-
28
-
29
-
30
-
31
-
32
-
33
-
34
-
35
-
36
-
37
-
38
-
39
-
40
-
 41
41 -
 42
42 -
 43
43 -
 44
44 -
 45
45 -
 46
46 -
 47
47 -
 48
48 -
 49
49 -
 50
50 -
 51
51 -
52
-
53
-
54
-
55
-
56
-
57
-
58
-
59
-
60
-
61
-
62
-
63
-
64
-
65
-
66
-
67
-
68
-
69
-
70
-
71
-
72
-
73
-
74
-
75
-
76
-
77
-
78
-
79
-
80
-
81
-
82
-
83
-
84
-
85
-
86
-
87
-
88
-
89
-
90
-
91
-
92
-
93
-
94
-
95
-
96
-
97
-
98
-
99
-
100
-
101
-
102
-
103
-
104
-
105
-
106
-
107
-
108
-
109
-
110
-
111
-
112
-
113
-
114
-
115
-
116
-
117
-
118
-
119
-
120
-
121
-
122
-
123
-
124
-
125
-
126
-
127
-
128
-
129
-
130
-
131
-
132
-
133
-
134
-
135
-
136
-
137
-
138
-
139
-
140
-
141
-
142
-
143
-
144
-
145
-
146
-
147
-
148
-
149
-
150
-
151
-
152
-
153
-
154
-
155
-
156
-
157
-
158
-
159
-
160
-
161
-
162
-
163
-
164
-
165
-
166
-
167
-
168
-
169
-
170
-
171
-
172
-
173
-
174
-
175
-
176
-
177
-
178
-
179
-
180
-
181
-
182
-
183
-
184
-
185
-
186
-
187
-
188
-
189
-
190
-
191
-
192
-
193
-
194
-
195
-
196
-
197
-
198
-
199
-
200
-
201
-
202
-
203
-
204
-
205
-
206
-
207
-
208
-
209
-
210
-
211
-
212
-
213
-
214
-
215
-
216
-
217
-
218
-
219
-
220
-
221
-
222
-
223
-
224
-
225
-
226
-
227
-
228
-
229
-
230
-
231
-
232
-
233
-
234
-
235
-
236
-
237
-
238
-
239
-
240
-
241
-
242
-
243
-
244
-
245
-
246
-
247
-
248
-
249
-
250
-
251
-
252
-
253
-
254
-
255
-
256
-
257
-
258
-
259
-
260
-
261
-
262
-
263
-
264
-
265
-
266
-
267
-
268
-
269
-
270
-
271
-
272
-
273
-
274
-
275
-
276
-
277
-
278
-
279
-
280
 |
 |