Brother International GT-541 Instruction Manual - English - Page 77
Replacing the Waste Ink Cartridge - wpc removed
 |
View all Brother International GT-541 manuals
Add to My Manuals
Save this manual to your list of manuals |
Page 77 highlights
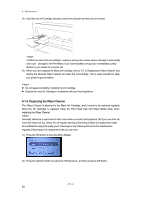
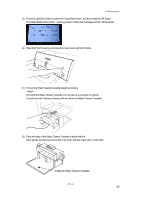
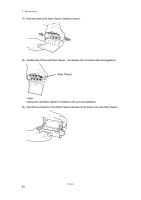
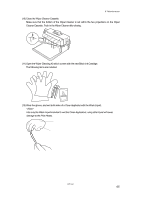
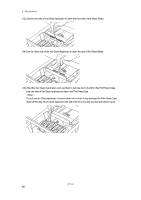
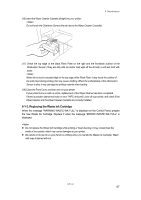
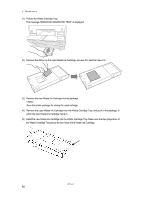
6. Maintenance (16) Insert the Wiper Cleaner Cassette straight into your printer. Do not touch the Clearance Sensor (the bar above the Wiper Cleaner Cassette).. (17) Check the top edge of the black Flash Plate on the right and the front/back surface of the Obstruction Sensor, if they are dirty with ink and/or dust wipe off the dirt with a soft wet cloth with water. When ink or dust is mounted high on the top edge of the Flash Plate, it may touch the surface of the print head during printing, this may cause misfiring. When the surface/back of the Obstruction Sensor is dirty, it may damage the printing material when loading. (18) Close the Front Cover, and then turn on your printer. If your printer turns on with no errors, replacement of the Wiper Cleaner has been completed. If there is problem (abnormal noise or error "WPC removed"), turn off your printer, and check if the Wiper Cleaner and the Wiper Cleaner Cassette are correctly installed. 6-1-3. Replacing the Waste Ink Cartridge When the message "WARNING WASTE INK FULL" is displayed on the Control Panel, prepare the new Waste Ink Cartridge. Replace it when the message "ERROR WASTE INK FULL" is displayed. Do not replace the Waste Ink Cartridge while printing or head cleaning. It may contaminate the inside of your printer, which may cause damages to your printer. Be careful not to get ink on your hands or clothing when you handle the Waste Ink Cartridge. Wash with soap if stained with ink. GT-541 67
-
 1
1 -
2
-
3
-
4
-
5
-
6
-
7
-
8
-
9
-
10
-
11
-
12
-
13
-
14
-
15
-
16
-
17
-
18
-
19
-
20
-
21
-
22
-
23
-
24
-
25
-
26
-
27
-
28
-
29
-
30
-
31
-
32
-
33
-
34
-
35
-
36
-
37
-
38
-
39
-
40
-
41
-
42
-
43
-
44
-
45
-
46
-
47
-
48
-
49
-
50
-
51
-
52
-
53
-
54
-
55
-
56
-
57
-
58
-
59
-
60
-
61
-
62
-
63
-
64
-
65
-
66
-
67
-
68
-
69
-
70
-
71
-
 72
72 -
 73
73 -
 74
74 -
 75
75 -
 76
76 -
 77
77 -
 78
78 -
 79
79 -
 80
80 -
 81
81 -
 82
82 -
83
-
84
-
85
-
86
-
87
-
88
-
89
-
90
-
91
-
92
-
93
-
94
-
95
-
96
-
97
-
98
-
99
-
100
-
101
-
102
-
103
-
104
-
105
-
106
-
107
-
108
-
109
-
110
-
111
-
112
-
113
-
114
-
115
-
116
-
117
-
118
-
119
-
120
-
121
-
122
-
123
-
124
-
125
-
126
 |
 |
