Brother International HL-1440 Users Manual - English - Page 63
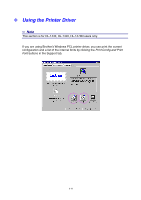
Print Configuration and Fonts, Using Control Panel Button - print configuration page
 |
UPC - 689466270150
View all Brother International HL-1440 manuals
Add to My Manuals
Save this manual to your list of manuals |
Page 63 highlights
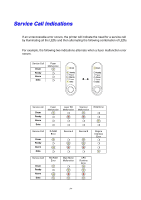
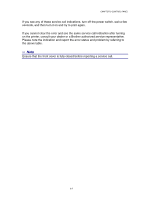
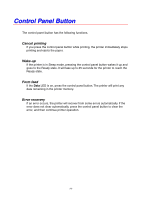
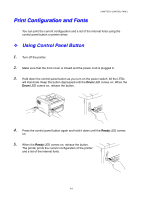
Print Configuration and Fonts CHAPTER 3 CONTROL PANEL You can print the current configuration and a list of the internal fonts using the control panel button or printer driver. ™ Using Control Panel Button 1. Turn off the printer. 2. Make sure that the front cover is closed and the power cord is plugged in. 3. Hold down the control panel button as you turn on the power switch. All the LEDs will illuminate. Keep the button depressed until the Drum LED comes on. When the Drum LED comes on, release the button. Drum Ready Alarm Data 4. Press the control panel button again and hold it down until the Ready LED comes on. 5. When the Ready LED comes on, release the button. The printer prints the current configuration of the printer and a list of the internal fonts. Drum Ready Alarm Data 3-9
-
 1
1 -
2
-
3
-
4
-
5
-
6
-
7
-
8
-
9
-
10
-
11
-
12
-
13
-
14
-
15
-
16
-
17
-
18
-
19
-
20
-
21
-
22
-
23
-
24
-
25
-
26
-
27
-
28
-
29
-
30
-
31
-
32
-
33
-
34
-
35
-
36
-
37
-
38
-
39
-
40
-
41
-
42
-
43
-
44
-
45
-
46
-
47
-
48
-
49
-
50
-
51
-
52
-
53
-
54
-
55
-
56
-
57
-
 58
58 -
 59
59 -
 60
60 -
 61
61 -
 62
62 -
 63
63 -
 64
64 -
 65
65 -
 66
66 -
 67
67 -
 68
68 -
69
-
70
-
71
-
72
-
73
-
74
-
75
-
76
-
77
-
78
-
79
-
80
-
81
-
82
-
83
-
84
-
85
-
86
-
87
-
88
-
89
-
90
-
91
-
92
-
93
-
94
-
95
-
96
-
97
-
98
-
99
-
100
-
101
-
102
-
103
-
104
-
105
-
106
-
107
-
108
-
109
-
110
-
111
-
112
-
113
-
114
-
115
-
116
 |
 |