Brother International HL-1440 Users Manual - English - Page 95
Close the rear cover., Install the drum unit assembly. - how to print test page
 |
UPC - 689466270150
View all Brother International HL-1440 manuals
Add to My Manuals
Save this manual to your list of manuals |
Page 95 highlights
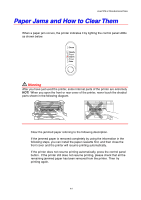
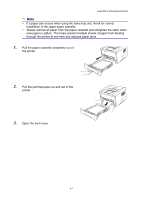
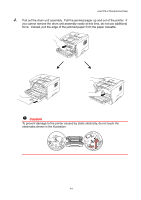
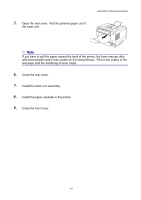
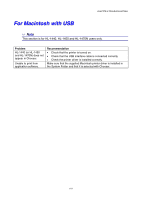
5. Open the rear cover. Pull the jammed paper out of the fuser unit. CHAPTER 6 TROUBLESHOOTING ✏ Note If you have to pull the paper toward the back of the printer, the fuser may get dirty 0 with toner powder and it may scatter on the next printouts. Print a few copies of the test page until the scattering of toner stops. 6. Close the rear cover. 7. Install the drum unit assembly. 8. Install the paper cassette in the printer. 9. Close the front cover. 6-9
-
 1
1 -
2
-
3
-
4
-
5
-
6
-
7
-
8
-
9
-
10
-
11
-
12
-
13
-
14
-
15
-
16
-
17
-
18
-
19
-
20
-
21
-
22
-
23
-
24
-
25
-
26
-
27
-
28
-
29
-
30
-
31
-
32
-
33
-
34
-
35
-
36
-
37
-
38
-
39
-
40
-
41
-
42
-
43
-
44
-
45
-
46
-
47
-
48
-
49
-
50
-
51
-
52
-
53
-
54
-
55
-
56
-
57
-
58
-
59
-
60
-
61
-
62
-
63
-
64
-
65
-
66
-
67
-
68
-
69
-
70
-
71
-
72
-
73
-
74
-
75
-
76
-
77
-
78
-
79
-
80
-
81
-
82
-
83
-
84
-
85
-
86
-
87
-
88
-
89
-
 90
90 -
 91
91 -
 92
92 -
 93
93 -
 94
94 -
 95
95 -
 96
96 -
 97
97 -
 98
98 -
 99
99 -
 100
100 -
101
-
102
-
103
-
104
-
105
-
106
-
107
-
108
-
109
-
110
-
111
-
112
-
113
-
114
-
115
-
116
 |
 |
CHAPTER 6 TROUBLESHOOTING
6-9
5.
Open the rear cover.
Pull the jammed paper out of
the fuser unit.
✏
Note
If you have to pull the paper toward the back of the printer, the fuser may get dirty
with toner powder and it may scatter on the next printouts.
Print a few copies of the
test page until the scattering of toner stops.
6.
Close the rear cover.
7.
Install the drum unit assembly.
8.
Install the paper cassette in the printer.
9.
Close the front cover.