Brother International HL-2270DW Quick Setup Guide - English - Page 16
Configuration using the automatic wireless (one-push) method, 8 Con the wireless settings - wireless setup windows 8
 |
UPC - 012502626749
View all Brother International HL-2270DW manuals
Add to My Manuals
Save this manual to your list of manuals |
Page 16 highlights
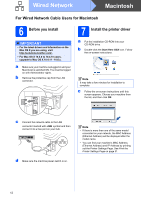
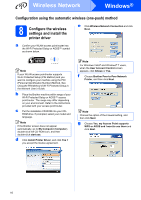
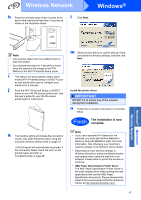
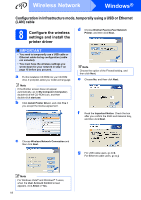
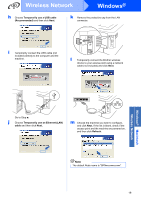
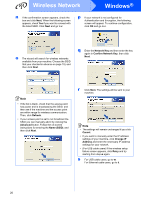
Wireless Network Windows® Configuration using the automatic wireless (one-push) method 8 Configure the wireless settings and install the printer driver e Click Wireless Network Connection and click Next. a Confirm your WLAN access point/router has the Wi-Fi Protected Setup or AOSS™ symbol as shown below. Note If your WLAN access point/router supports Wi-Fi Protected Setup (PIN Method) and you want to configure your machine using the PIN (Personal Identification Number) Method, See Using the PIN Method of Wi-Fi Protected Setup in the Network User's Guide. b Place the Brother machine within range of your Wi-Fi Protected Setup or AOSS™ access point/router. The range may differ depending on your environment. Refer to the instructions provided with your access point/router. c Put the installation CD-ROM into your CDROM drive. If prompted, select your model and language. Note If the Brother screen does not appear automatically, go to My Computer (Computer), double-click the CD-ROM icon, and then double-click start.exe. d Click Install Printer Driver, and click Yes if you accept the license agreement. Note For Windows Vista® and Windows® 7 users, when the User Account Control screen appears, click Allowe or Yes. f Choose Brother Peer-to-Peer Network Printer, and then click Next. Note Choose the option of the Firewall setting, and then click Next. g Choose Yes, my Access Point supports WPS or AOSS and I want to use them and click Next. 16
-
 1
1 -
2
-
3
-
4
-
5
-
6
-
7
-
8
-
9
-
10
-
 11
11 -
 12
12 -
 13
13 -
 14
14 -
 15
15 -
 16
16 -
 17
17 -
 18
18 -
 19
19 -
 20
20 -
 21
21 -
22
-
23
-
24
-
25
-
26
-
27
-
28
-
29
-
30
-
31
-
32
-
33
-
34
-
35
 |
 |
