Brother International HL-4150CDN Network Users Manual - English - Page 13
Configuring your machine for a wireless network (For HL-4570CDW(T)), Overview - wireless printing
 |
UPC - 012502624998
View all Brother International HL-4150CDN manuals
Add to My Manuals
Save this manual to your list of manuals |
Page 13 highlights
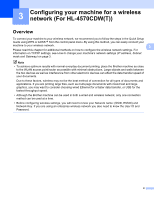
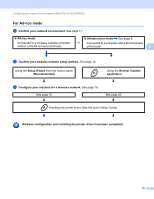
3 Configuring your machine for a wireless network (For HL-4570CDW(T)) 3 Overview 3 To connect your machine to your wireless network, we recommend you to follow the steps in the Quick Setup Guide using WPS or AOSS™ from the control panel menu. By using this method, you can easily connect your machine to your wireless network. 3 Please read this chapter for additional methods on how to configure the wireless network settings. For information on TCP/IP settings, see How to change your machine's network settings (IP address, Subnet mask and Gateway) on page 3. Note • To achieve optimum results with normal everyday document printing, place the Brother machine as close to the WLAN access point/router as possible with minimal obstructions. Large objects and walls between the two devices as well as interference from other electronic devices can affect the data transfer speed of your documents. Due to these factors, wireless may not be the best method of connection for all types of documents and applications. If you are printing large files, such as multi-page documents with mixed text and large graphics, you may want to consider choosing wired Ethernet for a faster data transfer, or USB for the fastest throughput speed. • Although the Brother machine can be used in both a wired and wireless network, only one connection method can be used at a time. • Before configuring wireless settings, you will need to know your Network name: (SSID, ESSID) and Network Key. If you are using an enterprise wireless network you also need to know the User ID and Password. 8
-
 1
1 -
2
-
3
-
4
-
5
-
6
-
7
-
 8
8 -
 9
9 -
 10
10 -
 11
11 -
 12
12 -
 13
13 -
 14
14 -
 15
15 -
 16
16 -
 17
17 -
 18
18 -
19
-
20
-
21
-
22
-
23
-
24
-
25
-
26
-
27
-
28
-
29
-
30
-
31
-
32
-
33
-
34
-
35
-
36
-
37
-
38
-
39
-
40
-
41
-
42
-
43
-
44
-
45
-
46
-
47
-
48
-
49
-
50
-
51
-
52
-
53
-
54
-
55
-
56
-
57
-
58
-
59
-
60
-
61
-
62
-
63
-
64
-
65
-
66
-
67
-
68
-
69
-
70
-
71
-
72
-
73
-
74
-
75
-
76
-
77
-
78
-
79
-
80
-
81
-
82
-
83
 |
 |