Brother International HL-4570CDW Users Manual - English - Page 147
Error messages continued, Error message, Cause, Action - fuser
 |
UPC - 012502625001
View all Brother International HL-4570CDW manuals
Add to My Manuals
Save this manual to your list of manuals |
Page 147 highlights
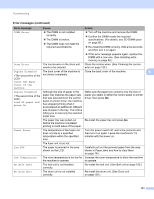
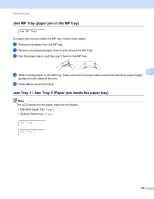
Troubleshooting Error messages (continued) Error message Cause Action DIMM Error The DIMM is not installed correctly. The DIMM is broken. The DIMM does not meet the required specifications. Turn off the machine and remove the DIMM. Confirm the DIMM meets the required specifications. (For details, see SO-DIMM types on page 85.) Re-install the DIMM correctly. Wait a few seconds, and then turn it on again. If this error message appears again, replace the DIMM with a new one. (See Installing extra memory on page 86.) Drum Error The corona wire on the drum unit needs to be cleaned. Clean the corona wires. (See Cleaning the corona wires on page 120.) Duplex Disabled The back cover of the machine is Close the back cover of the machine. 6 Close the Back Cover of the machine. Duplex Disabled Load XX paper and press Go. Although the size of paper in the paper tray matches the paper size that was selected from the control panel or printer driver, the machine has stopped printing when it encountered an additional, different size of paper in the tray. The LCD is telling you to load only the selected paper size. Make sure the paper tray contains only the size of paper you select in either the control panel or printer driver, then press Go. The paper tray was pulled out Re-install the paper tray and press Go. before the machine completed printing on both sides of the paper. Fuser Error The temperature of the fuser unit does not rise to a specified temperature within the specified time. Turn the power switch off, wait a few seconds and then turn it on again. Leave the machine for 15 minutes with the power on. The fuser unit is too hot. Jam XXX The paper is jammed in the area shown on the LCD. Carefully pull out the jammed paper from the area shown in Paper jams and how to clear them on page 145. Low Temperature The room temperature is too low for Increase the room temperature to allow the machine the machine to operate. to operate. No Belt Unit The belt unit is not installed correctly. Re-install the belt unit. (See Belt unit on page 105.) No Drum Unit The drum unit is not installed correctly. Re-install the drum unit. (See Drum unit on page 100.) 141
-
 1
1 -
2
-
3
-
4
-
5
-
6
-
7
-
8
-
9
-
10
-
11
-
12
-
13
-
14
-
15
-
16
-
17
-
18
-
19
-
20
-
21
-
22
-
23
-
24
-
25
-
26
-
27
-
28
-
29
-
30
-
31
-
32
-
33
-
34
-
35
-
36
-
37
-
38
-
39
-
40
-
41
-
42
-
43
-
44
-
45
-
46
-
47
-
48
-
49
-
50
-
51
-
52
-
53
-
54
-
55
-
56
-
57
-
58
-
59
-
60
-
61
-
62
-
63
-
64
-
65
-
66
-
67
-
68
-
69
-
70
-
71
-
72
-
73
-
74
-
75
-
76
-
77
-
78
-
79
-
80
-
81
-
82
-
83
-
84
-
85
-
86
-
87
-
88
-
89
-
90
-
91
-
92
-
93
-
94
-
95
-
96
-
97
-
98
-
99
-
100
-
101
-
102
-
103
-
104
-
105
-
106
-
107
-
108
-
109
-
110
-
111
-
112
-
113
-
114
-
115
-
116
-
117
-
118
-
119
-
120
-
121
-
122
-
123
-
124
-
125
-
126
-
127
-
128
-
129
-
130
-
131
-
132
-
133
-
134
-
135
-
136
-
137
-
138
-
139
-
140
-
141
-
 142
142 -
 143
143 -
 144
144 -
 145
145 -
 146
146 -
 147
147 -
 148
148 -
 149
149 -
 150
150 -
 151
151 -
 152
152 -
153
-
154
-
155
-
156
-
157
-
158
-
159
-
160
-
161
-
162
-
163
-
164
-
165
-
166
-
167
-
168
-
169
-
170
-
171
-
172
-
173
-
174
-
175
-
176
-
177
-
178
-
179
-
180
-
181
-
182
-
183
-
184
-
185
-
186
-
187
-
188
-
189
-
190
-
191
-
192
-
193
-
194
-
195
-
196
-
197
-
198
-
199
 |
 |