Brother International HL 5370DW Users Manual - English - Page 126
Error messages in the Status Monitor, Fuser Cover is Open - troubleshooting
 |
UPC - 012502622482
View all Brother International HL 5370DW manuals
Add to My Manuals
Save this manual to your list of manuals |
Page 126 highlights
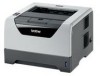
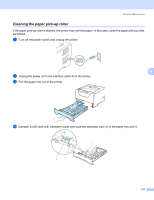
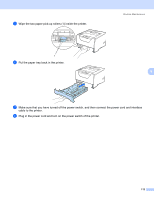
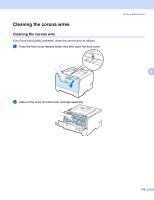
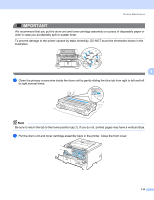
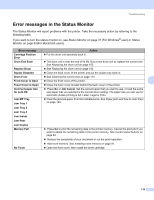
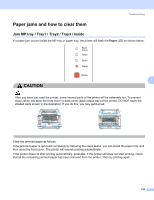
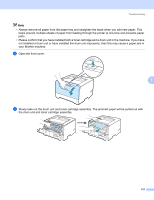
Troubleshooting Error messages in the Status Monitor 7 The Status Monitor will report problems with the printer. Take the necessary action by referring to the following table. If you want to turn the status monitor on, see Status Monitor on page 47 (For Windows® user) or Status Monitor on page 63(For Macintosh users). Error message Action Cartridge Position Error „ Put the drum unit assembly back in. Drum End Soon „ The drum unit is near the end of its life. Buy a new drum unit to replace the current one. See Replacing the drum unit on page 102. Replace Drum „ See Replacing the drum unit on page 102 Duplex Disabled „ Close the back cover of the printer and put the duplex tray back in. Drum Error „ See Cleaning the corona wire on page 113. Front Cover is Open „ Close the front cover of the printer. 7 Fuser Cover is Open „ Close the fuser cover located behind the back cover of the printer. Incorrect paper size for auto DX „ Press Go or Job Cancel. Set the correct paper that you want to use, or load the same size paper that you selected in the current driver setting. The paper size you can use for automatic duplex printing is A4, Letter, Legal or Folio. Jam MP Tray Jam Tray 1 „ Clear the jammed paper from the indicated area. See Paper jams and how to clear them on page 120. Jam Tray 2 Jam Tray 3 Jam Inside Jam Rear Jam Duplex Memory Full „ Press Go to print the remaining data in the printer memory. Cancel the print job if you want to delete the remaining data in the printer memory. See Control panel buttons on page 84. „ Reduce the complexity of your document or cut the print resolution. No Toner „ Add more memory. See Installing extra memory on page 91. „ Open the front cover, then install the toner cartridge. 116
-
 1
1 -
2
-
3
-
4
-
5
-
6
-
7
-
8
-
9
-
10
-
11
-
12
-
13
-
14
-
15
-
16
-
17
-
18
-
19
-
20
-
21
-
22
-
23
-
24
-
25
-
26
-
27
-
28
-
29
-
30
-
31
-
32
-
33
-
34
-
35
-
36
-
37
-
38
-
39
-
40
-
41
-
42
-
43
-
44
-
45
-
46
-
47
-
48
-
49
-
50
-
51
-
52
-
53
-
54
-
55
-
56
-
57
-
58
-
59
-
60
-
61
-
62
-
63
-
64
-
65
-
66
-
67
-
68
-
69
-
70
-
71
-
72
-
73
-
74
-
75
-
76
-
77
-
78
-
79
-
80
-
81
-
82
-
83
-
84
-
85
-
86
-
87
-
88
-
89
-
90
-
91
-
92
-
93
-
94
-
95
-
96
-
97
-
98
-
99
-
100
-
101
-
102
-
103
-
104
-
105
-
106
-
107
-
108
-
109
-
110
-
111
-
112
-
113
-
114
-
115
-
116
-
117
-
118
-
119
-
120
-
 121
121 -
 122
122 -
 123
123 -
 124
124 -
 125
125 -
 126
126 -
 127
127 -
 128
128 -
 129
129 -
 130
130 -
 131
131 -
132
-
133
-
134
-
135
-
136
-
137
-
138
-
139
-
140
-
141
-
142
-
143
-
144
-
145
-
146
-
147
-
148
-
149
-
150
-
151
-
152
-
153
-
154
-
155
-
156
-
157
-
158
-
159
-
160
-
161
-
162
-
163
-
164
-
165
-
166
-
167
-
168
-
169
-
170
-
171
-
172
 |
 |