Brother International HL 5370DW Users Manual - English - Page 128
Error message printout, Advanced - printer troubleshoot
 |
UPC - 012502622482
View all Brother International HL 5370DW manuals
Add to My Manuals
Save this manual to your list of manuals |
Page 128 highlights
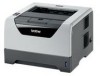
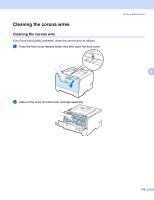
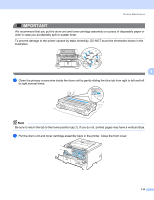
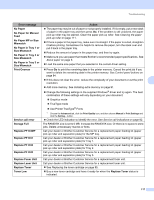
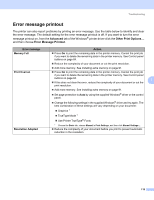
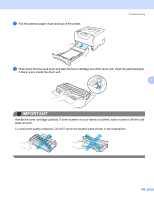
Troubleshooting Error message printout 7 The printer can also report problems by printing an error message. Use the table below to identify and clear the error message. The default setting for the error message printout is off. If you want to turn the error message printout on, from the Advanced tab of the Windows® printer driver click the Other Print Options..., and then choose Error Message Printout. Error message Memory Full Print Overrun Resolution Adapted Action „ Press Go to print the remaining data in the printer memory. Cancel the print job if you want to delete the remaining data in the printer memory. See Control panel buttons on page 84. „ Reduce the complexity of your document or cut the print resolution. „ Add more memory. See Installing extra memory on page 91. „ Press Go to print the remaining data in the printer memory. Cancel the print job if you want to delete the remaining data in the printer memory. See Control panel buttons on page 84. 7 „ If this does not clear the error, reduce the complexity of your document or cut the print resolution. „ Add more memory. See Installing extra memory on page 91. „ Set page protection to Auto by using the supplied Windows® driver or the control panel. „ Change the following settings in the supplied Windows® driver and try again. The best combination of these settings will vary depending on your document: „ Graphics 1 „ TrueType Mode 1 „ Use Printer TrueType® Fonts 1 Choose the Basic tab, choose Manual in Print Settings, and then click Manual Settings.... „ Reduce the complexity of your document before you print to prevent automatic reduction in the resolution. 118
-
 1
1 -
2
-
3
-
4
-
5
-
6
-
7
-
8
-
9
-
10
-
11
-
12
-
13
-
14
-
15
-
16
-
17
-
18
-
19
-
20
-
21
-
22
-
23
-
24
-
25
-
26
-
27
-
28
-
29
-
30
-
31
-
32
-
33
-
34
-
35
-
36
-
37
-
38
-
39
-
40
-
41
-
42
-
43
-
44
-
45
-
46
-
47
-
48
-
49
-
50
-
51
-
52
-
53
-
54
-
55
-
56
-
57
-
58
-
59
-
60
-
61
-
62
-
63
-
64
-
65
-
66
-
67
-
68
-
69
-
70
-
71
-
72
-
73
-
74
-
75
-
76
-
77
-
78
-
79
-
80
-
81
-
82
-
83
-
84
-
85
-
86
-
87
-
88
-
89
-
90
-
91
-
92
-
93
-
94
-
95
-
96
-
97
-
98
-
99
-
100
-
101
-
102
-
103
-
104
-
105
-
106
-
107
-
108
-
109
-
110
-
111
-
112
-
113
-
114
-
115
-
116
-
117
-
118
-
119
-
120
-
121
-
122
-
 123
123 -
 124
124 -
 125
125 -
 126
126 -
 127
127 -
 128
128 -
 129
129 -
 130
130 -
 131
131 -
 132
132 -
 133
133 -
134
-
135
-
136
-
137
-
138
-
139
-
140
-
141
-
142
-
143
-
144
-
145
-
146
-
147
-
148
-
149
-
150
-
151
-
152
-
153
-
154
-
155
-
156
-
157
-
158
-
159
-
160
-
161
-
162
-
163
-
164
-
165
-
166
-
167
-
168
-
169
-
170
-
171
-
172
 |
 |