Brother International IntelliFax-2840 Quick Setup Guide - Page 11
Fax Transmission Report, Set tone or pulse dialing, mode Canada only, Set the telephone line, - set date and time
 |
View all Brother International IntelliFax-2840 manuals
Add to My Manuals
Save this manual to your list of manuals |
Page 11 highlights
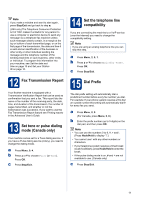
Note If you make a mistake and want to start again, press Stop/Exit and go back to step a. (USA only) The Telephone Consumer Protection Act of 1991 makes it unlawful for any person to use a computer or electronic device to send any message via a telephone fax machine unless such messages clearly contain, in a margin at the top or bottom of each transmitted page, or on the first page of the transmission, the date and time it is sent and an identification of the business or other entity or other individual sending the message and the telephone number of the sending machines or such business, other entity or individual. To program this information into your machine, see Set the date and time on page 10 and Set your Station ID on page 10. 12 Fax Transmission Report Your Brother machine is equipped with a Transmission Verification Report that can be used as confirmation that you sent a fax. This report lists the name or fax number of the receiving party, the date, time, and duration of the transmission, the number of pages transmitted, and whether or not the transmission was successful. If you want to use the Fax Transmission Report feature see Printing reports in the Advanced User's Guide. 13 Set tone or pulse dialing mode (Canada only) Your machine comes set for a Tone dialing service. If you have a Pulse dialing service (rotary), you need to change the dialing mode. a Press Menu, 0, 4. b Press a or b to choose Pulse (or Tone). Press OK. c Press Stop/Exit. 14 Set the telephone line compatibility If you are connecting the machine to a VoIP service (over the Internet) you need to change the compatibility setting. Note If you are using an analog telephone line you can skip this step. a Press Menu, 2, 0, 1. b Press a or b to choose Basic(for VoIP). Press OK. c Press Stop/Exit. 15 Dial Prefix The dial prefix setting will automatically dial a predefined number before every fax number you dial. For example: If your phone system requires a 9 to dial an outside number this setting will automatically dial 9 for every fax you send. a Press Menu, 0, 5. (For Canada, press Menu, 0, 6.) b Enter the prefix number (up to 5 digits) on the dial pad, and then press OK. Note • You can use the numbers 0 to 9, #, l and !. (Press Hook/Hold to display "!".) • You cannot use ! with any other numbers or characters. • If your telephone system requires a timed break recall (hookflash), press Hook/Hold to enter the break. • If the pulse dialing mode is on, # and l are not available to use. (Canada only) c Press Stop/Exit. 11
-
 1
1 -
2
-
3
-
4
-
5
-
 6
6 -
 7
7 -
 8
8 -
 9
9 -
 10
10 -
 11
11 -
 12
12 -
 13
13 -
 14
14 -
 15
15
 |
 |