Brother International LX2500 Users Manual - English and Spanish - Page 19
Sewing Basics - needle
 |
View all Brother International LX2500 manuals
Add to My Manuals
Save this manual to your list of manuals |
Page 19 highlights
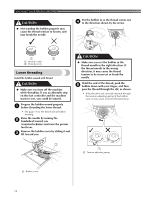
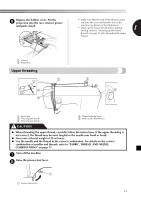
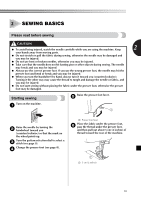
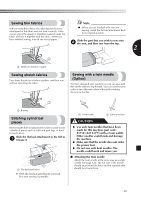
2 SEWING BASICS Please read before sewing CAUTION ● To avoid being injured, watch the needle carefully while you are using the machine. Keep 2 your hands away from moving parts. ● Do not stretch or pull the fabric during sewing, otherwise the needle may be damaged and you may be injured. ● Do not use bent or broken needles, otherwise you may be injured. ● Take care that the needle does not hit basting pins or other objects during sewing. The needle may break and you may be injured. ● Always use the correct presser foot. If you use the wrong presser foot, the needle may hit the presser foot and bend or break and you may be injured. ● When you turn the handwheel by hand, always turn it toward you (counterclockwise). Turning it the other way may cause the thread to tangle and damage the needle or fabric, and you may be injured. ● Do not start sewing without placing the fabric under the presser foot, otherwise the presser foot may be damaged. Starting sewing Raise the presser foot lever. 5 Turn on the machine. 1 1 Raise the needle by turning the 2 handwheel toward you (counterclockwise) so that the mark on the wheel points up. Turn the pattern selection dial to select a 3 stitch (see page 9). Change the presser foot (see page 8). 4 1 Presser foot lever Place the fabric under the presser foot, 6 pass the thread under the presser foot, and then pull out about 5 cm (2 inches) of thread toward the rear of the machine. 1 1 5 cm (2 inches) 18
-
 1
1 -
2
-
3
-
4
-
5
-
6
-
7
-
8
-
9
-
10
-
11
-
12
-
13
-
 14
14 -
 15
15 -
 16
16 -
 17
17 -
 18
18 -
 19
19 -
 20
20 -
 21
21 -
 22
22 -
 23
23 -
 24
24 -
25
-
26
-
27
-
28
-
29
-
30
-
31
-
32
-
33
-
34
-
35
-
36
-
37
-
38
-
39
-
40
-
41
-
42
-
43
-
44
-
45
-
46
-
47
-
48
-
49
-
50
-
51
-
52
-
53
-
54
-
55
-
56
-
57
-
58
-
59
-
60
-
61
-
62
-
63
-
64
-
65
-
66
-
67
-
68
-
69
-
70
-
71
-
72
-
73
-
74
-
75
-
76
-
77
-
78
-
79
-
80
-
81
-
82
-
83
-
84
-
85
-
86
-
87
-
88
-
89
-
90
-
91
-
92
 |
 |