Brother International LX2500 Users Manual - English and Spanish - Page 39
Appendix - bobbin case
 |
View all Brother International LX2500 manuals
Add to My Manuals
Save this manual to your list of manuals |
Page 39 highlights
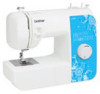
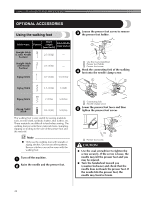
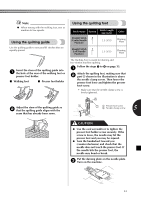
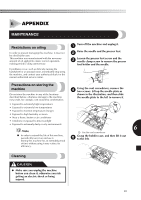
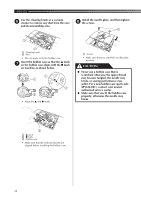
6 APPENDIX MAINTENANCE Restrictions on oiling In order to prevent damaging this machine, it must not be oiled by the user. This machine was manufactured with the necessary amount of oil applied to ensure correct operation, making periodic oiling unnecessary. If problems occur, such as difficulty turning the handwheel or an unusual noise, immediately stop using the machine, and contact your authorized dealer or the nearest authorized service center. Turn off the machine and unplug it. 1 Raise the needle and the presser foot. 2 Loosen the presser foot screw and the 3 needle clamp screw to remove the presser foot holder and the needle. Precautions on storing the machine Do not store the machine in any of the locations described below, otherwise damage to the machine may result, for example, rust caused by condensation. Using the oval screwdriver, remove the 4 two screws. Lift up the needle plate as shown in the illustration, and then slide the needle plate to the left to remove it. • Exposed to extremely high temperatures • Exposed to extremely low temperatures 1 • Exposed to extreme temperature changes • Exposed to high humidity or steam • Near a flame, heater or air conditioner • Outdoors or exposed to direct sunlight • Exposed to extremely dusty or oily environments 6 Note 1 Use the oval screwdriver ● In order to extend the life of this machine, periodically turn it on and use it. Storing this machine for an extended period of time without using it may reduce its efficiency. Grasp the bobbin case, and then lift it out 5 to the left. Cleaning CAUTION ● Make sure you unplug the machine before you clean it, otherwise you risk getting an electric shock or being injured. 38
-
 1
1 -
2
-
3
-
4
-
5
-
6
-
7
-
8
-
9
-
10
-
11
-
12
-
13
-
14
-
15
-
16
-
17
-
18
-
19
-
20
-
21
-
22
-
23
-
24
-
25
-
26
-
27
-
28
-
29
-
30
-
31
-
32
-
33
-
 34
34 -
 35
35 -
 36
36 -
 37
37 -
 38
38 -
 39
39 -
 40
40 -
 41
41 -
 42
42 -
 43
43 -
 44
44 -
45
-
46
-
47
-
48
-
49
-
50
-
51
-
52
-
53
-
54
-
55
-
56
-
57
-
58
-
59
-
60
-
61
-
62
-
63
-
64
-
65
-
66
-
67
-
68
-
69
-
70
-
71
-
72
-
73
-
74
-
75
-
76
-
77
-
78
-
79
-
80
-
81
-
82
-
83
-
84
-
85
-
86
-
87
-
88
-
89
-
90
-
91
-
92
 |
 |