Brother International MFC 495CW Quick Setup Guide - English - Page 2
Load plain Letter/A4 paper, e - paper jam
 |
UPC - 012502623175
View all Brother International MFC 495CW manuals
Add to My Manuals
Save this manual to your list of manuals |
Page 2 highlights
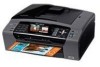
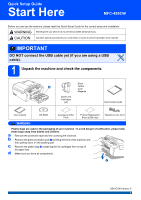
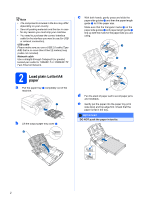
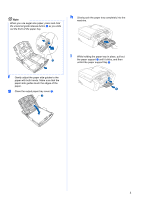
Note • The components included in the box may differ depending on your country. • Save all packing materials and the box in case for any reason you must ship your machine. • You need to purchase the correct interface cable for the interface you want to use (for USB or network connection). USB cable Please make sure you use a USB 2.0 cable (Type A/B) that is no more than 6 feet (2 meters) long (cable not included). Network cable Use a straight-through Category5 (or greater) twisted-pair cable for 10BASE-T or 100BASE-TX Fast Ethernet Network. 2 Load plain Letter/A4 paper a Pull the paper tray a completely out of the machine. 1 b Lift the output paper tray cover a. 1 c With both hands, gently press and slide the paper side guides a and then the paper length guide b to fit the paper size. Make sure that the triangular marks c on the paper side guides a and paper length guide b line up with the mark for the paper size you are using. 1 3 2 3 d Fan the stack of paper well to avoid paper jams and misfeeds. e Gently put the paper into the paper tray print side down and top edge first. Check that the paper is flat in the tray. IMPORTANT DO NOT push the paper in too far. 2
-
 1
1 -
 2
2 -
 3
3 -
 4
4 -
 5
5 -
 6
6 -
 7
7 -
 8
8 -
9
-
10
-
11
-
12
-
13
-
14
-
15
-
16
-
17
-
18
-
19
-
20
-
21
-
22
-
23
-
24
-
25
-
26
-
27
-
28
-
29
-
30
-
31
-
32
-
33
-
34
-
35
-
36
-
37
-
38
-
39
-
40
-
41
-
42
-
43
-
44
-
45
-
46
 |
 |