Brother International MFC 495CW Quick Setup Guide - English - Page 9
Set the LCD contrast (if needed), 9 Set the date and time, g - fax
 |
UPC - 012502623175
View all Brother International MFC 495CW manuals
Add to My Manuals
Save this manual to your list of manuals |
Page 9 highlights
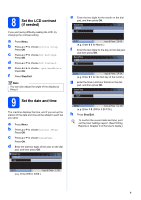
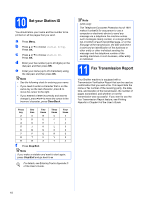
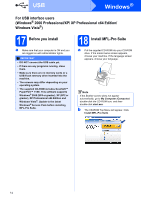
8 Set the LCD contrast (if needed) If you are having difficulty reading the LCD, try changing the contrast setting. a Press Menu. b Press a or b to choose General Setup. Press OK. c Press a or b to choose LCD Settings. Press OK. d Press a or b to choose LCD Contrast. e Press d or c to choose Light, Med or Dark. Press OK. f Press Stop/Exit. Note You can also adjust the angle of the display by lifting it. 9 Set the date and time The machine displays the time, and if you set up the station ID the date and time will be added to each fax you send. a Press Menu. b Press a or b to choose Initial Setup. Press OK. c Press a or b to choose Date&Time. Press OK. d Enter the last two digits of the year on the dial pad, and then press OK. Date&Time Year:20 09 e Enter the two digits for the month on the dial pad, and then press OK. Date&Time Month: 03 MENU Input & Press OK (e.g. Enter 0 3 for March.) f Enter the two digits for the day on the dial pad, and then press OK. Date&Time Day: 01 MENU Input & Press OK (e.g. Enter 0 1 for the first day of the month.) g Enter the time in 24-hour format on the dial pad, and then press OK. Date&Time Time: 15:25 MENU Input & Press OK (e.g. Enter 1 5, 2 5 for 3:25 P.M.) h Press Stop/Exit. To confirm the current date and time, print out the User Settings report. (See Printing Reports in Chapter 9 of the User's Guide.) MENU Input & Press OK (e.g. Enter 0 9 for 2009.) 9
-
 1
1 -
2
-
3
-
 4
4 -
 5
5 -
 6
6 -
 7
7 -
 8
8 -
 9
9 -
 10
10 -
 11
11 -
 12
12 -
 13
13 -
 14
14 -
15
-
16
-
17
-
18
-
19
-
20
-
21
-
22
-
23
-
24
-
25
-
26
-
27
-
28
-
29
-
30
-
31
-
32
-
33
-
34
-
35
-
36
-
37
-
38
-
39
-
40
-
41
-
42
-
43
-
44
-
45
-
46
 |
 |