Brother International MFC-7360N Users Manual - English - Page 120
C Menu and features, On-screen programming, Menu table, How to access the menu mode, On-screen
 |
UPC - 012502627005
View all Brother International MFC-7360N manuals
Add to My Manuals
Save this manual to your list of manuals |
Page 120 highlights
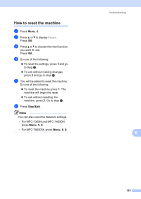
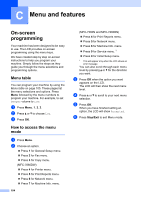
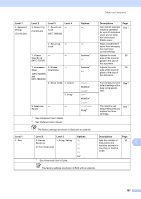
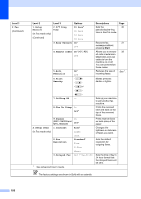
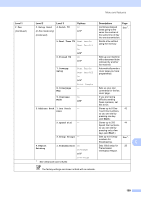
C Menu and features C On-screen programming C Your machine has been designed to be easy to use. The LCD provides on-screen programming using the menu keys. We have created step by step on-screen instructions to help you program your machine. Simply follow the steps as they guide you through the menu selections and programming options. Menu table C You can program your machine by using the Menu table on page 105. These pages list the menu selections and options. Press Menu followed by the menu numbers to program your machine. For example, to set Beeper volume to Low: a Press Menu, 1, 3, 2. b Press a or b to choose Low. c Press OK. How to access the menu mode C a Press Menu. b Choose an option. Press 1 for General Setup menu. Press 2 for Fax menu. Press 3 for Copy menu. (MFC-7860DW) Press 4 for Printer menu. Press 5 for Print Reports menu. Press 6 for Network menu. Press 7 for Machine Info. menu. 104 (MFC-7360N and MFC-7460DN) Press 4 for Print Reports menu. Press 5 for Network menu. Press 6 for Machine Info. menu. Press 9 for Service menu. 1 Press 0 for Initial Setup menu. 1 This will appear only when the LCD shows an error message. You can also scroll through each menu level by pressing a or b for the direction you want. c Press OK when the option you want appears on the LCD. The LCD will then show the next menu level. d Press a or b to scroll to your next menu selection. e Press OK. When you have finished setting an option, the LCD will show Accepted. f Press Stop/Exit to exit Menu mode.
-
 1
1 -
2
-
3
-
4
-
5
-
6
-
7
-
8
-
9
-
10
-
11
-
12
-
13
-
14
-
15
-
16
-
17
-
18
-
19
-
20
-
21
-
22
-
23
-
24
-
25
-
26
-
27
-
28
-
29
-
30
-
31
-
32
-
33
-
34
-
35
-
36
-
37
-
38
-
39
-
40
-
41
-
42
-
43
-
44
-
45
-
46
-
47
-
48
-
49
-
50
-
51
-
52
-
53
-
54
-
55
-
56
-
57
-
58
-
59
-
60
-
61
-
62
-
63
-
64
-
65
-
66
-
67
-
68
-
69
-
70
-
71
-
72
-
73
-
74
-
75
-
76
-
77
-
78
-
79
-
80
-
81
-
82
-
83
-
84
-
85
-
86
-
87
-
88
-
89
-
90
-
91
-
92
-
93
-
94
-
95
-
96
-
97
-
98
-
99
-
100
-
101
-
102
-
103
-
104
-
105
-
106
-
107
-
108
-
109
-
110
-
111
-
112
-
113
-
114
-
 115
115 -
 116
116 -
 117
117 -
 118
118 -
 119
119 -
 120
120 -
 121
121 -
 122
122 -
 123
123 -
 124
124 -
 125
125 -
126
-
127
-
128
-
129
-
130
-
131
-
132
-
133
-
134
-
135
-
136
-
137
-
138
-
139
-
140
-
141
-
142
-
143
-
144
-
145
-
146
-
147
-
148
-
149
-
150
-
151
-
152
-
153
-
154
-
155
-
156
-
157
-
158
 |
 |