Brother International MFC-9320CW Software Users Manual - English - Page 207
How to set a new default for the file size (For Scan to FTP and Network), <Manual>, Color, Small
 |
UPC - 012502622406
View all Brother International MFC-9320CW manuals
Add to My Manuals
Save this manual to your list of manuals |
Page 207 highlights
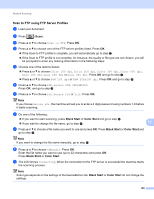
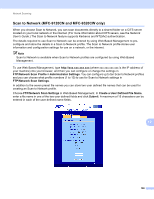
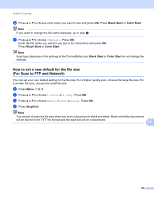
Network Scanning j Press a or b to choose a file name you want to use and press OK. Press Black Start or Color Start. Note If you want to change the file name manually, go to step k. k Press a or b to choose . Press OK. Enter the file name you want to use (up to 32 characters) and press OK. Press Black Start or Color Start. Note Scan type depends on the settings of the DeviceButton tab, Black Start or Color Start do not change the settings. How to set a new default for the file size (For Scan to FTP and Network) 12 You can set your own default setting for the file size. For a higher quality scan, choose the large file size. For a smaller file size, choose the small file size a Press Menu, 1, 8, 2. b Press a or b to choose 1.Color or 2.Gray. Press OK. c Press a or b to choose Small, Middle or Large. Press OK. d Press Stop/Exit. Note You cannot choose the file size when you scan a document in black and white. Black and white documents will be stored in the TIFF file format and the data will not be compressed. 12 199
-
 1
1 -
2
-
3
-
4
-
5
-
6
-
7
-
8
-
9
-
10
-
11
-
12
-
13
-
14
-
15
-
16
-
17
-
18
-
19
-
20
-
21
-
22
-
23
-
24
-
25
-
26
-
27
-
28
-
29
-
30
-
31
-
32
-
33
-
34
-
35
-
36
-
37
-
38
-
39
-
40
-
41
-
42
-
43
-
44
-
45
-
46
-
47
-
48
-
49
-
50
-
51
-
52
-
53
-
54
-
55
-
56
-
57
-
58
-
59
-
60
-
61
-
62
-
63
-
64
-
65
-
66
-
67
-
68
-
69
-
70
-
71
-
72
-
73
-
74
-
75
-
76
-
77
-
78
-
79
-
80
-
81
-
82
-
83
-
84
-
85
-
86
-
87
-
88
-
89
-
90
-
91
-
92
-
93
-
94
-
95
-
96
-
97
-
98
-
99
-
100
-
101
-
102
-
103
-
104
-
105
-
106
-
107
-
108
-
109
-
110
-
111
-
112
-
113
-
114
-
115
-
116
-
117
-
118
-
119
-
120
-
121
-
122
-
123
-
124
-
125
-
126
-
127
-
128
-
129
-
130
-
131
-
132
-
133
-
134
-
135
-
136
-
137
-
138
-
139
-
140
-
141
-
142
-
143
-
144
-
145
-
146
-
147
-
148
-
149
-
150
-
151
-
152
-
153
-
154
-
155
-
156
-
157
-
158
-
159
-
160
-
161
-
162
-
163
-
164
-
165
-
166
-
167
-
168
-
169
-
170
-
171
-
172
-
173
-
174
-
175
-
176
-
177
-
178
-
179
-
180
-
181
-
182
-
183
-
184
-
185
-
186
-
187
-
188
-
189
-
190
-
191
-
192
-
193
-
194
-
195
-
196
-
197
-
198
-
199
-
200
-
201
-
 202
202 -
 203
203 -
 204
204 -
 205
205 -
 206
206 -
 207
207 -
 208
208 -
 209
209
 |
 |