Brother International MFC-9320CW Network Users Manual - English - Page 158
Setting up public mode, Other features - counter
 |
UPC - 012502622406
View all Brother International MFC-9320CW manuals
Add to My Manuals
Save this manual to your list of manuals |
Page 158 highlights
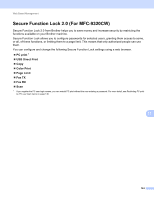
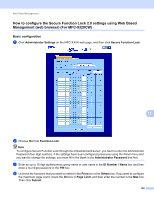
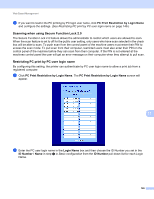
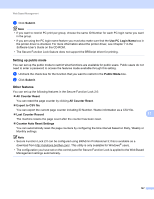
Web Based Management c Click Submit. Note • If you want to restrict PC print per group, choose the same ID Number for each PC login name you want in the group. • If you are using the PC login name feature you must also make sure that the Use PC Login Name box in the printer driver is checked. For more information about the printer driver, see Chapter 1 in the Software User's Guide on the CD-ROM. • The Secure Function Lock feature does not support the BRScript driver for printing. Setting up public mode 11 You can set up the public mode to restrict what functions are available for public users. Public users do not need to enter a password to access the features made available through this setting. a Uncheck the check box for the function that you want to restrict in the Public Mode box. b Click Submit. Other features 11 You can set up the following features in the Secure Function Lock 2.0: „ All Counter Reset You can reset the page counter by clicking All Counter Reset. „ Export to CSV file You can export the current page counter including ID Number / Name information as a CSV file. „ Last Counter Record 11 The machine retains the page count after the counter has been reset. „ Counter Auto Reset Settings You can automatically reset the page counters by configuring the time interval based on Daily, Weekly or Monthly settings. Note • Secure Function Lock 2.0 can be configured using BRAdmin Professional 3; this is available as a download from http://solutions.brother.com/. This utility is only available for Windows® users. • The configuration you have set on the control panel for Secure Function Lock is applied to the Web Based Management settings automatically. 147
-
 1
1 -
2
-
3
-
4
-
5
-
6
-
7
-
8
-
9
-
10
-
11
-
12
-
13
-
14
-
15
-
16
-
17
-
18
-
19
-
20
-
21
-
22
-
23
-
24
-
25
-
26
-
27
-
28
-
29
-
30
-
31
-
32
-
33
-
34
-
35
-
36
-
37
-
38
-
39
-
40
-
41
-
42
-
43
-
44
-
45
-
46
-
47
-
48
-
49
-
50
-
51
-
52
-
53
-
54
-
55
-
56
-
57
-
58
-
59
-
60
-
61
-
62
-
63
-
64
-
65
-
66
-
67
-
68
-
69
-
70
-
71
-
72
-
73
-
74
-
75
-
76
-
77
-
78
-
79
-
80
-
81
-
82
-
83
-
84
-
85
-
86
-
87
-
88
-
89
-
90
-
91
-
92
-
93
-
94
-
95
-
96
-
97
-
98
-
99
-
100
-
101
-
102
-
103
-
104
-
105
-
106
-
107
-
108
-
109
-
110
-
111
-
112
-
113
-
114
-
115
-
116
-
117
-
118
-
119
-
120
-
121
-
122
-
123
-
124
-
125
-
126
-
127
-
128
-
129
-
130
-
131
-
132
-
133
-
134
-
135
-
136
-
137
-
138
-
139
-
140
-
141
-
142
-
143
-
144
-
145
-
146
-
147
-
148
-
149
-
150
-
151
-
152
-
 153
153 -
 154
154 -
 155
155 -
 156
156 -
 157
157 -
 158
158 -
 159
159 -
 160
160 -
 161
161 -
 162
162 -
 163
163 -
164
-
165
-
166
-
167
-
168
-
169
-
170
-
171
-
172
-
173
-
174
-
175
-
176
-
177
-
178
-
179
-
180
-
181
-
182
-
183
-
184
-
185
-
186
-
187
-
188
-
189
-
190
-
191
-
192
-
193
-
194
-
195
-
196
-
197
-
198
-
199
-
200
-
201
-
202
-
203
-
204
-
205
-
206
-
207
-
208
-
209
-
210
-
211
-
212
-
213
-
214
-
215
-
216
-
217
-
218
-
219
-
220
-
221
-
222
-
223
-
224
-
225
-
226
-
227
-
228
-
229
-
230
-
231
-
232
-
233
-
234
-
235
-
236
-
237
-
238
-
239
-
240
-
241
-
242
-
243
-
244
-
245
-
246
-
247
-
248
-
249
 |
 |