Brother International MFC-9320CW Network Users Manual - English - Page 195
Creating CSR and installing a certificate, How to create the CSR
 |
UPC - 012502622406
View all Brother International MFC-9320CW manuals
Add to My Manuals
Save this manual to your list of manuals |
Page 195 highlights
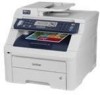
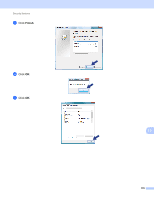
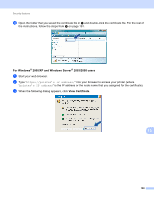
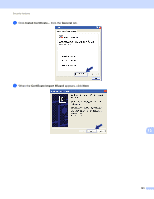
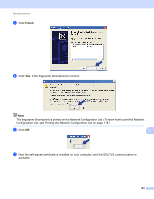
Security features Creating CSR and installing a certificate 13 How to create the CSR 13 a Click Create CSR on the Configure Certificate page. b Enter a Common Name and your information, such as Organization. Then click Submit. Note • We recommend that the Root Certificate from the CA be installed on your computer before creating the CSR. • The length of the Common Name is less than 64 bytes. Enter an identifier such as an IP address, node name or domain name to use when accessing this printer through SSL/TLS communication. The node name is displayed by default. The Common Name is required. • A warning will pop-up if you enter a different name in the URL than the Common Name that was used for the certificate. • The length of the Organization, the Organization Unit, the City/Locality and the State/Province is less than 64 bytes. • The Country/Region should be an ISO 3166 country code composed of two characters. c When the contents of the CSR appear, click Save to save the CSR file to your computer. d Now the CSR is created. Note • Follow your CA policy regarding the method to send a CSR to your CA. • If you are using Enterprise root CA of Windows Server® 2003/2008, we recommend using the Web Server Certificate Template when creating the certificate. For more information, visit us at http://solutions.brother.com/. How to install the certificate to your printer When you receive the certificate from a CA, follow the steps below to install it into the print server. Note Only a certificate issued with this printer's CSR can be installed. 13 13 a Click Install Certificate on the Configure Certificate page. b Specify the file of the certificate that has been issued by a CA, and then click Submit. c Now the certificate is created successfully. d Follow the on-screen instructions to configure the other security settings. e Restart the printer to activate the configuration. f Now the certificate is saved in your printer. To use SSL/TLS communication, the Root Certificate from the CA needs to be installed on your computer. Contact your network administrator about installation. 184
-
 1
1 -
2
-
3
-
4
-
5
-
6
-
7
-
8
-
9
-
10
-
11
-
12
-
13
-
14
-
15
-
16
-
17
-
18
-
19
-
20
-
21
-
22
-
23
-
24
-
25
-
26
-
27
-
28
-
29
-
30
-
31
-
32
-
33
-
34
-
35
-
36
-
37
-
38
-
39
-
40
-
41
-
42
-
43
-
44
-
45
-
46
-
47
-
48
-
49
-
50
-
51
-
52
-
53
-
54
-
55
-
56
-
57
-
58
-
59
-
60
-
61
-
62
-
63
-
64
-
65
-
66
-
67
-
68
-
69
-
70
-
71
-
72
-
73
-
74
-
75
-
76
-
77
-
78
-
79
-
80
-
81
-
82
-
83
-
84
-
85
-
86
-
87
-
88
-
89
-
90
-
91
-
92
-
93
-
94
-
95
-
96
-
97
-
98
-
99
-
100
-
101
-
102
-
103
-
104
-
105
-
106
-
107
-
108
-
109
-
110
-
111
-
112
-
113
-
114
-
115
-
116
-
117
-
118
-
119
-
120
-
121
-
122
-
123
-
124
-
125
-
126
-
127
-
128
-
129
-
130
-
131
-
132
-
133
-
134
-
135
-
136
-
137
-
138
-
139
-
140
-
141
-
142
-
143
-
144
-
145
-
146
-
147
-
148
-
149
-
150
-
151
-
152
-
153
-
154
-
155
-
156
-
157
-
158
-
159
-
160
-
161
-
162
-
163
-
164
-
165
-
166
-
167
-
168
-
169
-
170
-
171
-
172
-
173
-
174
-
175
-
176
-
177
-
178
-
179
-
180
-
181
-
182
-
183
-
184
-
185
-
186
-
187
-
188
-
189
-
 190
190 -
 191
191 -
 192
192 -
 193
193 -
 194
194 -
 195
195 -
 196
196 -
 197
197 -
 198
198 -
 199
199 -
 200
200 -
201
-
202
-
203
-
204
-
205
-
206
-
207
-
208
-
209
-
210
-
211
-
212
-
213
-
214
-
215
-
216
-
217
-
218
-
219
-
220
-
221
-
222
-
223
-
224
-
225
-
226
-
227
-
228
-
229
-
230
-
231
-
232
-
233
-
234
-
235
-
236
-
237
-
238
-
239
-
240
-
241
-
242
-
243
-
244
-
245
-
246
-
247
-
248
-
249
 |
 |