Brother International MFC-9460CDN Users Manual - English - Page 114
Aimportant, G
 |
UPC - 012502625117
View all Brother International MFC-9460CDN manuals
Add to My Manuals
Save this manual to your list of manuals |
Page 114 highlights
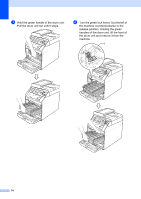
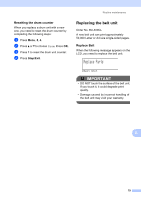
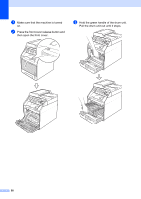
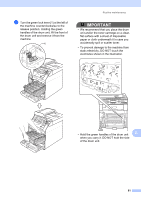
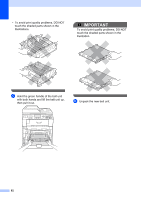
IMPORTANT • To avoid print quality problems, DO NOT touch the shaded parts shown in the illustrations. Routine maintenance g Hold the handle of the toner cartridge and slide the toner cartridge into the new drum unit, then slightly pull it toward you until you hear it click into place. Make sure that you match the toner cartridge color to the same color label on the drum unit. Repeat this for all the toner cartridges. • Wait to unpack the new drum unit until C immediately before you put it in the machine. Exposure to direct sunlight or M room light may damage the drum unit. Y K A C - Cyan Y - Yellow M - Magenta K - Black 77
-
 1
1 -
2
-
3
-
4
-
5
-
6
-
7
-
8
-
9
-
10
-
11
-
12
-
13
-
14
-
15
-
16
-
17
-
18
-
19
-
20
-
21
-
22
-
23
-
24
-
25
-
26
-
27
-
28
-
29
-
30
-
31
-
32
-
33
-
34
-
35
-
36
-
37
-
38
-
39
-
40
-
41
-
42
-
43
-
44
-
45
-
46
-
47
-
48
-
49
-
50
-
51
-
52
-
53
-
54
-
55
-
56
-
57
-
58
-
59
-
60
-
61
-
62
-
63
-
64
-
65
-
66
-
67
-
68
-
69
-
70
-
71
-
72
-
73
-
74
-
75
-
76
-
77
-
78
-
79
-
80
-
81
-
82
-
83
-
84
-
85
-
86
-
87
-
88
-
89
-
90
-
91
-
92
-
93
-
94
-
95
-
96
-
97
-
98
-
99
-
100
-
101
-
102
-
103
-
104
-
105
-
106
-
107
-
108
-
 109
109 -
 110
110 -
 111
111 -
 112
112 -
 113
113 -
 114
114 -
 115
115 -
 116
116 -
 117
117 -
 118
118 -
 119
119 -
120
-
121
-
122
-
123
-
124
-
125
-
126
-
127
-
128
-
129
-
130
-
131
-
132
-
133
-
134
-
135
-
136
-
137
-
138
-
139
-
140
-
141
-
142
-
143
-
144
-
145
-
146
-
147
-
148
-
149
-
150
-
151
-
152
-
153
-
154
-
155
-
156
-
157
-
158
-
159
-
160
-
161
-
162
-
163
-
164
-
165
-
166
-
167
-
168
-
169
-
170
-
171
-
172
-
173
-
174
-
175
-
176
-
177
-
178
-
179
-
180
-
181
-
182
-
183
-
184
-
185
-
186
-
187
-
188
-
189
-
190
-
191
-
192
-
193
-
194
-
195
-
196
-
197
-
198
-
199
-
200
-
201
-
202
-
203
-
204
-
205
-
206
-
207
-
208
-
209
-
210
-
211
-
212
-
213
-
214
-
215
-
216
-
217
-
218
-
219
-
220
-
221
-
222
-
223
-
224
-
225
-
226
-
227
-
228
-
229
-
230
-
231
-
232
-
233
-
234
-
235
-
236
-
237
-
238
-
239
-
240
-
241
-
242
-
243
-
244
-
245
-
246
-
247
-
248
-
249
-
250
-
251
-
252
-
253
-
254
-
255
-
256
-
257
-
258
-
259
-
260
-
261
-
262
-
263
-
264
-
265
-
266
-
267
-
268
-
269
-
270
-
271
-
272
-
273
-
274
-
275
-
276
-
277
-
278
-
279
-
280
-
281
-
282
-
283
-
284
-
285
-
286
-
287
-
288
-
289
-
290
-
291
-
292
-
293
-
294
-
295
-
296
-
297
-
298
-
299
-
300
-
301
-
302
-
303
-
304
-
305
-
306
-
307
-
308
-
309
-
310
-
311
-
312
-
313
-
314
-
315
 |
 |
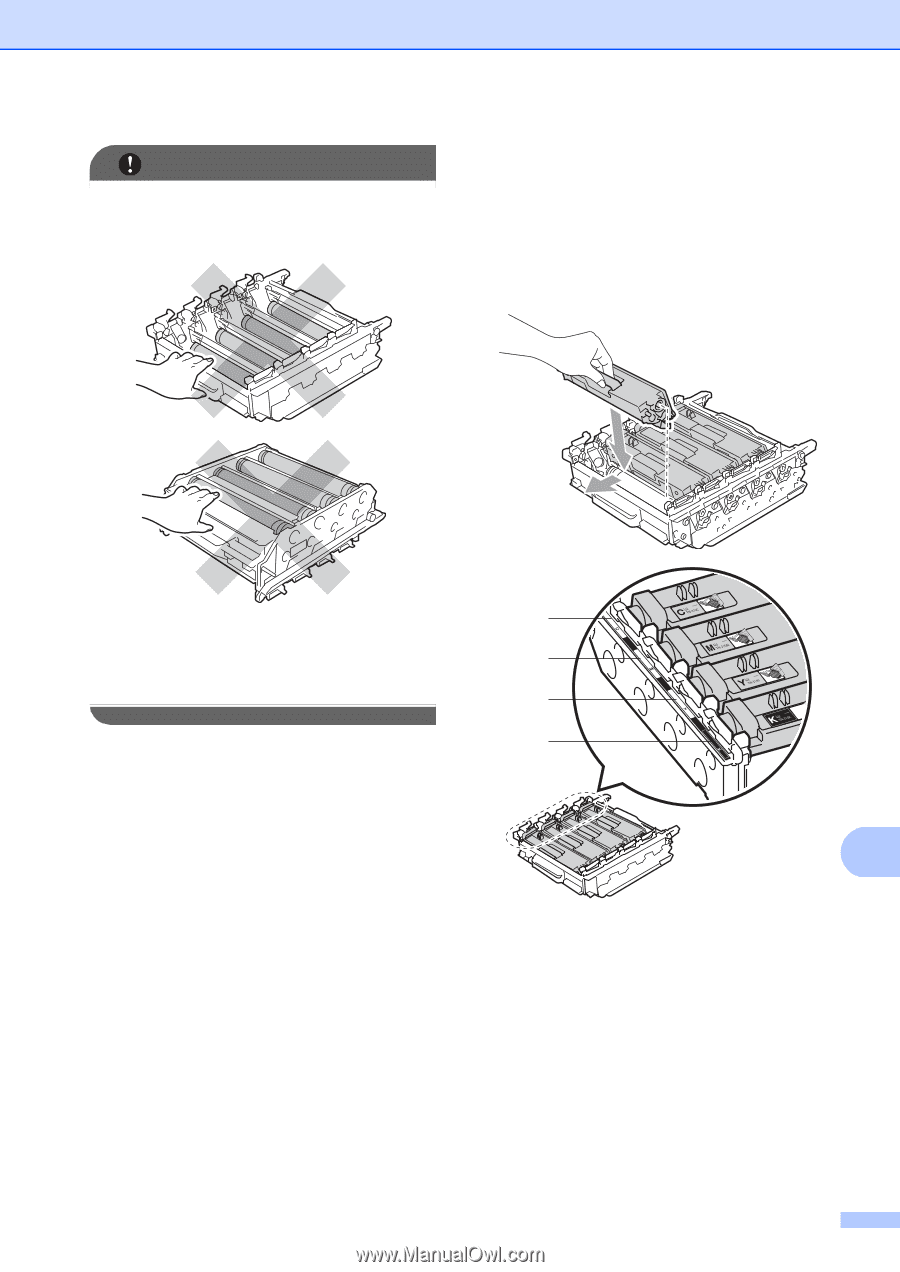
Routine maintenance
77
A
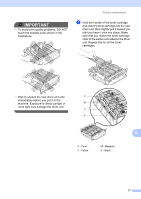
IMPORTANT
•
To avoid print quality problems, DO NOT
touch the shaded parts shown in the
illustrations.
•
Wait to unpack the new drum unit until
immediately before you put it in the
machine. Exposure to direct sunlight or
room light may damage the drum unit.
g
Hold the handle of the toner cartridge
and slide the toner cartridge into the new
drum unit, then slightly pull it toward you
until you hear it click into place. Make
sure that you match the toner cartridge
color to the same color label on the drum
unit. Repeat this for all the toner
cartridges.
C - Cyan
M - Magenta
Y - Yellow
K - Black
C
M
Y
K