Brother International MFC-J410w Basic Users Manual - English - Page 60
Print Images, View Photos, PhotoCapture Center® print settings - how to clear memory
 |
View all Brother International MFC-J410w manuals
Add to My Manuals
Save this manual to your list of manuals |
Page 60 highlights
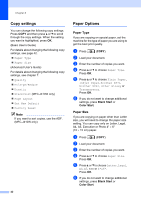
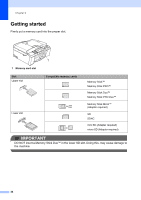
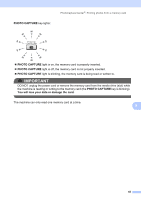
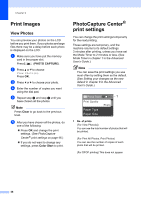
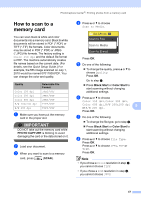
Chapter 9 Print Images 9 View Photos 9 You can preview your photos on the LCD before you print them. If your photos are large files there may be a delay before each photo is displayed on the LCD. a Make sure you have put the memory card in the proper slot. Press (PHOTO CAPTURE). b Press a or b to choose View Photo(s). Press OK. c Press d or c to choose your photo. d Enter the number of copies you want using the dial pad. e Repeat step c and step d until you have chosen all the photos. Note Press Clear to go back to the previous level. f After you have chosen all the photos, do one of the following: Press OK and change the print settings. (See PhotoCapture Center® print settings on page 46.) If you do not want to change any settings, press Color Start to print. PhotoCapture Center® print settings 9 You can change the print settings temporarily for the next printing. These settings are temporary, and the machine returns to its default settings 3 minutes after printing, unless you have set the Mode Timer to 2 minutes or less. (See Mode Timer in chapter 1 in the Advanced User's Guide.) Note You can save the print settings you use most often by setting them as the default. (See Setting your changes as the new default in chapter 8 in the Advanced User's Guide.) Press Start 001 1 Print Quality Photo Paper Type Paper Size 1 No. of prints (For View Photo(s)) You can see the total number of photos that will be printed. (For Print All Photos, Print Photos) You can see the number of copies of each photo that will be printed. (For DPOF printing) This does not appear. 46
-
 1
1 -
2
-
3
-
4
-
5
-
6
-
7
-
8
-
9
-
10
-
11
-
12
-
13
-
14
-
15
-
16
-
17
-
18
-
19
-
20
-
21
-
22
-
23
-
24
-
25
-
26
-
27
-
28
-
29
-
30
-
31
-
32
-
33
-
34
-
35
-
36
-
37
-
38
-
39
-
40
-
41
-
42
-
43
-
44
-
45
-
46
-
47
-
48
-
49
-
50
-
51
-
52
-
53
-
54
-
 55
55 -
 56
56 -
 57
57 -
 58
58 -
 59
59 -
 60
60 -
 61
61 -
 62
62 -
 63
63 -
 64
64 -
 65
65 -
66
-
67
-
68
-
69
-
70
-
71
-
72
-
73
-
74
-
75
-
76
-
77
-
78
-
79
-
80
-
81
-
82
-
83
-
84
-
85
-
86
-
87
-
88
-
89
-
90
-
91
-
92
-
93
-
94
-
95
-
96
-
97
-
98
-
99
-
100
-
101
-
102
-
103
-
104
-
105
-
106
-
107
-
108
-
109
-
110
-
111
-
112
-
113
-
114
-
115
-
116
-
117
-
118
-
119
-
120
-
121
-
122
 |
 |